文章目录
1.初始化项目
通过idea初始化springboot项目,mysql和mybatis这两个依赖必选,其余按需选择。创建好项目之后,在pom里增加阿里druid依赖
如下是pom.xml:
<?xml version="1.0" encoding="UTF-8"?>
<project xmlns="http://maven.apache.org/POM/4.0.0" xmlns:xsi="http://www.w3.org/2001/XMLSchema-instance"
	xsi:schemaLocation="http://maven.apache.org/POM/4.0.0 http://maven.apache.org/xsd/maven-4.0.0.xsd">
	<modelVersion>4.0.0</modelVersion>

	<groupId>com.steven</groupId>
	<artifactId>six</artifactId>
	<version>0.0.1-SNAPSHOT</version>
	<packaging>jar</packaging>

	<name>six</name>
	<description>Demo project for Spring Boot</description>

	<parent>
		<groupId>org.springframework.boot</groupId>
		<artifactId>spring-boot-starter-parent</artifactId>
		<version>2.0.5.RELEASE</version>
		<relativePath/> <!-- lookup parent from repository -->
	</parent>

	<properties>
		<project.build.sourceEncoding>UTF-8</project.build.sourceEncoding>
		<project.reporting.outputEncoding>UTF-8</project.reporting.outputEncoding>
		<java.version>1.8</java.version>
	</properties>

	<repositories><!-- 代码库 -->
		<repository>
			<id>maven-ali</id>
			<url>http://maven.aliyun.com/nexus/content/groups/public/</url>
			<releases>
				<enabled>true</enabled>
			</releases>
			<snapshots>
				<enabled>true</enabled>
				<updatePolicy>always</updatePolicy>
				<checksumPolicy>fail</checksumPolicy>
			</snapshots>
		</repository>
	</repositories>

	<dependencies>
		<dependency>
			<groupId>org.springframework.boot</groupId>
			<artifactId>spring-boot-starter-web</artifactId>
		</dependency>
		<dependency>
			<groupId>org.mybatis.spring.boot</groupId>
			<artifactId>mybatis-spring-boot-starter</artifactId>
			<version>1.3.2</version>
		</dependency>

		<dependency>
			<groupId>mysql</groupId>
			<artifactId>mysql-connector-java</artifactId>
			<scope>runtime</scope>
		</dependency>
		<dependency>
			<groupId>org.springframework.boot</groupId>
			<artifactId>spring-boot-starter-test</artifactId>
			<scope>test</scope>
		</dependency>
		<dependency>
			<groupId>com.alibaba</groupId>
			<artifactId>druid-spring-boot-starter</artifactId>
			<version>1.1.10</version>
		</dependency>
	</dependencies>

	<build>
		<plugins>
			<plugin>
				<groupId>org.springframework.boot</groupId>
				<artifactId>spring-boot-maven-plugin</artifactId>
			</plugin>
			<!--配置mybatis插件-->
			<plugin>
				<groupId>org.mybatis.generator</groupId>
				<artifactId>mybatis-generator-maven-plugin</artifactId>
				<version>1.3.5</version>
				<configuration>
					<configurationFile>${project.basedir}/src/main/resources/mybatis/generatorConfig.xml</configurationFile>
					<verbose>true</verbose>
					<overwrite>true</overwrite>
				</configuration>
			</plugin>
		</plugins>
	</build>
</project>
可能阿里druid在maven中心库下载不到,增加阿里仓库。
2.配置properties或者yml
2.1 先配置Druid的一些参数
properties或者yml都可以。
spring.datasource.name=datasource
spring.datasource.type=com.alibaba.druid.pool.DruidDataSource
#监控统计拦截的filters
spring.datasource.druid.filters=stat
spring.datasource.driver-class-name=com.mysql.jdbc.Driver
spring.datasource.url=jdbc:mysql://localhost:3306/test?useSSL=true&useUnicode=true&characterEncoding=utf-8
spring.datasource.username=root
spring.datasource.password=root
#配置初始化大小/最小/最大
spring.datasource.druid.initial-size=1
spring.datasource.druid.min-idle=1
spring.datasource.druid.max-active=20
#获取连接等待超时时间
spring.datasource.druid.max-wait=60000
#间隔多久进行一次检测,检测需要关闭的空闲连接
spring.datasource.druid.time-between-eviction-runs-millis=60000
#一个连接在池中最小生存的时间
spring.datasource.druid.min-evictable-idle-time-millis=300000
spring.datasource.druid.validation-query=SELECT 'x'
spring.datasource.druid.test-while-idle=true
spring.datasource.druid.test-on-borrow=false
spring.datasource.druid.test-on-return=false
#打开PSCache,并指定每个连接上PSCache的大小。oracle设为true,mysql设为false。分库分表较多推荐设置为false
spring.datasource.druid.pool-prepared-statements=false
spring.datasource.druid.max-pool-prepared-statement-per-connection-size=20
2.2 配置mybatis的参数
#映射方式 配置下面这个就行了
#pojo类所在包路径
mybatis.type-aliases-package=com.steven.six.entity

#xml方式
#xml文件所在路径
mybatis.mapper-locations=classpath:mybatis/mapper/*.xml
mybatis.config-location=classpath:mybatis/mybatis-config.xml
3.配置mybatis-config.xml
<?xml version="1.0" encoding="UTF-8"?>
<!DOCTYPE configuration
        PUBLIC "-//mybatis.org//DTD Config 3.0//EN"
        "http://mybatis.org/dtd/mybatis-3-config.dtd">
<configuration>
    <settings>
		<setting name="lazyLoadingEnabled" value="false"/>
	</settings>
</configuration>
只是简单的把懒加载取消。
4.配置MapperScan路径
可以在Application上,也可以在@Configuration文件上
@SpringBootApplication
@MapperScan("com.steven.six.dao")
public class SixApplication {

	public static void main(String[] args) {
		SpringApplication.run(SixApplication.class, args);
	}
}
5.通过mybatis-generator生成entity和mapper
5.1配置generatorConfig
先通过idea,建立一个mybatis-generator模版,然后下次新建的时候,只要稍作改动就行了,如下图
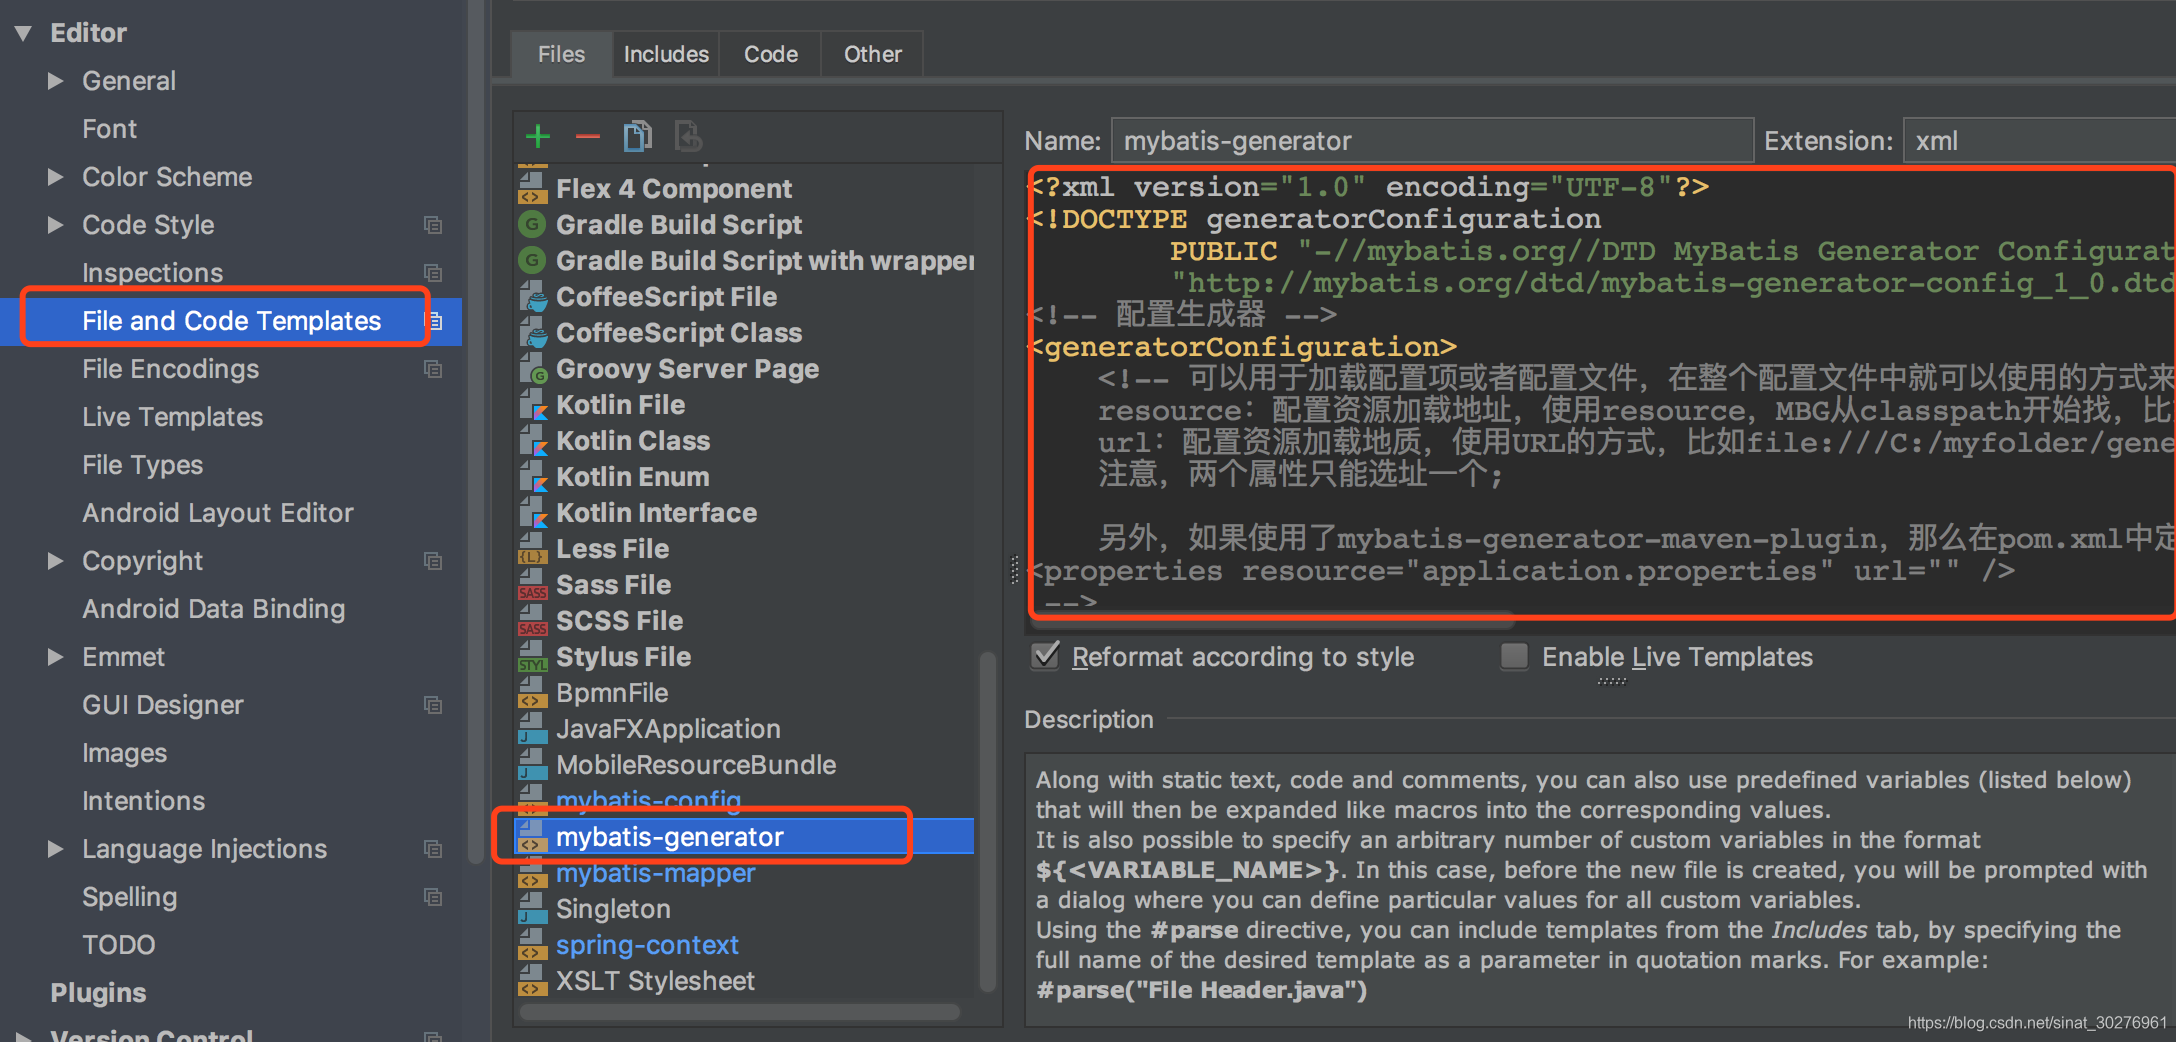
下面是我的配置:
<?xml version="1.0" encoding="UTF-8"?>
<!DOCTYPE generatorConfiguration
PUBLIC "-//mybatis.org//DTD MyBatis Generator Configuration 1.0//EN"
"http://mybatis.org/dtd/mybatis-generator-config_1_0.dtd">
<!-- 配置生成器 -->
<generatorConfiguration>
<!-- 可以用于加载配置项或者配置文件,在整个配置文件中就可以使用的方式来引用配置项
resource:配置资源加载地址,使用resource,MBG从classpath开始找,比如com/myproject/generatorConfig.properties
url:配置资源加载地质,使用URL的方式,比如file:///C:/myfolder/generatorConfig.properties.
注意,两个属性只能选址一个;
另外,如果使用了mybatis-generator-maven-plugin,那么在pom.xml中定义的properties都可以直接在generatorConfig.xml中使用
<properties resource="" url="" />
-->
<properties resource="application.properties"/>
<!-- 在MBG工作的时候,需要额外加载的依赖包
location属性指明加载jar/zip包的全路径
<classPathEntry location="/Program Files/IBM/SQLLIB/java/db2java.zip" />
-->
<!--指定特定数据库的jdbc驱动jar包的位置 -->
<classPathEntry location="/Users/ZhiLiSteven/common/gitProject/SpringBootTest/Six/src/main/resources/mysql-connector-java-5.1.47.jar"/>
<!--
context:生成一组对象的环境
id:必选,上下文id,用于在生成错误时提示
defaultModelType:指定生成对象的样式
1,conditional:类似hierarchical;
2,flat:所有内容(主键,blob)等全部生成在一个对象中;
3,hierarchical:主键生成一个XXKey对象(key class),Blob等单独生成一个对象,其他简单属性在一个对象中(record class)
targetRuntime:
1,MyBatis3:默认的值,生成基于MyBatis3.x以上版本的内容,包括XXXBySample;
2,MyBatis3Simple:类似MyBatis3,只是不生成XXXBySample;
introspectedColumnImpl:类全限定名,用于扩展MBG
-->
<context id="mysql" defaultModelType="hierarchical" targetRuntime="MyBatis3Simple">
<!--TODO 里面元素要按顺序写-->
<!-- 自动识别数据库关键字,默认false,如果设置为true,根据SqlReservedWords中定义的关键字列表;
一般保留默认值,遇到数据库关键字(Java关键字),使用columnOverride覆盖
-->
<property name="autoDelimitKeywords" value="false"/>
<!-- 生成的Java文件的编码 -->
<property name="javaFileEncoding" value="UTF-8"/>
<!-- 格式化java代码 -->
<property name="javaFormatter" value="org.mybatis.generator.api.dom.DefaultJavaFormatter"/>
<!-- 格式化XML代码 -->
<property name="xmlFormatter" value="org.mybatis.generator.api.dom.DefaultXmlFormatter"/>
<!-- beginningDelimiter和endingDelimiter:指明数据库的用于标记数据库对象名的符号,比如ORACLE就是双引号,MYSQL默认是`反引号; -->
<property name="beginningDelimiter" value="`"/>
<property name="endingDelimiter" value="`"/>
<!-- optional,旨在创建class时,对注释进行控制 -->
<commentGenerator>
<property name="suppressDate" value="true"/>
<property name="suppressAllComments" value="true"/>
</commentGenerator>
<!-- 必须要有的,使用这个配置链接数据库
@TODO:是否可以扩展
-->
<jdbcConnection driverClass="${spring.datasource.driver-class-name}" connectionURL="${spring.datasource.url}" userId="${spring.datasource.username}"
password="${spring.datasource.password}">
<!-- 这里面可以设置property属性,每一个property属性都设置到配置的Driver上 -->
</jdbcConnection>
<!-- java类型处理器
用于处理DB中的类型到Java中的类型,默认使用JavaTypeResolverDefaultImpl;
注意一点,默认会先尝试使用Integer,Long,Short等来对应DECIMAL和 NUMERIC数据类型;
-->
<javaTypeResolver type="org.mybatis.generator.internal.types.JavaTypeResolverDefaultImpl">
<!--
true:使用BigDecimal对应DECIMAL和 NUMERIC数据类型
false:默认,
scale>0;length>18:使用BigDecimal;
scale=0;length[10,18]:使用Long;
scale=0;length[5,9]:使用Integer;
scale=0;length<5:使用Short;
-->
<property name="forceBigDecimals" value="false"/>
</javaTypeResolver>
<!-- java模型创建器,是必须要的元素
负责:1,key类(见context的defaultModelType);2,java类;3,查询类
targetPackage:生成的类要放的包,真实的包受enableSubPackages属性控制;
targetProject:目标项目,指定一个存在的目录下,生成的内容会放到指定目录中,如果目录不存在,MBG不会自动建目录
-->
<javaModelGenerator targetPackage="com.steven.six.entity" targetProject="src/main/java">
<!-- for MyBatis3/MyBatis3Simple
自动为每一个生成的类创建一个构造方法,构造方法包含了所有的field;而不是使用setter;
-->
<property name="constructorBased" value="true"/>
<!-- 在targetPackage的基础上,根据数据库的schema再生成一层package,最终生成的类放在这个package下,默认为false -->
<property name="enableSubPackages" value="true"/>
<!-- for MyBatis3 / MyBatis3Simple
是否创建一个不可变的类,如果为true,
那么MBG会创建一个没有setter方法的类,取而代之的是类似constructorBased的类
-->
<property name="immutable" value="false"/>
<!-- 设置一个根对象,
如果设置了这个根对象,那么生成的keyClass或者recordClass会继承这个类;在Table的rootClass属性中可以覆盖该选项
注意:如果在key class或者record class中有root class相同的属性,MBG就不会重新生成这些属性了,包括:
1,属性名相同,类型相同,有相同的getter/setter方法;
-->
<!--<property name="rootClass" value="com._520it.mybatis.domain.BaseDomain"/>-->
<!-- 设置是否在getter方法中,对String类型字段调用trim()方法 -->
<property name="trimStrings" value="true"/>
</javaModelGenerator>
<!-- 生成SQL map的XML文件生成器,
注意,在Mybatis3之后,我们可以使用mapper.xml文件+Mapper接口(或者不用mapper接口),
或者只使用Mapper接口+Annotation,所以,如果 javaClientGenerator配置中配置了需要生成XML的话,这个元素就必须配置
targetPackage/targetProject:同javaModelGenerator
-->
<sqlMapGenerator targetPackage="mybatis.mapper" targetProject="src/main/resources">
<!-- 在targetPackage的基础上,根据数据库的schema再生成一层package,最终生成的类放在这个package下,默认为false -->
<property name="enableSubPackages" value="true"/>
</sqlMapGenerator>
<!-- 对于mybatis来说,即生成Mapper接口,注意,如果没有配置该元素,那么默认不会生成Mapper接口
targetPackage/targetProject:同javaModelGenerator
type:选择怎么生成mapper接口(在MyBatis3/MyBatis3Simple下):
1,ANNOTATEDMAPPER:会生成使用Mapper接口+Annotation的方式创建(SQL生成在annotation中),不会生成对应的XML;
2,MIXEDMAPPER:使用混合配置,会生成Mapper接口,并适当添加合适的Annotation,但是XML会生成在XML中;
3,XMLMAPPER:会生成Mapper接口,接口完全依赖XML;
注意,如果context是MyBatis3Simple:只支持ANNOTATEDMAPPER和XMLMAPPER
-->
<javaClientGenerator targetPackage="com.steven.six.dao" type="XMLMAPPER"
targetProject="src/main/java">
<!-- 在targetPackage的基础上,根据数据库的schema再生成一层package,最终生成的类放在这个package下,默认为false -->
<property name="enableSubPackages" value="true"/>
<!-- 可以为所有生成的接口添加一个父接口,但是MBG只负责生成,不负责检查
<property name="rootInterface" value=""/>
-->
</javaClientGenerator>
<!-- 选择一个table来生成相关文件,可以有一个或多个table,必须要有table元素
选择的table会生成一下文件:
1,SQL map文件
2,生成一个主键类;
3,除了BLOB和主键的其他字段的类;
4,包含BLOB的类;
5,一个用户生成动态查询的条件类(selectByExample, deleteByExample),可选;
6,Mapper接口(可选)
tableName(必要):要生成对象的表名;
注意:大小写敏感问题。正常情况下,MBG会自动的去识别数据库标识符的大小写敏感度,在一般情况下,MBG会
根据设置的schema,catalog或tablename去查询数据表,按照下面的流程:
1,如果schema,catalog或tablename中有空格,那么设置的是什么格式,就精确的使用指定的大小写格式去查询;
2,否则,如果数据库的标识符使用大写的,那么MBG自动把表名变成大写再查找;
3,否则,如果数据库的标识符使用小写的,那么MBG自动把表名变成小写再查找;
4,否则,使用指定的大小写格式查询;
另外的,如果在创建表的时候,使用的""把数据库对象规定大小写,就算数据库标识符是使用的大写,在这种情况下也会使用给定的大小写来创建表名;
这个时候,请设置delimitIdentifiers="true"即可保留大小写格式;
可选:
1,schema:数据库的schema;
2,catalog:数据库的catalog;
3,alias:为数据表设置的别名,如果设置了alias,那么生成的所有的SELECT SQL语句中,列名会变成:alias_actualColumnName
4,domainObjectName:生成的domain类的名字,如果不设置,直接使用表名作为domain类的名字;可以设置为somepck.domainName,那么会自动把domainName类再放到somepck包里面;
5,enableInsert(默认true):指定是否生成insert语句;
6,enableSelectByPrimaryKey(默认true):指定是否生成按照主键查询对象的语句(就是getById或get);
7,enableSelectByExample(默认true):MyBatis3Simple为false,指定是否生成动态查询语句;
8,enableUpdateByPrimaryKey(默认true):指定是否生成按照主键修改对象的语句(即update);
9,enableDeleteByPrimaryKey(默认true):指定是否生成按照主键删除对象的语句(即delete);
10,enableDeleteByExample(默认true):MyBatis3Simple为false,指定是否生成动态删除语句;
11,enableCountByExample(默认true):MyBatis3Simple为false,指定是否生成动态查询总条数语句(用于分页的总条数查询);
12,enableUpdateByExample(默认true):MyBatis3Simple为false,指定是否生成动态修改语句(只修改对象中不为空的属性);
13,modelType:参考context元素的defaultModelType,相当于覆盖;
14,delimitIdentifiers:参考tableName的解释,注意,默认的delimitIdentifiers是双引号,如果类似MYSQL这样的数据库,使用的是`(反引号,那么还需要设置context的beginningDelimiter和endingDelimiter属性)
15,delimitAllColumns:设置是否所有生成的SQL中的列名都使用标识符引起来。默认为false,delimitIdentifiers参考context的属性
注意,table里面很多参数都是对javaModelGenerator,context等元素的默认属性的一个复写;
-->
<table tableName="user">
<!-- 参考 javaModelGenerator 的 constructorBased属性-->
<property name="constructorBased" value="true"/>
<!-- 默认为false,如果设置为true,在生成的SQL中,table名字不会加上catalog或schema; -->
<property name="ignoreQualifiersAtRuntime" value="false"/>
<!-- 参考 javaModelGenerator 的 immutable 属性 -->
<property name="immutable" value="false"/>
<!-- 指定是否只生成domain类,如果设置为true,只生成domain类,如果还配置了sqlMapGenerator,那么在mapper XML文件中,只生成resultMap元素 -->
<property name="modelOnly" value="false"/>
<!-- 参考 javaModelGenerator 的 rootClass 属性
<property name="rootClass" value=""/>
-->
<!-- 参考javaClientGenerator 的 rootInterface 属性
<property name="rootInterface" value=""/>
-->
<!-- 如果设置了runtimeCatalog,那么在生成的SQL中,使用该指定的catalog,而不是table元素上的catalog
<property name="runtimeCatalog" value=""/>
-->
<!-- 如果设置了runtimeSchema,那么在生成的SQL中,使用该指定的schema,而不是table元素上的schema
<property name="runtimeSchema" value=""/>
-->
<!-- 如果设置了runtimeTableName,那么在生成的SQL中,使用该指定的tablename,而不是table元素上的tablename
<property name="runtimeTableName" value=""/>
-->
<!-- 注意,该属性只针对MyBatis3Simple有用;
如果选择的runtime是MyBatis3Simple,那么会生成一个SelectAll方法,如果指定了selectAllOrderByClause,那么会在该SQL中添加指定的这个order条件;
-->
<!--<property name="selectAllOrderByClause" value="age desc,username asc"/>-->
<!-- 如果设置为true,生成的model类会直接使用column本身的名字,而不会再使用驼峰命名方法,比如BORN_DATE,生成的属性名字就是BORN_DATE,而不会是bornDate -->
<property name="useActualColumnNames" value="false"/>
<!-- generatedKey用于生成生成主键的方法,
如果设置了该元素,MBG会在生成的<insert>元素中生成一条正确的<selectKey>元素,该元素可选
column:主键的列名;
sqlStatement:要生成的selectKey语句,有以下可选项:
Cloudscape:相当于selectKey的SQL为: VALUES IDENTITY_VAL_LOCAL()
DB2 :相当于selectKey的SQL为: VALUES IDENTITY_VAL_LOCAL()
DB2_MF :相当于selectKey的SQL为:SELECT IDENTITY_VAL_LOCAL() FROM SYSIBM.SYSDUMMY1
Derby :相当于selectKey的SQL为:VALUES IDENTITY_VAL_LOCAL()
HSQLDB :相当于selectKey的SQL为:CALL IDENTITY()
Informix :相当于selectKey的SQL为:select dbinfo('sqlca.sqlerrd1') from systables where tabid=1
MySql :相当于selectKey的SQL为:SELECT LAST_INSERT_ID()
SqlServer :相当于selectKey的SQL为:SELECT SCOPE_IDENTITY()
SYBASE :相当于selectKey的SQL为:SELECT @@IDENTITY
JDBC :相当于在生成的insert元素上添加useGeneratedKeys="true"和keyProperty属性
<generatedKey column="" sqlStatement=""/>
-->
<!--
该元素会在根据表中列名计算对象属性名之前先重命名列名,非常适合用于表中的列都有公用的前缀字符串的时候,
比如列名为:CUST_ID,CUST_NAME,CUST_EMAIL,CUST_ADDRESS等;
那么就可以设置searchString为"^CUST_",并使用空白替换,那么生成的Customer对象中的属性名称就不是
custId,custName等,而是先被替换为ID,NAME,EMAIL,然后变成属性:id,name,email;
注意,MBG是使用java.util.regex.Matcher.replaceAll来替换searchString和replaceString的,
如果使用了columnOverride元素,该属性无效;
<columnRenamingRule searchString="" replaceString=""/>
-->
<!-- 用来修改表中某个列的属性,MBG会使用修改后的列来生成domain的属性;
column:要重新设置的列名;
注意,一个table元素中可以有多个columnOverride元素哈~
-->
<!--<columnOverride column="username">-->
<!--<!– 使用property属性来指定列要生成的属性名称 –>-->
<!--<property name="property" value="userName"/>-->
<!-- javaType用于指定生成的domain的属性类型,使用类型的全限定名
<property name="javaType" value=""/>
-->
<!-- jdbcType用于指定该列的JDBC类型
<property name="jdbcType" value=""/>
-->
<!-- typeHandler 用于指定该列使用到的TypeHandler,如果要指定,配置类型处理器的全限定名
注意,mybatis中,不会生成到mybatis-config.xml中的typeHandler
只会生成类似:where id = #{id,jdbcType=BIGINT,typeHandler=com._520it.mybatis.MyTypeHandler}的参数描述
<property name="jdbcType" value=""/>
-->
<!-- 参考table元素的delimitAllColumns配置,默认为false
<property name="delimitedColumnName" value=""/>
-->
<!--</columnOverride>-->
<!-- ignoreColumn设置一个MGB忽略的列,如果设置了改列,那么在生成的domain中,生成的SQL中,都不会有该列出现
column:指定要忽略的列的名字;
delimitedColumnName:参考table元素的delimitAllColumns配置,默认为false
注意,一个table元素中可以有多个ignoreColumn元素
<ignoreColumn column="deptId" delimitedColumnName=""/>
-->
</table>
<table tableName="user_info">
<!-- 参考 javaModelGenerator 的 constructorBased属性-->
<property name="constructorBased" value="true"/>
<!-- 默认为false,如果设置为true,在生成的SQL中,table名字不会加上catalog或schema; -->
<property name="ignoreQualifiersAtRuntime" value="false"/>
<!-- 参考 javaModelGenerator 的 immutable 属性 -->
<property name="immutable" value="false"/>
<!-- 指定是否只生成domain类,如果设置为true,只生成domain类,如果还配置了sqlMapGenerator,那么在mapper XML文件中,只生成resultMap元素 -->
<property name="modelOnly" value="false"/>
<property name="useActualColumnNames" value="false"/>
</table>
</context>
</generatorConfiguration>
5.2通过maven插件执行mybatis-generator
确保pom里已经配置mybatis-generator,
	<build>
		<plugins>
			<plugin>
				<groupId>org.springframework.boot</groupId>
				<artifactId>spring-boot-maven-plugin</artifactId>
			</plugin>
			<!--配置mybatis插件-->
			<plugin>
				<groupId>org.mybatis.generator</groupId>
				<artifactId>mybatis-generator-maven-plugin</artifactId>
				<version>1.3.5</version>
				<configuration>
					<configurationFile>${project.basedir}/src/main/resources/mybatis/generatorConfig.xml</configurationFile>
					<verbose>true</verbose>
					<overwrite>true</overwrite>
				</configuration>
			</plugin>
		</plugins>
	</build>
5.3执行mybatis-generator:generate
如下图,执行mybatis-generator:generate
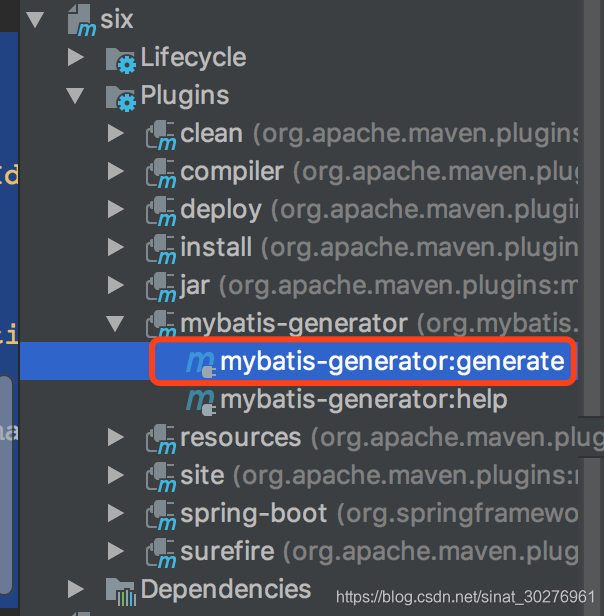
也可以自己创建maven命令执行。
一切顺利,会创建出dao下java文件,entity下java文件和mapper下xml文件。
dao下文件UserMapper.java(手动加上@Repository,注入需要)
package com.steven.six.dao;

import com.steven.six.entity.User;
import org.springframework.stereotype.Repository;

import java.util.List;

@Repository
public interface UserMapper {
    int deleteByPrimaryKey(Long id);

    int insert(User record);

    User selectByPrimaryKey(Long id);

    List<User> selectAll();

    int updateByPrimaryKey(User record);
}
entity下文件User.java
package com.steven.six.entity;

public class User {
    private Long id;

    private String email;

    private String nickName;

    private String password;

    private String regTime;

    private String userName;

    public User(Long id, String email, String nickName, String password, String regTime, String userName) {
        this.id = id;
        this.email = email;
        this.nickName = nickName;
        this.password = password;
        this.regTime = regTime;
        this.userName = userName;
    }

    public User() {
        super();
    }

    public Long getId() {
        return id;
    }

    public void setId(Long id) {
        this.id = id;
    }

    public String getEmail() {
        return email;
    }

    public void setEmail(String email) {
        this.email = email == null ? null : email.trim();
    }

    public String getNickName() {
        return nickName;
    }

    public void setNickName(String nickName) {
        this.nickName = nickName == null ? null : nickName.trim();
    }

    public String getPassword() {
        return password;
    }

    public void setPassword(String password) {
        this.password = password == null ? null : password.trim();
    }

    public String getRegTime() {
        return regTime;
    }

    public void setRegTime(String regTime) {
        this.regTime = regTime == null ? null : regTime.trim();
    }

    public String getUserName() {
        return userName;
    }

    public void setUserName(String userName) {
        this.userName = userName == null ? null : userName.trim();
    }
}
mapper下xml文件UserMapper.xml
<?xml version="1.0" encoding="UTF-8"?>
<!DOCTYPE mapper PUBLIC "-//mybatis.org//DTD Mapper 3.0//EN" "http://mybatis.org/dtd/mybatis-3-mapper.dtd">
<mapper namespace="com.steven.six.dao.UserMapper">
  <resultMap id="BaseResultMap" type="com.steven.six.entity.User">
    <constructor>
      <idArg column="id" javaType="java.lang.Long" jdbcType="BIGINT" />
      <arg column="email" javaType="java.lang.String" jdbcType="VARCHAR" />
      <arg column="nick_name" javaType="java.lang.String" jdbcType="VARCHAR" />
      <arg column="password" javaType="java.lang.String" jdbcType="VARCHAR" />
      <arg column="reg_time" javaType="java.lang.String" jdbcType="VARCHAR" />
      <arg column="user_name" javaType="java.lang.String" jdbcType="VARCHAR" />
    </constructor>
  </resultMap>
  <delete id="deleteByPrimaryKey" parameterType="java.lang.Long">
    delete from user
    where id = #{id,jdbcType=BIGINT}
  </delete>
  <insert id="insert" parameterType="com.steven.six.entity.User">
    insert into user (id, email, nick_name,
      password, reg_time, user_name
      )
    values (#{id,jdbcType=BIGINT}, #{email,jdbcType=VARCHAR}, #{nickName,jdbcType=VARCHAR},
      #{password,jdbcType=VARCHAR}, #{regTime,jdbcType=VARCHAR}, #{userName,jdbcType=VARCHAR}
      )
  </insert>
  <update id="updateByPrimaryKey" parameterType="com.steven.six.entity.User">
    update user
    set email = #{email,jdbcType=VARCHAR},
      nick_name = #{nickName,jdbcType=VARCHAR},
      password = #{password,jdbcType=VARCHAR},
      reg_time = #{regTime,jdbcType=VARCHAR},
      user_name = #{userName,jdbcType=VARCHAR}
    where id = #{id,jdbcType=BIGINT}
  </update>
  <select id="selectByPrimaryKey" parameterType="java.lang.Long" resultMap="BaseResultMap">
    select id, email, nick_name, password, reg_time, user_name
    from user
    where id = #{id,jdbcType=BIGINT}
  </select>
  <select id="selectAll" resultMap="BaseResultMap">
    select id, email, nick_name, password, reg_time, user_name
    from user
  </select>
</mapper>
6.创建service和controller,测试
6.1 Service
package com.steven.six.service;

import com.steven.six.dao.UserDao;
import com.steven.six.dao.UserMapper;
import com.steven.six.entity.User;
import org.springframework.beans.factory.annotation.Autowired;
import org.springframework.stereotype.Service;

import java.util.List;

/**
 * com.steven.six.service
 * Date 2018/10/27
 */
@Service
public class UserService {

    @Autowired
    private UserMapper userMapper;

    public User selectByPrimaryKey(Long id) {
        return userMapper.selectByPrimaryKey(id);
    }
}
6.2 Controller
package com.steven.six.web;

import com.steven.six.common.ServerResponse;
import com.steven.six.entity.User;
import com.steven.six.service.AnnoUserService;
import com.steven.six.service.UserService;
import org.springframework.beans.factory.annotation.Autowired;
import org.springframework.web.bind.annotation.GetMapping;
import org.springframework.web.bind.annotation.PathVariable;
import org.springframework.web.bind.annotation.RestController;

import java.util.List;

/**
 * com.steven.six.web
 * Created by ZhiLiSteven
 * Date 2018/10/26
 */
@RestController
public class AnnoUserController {

    @Autowired
    private AnnoUserService annoUserService;
    @Autowired
    private UserService userService;

    @GetMapping("userList")
    public ServerResponse<List<User>> getUserList() {
        return ServerResponse.createBySuccess("success", annoUserService.getUserList());
    }

    @GetMapping("getUserById/{id}")
    public ServerResponse<User> getUserById(@PathVariable("id") String id) {
        return ServerResponse.createBySuccess(userService.selectByPrimaryKey(Long.parseLong(id)));
    }
}
测试结果
http://localhost:8888/getUserById/9
{“status”:0,“data”:{“id”:9,“email”:“bb”,“nickName”:“bb123456”,“password”:“[email protected]”,“regTime”:“2018年10月24日 下午02时03分53秒”,“userName”:“bb2”}}
7.通过注解方式写sql
7.1 dao下文件
package com.steven.six.dao;

import com.steven.six.entity.User;
import org.apache.ibatis.annotations.Insert;
import org.apache.ibatis.annotations.Result;
import org.apache.ibatis.annotations.Results;
import org.apache.ibatis.annotations.Select;
import org.springframework.stereotype.Component;
import org.springframework.stereotype.Repository;
import org.springframework.stereotype.Service;

import java.util.List;

/**
 * com.steven.six.dao
 * Created by ZhiLiSteven
 * Date 2018/10/26
 */
@Repository
public interface AnnoUserDao {

    @Select("select * from user")
    @Results({
            @Result(property = "userName", column = "user_name"),
            @Result(property = "nickName", column = "nick_name"),
            @Result(property = "regTime", column = "reg_time")
    })
    List<User> getUserList();

}
7.2可以套一层service
package com.steven.six.service;

import com.steven.six.dao.AnnoUserDao;
import com.steven.six.entity.User;
import org.springframework.beans.factory.annotation.Autowired;
import org.springframework.stereotype.Service;

import java.util.List;

/**
 * com.steven.six.service
 * Created by ZhiLiSteven
 * Date 2018/10/26
 */
@Service
public class AnnoUserService {

    @Autowired
    private AnnoUserDao annoUserDao;

    public List<User> getUserList() {
        return annoUserDao.getUserList();
    }
}
7.3 controller参考上面贴出来的controller
测试结果:
http://localhost:8888/userList
{“status”:0,“msg”:“success”,“data”:[{“id”:9,“email”:“bb”,“nickName”:“bb123456”,“password”:“[email protected]”,“regTime”:“2018年10月24日 下午02时03分53秒”,“userName”:“bb2”},{“id”:10,“email”:“cc”,“nickName”:“cc123456”,“password”:“[email protected]”,“regTime”:“2018年10月24日 下午02时03分53秒”,“userName”:“cc3”},{“id”:11,“email”:“[email protected]”,“nickName”:“steven”,“password”:“123456”,“regTime”:“2018年10月24日 下午02时06分57秒”,“userName”:“steven”},{“id”:12,“email”:“[email protected]”,“nickName”:“Liz”,“password”:“123321”,“regTime”:“2018年10月24日 下午02时06分57秒”,“userName”:“Liz”},{“id”:13,“email”:“[email protected]”,“nickName”:“HanHan”,“password”:“654321”,“regTime”:“2018年10月24日 下午02时06分57秒”,“userName”:“HanHan”},{“id”:15,“email”:“[email protected]”,“nickName”:“YaoYao”,“password”:“654321”,“regTime”:“2018-01-01”,“userName”:“YaoYao”}]}
至此,搭建完成。