版权声明:本文为博主原创文章,未经博主允许不得转载。 https://blog.csdn.net/qq_28142539/article/details/51172508
在开发过程中我们经常会用到相册与相机
下面我讲一下相册与相机的基本操作:
 1. 打开相册
 2. 保存图片到相册
 3. 打开相机
1,打开相册
//1. 要遵循代理
<UINavigationControllerDelegate, UIImagePickerControllerDelegate>

    //2. 自定义一个按钮
     UIButton *btn = [UIButton buttonWithType:UIButtonTypeSystem];
     [btn setTitle:@"打开相册" forState:UIControlStateNormal];
     btn.frame = CGRectMake(100, 100, 100, 100);
     [btn addTarget:self action:@selector(toQRCode:) forControlEvents:UIControlEventTouchUpInside];
     [self.view addSubview:btn];
//3. 执行按钮的方法
- (void)toQRCode:(UIButton *)btn {

    NSLog(@"打开相册");

    UIImagePickerController *picker = [[UIImagePickerController alloc] init];
    picker.delegate = self;
    picker.allowsEditing = true;
    [self presentViewController:picker animated:true completion:nil];
}
效果图:
2,保存图片到相册
  // 1.
    // 定义个全局 UIImageView
    _imageView = [[UIImageView alloc] initWithImage:[UIImage imageNamed:@"logo"]];
    _imageView.frame = CGRectMake(kScreen_Width/2-100, kScreen_Height/2-70, 200, 200);
    [self.view addSubview:_imageView];

    // 启动用户交互
    _imageView.userInteractionEnabled = YES;

    // 手势 长按
    UILongPressGestureRecognizer *longAccording = [[UILongPressGestureRecognizer alloc] initWithTarget:self action:@selector(longAccordingAction:)];
    [_imageView addGestureRecognizer:longAccording];
//2.
#pragma mark - 长按 执行的方法
- (void)longAccordingAction:(UILongPressGestureRecognizer *)sender {

    NSLog(@"长按");
    if (sender.state == UIGestureRecognizerStateBegan) {

        // 定义个提示框
        UIAlertController *alertController = [UIAlertController alertControllerWithTitle:@"是否要保存到相册" message:nil preferredStyle:UIAlertControllerStyleAlert];
        UIAlertAction *action1 = [UIAlertAction actionWithTitle:@"取消" style:UIAlertActionStyleDefault handler:^(UIAlertAction * _Nonnull action) {

        }];
        [alertController addAction:action1];

        UIAlertAction *action = [UIAlertAction actionWithTitle:@"OK" style:UIAlertActionStyleDefault handler:^(UIAlertAction * _Nonnull action) {

            // 关键代码在这里
            UIImageWriteToSavedPhotosAlbum(_imageView.image, self, @selector(image:didFinishSavingWithError:contextInfo:), NULL);

        }];
        [alertController addAction:action];

        [self presentViewController:alertController animated:YES completion:^{

        }];
    }
}
//3.
#pragma mark - 保存图片成功后 回调一个方法
- (void)image:(UIImage *)image didFinishSavingWithError:(NSError *)error contextInfo:(void *)contextInfo;
{
NSString *msg=nil;
if (!error)
{
msg=@"保存成功";
}
else
{
msg=@"保存失败";
}
NSLog(@"%@",msg);
}
效果图:
3,打开相机
//1. 要遵循 <UINavigationControllerDelegate, UIImagePickerControllerDelegate>代理
//2. 自定义一个按钮
 UIButton *btn = [UIButton buttonWithType:UIButtonTypeSystem];
     [btn setTitle:@"打开相机" forState:UIControlStateNormal];
     btn.frame = CGRectMake(100, 100, 100, 100);
     [btn addTarget:self action:@selector(toQRCode:) forControlEvents:UIControlEventTouchUpInside];
     [self.view addSubview:btn];
//3. 执行按钮的方法
- (void)toQRCode:(UIButton *)btn {
NSLog(@"打开相机");
UIImagePickerController *picker=[[UIImagePickerController alloc] init];
picker.sourceType=UIImagePickerControllerSourceTypeCamera;
picker.delegate=self;
picker.allowsEditing=YES;
[self presentViewController:picker animated:YES completion:nil];
}
要打开相机 只有真机才能实现
这里就不演示了 请见谅。
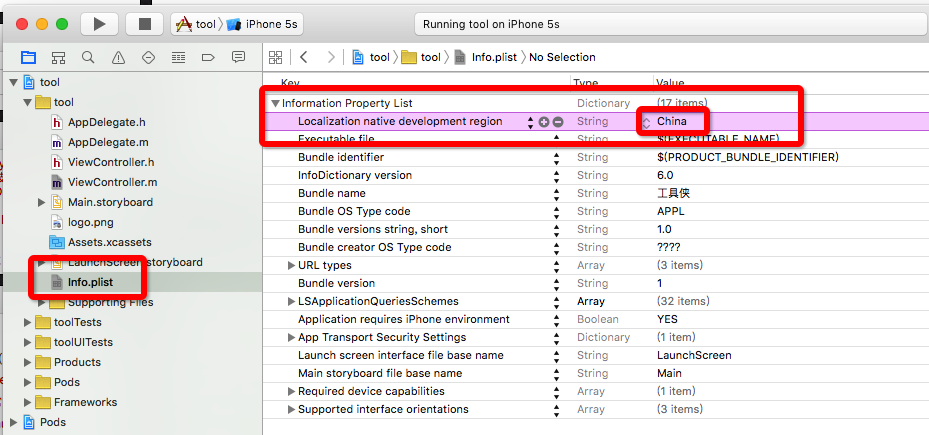
解决:调用系统相册、相机发现是英文状态。
第一中方法:在info.plist里面添加: Localizedresources
can be mixed YES第二中方法:在info.plist里面添加:Localization
native development region China