一、TestNG简介和安装
TestNG(Test Next Generation)是一个测试框架,和Unit类似,但引入了一些新的功能,使其功能更强大,使用更方便。TestNG作为Java项目的单元测试框架,在参数化测试、依赖测试和套件测试(分组概念)方面更加突出。 TestNG用于高级测试和复杂集成测试。 它的灵活性对于大型测试套件尤其有用。 此外,TestNG还涵盖了整个核心的JUnit4功能。
可以在Eclipse中在线安装,Help-Install new software像安装其他插件一样,输入其官方地址为http://beust.com/eclipse。或者下载之后离线安装,可以从此处下载,下载之后将features和plugins下的文件,分别放到Eclipse中对应的文件夹下面即可。具体安装的细节不多说了,网络上的文档很多。
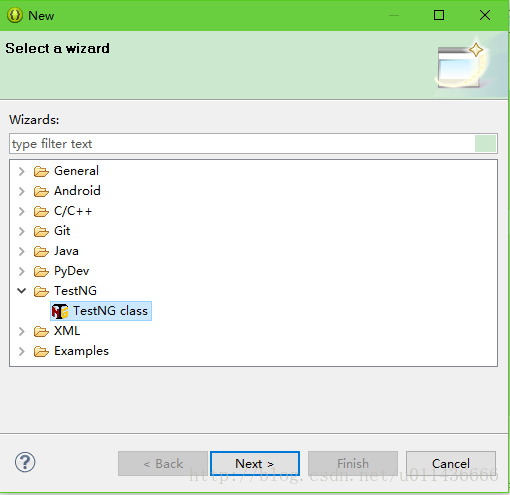
安装成功之后,可以看见在新建时多了TestNG class的选项。
二、一个简单示例
创建如下两个类:
//此类名为NewTest.java
package com.lupu;

import org.testng.annotations.Test;

public class NewTest {

    @Test
    public void test2() {
        System.out.print("NewTest-来自test2\n");
    }

    @Test
    public void test() {
        System.out.print("NewTest-来自test\n");
    }

    @Test
    public void test3() {
        System.out.print("NewTest-来自test3\n");
    }

    @Test(enabled = false)
    public void test4() {
        System.out.print("NewTest-来自test4\n");
    }

    @Test(timeOut=2000)
    public void test5() {
        System.out.print("NewTest-来自test5\n");
        try {
            Thread.sleep(4000);
        } catch (InterruptedException e) {
            e.printStackTrace();
        }
    }
}
此类中,用@Test来定义测试方法,在@Test中支持非常多的配置,上面我们用跳过此方法和超时来做简单的示例。
//此类名为NewTest2.java
package com.lupu;

import org.testng.annotations.AfterSuite;
import org.testng.annotations.AfterTest;
import org.testng.annotations.BeforeSuite;
import org.testng.annotations.BeforeTest;

public class NewTest2 {

    @BeforeSuite
    public void beforeSuite() {
        System.out.print("NewTest2-@BeforeSuite\n");
    }

    @AfterSuite
    public void afterSuite() {
        System.out.print("NewTest2-@AfterSuite\n");
    }

    @BeforeTest
    public void beforeTest() {
        System.out.print("NewTest2-@BeforeTest\n");

    }

    @AfterTest
    public void afterTest() {
        System.out.print("NewTest2-@AfterTest\n");
    }
}
此类中用了注释来执行测试类的配置,通过它们可以方便的进行一些配置操作。
接着,创建一个XML文件来运行多个测试用例,同时也保证了结构清晰,testng.xml文件内容如下所示:
<?xml version="1.0" encoding="UTF-8"?>
<!DOCTYPE suite SYSTEM "http://testng.org/testng-1.0.dtd" >
<!-- @BeforeSuite -->
<suite name="TestAll">
<!-- @BeforeTest -->
<test name="case1">
<classes>
<class name="com.lupu.NewTest" />
<class name="com.lupu.NewTest2" />
</classes>
</test>
<!-- @AfterTest -->
<!-- @BeforeTest -->
<test name="case2">
<classes>
<class name="com.lupu.NewTest" />
</classes>
</test>
<!-- @AfterTest -->
</suite>
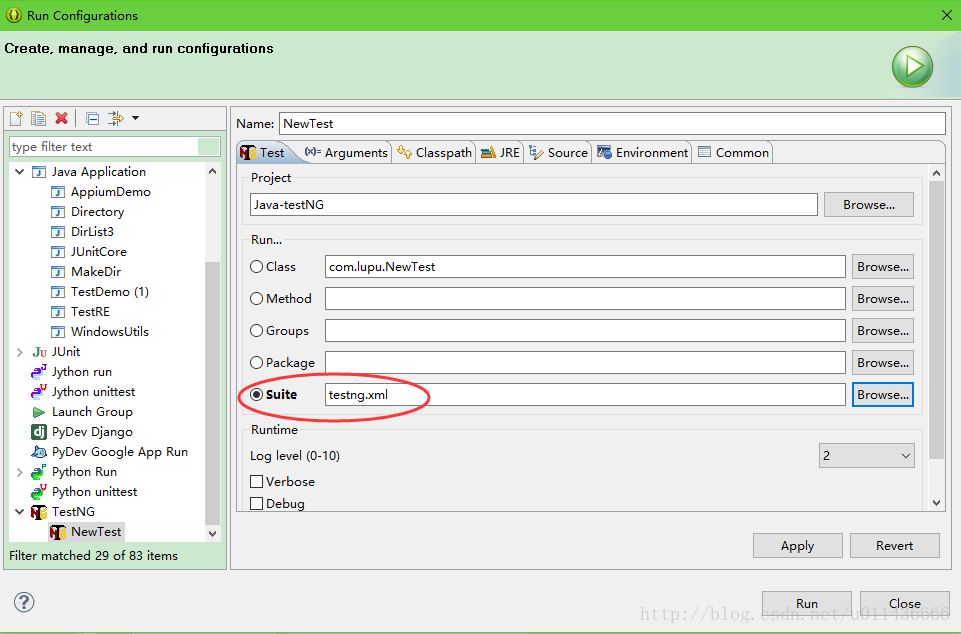
<!-- @AfterSuite -->设置用testng.xml运行,在testng.xml文件中右键,选择Suite,如下图所示:
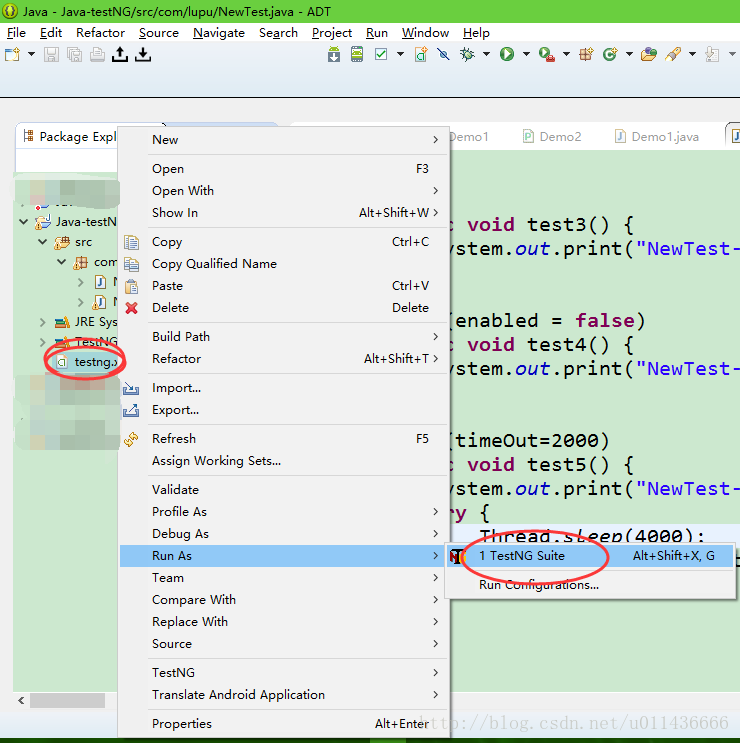
设置完成之后,这时右键点击testng.xml可以看见,以TestNG Suite来运行:
运行之后,我们可以在控制台下面查看输出和testng的运行结果:
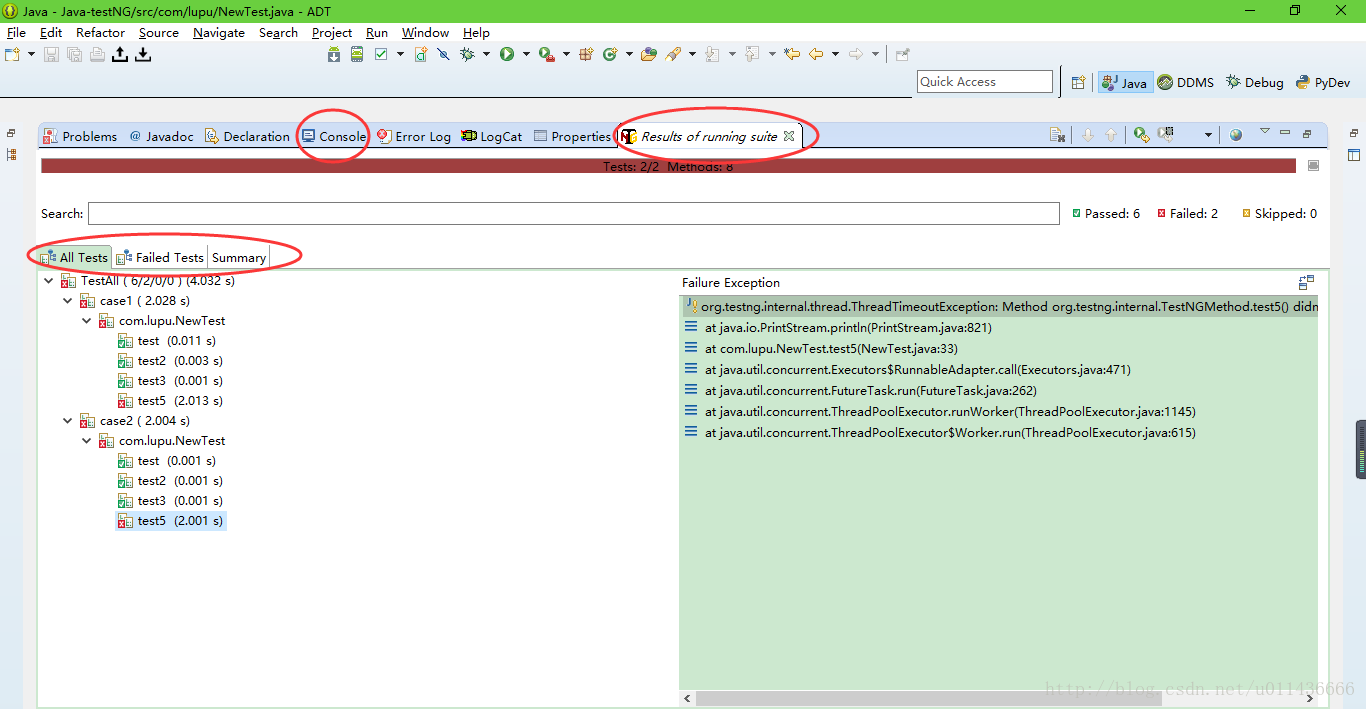
Console控制台的输出如下所示:
[TestNG] Running:
  D:\Android\EclipseProjects\Java-testNG\testng.xml

NewTest2-@BeforeSuite
NewTest2-@BeforeTest
NewTest-来自test
NewTest-来自test2
NewTest-来自test3
NewTest-来自test5
java.lang.InterruptedException: sleep interrupted
    at java.lang.Thread.sleep(Native Method)
    at com.lupu.NewTest.test5(NewTest.java:31)
    //此处省略大段的异常输出信息
    java.util.concurrent.ThreadPoolExecutor$Worker.run(ThreadPoolExecutor.java:615)
    at java.lang.Thread.run(Thread.java:745)
NewTest2-@AfterTest
NewTest-来自test
NewTest-来自test2
NewTest-来自test3
NewTest-来自test5
java.lang.InterruptedException: sleep interrupted
    at java.lang.Thread.sleep(Native Method)
    at com.lupu.NewTest.test5(NewTest.java:31)
    //此处省略大段的异常输出信息java.util.concurrent.ThreadPoolExecutor$Worker.run(ThreadPoolExecutor.java:615)
    at java.lang.Thread.run(Thread.java:745)
NewTest2-@AfterSuite

===============================================
TestAll
Total tests run: 8, Failures: 2, Skips: 0
===============================================
此处的两个Failures是我们在@Test中添加了超时时间,然后在方法中使它超时,则会运行失败,这在一些性能测试中,可以确保方法在合理的时间内返回。
TestNG配置注解:
@BeforeSuite - 对于套件测试,在此套件中的所有测试运行之前运行。
@AfterSuite - 对于套件测试,在此套件中的所有测试运行之后运行。
//以上两个注解,只会运行一次

@BeforeTest - 对于套件测试,在运行属于<test>标签内的类的任何测试方法之前运行。
@AfterTest - 对于套件测试,在运行属于<test>标签内的类的所有测试方法都已运行之后运行。


@BeforeGroups:在调用属于该组的第一个测试方法之前运行。
@AfterGroups:在调用属于组的最后一个测试方法之后运行。

@BeforeClass- 在当前类的第一个测试方法之前运行。
@AfterClass - 运行当前类中的所有测试方法之后都运行。

@BeforeMethod - 在每个测试方法之前运行。
@AfterMethod - 在每个测试方法之后运行。
三、更多常用功能
1、预期异常测试
使用TestNG expectedExceptions来测试代码中的预期异常抛出,并且可以判断Error Message是否匹配,如果匹配则此用例会通过。
@Test(expectedExceptions=IllegalArgumentException.class,expectedExceptionsMessageRegExp="Null")
    public void test5() {
        System.out.print("NewTest-来自test5\n");
        throw new IllegalArgumentException("Null");
    }
如上所示,我们在方法中抛出一个异常,但是用expectedExceptions来判断它,此时此方法可以通过。
2、分组测试
@Test(groups = {“group1”})
public void test2() {
System.out.print(“NewTest-来自test2\n”);
}
    //NewTest
    @Test(groups = {"group1"})
    public void test() {
        System.out.print("NewTest-来自test\n");
    }

    @Test(groups = {"group1","group2"})
    public void test3() {
        System.out.print("NewTest-来自test3\n");
    }

    //NewTest2
    @BeforeSuite(groups="group2")
    public void beforeSuite() {
        System.out.print("NewTest2-@BeforeSuite\n");
    }
运行之后可以发现,输出为:
NewTest2-@BeforeSuite
NewTest-来自test
NewTest-来自test2
NewTest-来自test3
NewTest-来自test3
上面用到的是分组测试,对一个方法我们可以指定多个分组名,这样便可以有很多种组合了。也可以在工程目录下建立多个xml文件,去运行不同的方法。还可以对类进行分组测试,用法类似于对方法进行分组测试,不在赘述。
3、依赖测试
TestNG允许指定依赖关系:
在@Test注释中使用属性dependsOnMethods,或者在@Test注释中使用属性dependsOnGroups。如果被依赖的方法执行成功,则执行此方法;反之,则不执行。见下面代码片段:
    //Run if test5() is passed.
    @Test(dependsOnMethods="test5")
    public void test() {
        System.out.print("NewTest-来自test\n");
    }

    @Test
    public void test5() {
        System.out.print("NewTest-来自test5\n");
        throw new IllegalArgumentException("Null");
    }
这里test5方法会执行失败,而test方法依赖于test5方法,所以test方法不会执行。
4、参数化测试
参数化测试允许我们使用不同的值一次又一次地运行相同的测试。
TestNG可以通过两种不同的方式将参数直接传递给测试方法:
- 使用testng.xml,使代码和测试数据分离,方便维护
- 使用数据提供者@DataProvider
1、使用testng.xml:
    @Test
    @Parameters("username")
    public void test2(String username) {
        System.out.print(username+"\n");
    }
在testng.xml中一定要定义叫做username的参数:
<?xml version="1.0" encoding="UTF-8"?>
<!DOCTYPE suite SYSTEM "http://testng.org/testng-1.0.dtd" >

<suite name="TestAll">
    <parameter name="username" value="HelloWorld" />

    <test name="case1">
        <classes>
            <class name="com.lupu.NewTest" />
        </classes>
    </test>
</suite>
运行之后,就可以看见输出的是我们定义的变量了。
2、使用DataProvider:
    @Test(dataProvider = "provideNumbers")
    public void testDp(int number, int expected) {
        Assert.assertEquals(number + 10, expected);
        System.out.println(number+ " "+expected);
    }

    @DataProvider(name = "provideNumbers")
    public Object[][] provideData() {
        return new Object[][] { { 10, 20 }, { 100, 110 }, { 200, 210 } };
    }
如上面代码片断所示,用@DataProvider(name = XXX)来定义一个DataProvider,然后在需要使用的地方法前面使用@Test(dataProvider = “XXX”)即可调用,上面代码的输出为:
10 20
100 110
200 210@DataProvider支持传递一个对象参数;并且支持根据测试方法名称传递不同的参数过去,用到的时候再查看相关的文档即可。
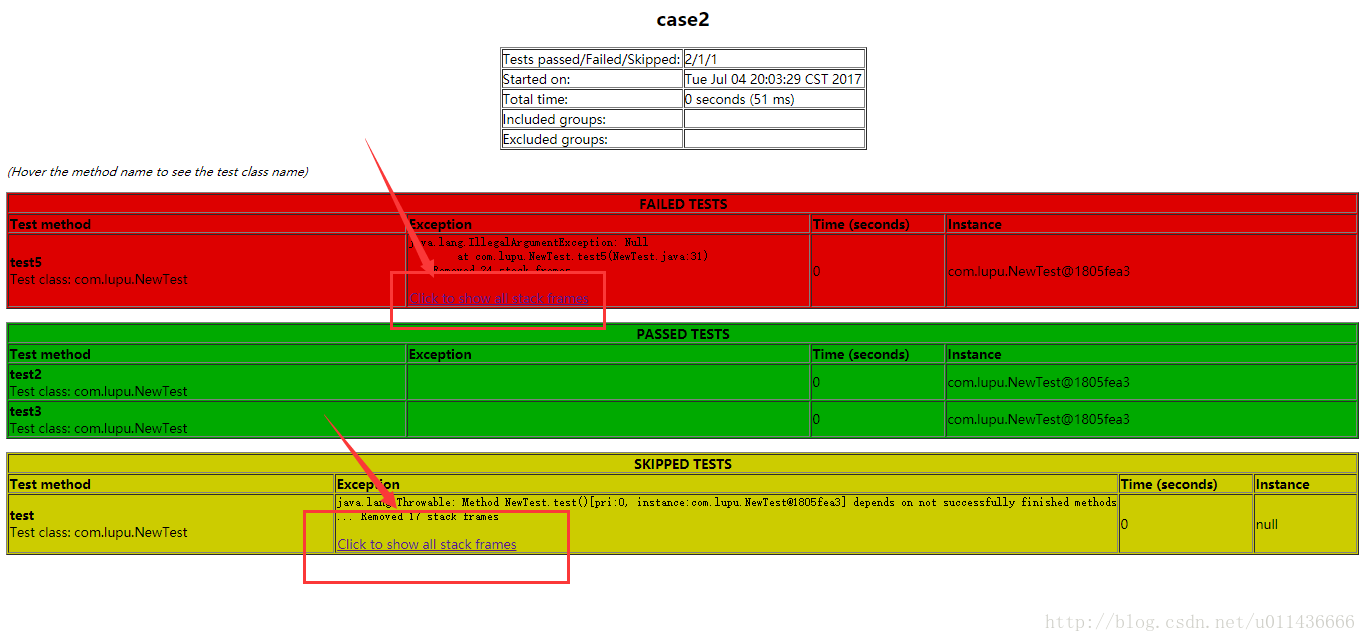
5、测试报告
TestNG测试结果默认放在工程目录下的test-output/文件夹下面,有xml和html两种格式的报告。下图展示的是html格式的报告,点击“Click to show all stack frames”,可以查看相关的详细信息。但是它的报告并不美观!