一,免安装,解压后,配置环境,把箱子目录放在环境变量路径中
检验配置成功:cmd 中输入 mvn -v ,显示如下信息即为配置成功

二, eclipse 中配置maven
1 ,修改maven 中的配置文件
Apache的行家-3.5.3 \的conf \ settings.xml的文件修改
1.1 文件第55 行处,添加一个“ <localRepository> E:/ local / repo </ localRepository> ”
(注意,此文件夹是配置后行家自动下载配置文件的目录,可随便自己放,建议不放在行家解压的文件中,最好用二层目录,文件夹/回购的并列需要放置改文件设定.xml ,后面配置的还需要用到)

1.2 在外层的 </反射镜> 中放置一个 <镜> ******** </反射镜> 固定(直接复制过去即可):
<镜>

<ID>阿里云</ ID>
<name> aliyun Maven </ name>
<mirrorOf> * </ mirrorOf>
<url> http://maven.aliyun.com/nexus/content/groups/public/ </ url> ;
</镜>

1.3 创建上面提到的文件夹(那就上面说的那个用来放自动下载的配置文件你的文件夹)> E:/ local / repo
然后复制 Setting.xml的文件放在本地文件夹目录下,与文件夹repo并列
2.eclipse 中添加的Maven
2.1 添加行家


2.2 添加资源文件夹的位置

三,创建 Maven的文件
1 ,三步:添加插件,修改三个xml ,Build path
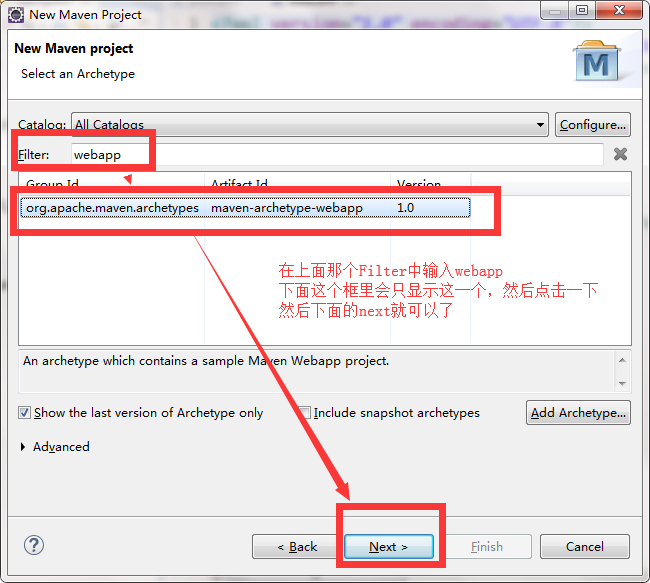
2 ,新建一个maven 项目


到这里项目算是半成品了,后面就是走前面提到的那三步 “添加插件,修改三个xml ,Build path ”了
3 ,添加插件


4 ,修改三个xml。
三个文件的位置分别为:
4.1一个大目录下, pom.xml
里面配置的内容改成这个:(记得第六行的文件名要更新)

< project xmlns = “ http://maven.apache.org/POM/4.0.0 ”

xmlns:xsi = “ http://www.w3.org/2001/XMLSchema-instance ”

xsi:schemaLocation = “ http://maven.apache.org/POM/4.0.0  http://maven.apache.org/maven-v4_0_0.xsd ” >

< modelVersion > 4.0.0 </ modelVersion >

< groupId > cn.yuqing </ groupId >

< artifactId > demo3 </ artifactId >

< packaging > war</ packaging >

< version > 0.0.1-SNAPSHOT </ version >

< name > drimgs Maven Webapp </ name >

< url > http://maven.apache.org </ url >

< dependencies >

<! - 1,junit  - >

< dependency >

< groupId > junit </ groupId >

< artifactId > junit </ artifactId >

< version > 4.12 </ version >

</ dependency >

<! - 2,javaee  - >

< dependency >

< groupId > javax </ groupId >

< artifactId > javaee -web- api </ artifactId >

< version > 7.0 </ version >

</ dependency >

<! - 3,mysql  - >

< dependency >

< groupId > mysql </ groupId >

< artifactId > mysql -connector-java </ artifactId >

< version > 5.1.45 </ version >

</ dependency >

<! - 4,jstl  - >

< dependency >

< groupId > javax.servlet </ groupId >

< artifactId > jstl </ artifactId >

< version > 1.2 </ version >

</ dependency >

<! - 5,log4j - >

< dependency >

< groupId > log4j </ groupId >

< artifactId > log4j </ artifactId >

< version > 1.2.17 </ version >

</ dependency >

</ dependencies >

< build >

< finalName > drimgs </ finalName >

< plugins >

< plugin >

< groupId > org.apache.maven.plugins </ groupId >

< artifactId > maven-compiler-plugins </ artifactId >

< version > 3.0 </ version >

< configuration >

< source > 1.8 </ source >

< target > 1.8 </ target >

< encoding > utf-8 </ encoding >

</ configuration >

</ plugin >

</ plugins >

</ build >

</ project >4.2一个文件的设置目录下设置里面的xml
更新,然后项目的默认jre就是1.8了:
4.3一个 src底下 web.xml


没错,直接,复制粘贴,记得改项目名


内容如下:
<?xml version = “1.0” encoding = “UTF-8”?>

< web-app xmlns:xsi = “ http://www.w3.org/2001/XMLSchema-instance ”

xmlns = “ http://xmlns.jcp.org/xml/ns/javaee ”

xsi:schemaLocation = “ http://xmlns.jcp.org/xml/ns/javaee  http://xmlns.jcp.org/xml/ns/javaee /web-app_3_1.xsd”

id = “WebApp_ID” version = “3.1” >

< display-name > demo3 </ display-name >

< welcome-file-list >

< welcome-file > index.jsp </ welcome-file >

</ welcome-file-list >

</ web-app >
5 ,建立路径

选择默认的JRE,然后全部都是确定,到主界面

就有了存放项目的文件夹

最后一步,嗯,就是更新一下项目,把配置的东西都应用进去
文件完成,然后放置你要的文件和资源了
