环境说明
| 系统 | IP | 服务 |
|---|---|---|
| redhat7 | 192.168.225.128 | nginx |
| redhat7 | 192.168.225.129 | tomcat |
| redhat7 | 192.168.225.130 | mysql |
lnmt部署流程
- 在192.168.225.128上安装nginx
//创建系统用户nginx
[root@hxdserver ~]# groupadd -r nginx
[root@hxdserver ~]# useradd -r -M -s /sbin/nologin nginx -g nginx
//安装依赖环境
[root@hxdserver ~]# yum -y install pcre-devel openssl openssl-devel gd-devel gcc gcc-c++
[root@hxdserver ~]# yum -y groups install 'Development Tools'
//创建日志存放目录
[root@hxdserver ~]# mkdir -p /var/log/nginx
[root@hxdserver ~]# chown -R nginx.nginx /var/log/nginx/
//下载nginx
[root@hxdserver ~]# cd /usr/src/
[root@hxdserver src]# wget http://nginx.org/download/nginx-1.14.0.tar.gz --2018-08-20 11:19:09-- http://nginx.org/download/nginx-1.14.0.tar.gz
[root@hxdserver src]# ls
debug kernels nginx-1.14.0.tar.gz
//编译安装
[root@hxdserver src]# tar xf nginx-1.14.0.tar.gz
[root@hxdserver nginx-1.14.0]# cd nginx-1.14.0/
[root@hxdserver nginx-1.14.0]# ./configure --prefix=/usr/local/nginx --user=nginx --group=nginx --with-debug --with-http_ssl_module --with-http_realip_module --with-http_image_filter_module --with-http_gunzip_module --with-http_gzip_static_module --with-http_stub_status_module --http-log-path=/var/log/nginx/access.log --error-log-path=/var/log/nginx/error.log
[root@hxdserver nginx-1.14.0]# make && make install
//nginx安装后配置
//设置环境变量
[root@hxdserver ~]# echo 'export PATH=/usr/local/nginx/sbin:$PATH' > /etc/profile.d/nginx.sh
[root@hxdserver ~]# . /etc/profile.d/nginx.sh
//启动nginx
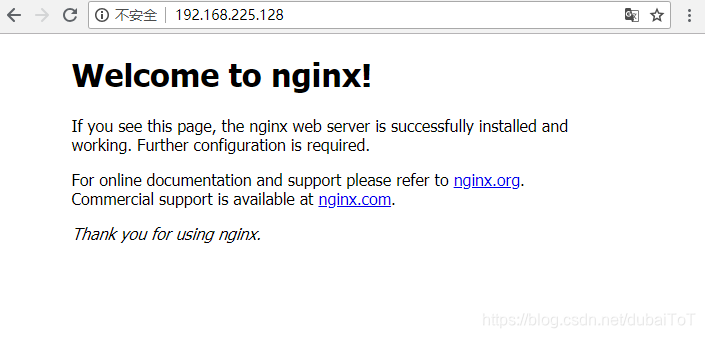
[root@hxdserver ~]# nginx
[root@hxdserver ~]# ss -antl
State Recv-Q Send-Q Local Address:Port Peer Address:Port
LISTEN 0 128 *:80 *:*
LISTEN 0 128 *:22 *:*
LISTEN 0 100 127.0.0.1:25 *:*
LISTEN 0 128 :::22 :::*
LISTEN 0 100 ::1:25 :::*
//关闭防火墙
[root@hxdserver ~]# systemctl stop firewalld.service
//关闭selinux
[root@hxdserver ~]# setenforce 0
在浏览器中输入nginx的ip进行访问
- 192.168.225.130
//下载二进制格式的mysql软件包
[root@hxdserver local]# ls
apache    bin    include  libexec                                     share
apr       etc    lib      mysql-5.7.23-linux-glibc2.12-x86_64.tar.gz  src
apr-util  games  lib64    sbin

[root@hxdserver local]# tar xf mysql-5.7.23-linux-glibc2.12-x86_64.tar.gz
[root@hxdserver local]# ln -sv mysql-5.7.23-linux-glibc2.12-x86_64/ mysql
"mysql" -> "mysql-5.7.23-linux-glibc2.12-x86_64/"

//修改目录/usr/local/mysql的属主属组
[root@hxdserver local]# chown -R mysql.mysql /usr/local/mysql
[root@hxdserver local]# ll /usr/local/mysql -d
lrwxrwxrwx. 1 mysql mysql 36 9月  27 10:28 /usr/local/mysql -> mysql-5.7.23-linux-glibc2.12-x86_64/

//添加环境变量
[root@hxdserver local]# cd
[root@hxdserver ~]# ls /usr/local/mysql
bin  COPYING  docs  include  lib  man  README  share  support-files
[root@hxdserver ~]# echo 'export PATH=/usr/local/mysql/bin:$PATH' > /etc/profile.d/mysql.sh
[root@hxdserver ~]# . /etc/profile.d/mysql.sh
[root@hxdserver ~]# echo $PATH
/usr/local/mysql/bin:/usr/local/apache/bin:/usr/local/sbin:/usr/local/bin:/usr/sbin:/usr/bin:/root/bin

//建立数据存放目录
[root@hxdserver ~]# mkdir /opt/data
[root@hxdserver ~]# chown -R mysql.mysql /opt/data/
[root@hxdserver ~]# ll /opt/
总用量 0
drwxr-xr-x. 2 mysql mysql 6 9月  27 10:36 data

//初始化数据库
[root@hxdserver ~]# /usr/local/mysql/bin/mysqld --initialize --user=mysql --datadir=/opt/data/
2018-10-18T10:06:27.093840Z 0 [Warning] TIMESTAMP with implicit DEFAULT value is deprecated. Please use --explicit_defaults_for_timestamp server option (see documentation for more details).
2018-10-18T10:06:27.742780Z 0 [Warning] InnoDB: New log files created, LSN=45790
2018-10-18T10:06:27.821871Z 0 [Warning] InnoDB: Creating foreign key constraint system tables.
2018-10-18T10:06:29.215545Z 0 [Warning] No existing UUID has been found, so we assume that this is the first time that this server has been started. Generating a new UUID: 7b2f63b5-d2bd-11e8-9110-000c294b7cb8.
2018-10-18T10:06:29.216758Z 0 [Warning] Gtid table is not ready to be used. Table 'mysql.gtid_executed' cannot be opened.
2018-10-18T10:06:29.580008Z 1 [Note] A temporary password is generated for root@localhost: ur1),jhW!Isp

//配置mysql
[root@hxdserver ~]# ln -sv /usr/local/mysql/include/ /usr/local/include/mysql
"/usr/local/include/mysql" -> "/usr/local/mysql/include/"
[root@hxdserver ~]# echo '/usr/local/mysql/lib' > /etc/ld.so.conf.d/mysql.conf
[root@hxdserver ~]# ldconfig -v
[root@hxdserver ~]# ldconfig -p |grep mysql
	libmysqlclient.so.20 (libc6,x86-64) => /usr/local/mysql/lib/libmysqlclient.so.20
	libmysqlclient.so.18 (libc6,x86-64) => /usr/lib64/mysql/libmysqlclient.so.18
	libmysqlclient.so (libc6,x86-64) => /usr/lib64/mysql/libmysqlclient.so
	libmysqlclient.so (libc6,x86-64) => /usr/local/mysql/lib/libmysqlclient.so

//生成配置文件
[root@hxdserver ~]# vim /etc/my.cnf
[root@hxdserver ~]# cat /etc/my.cnf
[mysqld]
basedir=/usr/local/mysql
datadir=/opt/data
socket=/tmp/mysql.sock
port=3306
pid-file=/opt/data/mysql.pid
user=mysql
skip-name-resolve

//配置服务启动脚本
[root@hxdserver ~]# cp -a /usr/local/mysql/support-files/mysql.server /etc/init.d/mysqld
[root@hxdserver ~]# sed -ri 's#^(basedir=).*#\1/usr/local/mysql#g' /etc/init.d/mysqld
[root@hxdserver ~]# sed -ri 's#^(datadir=).*#\1/opt/data/#g' /etc/init.d/mysqld

//启动mysql
[root@hxdserver ~]# service mysqld start
Starting MySQL.Logging to '/opt/data/hxdserver.err'.
 SUCCESS!
[root@hxdserver ~]# ps -ef |grep mysql
root      57089      1  0 11:09 pts/1    00:00:00 /bin/sh /usr/local/mysql/bin/mysqld_safe --datadir=/opt/data --pid-file=/opt/data/mysql.pid
mysql     57267  57089  3 11:09 pts/1    00:00:00 /usr/local/mysql/bin/mysqld --basedir=/usr/local/mysql --datadir=/opt/data --plugin-dir=/usr/local/mysql/lib/plugin --user=mysql --log-error=hxdserver.err --pid-file=/opt/data/mysql.pid --socket=/tmp/mysql.sock --port=3306
root      57297  12647  0 11:10 pts/1    00:00:00 grep --color=auto mysql
[root@hxdserver ~]# ss -antl
State      Recv-Q Send-Q Local Address:Port               Peer Address:Port
LISTEN     0      128              *:80                           *:*
LISTEN     0      128              *:22                           *:*
LISTEN     0      100      127.0.0.1:25                           *:*
LISTEN     0      128             :::22                          :::*
LISTEN     0      100            ::1:25                          :::*
LISTEN     0      80              :::3306                        :::*
//修改密码
//使用初始密码登录
[root@hxdserver ~]# mysql -uroot -p
Enter password:
Welcome to the MySQL monitor.  Commands end with ; or \g.
Your MySQL connection id is 2
Server version: 5.7.23

Copyright (c) 2000, 2018, Oracle and/or its affiliates. All rights reserved.

Oracle is a registered trademark of Oracle Corporation and/or its
affiliates. Other names may be trademarks of their respective
owners.

Type 'help;' or '\h' for help. Type '\c' to clear the current input statement.

mysql> set password = password('hxd123456.');
Query OK, 0 rows affected, 1 warning (0.00 sec)

mysql> exit
Bye
- 在192.168.225.129上安装Tomcat
安装依赖包
[root@localhost ~]# yum -y install java-1.8.0-openjdk-devel
//下载好Tomcat包
[root@localhost ~]# tar xf apache-tomcat-9.0.12.tar.gz
[root@localhost ~]# ln -s /root/apache-tomcat-9.0.12 /usr/local/tomcat
[root@localhost ~]# echo "export PATH=/usr/local/tomcat/bin/:$PATH" > /etc/profile.d/tomcat.sh
[root@localhost ~]# source /etc/profile.d/tomcat.sh
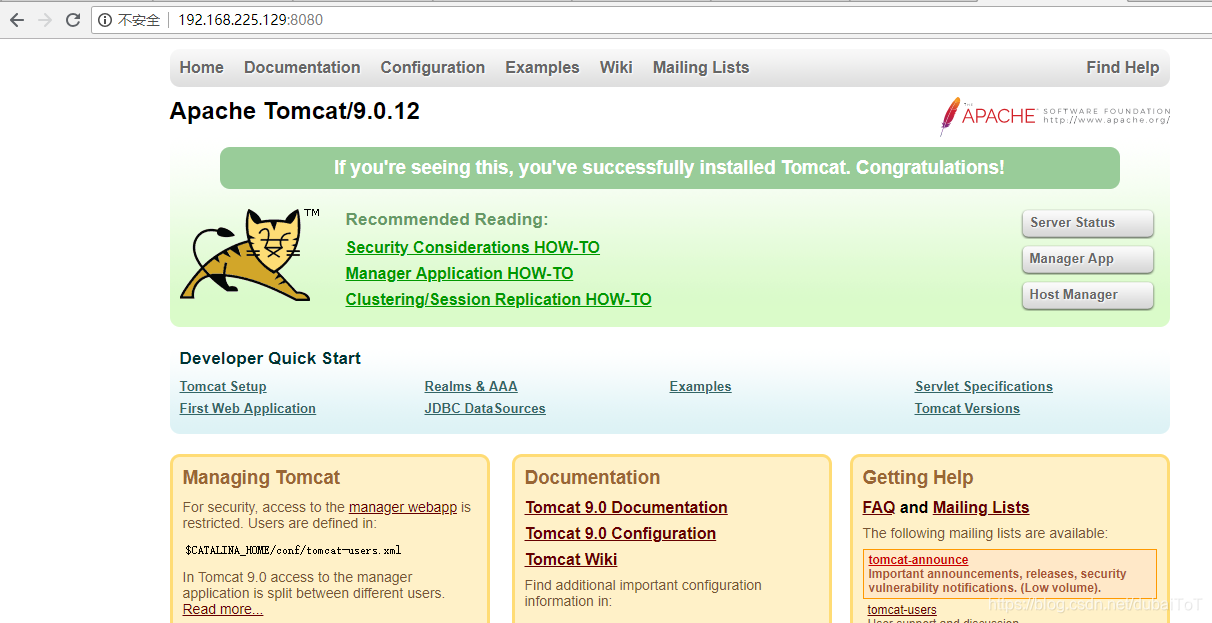
[root@localhost ~]# catalina.sh start
Using CATALINA_BASE: /usr/local/tomcat
Using CATALINA_HOME: /usr/local/tomcat
Using CATALINA_TMPDIR: /usr/local/tomcat/temp
Using JRE_HOME: /usr
Using CLASSPATH: /usr/local/tomcat/bin/bootstrap.jar:/usr/local/tomcat/bin/tomcat-juli.jar
Tomcat started.
在浏览器中访问装有tomcat的ip地址加8080端口
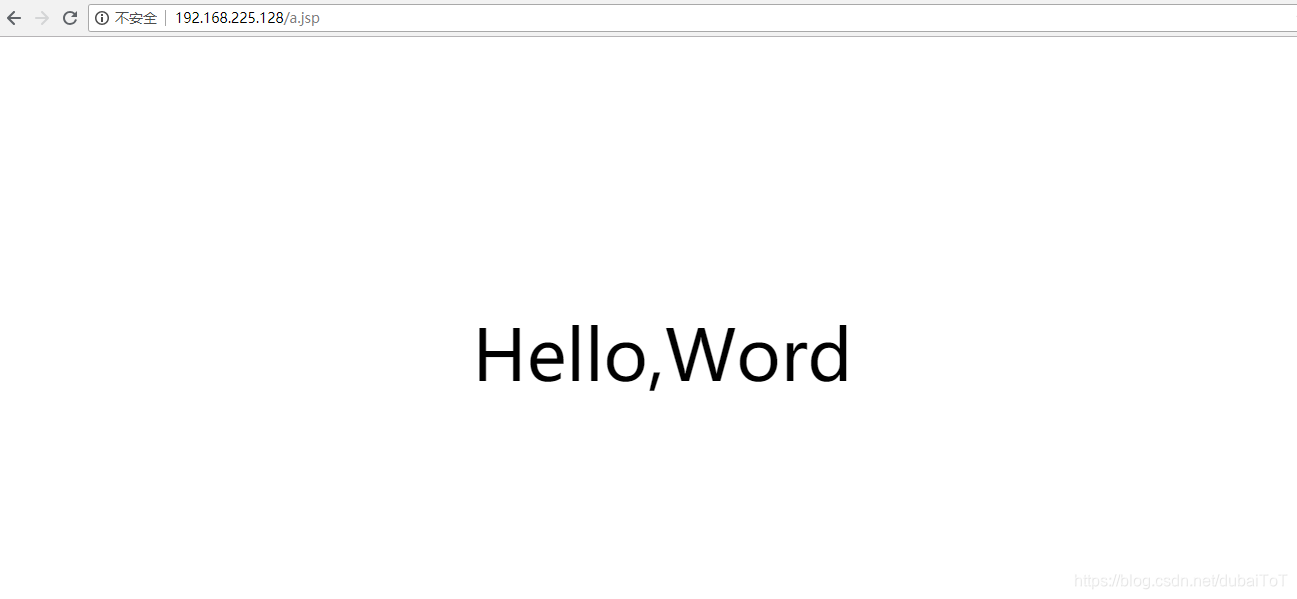
- 在192.168.225.128的nginx服务器上做代理
修改配置文件
[root@hxdserver ~]# vim /usr/local/nginx/conf/nginx.conf
http {
    upstream 192.168.225.129:8080{
    server 192.168.225.129:8080;
}
server {
		location / {
            root   html;
            index  index.html index.htm;
}
        location ~ /.*(\.jsp|\.do) {
         proxy_pass   http://192.168.225.129:8080;
    }
  }
}
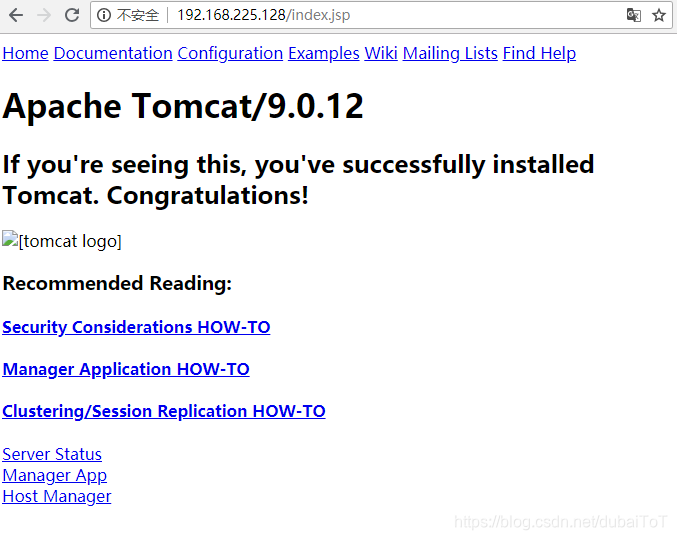
访问192.168.225.128/index.jsp
- 在192.168.225.129上写一个Java测试页面
[root@localhost ~]# cd /usr/local/tomcat/webapps/ROOT/
[root@localhost ROOT]# vim a.jsp
<html>
<head>
<meta http-equiv="Content-Type" content="text/html; charset=UTF-8">
<title>Insert title here</title>
<style type="text/css">
        #show{
                margin: auto;
                margin-left: 35%;
                margin-top: 20%;
                font-size: 70px;
        }
</style>
<script>
        window.onload=function(){
            var story = document.getElementById('word');
            var s = document.getElementById('show');
            var i = 0;
            timer=setInterval(function(){
                s.innerHTML=story.innerHTML.substring(0,i);
                i++;
                if(s.innerHTML==story.innerHTML){
                    clearInterval(timer);
                }
            },200);
        }
    </script>
</head>
<body>
        <p id="word" style="display:none;">Hello,World</p>
    <p id="show"></p>
</body>
</html>
在浏览器访问192.168.225.128/a.jsp