本章主要讲解自动装配的几种方式,接上一章依赖注入的方式以及装配属性:
https://blog.csdn.net/qq_34598667/article/details/83308071
自动装配之自动装配的几种方式
Spring 容器可以在不使用< constructor-arg >和< property > 元素的情况下自动装配相互协作的 bean 之间的关系,助于减少编写一个大的基于 Spring 的应用程序的 XML 配置的数量
使用< bean >元素的 autowire 属性为一个 bean 定义指定自动装配模式。
下面通过案例讲解一下autowire的几个值,代表自动装配的几种方式
案例准备:基于之前案例的实体类Person和Man
no
默认设置,没有自动装配
就不举例了
byName:由属性名自动装配
将它的属性与在配置文件中被定义为相同名称的 beans 的属性进行连接。
定义applicationContext.xml文件为:
 	 <!-- setter注入 -->
     <bean id="person" class="com.oak.entity.Person">
    		    <property name="age" value="18"/>
    		    <property name="name" value="二蛋"/>
   	 </bean>
   	 <!--byName 根据属性名自动装配 -->
     <bean id="man" class="com.oak.entity.Man" autowire="byName"></bean>
在test类中添加test05方法并测试:
	@Test
	public void test05(){
		ApplicationContext ctx = new ClassPathXmlApplicationContext("applicationContext.xml");
		Person person=ctx.getBean("person",Person.class);
		System.out.println(person);
		Man man=ctx.getBean("man",Man.class);
		System.out.println(man);
	}
查看控制台输出:
Person [name=二蛋, age=18]
Man [person=Person [name=二蛋, age=18]]
装配成功
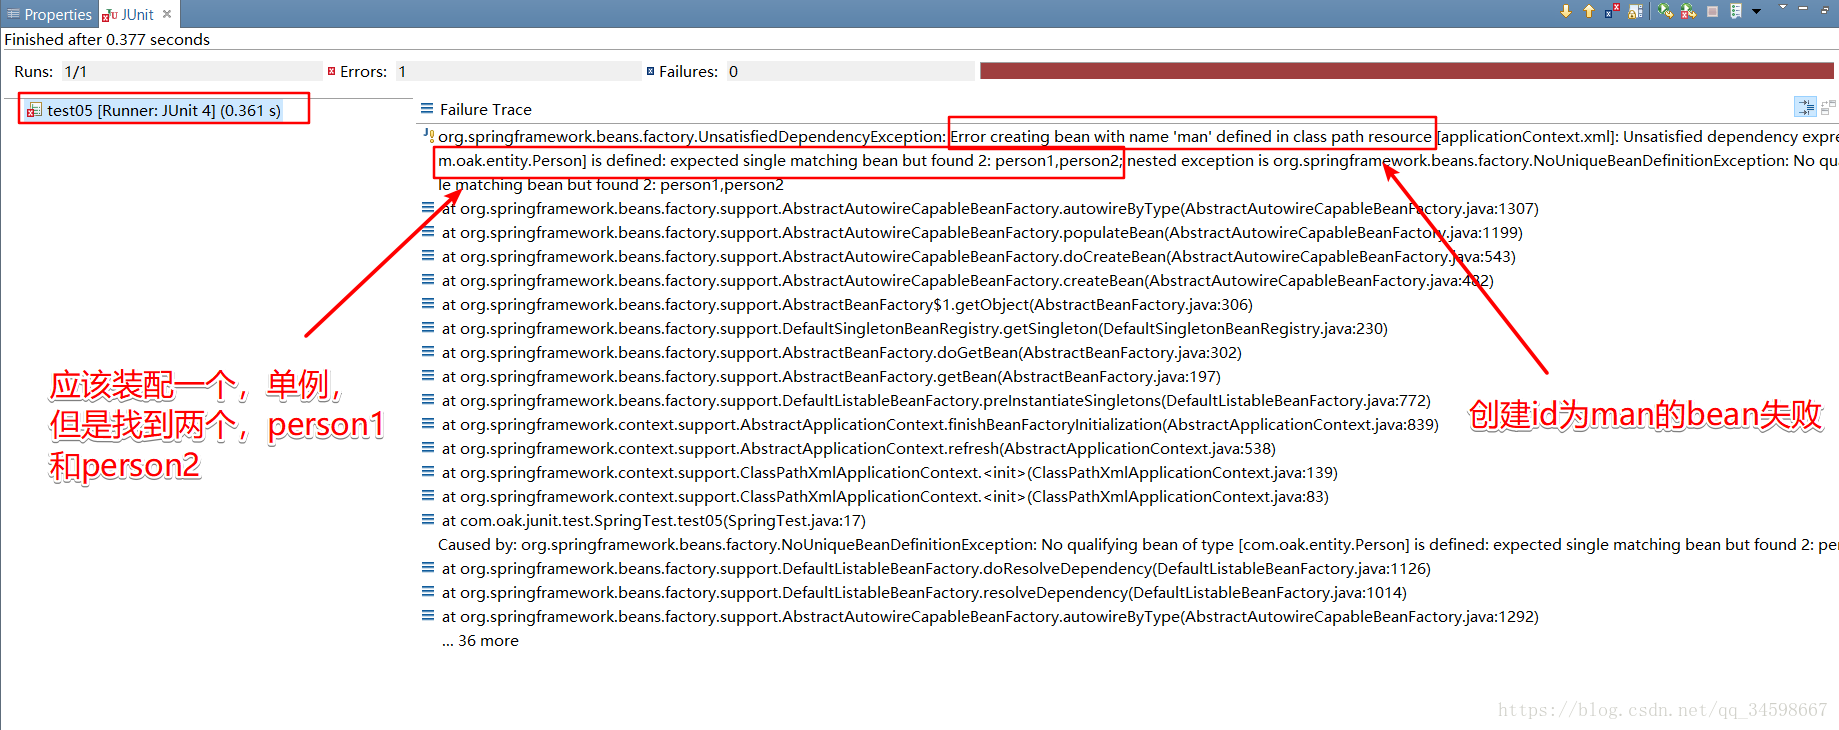
Man的属性person会自动找到id/name为person的bean,如果没有定义为person的bean则装配失败,例如,修改xml中bean为person的名称为person1:
 	 <!-- setter注入 -->
     <bean id="person1" class="com.oak.entity.Person">
    		    <property name="age" value="18"/>
    		    <property name="name" value="二蛋"/>
   	 </bean>
   	 <!--byName 根据属性名自动装配 -->
     <bean id="man" class="com.oak.entity.Man" autowire="byName"></bean>
修改测试test05得到id为person1的bean,控制台结果为
Person [name=二蛋, age=18]
Man [person=null]
自动装配失败
byType:由属性数据类型自动装配
它的类型匹配配置文件中的一个确切的 bean 名称,
直接修改配置文件中的装配类型为byType
   	 <!--byType 根据属性名自动装配 -->
     <bean id="man" class="com.oak.entity.Man" autowire="byType"></bean>
其他不用修改,直接测试test05方法:
控制台结果为:
Person [name=二蛋, age=18]
Man [person=Person [name=二蛋, age=18]]
就算找不到与属性名相同的bean也能装配成功,因为是根据属性类型查找的。
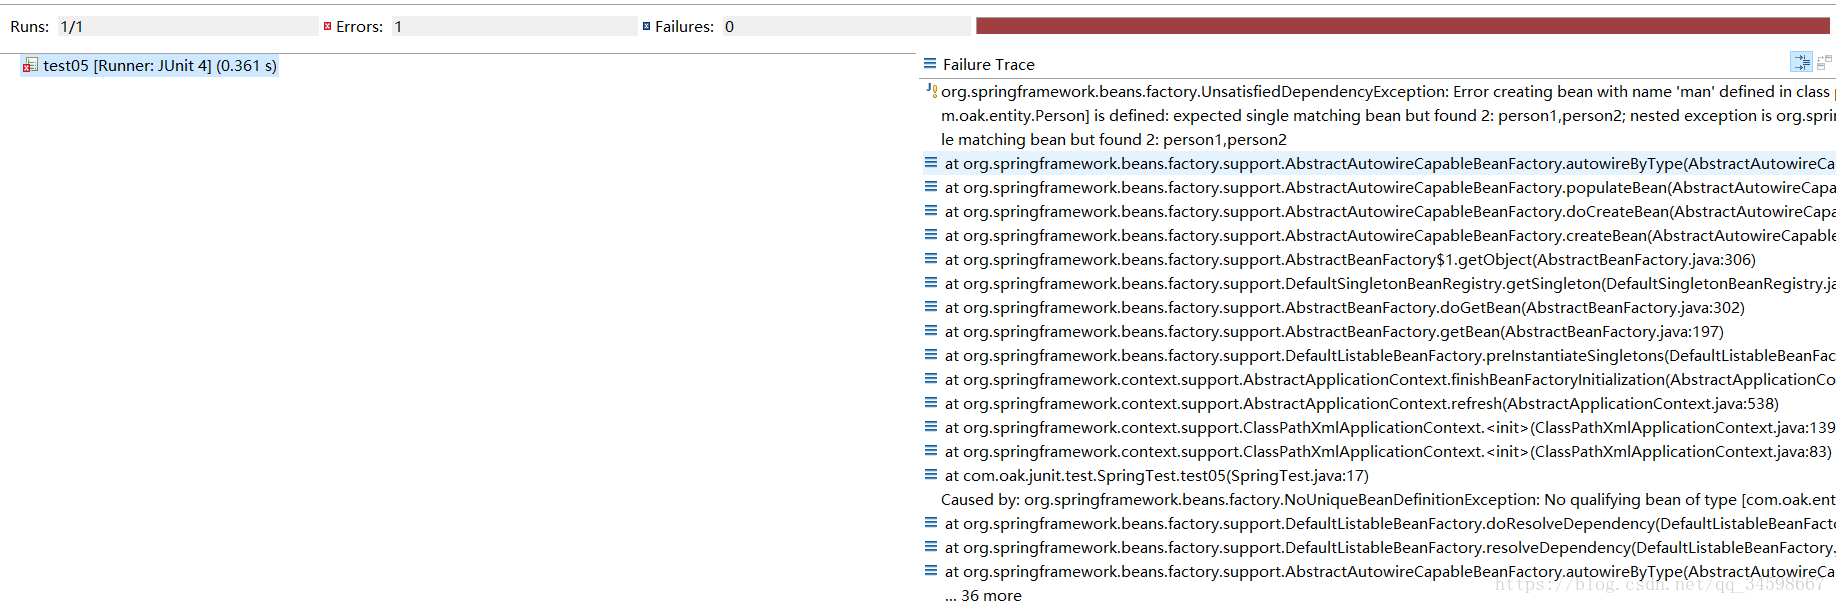
但是当出现多个同一属性的bean时会报异常,例如,修改xml文件如下:
  	<!-- setter注入 -->
     <bean id="person1" class="com.oak.entity.Person">
 		    <property name="age" value="18"/>
 		    <property name="name" value="二蛋"/>
   	 </bean>
   	  <!-- setter注入 -->
     <bean id="person2" class="com.oak.entity.Person">
 		    <property name="age" value="19"/>
 		    <property name="name" value="二狗"/>
   	 </bean>
     <bean id="man" class="com.oak.entity.Man" autowire="byType"></bean>
继续测试test05方法,Junit测试出异常
constructor:与byType类似,应用于构造函数
测试此方式时不要忘记在实体类中需要带有bean参数类型的构造方法
	public Man(Person person) {
		super();
		this.person = person;
	}
修改xml配置文件
   	<!-- setter注入 -->
     <bean id="person1" class="com.oak.entity.Person">
 		    <property name="age" value="18"/>
 		    <property name="name" value="二蛋"/>
   	 </bean>
     <bean id="man" class="com.oak.entity.Man" autowire="constructor">
     </bean>
测试test05方法,控制台结果为:
Person [name=二蛋, age=18]
Man [person=Person [name=二蛋, age=18]]
constructor自动装配具有和byType自动装配相同的局限性。当发现多个Bean匹配某个构造器的入参时,Spring不会尝试猜测哪一个Bean更适合自动装配,会装配失败。此外,如果一个类有多个构造器,它们都满足自动装配的条件时,Spring也不会尝试猜测哪一个构造器更适合使用。
autodetect
Spring首先尝试通过 constructor 使用自动装配来连接,如果它不执行,Spring 尝试通过 byType 来自动装配。
如果想要自动装配bean,但是又不能决定该使用哪一种类型的自动装配,那么可以设置autowire属性为autodetect,由spring 来决定
就不举例了~
下一章,基于注解的自动装配(组件扫描):