版权声明:本文为博主原创文章,未经博主允许不得转载。 https://blog.csdn.net/u011240016/article/details/83989259
Tensorflow的物体检测API是非常强大的工具,它可以使得没有机器学习背景的人都可以快速部署强大的图像识别,物体检测模型。但是,考虑到使用的指导文档不够丰富,具体如何使用成了很多人的门槛。
本篇包含以下几个部分的内容:
- 选择模型
- 适应当前数据集
- 创建并标注自己的数据集
- 修改模型配置文件
- 训练模型
- 存储模型
- 部署模型
如何安装
git clone https://github.com/tensorflow/models.git
拿到模型库,这里提供了很多很多好用的机器学习模型,但是我们现在只用其中的models/research/object_detection模型。
使用模型
在object_detection文件夹下,jupyter notebook,使用object_detection_tutorial.ipynb,这个notebook的内容就是一步一步带我们使用预训练模型进行物体检测。
这里把代码全部贴出来,供参考:
import numpy as np
import os
import six.moves.urllib as urllib
import sys
import tarfile
import tensorflow as tf
import zipfile

from distutils.version import StrictVersion
from collections import defaultdict
from io import StringIO
from matplotlib import pyplot as plt
from PIL import Image

# This is needed since the notebook is stored in the object_detection folder.
sys.path.append("..")
from object_detection.utils import ops as utils_ops

if StrictVersion(tf.__version__) < StrictVersion('1.9.0'):
  raise ImportError('Please upgrade your TensorFlow installation to v1.9.* or later!')
# 环境设置
%matplotlib inline # 这在jupyter内使用

# 导入物体检测需要的包,值得注意的是,这里我置换了刚刚下的protos文件夹,因为最新下的不全
from utils import label_map_util
from utils import visualization_utils as vis_util

# 模型准备
# What model to download.
MODEL_NAME = 'ssd_mobilenet_v1_coco_2017_11_17'
MODEL_FILE = MODEL_NAME + '.tar.gz'
DOWNLOAD_BASE = 'http://download.tensorflow.org/models/object_detection/'

# Path to frozen detection graph. This is the actual model that is used for the object detection.
PATH_TO_FROZEN_GRAPH = MODEL_NAME + '/frozen_inference_graph.pb'

# List of the strings that is used to add correct label for each box.
PATH_TO_LABELS = os.path.join('data', 'mscoco_label_map.pbtxt')

# 下载模型
opener = urllib.request.URLopener()
opener.retrieve(DOWNLOAD_BASE + MODEL_FILE, MODEL_FILE)
tar_file = tarfile.open(MODEL_FILE)
for file in tar_file.getmembers():
  file_name = os.path.basename(file.name)
  if 'frozen_inference_graph.pb' in file_name:
    tar_file.extract(file, os.getcwd())

# 将frozen的模型加载到内存
detection_graph = tf.Graph()
with detection_graph.as_default():
  od_graph_def = tf.GraphDef()
  with tf.gfile.GFile(PATH_TO_FROZEN_GRAPH, 'rb') as fid:
    serialized_graph = fid.read()
    od_graph_def.ParseFromString(serialized_graph)
    tf.import_graph_def(od_graph_def, name='')

# 加载标记字典,比如预测结果输出是5,我们可以知道对应的是airplane
category_index = label_map_util.create_category_index_from_labelmap(PATH_TO_LABELS, use_display_name=True)

# 辅助代码
def load_image_into_numpy_array(image):
  (im_width, im_height) = image.size
  return np.array(image.getdata()).reshape(
      (im_height, im_width, 3)).astype(np.uint8)
# 检测
# 为了简单只用两个图片,如果想修改,只需要将图片放到test_images文件夹即可
# image1.jpg
# image2.jpg
# If you want to test the code with your images, just add path to the images to the TEST_IMAGE_PATHS.
PATH_TO_TEST_IMAGES_DIR = 'test_images'
TEST_IMAGE_PATHS = [ os.path.join(PATH_TO_TEST_IMAGES_DIR, 'image{}.jpg'.format(i)) for i in range(1, 3) ]

# Size, in inches, of the output images.
IMAGE_SIZE = (12, 8)

def run_inference_for_single_image(image, graph):
  with graph.as_default():
    with tf.Session() as sess:
      # Get handles to input and output tensors
      ops = tf.get_default_graph().get_operations()
      all_tensor_names = {output.name for op in ops for output in op.outputs}
      tensor_dict = {}
      for key in [
          'num_detections', 'detection_boxes', 'detection_scores',
          'detection_classes', 'detection_masks'
      ]:
        tensor_name = key + ':0'
        if tensor_name in all_tensor_names:
          tensor_dict[key] = tf.get_default_graph().get_tensor_by_name(
              tensor_name)
      if 'detection_masks' in tensor_dict:
        # The following processing is only for single image
        detection_boxes = tf.squeeze(tensor_dict['detection_boxes'], [0])
        detection_masks = tf.squeeze(tensor_dict['detection_masks'], [0])
        # Reframe is required to translate mask from box coordinates to image coordinates and fit the image size.
        real_num_detection = tf.cast(tensor_dict['num_detections'][0], tf.int32)
        detection_boxes = tf.slice(detection_boxes, [0, 0], [real_num_detection, -1])
        detection_masks = tf.slice(detection_masks, [0, 0, 0], [real_num_detection, -1, -1])
        detection_masks_reframed = utils_ops.reframe_box_masks_to_image_masks(
            detection_masks, detection_boxes, image.shape[0], image.shape[1])
        detection_masks_reframed = tf.cast(
            tf.greater(detection_masks_reframed, 0.5), tf.uint8)
        # Follow the convention by adding back the batch dimension
        tensor_dict['detection_masks'] = tf.expand_dims(
            detection_masks_reframed, 0)
      image_tensor = tf.get_default_graph().get_tensor_by_name('image_tensor:0')

      # Run inference
      output_dict = sess.run(tensor_dict,
                             feed_dict={image_tensor: np.expand_dims(image, 0)})

      # all outputs are float32 numpy arrays, so convert types as appropriate
      output_dict['num_detections'] = int(output_dict['num_detections'][0])
      output_dict['detection_classes'] = output_dict[
          'detection_classes'][0].astype(np.uint8)
      output_dict['detection_boxes'] = output_dict['detection_boxes'][0]
      output_dict['detection_scores'] = output_dict['detection_scores'][0]
      if 'detection_masks' in output_dict:
        output_dict['detection_masks'] = output_dict['detection_masks'][0]
  return output_dict
for image_path in TEST_IMAGE_PATHS:
  image = Image.open(image_path)
  # the array based representation of the image will be used later in order to prepare the
  # result image with boxes and labels on it.
  image_np = load_image_into_numpy_array(image)
  # Expand dimensions since the model expects images to have shape: [1, None, None, 3]
  image_np_expanded = np.expand_dims(image_np, axis=0)
  # Actual detection.
  output_dict = run_inference_for_single_image(image_np, detection_graph)
  # Visualization of the results of a detection.
  vis_util.visualize_boxes_and_labels_on_image_array(
      image_np,
      output_dict['detection_boxes'],
      output_dict['detection_classes'],
      output_dict['detection_scores'],
      category_index,
      instance_masks=output_dict.get('detection_masks'),
      use_normalized_coordinates=True,
      line_thickness=8)
  plt.figure(figsize=IMAGE_SIZE)
  plt.imshow(image_np)
其中,设定自己想要检测的图片,只需要修改:
PATH_TO_TEST_IMAGES_DIR = 'test_images'
TEST_IMAGE_PATHS = [ os.path.join(PATH_TO_TEST_IMAGES_DIR, 'image{}.jpg'.format(i)) for i in range(1, 3) ]
将图片放置在test_images文件夹下,并按照命名格式,重新定义读取图片名字的方式。
总体看,需要修改的地方只有两处:
- 指定模型
- 指定检测图片路径
选择模型
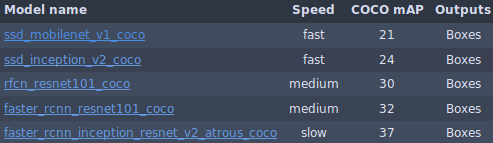
想对模型有更深入的了解,可以去这里阅读相关材料。
在object_detection文件夹下的g3doc文件夹内,有一些好用的.md文档,值得仔细阅读一番。
END.
参考:
https://ai.googleblog.com/2017/06/supercharge-your-computer-vision-models.html
https://github.com/tensorflow/models/tree/master/research/object_detection