In this lab, the advantages of using an embedded operating system are studied. An introductory on Linux kernel architecture is given with details on the different components of an embedded Linux operating system (Study Case : PetaLinux). The Linux system is configured, built, and booted on the Zedboard to target the ARM Cortex-A9 using SD card. Regular Linux commands and demo Linux applications are tested on board. The toolchains (configuration tools , BSPs, compilers ,assemblers ,linker, debuggers, and emulators ) are also discussed in this lab.

Lab10 Design Flow

Lab10 Block Diagram
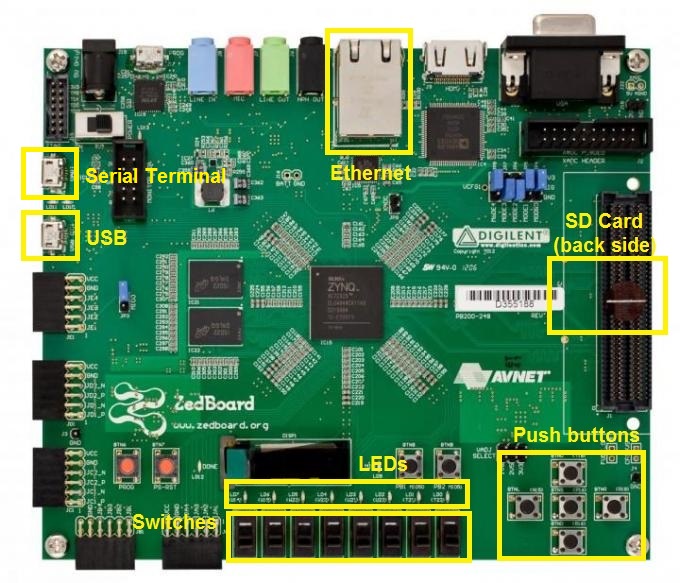
Lab10 Board Interface
The process of cross-compiling (compiler runs on a host, not on a target) a Linux kernel is considered a delicate task. Any missing dependent library or wrong environment variable would lead to failure in compilation, therefore, all steps needed to prepare the host development machine are elaborated. The development host machine here is a 64-bit workstation running Ubuntu-14.04. It is used to cross-compile, and build the Linux image(PetaLinux) to be downloaded on the Zedboard(target).
There are several options to choose from regarding Linux kernels for Zynq chips. For instance: Open Source Linux “OSL” , Yocto, Arch Linux , and PetaLinux . The one of choice for this lab is the PetaLinux. Why PetaLinux? PetaLinux is well-documented, thoroughly tested, moreover, Xilinx excessively provides tools for a turn-key development and deployment. It is currently available to users with no charge. One last factor, it has good community support.
The hardware setup for this lab is configured using a reference BSP (Covered in depth in later sections) of Zedboard by Avnet. Some of the hardware components enabled in the PS (Shown in lab10 block diagram )are optional (such as the USB). The minimum hardware components requirements for a Zynq system to run PetaLinux are:
- External memory (>32MB).
- Interrupt controller.
- Triple timer count (TTC).
- Shell access(UART or Ethernet).
Background Information
A-Operating Systems
In general, Operating Systems(OS’s) are used to enable multiple applications to run simultaneously on a processing platform in a safe and efficient manner. In addition to support multiple applications ( aka : multitasking ) they provide fundamental abstracted services such as file system, virtual memory, networking, hardware devices support, interrupter handling. An OS enables extremely high-level of abstraction that can save designers a lot of time dealing with the low-level complexities of hardware.

Operating Systems Abstraction
Operating systems hide the complexities of hardware and provide a standard interface(APIs) for applications to interact with the hardware regardless of the hardware type (X86, ARM, PowerPC, MicroBlaze,…etc.) making applications easily portable to different platforms( Example: an application developed for a desktop running Linux could be used on an embedded system running Linux with marginal modifications). Well-known operating systems are Linux, Android, Windows, Mac OS X.
B-Embedded Operating Systems
Embedded operating systems are operating systems designed to run on platforms with limited hardware resources ( small memory, low power, limited computational capabilities, etc..) , however, they share the same key features of regular operating systems such as offering fundamental serveries and high level of portability and abstraction.
When do we need to use an embedded operating system? The answer to this question is directly related to the requirements of the embedded system under development. Generally speaking, an embedded operating system is adopted if the embedded system to be designed is dealing with high level of complexity and/or if multitasking, networking, portability or scalability is of importance in the design. Below are some examples of requirements that are best addressed by using an embedded operating system.
1.Multiple applications are required to run on the embedded system simultaneously.
2.The embedded system must have network and file system capabilities.
3.Standard tools must be used in the development process of the embedded system.
4.Applications can be easily emulated on regular desktop machines and easily ported to the embedded system.
5.The embedded system must be scalable(accommodates a future increase in complexity).
All the above examples are scenarios were using an embedded operating system might be very handy. Keep in mind that does NOT mean that the above scenarios can not be tailored using a standalone system (aka: bare-metal system, no operation system ),it might be possible to use a standalone system , however, the complexity would be massive. Making the development time(hence the time to market) enormously large and probably practically infeasible. There are many types of embedded operating systems. The one selected for this lab is PetaLinux.
C-PetaLinux
PetaLinux is a Linux embedded operating system which includes a Linux kernel,as well as a complete configuration, build, emulate and deploy tools for Xilinx devices(Zynq SoC, MicroBlaze soft microprocessor ). When compared with other Linux embedded operating system targeting Xilinx devices (Open Source Linux (OSL) ,Yocto ,…etc.) one can easily tell that it is more stable and thoroughly tested and documented. This is why its currently the most recommenced embedded OS by Xilinx for its devices. It’s crucial to understand from now the different resources that comes with PetaLinux package(aka: SDK : Software Development Kit) which are:
1.Linux kernel.
2.Demo applications.
3.Configuration tools.
4.Board support packages.
Each of these component is covered in details in the next paragraphs.
PetaLinux System Anatomy
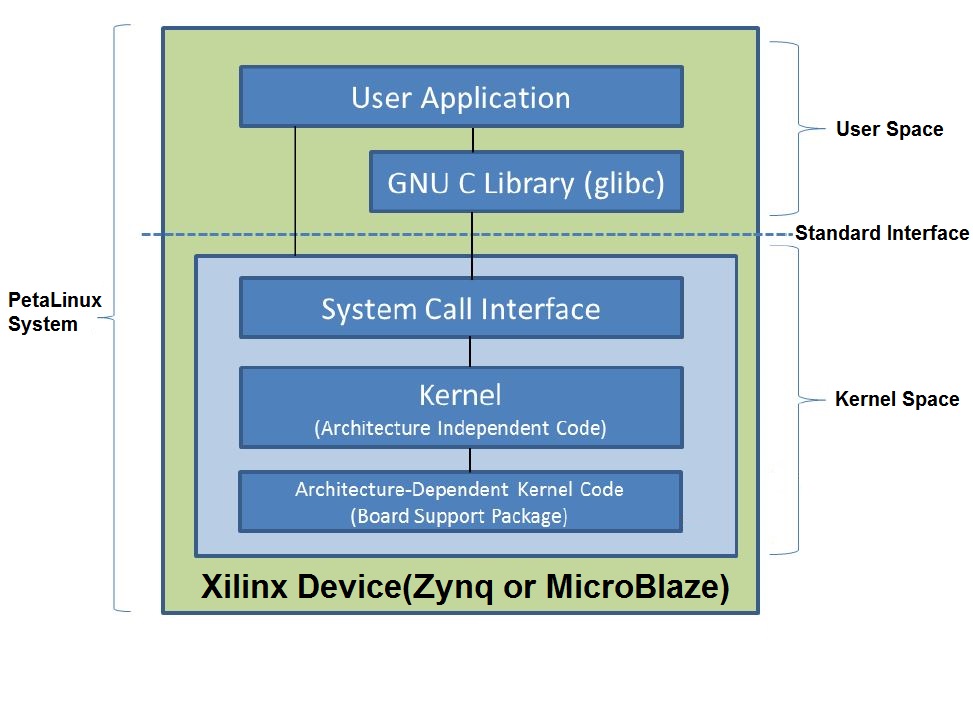
1.Kernel : The primary core component of a Linux OS is the kernel. It is where the core functionality of the OS is implemented. The Linux kernel is a monolithic modular kernel. Monolithic means that the entire OS is implemented in the privileged mode (aka: supervisor space, kernel space) and have full access to hardware. On the other hand, user applications are in user space( aka: user mode,restricted mode) where the one and only channel allowed to access the hardware is through the System Call Interface(SCI) of the OS. These spaces(user space and kernel space) are actually regions in the main memory. The separation of user code from the OS code leads to a safer and more stable system. The Linux kernel is modular in the sense that different tasks are delegated to different distinguished entities (components). These components are outlined in the figure below and explained in the next paragraphs.

PetaLinux Kernel Components
I.System Call Interface : Interface APIs ( Application Programming Interface) between user space and kernel space. Both standard C libraries and user applications have access to the OS through its system calls. System calls reflected the services offered by the OS. This is the only channel available for user applications to hardware. There is no other way around the OS to access the hardware in a monolithic Linux System.
II.Process Management : It is the unit responsible for the multi-tasking feature of the OS. User applications in Linux terminology are referred to as processes. This component manages the different processes and make sure that each process is taking its share of the CPU without locking the system. It continuously swaps in and out processes giving us the impression that they are all running simultaneously.
III.Memory Management : Manages both physical and virtual memory and provides larger virtual address space, fair physical memory allocation and protection. Virtual memory makes the system appear to have more memory than it actually has by sharing it between competing processes as they need it.
IV.Virtual File System : Deals with the low-level files APIs and disk IOs and provides a more flexible and user friendly file system.
V.Network Stack : Enables applications to access networks and the internet. An application issues network communication requests through the system call interface, the network stack receives the requests and do the necessary to communicate to the device driver of the network device available on the system (Ethernet controller, WiFi, etc… ). Common communications protocols are supported by the network stack such as TCP/IP and UDP.
VI.Device Drivers : device drivers for all Xilinx IP cores and generic drivers for standard peripherals such as keyboards , mouse devices , USB storage devices, etc..
VII.Architecture-dependent code : Actual OS-Hardware interaction and assembly translation happens here. This part of the kernel is hardware-specific (differs from the Zynq platform to other platforms ). The reason behind that is due to distinct difference in hardware layouts of different embedded systems and the difference in instruction sets for different processors (for example assembly translation of a certain C code to ARM instruction set is different than assembly translation to MicroBlaze instruction set).
2.Demo Applications : The PetaLinux package comes with five demo applications that can be easily integrated in the system and used as testbenches or templates. These application are: fwupgrade, gpio-demo, latencystat, peekpoke, and uWeb.

Demo Applications in PetaLinux Package(menuconfig rootfs)
The gpio-demo is used in this lab to communicate with the switches, LEDs and push buttons on Zedboard through PetaLinux shell. However, other demo applications and user applications development are covered in adequate depth in future labs.
3.Configuration tools : User friendly command line tools to customize and configure the following : boot loader(responsible for loading the kernel on power-on), Linux kernel, file system, libraries, applications and overall system parameters. These configuration tools are fully aware of Xilinx development tools(Vivado,SDK,….) and custom-hardware-specific data files so that, for example, device drivers for Xilinx embedded IP cores added in a design will be automatically built. These tools can be invoked using the command line once PetaLinux package is downloaded and installed on the development workstation. These tools are summarized by the table below:

PetaLinux Configuration Tools
Also part of the configuration tools is the QEMU system emulation environment which is used to emulate the ARM Cortex-A9 MPcore system on a host development workstation. QEMU(short for Quick Emulator) is a generic open-source machine emulator integrated into the PetaLinux configuration tools. The generated PetaLinux image can be tested and debugged on the host workstation using QEMU(petalinux -boot –qemu). QEMU (emulators in general) can significantly reduce the test and development time for a certain embedded system design as it cuts down the cross-platform compile/test/debug long cycle. More on usages of these configuration tools are covered in the Procedures section along with actual examples.
4.Board Support Packages : PetaLinux BSPs are reference designs that you may use to get up and going quickly when you want to target a specific development board (Currently officially supported boards by Xilinx -September 2015 are: Zedboard, AC701, KC705, ZC702, ZC706 ) . In addition, these designs can be used as a basis for creating your own projects. PetaLinux BSPs are provided in the form of installable BSP files and include all necessary design and configuration files required to get started. Hardware design (Vivado project) and software design (SDK project) are included in the BSP package and ready to be modified to tailor your design demands. BSPs allows fast integration of the Linux system. This allows embedded systems engineers to focus on their value-added applications rather than low level configuration tasks. Xilinx and 3rd party manufacturers of development boards provide BSPs. They can be found in the Download page of Xilinx website. The BSP for the Zedboard is used in this lab.
Objectives
1.Identify the situations where using an embedded operating system is necessary.
2.Understand the services offered by an embedded operating system, and the level of abstraction and portability it provides.
3.Get familiarized with the Linux kernel architecture, the different components inside it and their tasks.
4.Prepare a host development workstation for the cross-compilation process of a Linux kernel targeting the ARM Cortex-A9 on Zedboard.
5.Understand PetaLinux configuration tools which can be used to configure the system, Linux kernel, root filesystem, device tree, and create user application and loadable modules.
6.Use the Board Support Package(BSP) for Zedboard (that comes with a complete hardware design, Linux kernel, file system, device drivers and system configurations) as a template to build on top of it.
7.Compile, build ,download,boot and test the PetaLinux image on Zedboard.
8.Run some basic Linux commands and test demo Linux applications on Zedboard.
Procedures ( Host Workstation : 64-bit running Ubuntu 14.04)
A-Download PetaLinux Installer and Zedboard BSP
1.Download both PetaLinux installer and Zedboard PetaLinux BSP from Xilinx website here . You should be a registered member at Xilinx to be able to download the files.

Download PetaLinux Installer and Zedboard BSP
The download process takes some time depending on the speed of your internet connection. After the download is complete the two files should be located in your Downloads folder.

PetaLinux and BSP download complete
2.Create a folder in your (/opt) directory. (/opt) directory is the conventional location in Linux to store additional (and hence the name optional)applications and packages. Name the folder embeddedcentric . This folder will contain all PetaLinux configuration tools, BSP ,the kernel source code and the generated PetaLinux image for Zedboard. You can use any method you are familiar with to create a new folder in Linux or run the following script in the shell(You can open the shell by pressing Ctrl+Alt+T). You need to be root (administrator) to create folders in /opt directory. If you are not already logged in as root, the shell asks you for your root password in order to proceed with this command(You can copy and past commands using Ctrl+C (to copy from your browser )and Ctrl+Shift+V(to paste in the shell- notice that you must use the shift key in the key combination when in the shell )).
sudo mkdir /opt/embeddedcentric

Create folder embeddedcentric in /opt directory
3.Copy petalinux-v2015.2.1-final-installer.run and Avnet-Digilent-ZedBoard-v2015.2.1-final.bsp into (/opt/embeddedcentric). Again you can use any method you are familiar with to copy files in Linux or use the script below. Similarly, the shell is expected to ask you about the root password if you are not already logged in as root.
sudo cp /home/$USER/Downloads/{Avnet-Digilent-ZedBoard-v2015.2.1-final.bsp,petalinux-v2015.2.1-final-installer.run} /opt/embeddedcentric/

Copy files to opt/embeddedcentric
Copying will take some to finish.
B-Prepare host workstation for the cross-compilation of PetaLinux
1.Download and install the newest versions of all packages currently installed on the workstation from the ubuntu.com. This is done by issuing the following command in shell.
sudo apt-get update

Install the newest versions of all packages currently installed on workstation
The download and install process might take some time. Do not stop it.
2.Download and install all necessary(prerequisite) libraries. PetaLinux requires a number of standard development tools and libraries to be installed on your host workstation. The PetaLinux installation process checks for these tools and libraries, and reports an error if any are missing. However, it does not attempt to install them. You must do this manually. For a 64-bit Linux host, you must install the appropriate 32-bit compatible libraries. The following libraries are all required: tofrodos iproute tftpd-hpa gawk gcc git-core make net-tools libncurses5-dev zlib1g-dev libssl-dev flex bison lib32z1 lib32ncurses5 lib32bz2-1.0 lib32stdc++6 libselinux1 . Run the following shell command to download the necessary libraries, some of them might be already installed on your workstation but that’s totally OK as the shell will simply not install the ones already installed.
sudo apt-get install tofrodos iproute tftpd-hpa gawk gcc git-core make net-tools libncurses5-dev zlib1g-dev libssl-dev flex bison lib32z1 lib32ncurses5 lib32bz2-1.0 lib32stdc++6 libselinux1

Install prerequisite libraries and tools on host workstation
A command line message appears asking you to confirm the installation of the libraries and tools. Type y and press enter.

Confirm Installation of libraries
The download and install process takes some time. On a successful download and install, you should get a similar output to the one below.

Successful installation of libraries on the host workstation
By this you have installed all libraries and tools (packages) needed for PetaLinux cross-compilation on the host workstation.
3.Change default shell of the host workstation to bash. Ubuntu default shell is dash (Starts with the letter ‘d’). On the other hand, PetaLinux tools are mostly configured on bash (Starts with the letter ‘b’). Therefore it is better to change the shell to bash to avoid unnecessary errors. In order to do that issue the following command.
sudo dpkg-reconfigure dash

Change default shell to bash
In the next window make sure to select NO , and then hit enter.

Select No in the configure dash window
Now the default shell is bash. With this modification, the host workstation is ready for the cross-compilation of PetaLinux.
4.Download and configure GtkTerm serial port terminal. GtkTerm application is used on the host workstation as a terminal for Zedboard. Through this serial terminal we will have access to PetaLinux shell running on the ARM Cortex-A9 and run commands and applications on the Zedboard as needed. GtkTerm is our window to Zedboard once Petalinux kernel is up and running.
Issue the following command and enter your root password to download GtkTerm:
sudo apt-get install gtkterm
On a successful installation, you should end up with the a similar output as shown in the figure below.

Successful GtkTerm Serial Port Terminal installation
Launch GtkTerm by typing gtkterm in the command line. This step is needed to create a configuration file for the application. A configuration file is automatically created on the first launch of GtkTerm.
gtkterm
Two messages appear, first message saying that .gtktermrc configuration file was created and second message saying cannot open /dev/ttyS0 . Discard both messages and close Gtkterm.
Next step is to configure GtkTerm serial port settings to match the specifications of Zedboard. Keep in mind that for any Linux system, all sort of configurations (for the kernel, hardware, libraries, applications ,etc.. )are all saved in text files. To change settings(configurations) simply you need to modify the content of a configuration file. It’s a little bit unconventional process for people who are coming from a Microsoft Windows environment, however, this is how things are done in Linux.
With that being said, we will use the default text file editor in Ubuntu (gedit) to modify the content of the configuration file(.gtktermrc) for the GtkTerm application. Issue the following command.
gedit .gtktermrc
gedit is prompted with file .gtktermrc opened.

Open configuration file for GtkTerm
It is clear from the figure above that file .gtktermrc contains the configurations (settings ) for the serial port accessed by GtkTerm application. Leave all settings intact except the port and speed. Change speed to 115200 , and port to /dev/ttyACM0 to match the specifications of Zedboard, then click the Save button and close gedit. GtkTerm is configured correctly now to communicate with Zedboard.

Configure GtkTerm
C-Run PetaLinux Installer
Run PetaLinux Installer to extract source code of PetaLinux kernel and all its toolchain (including configuration tools, debugger, emulator,etc.. ). In shell change directory to /opt/embeddedcentric/ .
cd /opt/embeddedcentric/
Then type:
sudo chmod 777 petalinux-v2015.2.1-final-installer.run
The above command gives file petalinux-v2015.2.1-final-installer.run executable permissions. After that, type the following command to launch the installer :
sudo ./petalinux-v2015.2.1-final-installer.run
The installer might take some time to do integrity chcking and then it displays a message asking you to confirm the installation process. Type y and hit enter to proceed extracting in the current directory.

Launch PetaLinux Installer
The installer displays several messages regarding the terms of services and licenses. You need to press enter when the first message “Press Enter to display the license agreements” appears. The license document is open, read it if you wish, and press ‘q’ to exit the document and return to the installer. message “Do you accept Xilinx End User License Agreement? [y/N] > ” is displayed after. Type ‘y‘ and press enter. Webtalk terms and conditions document is displayed next. Press ‘q‘ to exit the document, then press ‘y‘ and hit enter when the “Do you accept Webtalk Terms and Conditions? [y/N] >” is displayed. Do the same procedures when message “Do you accept Third Party End User License Agreement? [y/N] >” is displayed. It takes some time for the installation to finish. On a successful installation, you should end up with a similar output as shown in the figure below.

Successful PetaLinux Package Installation
D-Setup PetaLinux working environment
This step is needed to setup the environment variables and search paths for PetaLinux tools. Bash script settings.sh can do this on your behalf.
Change directory to the location where the installer has extracted the files.
cd /opt/embeddedcentric/petalinux-v2015.2.1-final
Log in as a root by typing the following command and entering your root credentials.
sudo su
Make the file settings.sh executable by changing its permissions attributes using the chmod command.
chmod 777 ./settings.sh
Issue source command to execute the bash script settings.sh (IMPORTANT NOTE : THIS STEP HAS TO BE REPEATED ON EVERY DEVELOPMENT SESSION)
source ./settings.sh
On successful execution, you should get the output below.

Successful execution of script settings.sh
With this PetaLinux configuration tools are ready to use.
E-Create PetaLinux Project
petalinux-create tool is used in this lab to create a PetaLinux project. However, this tool can be used both to create a PetaLinux project ( -t project ) and to create various user components(apps , libraries, loadable kernel modules ,generics) within a specified PetaLinux project (-t COMPONENT). The following are some common parameters used with petalinux-create tool.

petalinux-create options
Make sure you are still logged in as root (# appears next to cursor), otherwise log in as root using sudo su.
1.Create a new folder named zedboard for PetaLinux project.
mkdir /opt/embeddedcentric/zedboard
2.Change directory to the newly created folder.
cd /opt/embeddedcentric/zedboard/
3.Create a new PetaLinux project that is based on the previously downloaded Zedboard Board Support Package(BSP) downloaded from Xilinx.com.
petalinux-create -t project -s /opt/embeddedcentric/Avnet-Digilent-ZedBoard-v2015.2.1-final.bsp
On successful execution, you should get the output below.

PetaLinux project based on Zedboard BSP
With this, a new Petalinux project targeting Zedboard is created in folder opt/embeddedcentric/zedboard .
Now, browse using Ubuntu Unity ( Equivalent to Windows Explorer for Microsoft Windows users) to the Petalinux project created using petalinux-create and Zedboard BSP and see what’s inside.

PetaLinux Project Directory
The content of these folders can be summarized by the table below.

PetaLinux Project Directory Structure -(Using BSP)
Without using the BSP, the next thing to do after creating PetaLinux project would be configuring the kernel using (petalinux-config -c kernel), however, since we are using a BSP, kernel configuration had already been made.
F-Configure root filesystem
In this step, configuration menu (menuconfig) of root filesystem is launched. menuconfig of root filesystem is used to configure different components of filesystem such as (shell, network stack, openssh, utility tools, loadable modules, libraries and applications). We will use it to include application gpio-demo, which is used to communicate with the switches, LEDs and push buttons on Zedboard.
1.Make sure you are still logged in as root (# symbol should appear next to cursor – otherwise log in as root using sudo su) and that petalinux tools are still sourced in the current session( you can verify that they are still sourced by typing echo $PETALINUX, you should obtain the output below – otherwise you need to re-source the tools as explained in Procedure D(Setup PetaLinux working environment).

Verify you have root access and PetaLinux tools are sourced in the session
2.Change directory to PetaLinux project directory(In case you are not already there).
cd /opt/embeddedcentric/zedboard/Avnet-Digilent-ZedBoard-2015.2/
3.Launch menuconfig of root filesystem by issuing the following command.
petalinux-config -c rootfs

Launch menuconfig of root filesystem
4.Use the down arrow key to navigate to Apps then hit enter. Use the key ‘y‘ to include application gpio-demo in the root filesystem. Use the right key to navigate to Save, Then hit enter three times to save the new configuration. Finally, select Exit to exit menuconfig and return to command line.

rootfs menuconfig – Navigate to Apps

rootfs menuconfig – Enable gpio-demo application

rootfs menuconfig -Confirm new configuration
G-Build PetaLinux Image
Since Linux kernel configuration were already taken care of by the BSP, we can directly proceed with building the PetaLinux image.
1.Browse to the PetaLinux project directory(In case you are not already there).
cd /opt/embeddedcentric/zedboard/Avnet-Digilent-ZedBoard-2015.2/
2.Run the petalinux-build command to start the cross-compilation process.
petalinux-build

Generate PetaLinux images using petalinux-build
The cross-compilation process will take some time. On a successful cross-compilation you should get an output similar to the one below.

Successful PetaLinux Cross-Compilation
The generated files are stored in folder /opt/embeddedcentric/zedboard/Avnet-Digilent-ZedBoard-2015.2/images/linux/

Generated PetaLinux files
The files represents the following :

Generated PetaLinux files descriptions
These files can be used to boot PetaLinux on Zesboard in different methods ( JTAG, Ethernet ,QSPI Flash , and SD Card). The method described next is for booting PetaLinux using SD card.
H-Generate deployment binary package (BOOT.BIN)
In this lab we will boot PetaLinux using the SD card. The bootable file that can be directly copied to the SD card is generated in this step. Configuration tool petalinux-package is used to combine the following three files (download.bit, zynq_fsbl.elf, u-boot.elf) into a single file named BOOT.BIN (deployment binary package). (IMPORTANT NOTE : PETALINUX-PACKAGE IS A WRAPPER AROUND THE BOOTGEN UTILITY PROVIDED WITH XILINX SDK. XILINX SDK MUST BE INSTALLED AND SOURCED BEFORE PROCEEDING WITH THIS STEP)
download.bit is the bitstream file for the PL-side of the chip.
zynq_fsbl.elf is the first stage boot loader (FSBL) for the PS-side of the chip, which is responsible for configuring the different components on the PS and also responsible for loading the u-boot.
u-boot.elf is the universal boot loader responsible for loading the Linux kernel image (image.ud). Issue the following command in PetaLinux project directory to generate the deployment binary package( BOOT.BIN) .
petalinux-package –boot –format BIN –force –fsbl /opt/embeddedcentric/zedboard/Avnet-Digilent-ZedBoard-2015.2/images/linux/zynq_fsbl.elf –fpga /opt/embeddedcentric/zedboard/Avnet-Digilent-ZedBoard-2015.2/images/linux/download.bit –uboot
NOTE: YOUR BROWSER MIGHT CONVERT THE DOUBLE MINUS SIGN TO ONE LONG DASH, YOU MAY NEED TO MANUALLY TYPE THIS SCRIPT AS SHOWN IN THE SNAPSHOT BELOW.

Generate BOOT.BIN (Deployment Binary Package)
On successful execution, file BOOT.BIN should be created in the PetaLinux project directory.

BOOT.BIN deployment package
I-Copy BOOT.BIN and Linux Kernel image (image.ud) to SD card
You need an appropriate SD card reader for this step ( In case your workstation does not have one built-in).

SD card reader
1.Copy Linux kernel image in u-boot format (image.ud) from /opt/embeddedcentric/zedboard/Avnet-Digilent-ZedBoard-2015.2/images/linux/ to SD card.

Copy image.ub
2.Copy deployment binary package (BOOT.BIN) from /opt/embeddedcentric/zedboard/Avnet-Digilent-ZedBoard-2015.2/ to SD card .

Copy BOOT.BIN
3.Eject SD card.

Eject SD card
Now the SD card is ready to be used for booting PetaLinux on Zedboard.
J-Setup Zedboard to boot from SD card
1.Setup the boot-up configuration mode of Zedboard to SD card. This is done by connecting jumpers JP9(MIO[4]) and JP10(MIO[5]) to logic high(3.3V) as shown in the figure below.
![Boot-up from SD card- Jumpers JP9 (MIO[4]) and JP10 (MIO[5]) are set to High.](https://embeddedcentric.files.wordpress.com/2015/08/bootup-jumpers-jp9-mio4-and-jp10-mio5-are-set-to-high1.jpg)
Boot-up from SD card- Jumpers JP9 (MIO[4]) and JP10 (MIO[5]) are set to High.
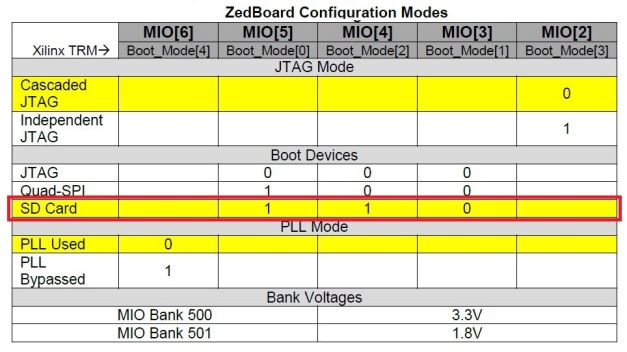
ZedBoard Configuration Modes
2.Insert the SD card containing the deployment binary package and Linux kernel image into Zedboard .

Insert SD Card
3.Connect a USB cable between your workstation and UART-USB connector of Zedboard.

Connect Serial Cable
4.Power on Zedboard.
K-Open GtkTerm serial port terminal
1.Change permission modes of device file associated with the serial port ttyACM0 to readable/writable by issuing the following command.
sudo chmod 666 /dev/ttyACM0

Make device file ttyACM0 readable/writable
2.Launch GtkTerm by typing gtkterm and hitting enter.

Launch GtkTerm
Make sure that the settings in the lower left corner match to the ones shown in the picture above, otherwise you need to configure GtkTerm to match Zedboard serial port specifications (read Procedure B4).
Now we have access to PetaLinux shell ! However , all we can see is black, that’s because we already have missed the booting sequence.
3.Press the PS-RST button to reboot PetaLinux and so that we can see the booting sequence.

PS-RST Button
Now PetaLinux boot screen should be displayed on GtkTerm

PetaLinux Reboot
Do NOT hit any key to let U-boot start booting the Linux kernel and load the different component of Linux system. A log in screen will appear, type in the following default credentials
Avnet-Digilent-ZedBoard-2015_2 login: root
Password: root

Enter root as username and password
With this we have logged into the shell of PetaLinux. From now on, this is the shell to use, you may close the host workstation shell. Keep in mind that Zedboard shell always has the title GtkTerm in the title bar.
L-Working with PetaLinux
The shell provides a powerful text-based interface to the Linux kernel of PetaLinux and all its services. The shell used on PetaLinux is the standard Bourne shell (sh). Regular Linux commands and scripts for Bourne shell can be used here.
For instance, issue the command top to provide an ongoing look at processor activity in real time. It displays a listing of the most CPU-intensive tasks on the system, and can provide an interactive interface for manipulating processes(applications, loadable modules, servcices). It can sort the tasks by CPU usage, memory usage and runtime.

top command running on PetaLinux
Press ‘q‘ to exit top command.
Regular Linux commands such as mkdir,cd, cat, grep, touch, ls,rm,…..etc. are all available at your convenience.
For instance , try command mkdir test_directory to create a new directory in the root folder. Then issue command ls to list the content of the current directory and see if the new directory actually got created.

Trying basic Linux commands on Zedboard(mkdir,ls)
Try more Linux commands. Change directory to the newly created folder using cdcommand. Then create two files(test1 , test2) inside test_directory using touch . Finally, list the content of the folder using ls

Trying basic Linux commands on Zedboard(cd,touch)
Utility applications, libraries, network stack are also all within your immediate access using the shell.
M-gpio-demo application
gpio-demo application is a command-line Linux application used to communicate with the switches, LEDs and push buttons on Zedboard. The eight switches, five push buttons and eight LEDs are giving the IDs below :

GPIO Devices IDs
To write to a GPIO, use the syntax below :

Value is passed in decimal format. For Instance, command gpio-demo -g 893 -o 3 will turn LED0 and LED1 ON . Because deciaml 3 in 8-bits binary is (00000011).
gpio-demo -g 893 -o 3
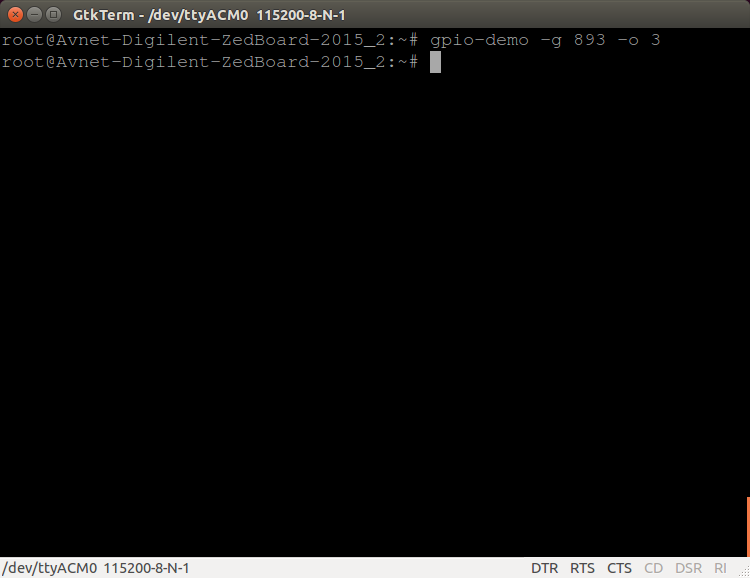
Turn LED0 and LED1 ON (Using gpio-demo)
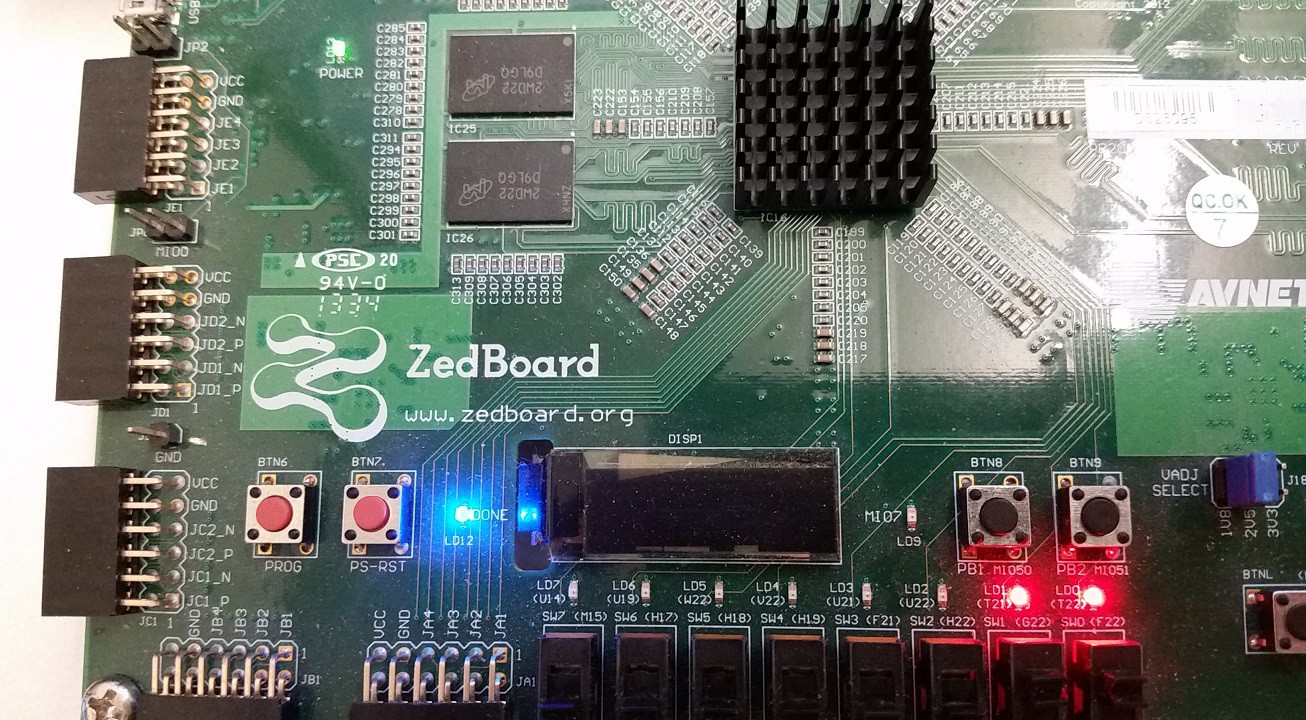
Turn LED0 and LED1 ON (Board View)


On the othe hand, to read from a GPIO, use the syntax below:

The returned value is in Hexadecimal notation.
For instance, suppose the eight switches are set as shown in the figure below.

SW0 and SW2 are set to High
Issuing command gpio-demo -i -g 885 will print the value 5 in hexadecimal (0x00000005) which is equivelent to the binary (00000101).
gpio-demo -i -g 885

Read switches status using gpio-demo
By this you have completed Lab10-Embedded Operating Systems.