1.多线程(下)
1.1单例设计模式:保证类在内存中只存在一个对象
************饿汉式与懒汉式的区别【面试题】
- 饿汉式单例模式:以空间换时间
- 懒汉式单例模式:以时间换空间(不推荐使用,仅在面试中用到)
3.多线程访问时:饿汉式不会创建多个对象;而懒汉式模式有可能会创建多个对象【弊端】
/* @author ZHENG
 *	饿汉式
*/
class Singleton{
	//1.私有构造方法,其他类不能访问该构造方法
	private Singleton(){

	}
	//2.创建本类对象(私有成员变量)
	private static Singleton s = new Singleton();
	//3.对外提供公共的访问方法
	public static Singleton getInstance(){
		return s;
	}
}
/**
 * @author ZHENG
 *	懒汉式:单例延迟加载模式
 */
class Singleton{
	//1.私有构造方法,其他类不能访问该构造方法
	private Singleton(){

	}
	//2.声明一个引用
	private static Singleton s;
	//3.对外提供公共的访问方法
	public static Singleton getInstance(){
		if(s==null){
			//线程1等待,线程2等待
			s=new Singleton();
		}
		return s;
	}
}
1.2第三种单例设计模式
非重点
class Singleton{
	//1.私有构造方法,其他类不能访问该构造方法
	private Singleton(){

	}
	//2.声明一个引用
	public final static Singleton s=new Singleton();

}
1.3多线程之RunTime类(了解)
public class demo2_Runtime {
	public static  void main(String[] args) throws IOException{
		Runtime r = Runtime.getRuntime();//获取运行时对象
		/*r.exec("shutdown -s -t 300");//设置电脑5分钟后关机
*/		r.exec("shutdown -a");
	}
}
1.4多线程之Timer类
Timer:一种计时器
TimerTask:创建一个计时器任务
t.schedule(安排的任务,new Date(当前年份-1900,月,日,时,分,秒),多长时间重复执行) //指定时间执行指定的任务
/**
 * @author ZHENG
 *	timer指定时间安排指定任务
 */
public class demo3_Timer {
	public static void main(String[] args) throws InterruptedException{
		Timer t = new Timer();
		//指定时间安排指定任务
		//t.schedule(安排的任务,new Date(当前年份-1900,月,日,时,分,秒),多长时间重复执行)
		//2018年11月3日
		t.schedule(new MyTimerTask(), new Date(118,10,3,19,39,10), 3000);
		while(true){
			Thread.sleep(1000);
			System.out.println(new Date());
		}
	}
}
class MyTimerTask extends TimerTask{
	@Override
	public void run() {
		System.out.println("起床了...");
	}
}
1.5多线程之线程之间的通信
-------wait方法:其他对象调用此对象的notify,导致当前线程等待
-------notify:两个线程间的通信:唤醒等待的单个线程
-------notifyAll:多个线程间的通信:唤醒所有线程
注意事项:1.在同步代码块中,用哪个对象锁,就用哪个对象调用wait方法;
2.sleep方法和wait方法区别?
—2.1.sleep必须传入时间参数,时间到了自动醒来;
wait既可以传入参数,也可以不传入参数,如果传入参数就是在参数时间结束后等待,若不传入参数就是直接等待;
—2.2.sleep方法在同步函数或同步代码块中,不释放锁;
wait方法在同步函数或者同步代码块中释放锁;
以下代码为两个线程之间的通信
同步代码块使用if判断
public class demo4_notify {
	/**
	 * @param args
	 *
	 * 等待唤醒机制
	 */
	public static void main(String[] args){
		final Print p = new Print();
		while(true){
			new Thread(){
				public void run(){
					try {
						p.print1();
					} catch (InterruptedException e) {
						e.printStackTrace();
					}
				}
			}.start();
			new Thread(){
				public void run(){
					try {
						p.print2();
					} catch (InterruptedException e) {
						e.printStackTrace();
					}
				}
			}.start();
		}
	}
}
class Print{
	private int flag = 1;
	public void print1() throws InterruptedException{
		//非静态代码块使用this
		synchronized (this) {
			if(flag != 1){
				this.wait();//当前线程等待
			}
			System.out.print("好");
			System.out.print("好");
			System.out.print("学");
			System.out.print("习");
			System.out.println();
			flag = 2;
			this.notify();//随机唤醒单个等待的线程
		}
	}
	public void print2() throws InterruptedException{
		//非静态代码块使用this
		synchronized (this) {
			if(flag != 2){
				this.wait();//当前线程等待
			}
			System.out.print("天");
			System.out.print("天");
			System.out.print("向");
			System.out.print("上");
			System.out.println();
			flag = 1;
			this.notify();//随机唤醒单个等待的线程
		}
	}
}
以下代码为多个线程间通信,代码块中使用while判断
public class demo5_notifyAll {


	/**
	 * @param args
	 * 三条线程调用三个方法:使用while
	 * 等待唤醒机制
	 */
	public static void main(String[] args){
		final PrintAll p = new PrintAll();
		while(true){
			new Thread(){
				public void run(){
					try {
						p.print1();
					} catch (InterruptedException e) {
						e.printStackTrace();
					}
				}
			}.start();
			new Thread(){
				public void run(){
					try {
						p.print2();
					} catch (InterruptedException e) {
						e.printStackTrace();
					}
				}
			}.start();
			new Thread(){
				public void run(){
					try {
						p.print3();
					} catch (InterruptedException e) {
						e.printStackTrace();
					}
				}
			}.start();
		}
	}
}
class PrintAll{
	private int flag = 1;
	public void print1() throws InterruptedException{
		//非静态代码块使用this
		synchronized (this) {
			while(flag != 1){
				this.wait();//当前线程等待
			}
			System.out.print("好");
			System.out.print("好");
			System.out.print("学");
			System.out.print("习");
			System.out.println();
			flag = 2;
			this.notifyAll();//随机唤醒所有等待的线程
		}
	}
	public void print2() throws InterruptedException{
		//非静态代码块使用this
		synchronized (this) {
			while(flag != 2){
				this.wait();//当前线程等待
			}
			System.out.print("天");
			System.out.print("天");
			System.out.print("向");
			System.out.print("上");
			System.out.println();
			flag = 3;
			this.notifyAll();//随机唤醒所有等待的线程
		}
	}
	public void print3() throws InterruptedException{
		//非静态代码块使用this
		synchronized (this) {
			while(flag != 3){
				this.wait();//当前线程等待
			}
			System.out.print("-");
			System.out.print("毛");
			System.out.print("主");
			System.out.print("席");
			System.out.println();
			flag = 1;
			this.notifyAll();//随机唤醒所有等待的线程
		}
	}
}
1.6多线程之互斥锁
-----------ReentrantLock:创建互斥锁>>>>>>>>>>ReentrantLock r = new ReentrantLock
----r.lock:获取锁
----r.unlock:释放锁
private ReentrantLock r = new ReentrantLock();//互斥锁
	private Condition c1 = r.newCondition();//创建3个监视器
	private Condition c2 = r.newCondition();
	private Condition c3 = r.newCondition();
对1.5由synchronized实现的多个线程间通信优化(1.5特性)
public class demo1 {
	public static void main(String[] args){
		final PrintAll p = new PrintAll();
		while(true){
			new Thread(){
				public void run(){
					try {
						p.print1();
					} catch (InterruptedException e) {
						e.printStackTrace();
					}
				}
			}.start();
			new Thread(){
				public void run(){
					try {
						p.print2();
					} catch (InterruptedException e) {
						e.printStackTrace();
					}
				}
			}.start();
			new Thread(){
				public void run(){
					try {
						p.print3();
					} catch (InterruptedException e) {
						e.printStackTrace();
					}
				}
			}.start();
		}
	}
	}
class PrintAll{
	private ReentrantLock r = new ReentrantLock();//互斥锁
	private Condition c1 = r.newCondition();//创建3个监视器
	private Condition c2 = r.newCondition();
	private Condition c3 = r.newCondition();
	private int flag = 1;
	public void print1() throws InterruptedException{
		r.lock();//获取锁
				if(flag != 1){
				c1.await();//c1等待
			}
			System.out.print("好");
			System.out.print("好");
			System.out.print("学");
			System.out.print("习");
			System.out.println();
			flag = 2;
			c2.signal();//唤醒c2
		r.unlock();//释放锁
	}
	public void print2() throws InterruptedException{
		r.lock();
			if(flag != 2){
				c2.await();
			}
			System.out.print("天");
			System.out.print("天");
			System.out.print("向");
			System.out.print("上");
			System.out.println();
			flag = 3;
			c3.signal();
		r.unlock();
	}
	public void print3() throws InterruptedException{
		r.lock();
			if(flag != 3){
				c3.await();;
			}
			System.out.print("-");
			System.out.print("毛");
			System.out.print("主");
			System.out.print("席");
			System.out.println();
			flag = 1;
			c1.signal();
		r.unlock();
	}
}
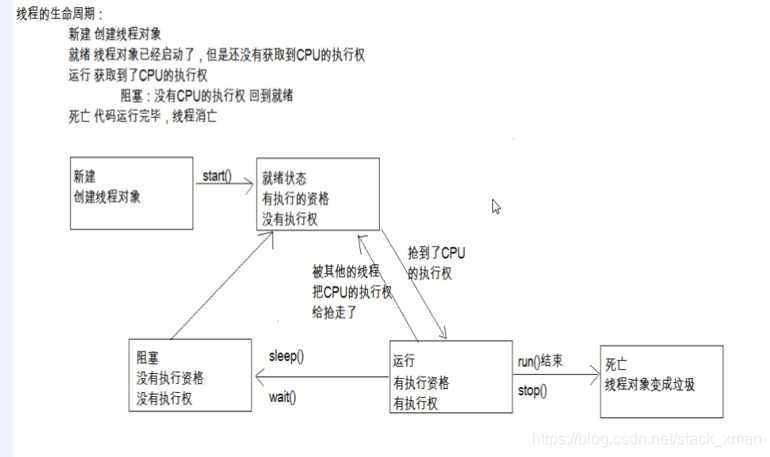
1.7多线程的5种状态【面试题】
1.8线程池
1.创建两个线程池
ExecutorService pool = Executors.newFixedThreadPool(2);
2.工厂模式【了解】
2.1简单工厂设计模式【了解】
第一步:创建一个抽象的Animal类
public abstract class Animal {

	public abstract void eat();
}
第二步:创建猫和狗类对象继承自Animal类
public class Cat extends Animal {

	@Override
	public void eat() {
		System.out.println("猫吃鱼");
	}

}
public class Dog extends Animal {

	@Override
	public void eat() {
		System.out.println("狗吃肉");
	}
}
第三步创建Animal的工厂类
public class Animal_Fac {
	public static Animal creatAnimal(String name){
		if("dog".equals(name)){
			return new Dog();
		}else if("cat".equals(name)){
			return new Cat();
		}else{
			return null;
		}
	}
}
第四步:创建测试类实现简单工厂模式
public class Test {
	public static void main(String[] args){
		Dog cd = (Dog) Animal_Fac.creatAnimal("dog");
		cd.eat();
		Animal ct = Animal_Fac.creatAnimal("cat");
		ct.eat();
	}
}
2.2工厂方法
第一步:创建动物抽象类,dog类与cat类分别继承该抽象类,步骤如1.9前三步;
第二步:创建工厂接口
/**
 * @author ZHENG
 *	工厂接口
 */
public interface Fac_Inter {
	public Animal creatAnimal();
}
第三步:分别创建Cat工厂和Dog工厂实现第二步中动物工厂接口
public class Cat_Fac implements Fac_Inter {
	@Override
	public Animal creatAnimal() {
		return new Cat();
	}
}
public class Dog_Fac implements Fac_Inter {
	@Override
	public Animal creatAnimal() {
		return new Dog();
	}
}
第四步:创建测试类,实现代码
public class Test {

	public static void main(String[] args) {
		Cat_Fac cf = new Cat_Fac();/*与创建狗工厂方法相同*/
		Dog_Fac df = new Dog_Fac();//创建狗工厂对象
		Dog d = (Dog) df.creatAnimal();//调用方法,向下强转,得狗对象
		d.eat();//狗对象调用方法
	}
}
2.3适配器设计模式
适配器原理:
1.适配器就是一个类实现监听接口,所有抽象方法都被重写,但是方法是空的;
2.适配器需要定义成抽象的,因为创建该类对象,调用空方法无意义;
3.目的:简化操作,定义监听器时继承适配器,仅重写需要的方法即可;
public class shipeiqi {
	public static void main(String[] args){

	}
}
interface 和尚{
	public void 打坐();
	public void 念经();
	public void 撞钟();
	public void 习武();
}
/**
 * 该类即是适配器类
 *
 * 声明成抽象的,防止其他类调用水浒传里的方法,因为创建也无意义,方法都是空的
 */
abstract class 水浒传 implements 和尚{

	@Override
	public void 打坐() {

	}

	@Override
	public void 念经() {

	}

	@Override
	public void 撞钟() {

	}

	@Override
	public void 习武() {

	}

}
/**
 * 鲁智深仅有习武这个方法
 *
 * 如果唐僧实现和尚这个接口,可以通过适配器,需要哪个方法就重写哪个方法
  */
class 鲁智深 extends 水浒传{
	public void 习武(){
		System.out.println("倒拔垂杨柳");
		System.out.println("拳打镇关西");
		System.out.println("......");
	}
}
2.4设计模式之模板(Template)
public class demo2 {
	public static void main(String[] args){
		Demo d = new Demo();
		System.out.println(d.getTime());
	}
}
/**
 * @author
 *	模板:定义一个框架模型,如需改动更改子类即可
 */
abstract class GetTime{
	public final long getTime(){//子类不可更改该方法
		long start = System.currentTimeMillis();
		code();
		long end = System.currentTimeMillis();
		return (end-start)/1000;
	}
	public abstract void code();//让子类可以重写该方法
}
class Demo extends GetTime{
	@Override
	public void code() {
		for (int i = 0; i < 100000; i++) {
			System.out.println(i);
		}
	}
}