rocketmq测试1-2m2s集群搭建
环境:
虚拟机centos;jdk1.8;rocketmq3.5.8
2个虚拟机ip地址:192.168.159.134,192.168.159.136
注意:1.同一台机器部署多个broker,注意端口及存储目录要不同,且端口号之间要相距大些。2.关闭虚拟机centos防火墙
| 1.2m2s集群搭建 |
| namesrv1 | 192.168.159.134:9876 |
|---|---|
| namesrv2 | 192.168.159.136:9876 |
| broker-a | 192.168.159.134:10911 |
| broker-b | 192.168.159.136:10911 |
| broker-a-s | 192.168.159.136:10923 |
| broker-b-s | 192.168.159.134:10923 |
1.1环境准备
1)安装rocketmq
见:http://rocketmq.apache.org/docs/quick-start/
修改安装目录名为rocketmq
2)将rocketmq的日志及存储文件统一存储在一个目录。
创建存储目录:
[yhh@localhost ~]$ mkdir rocketmqdata
修改日志存储目录
[yhh@localhost ~/yhh/rocketmq/distribution/target/apache-rocketmq/conf]$ sed -i 's#${user.home}#${user.home}/rocketmqdata#g' *.xml- 修改相关broker.properties存储目录及相关broker属性配置
在
[yhh@localhost~/yhh/rocketmq/distribution/target/apache-rocketmq/conf/2m-2s-async]$
下修改broker属性文件:
注意:同一台机器部署多个broker,注意端口及存储目录要不同,且端口号之间要相距大些。
broker-a.properties
#将a.properties和b.properties文件中的内容全部清掉(用下面的内容替换掉)
    #所属集群名字
    brokerClusterName=rocketmq-cluster
    #broker名字,注意此处不同的配置文件填写的不一样  例如:在a.properties 文件中写 broker-a  在b.properties 文件中写 broker-b
    brokerName=broker-a
    #0 表示 Master,>0 表示 Slave
    brokerId=0
    #nameServer地址,分号分割
    namesrvAddr=192.168.159.134:9876;192.168.159.136:9876
    #在发送消息时,自动创建服务器不存在的topic,默认创建的队列数
    defaultTopicQueueNums=4
    #是否允许 Broker 自动创建Topic,建议线下开启,线上关闭
    autoCreateTopicEnable=true
    #是否允许 Broker 自动创建订阅组,建议线下开启,线上关闭
    autoCreateSubscriptionGroup=true
    #Broker 对外服务的监听端口
    listenPort=10911
    #删除文件时间点,默认凌晨 4点
    deleteWhen=04
    #文件保留时间,默认 48 小时
    fileReservedTime=120
    #commitLog每个文件的大小默认1G
    mapedFileSizeCommitLog=1073741824
    #ConsumeQueue每个文件默认存30W条,根据业务情况调整
    mapedFileSizeConsumeQueue=300000
    #destroyMapedFileIntervalForcibly=120000
    #redeleteHangedFileInterval=120000
    #检测物理文件磁盘空间
    diskMaxUsedSpaceRatio=88
     #存储路径
    storePathRootDir=/home/yhh/rocketmqdata/rocketmq/1/store
    #commitLog 存储路径
    storePathCommitLog=/home/yhh/rocketmqdata/rocketmq/1/store/commitlog
    #消费队列存储路径存储路径
    storePathConsumeQueue=/home/yhh/rocketmqdata/rocketmq/1/store/consumequeue
    #消息索引存储路径
    storePathIndex=/home/yhh/rocketmqdata/rocketmq/1/store/index
    #checkpoint 文件存储路径
    storeCheckpoint=/home/yhh/rocketmqdata/rocketmq/1/store/checkpoint
    #abort 文件存储路径
    abortFile=/home/yhh/rocketmqdata/rocketmq/1/store/abort
    #限制的消息大小
    maxMessageSize=65536
    #flushCommitLogLeastPages=4
    #flushConsumeQueueLeastPages=2
    #flushCommitLogThoroughInterval=10000
    #flushConsumeQueueThoroughInterval=60000
    #Broker 的角色
    #- ASYNC_MASTER 异步复制Master
    #- SYNC_MASTER 同步双写Master
    #- SLAVE
    brokerRole=ASYNC_MASTER
    #刷盘方式
    #- ASYNC_FLUSH 异步刷盘
    #- SYNC_FLUSH 同步刷盘
    flushDiskType=ASYNC_FLUSH
    #checkTransactionMessageEnable=false
    #发消息线程池数量
    #sendMessageThreadPoolNums=128
    #拉消息线程池数量
    #pullMessageThreadPoolNums=128
broker-a-s.properties
#将a.properties和b.properties文件中的内容全部清掉(用下面的内容替换掉)
    #所属集群名字
    brokerClusterName=rocketmq-cluster
    #broker名字,注意此处不同的配置文件填写的不一样  例如:在a.properties 文件中写 broker-a  在b.properties 文件中写 broker-b
    brokerName=broker-a
    #0 表示 Master,>0 表示 Slave
    brokerId=1
    #nameServer地址,分号分割
    namesrvAddr=192.168.159.134:9876;192.168.159.136:9876
    #在发送消息时,自动创建服务器不存在的topic,默认创建的队列数
    defaultTopicQueueNums=4
    #是否允许 Broker 自动创建Topic,建议线下开启,线上关闭
    autoCreateTopicEnable=true
    #是否允许 Broker 自动创建订阅组,建议线下开启,线上关闭
    autoCreateSubscriptionGroup=true
    #Broker 对外服务的监听端口
    listenPort=10923
    #删除文件时间点,默认凌晨 4点
    deleteWhen=04
    #文件保留时间,默认 48 小时
    fileReservedTime=120
    #commitLog每个文件的大小默认1G
    mapedFileSizeCommitLog=1073741824
    #ConsumeQueue每个文件默认存30W条,根据业务情况调整
    mapedFileSizeConsumeQueue=300000
    #destroyMapedFileIntervalForcibly=120000
    #redeleteHangedFileInterval=120000
    #检测物理文件磁盘空间
    diskMaxUsedSpaceRatio=88
#存储路径
    storePathRootDir=/home/yhh/rocketmqdata/rocketmq/2/store
    #commitLog 存储路径
    storePathCommitLog=/home/yhh/rocketmqdata/rocketmq/2/store/commitlog
    #消费队列存储路径存储路径
    storePathConsumeQueue=/home/yhh/rocketmqdata/rocketmq/2/store/consumequeue
    #消息索引存储路径
    storePathIndex=/home/yhh/rocketmqdata/rocketmq/2/store/index
    #checkpoint 文件存储路径
    storeCheckpoint=/home/yhh/rocketmqdata/rocketmq/2/store/checkpoint
    #abort 文件存储路径
    abortFile=/home/yhh/rocketmqdata/rocketmq/2/store/abort
    #限制的消息大小
    maxMessageSize=65536
    #flushCommitLogLeastPages=4
    #flushConsumeQueueLeastPages=2
    #flushCommitLogThoroughInterval=10000
    #flushConsumeQueueThoroughInterval=60000
    #Broker 的角色
    #- ASYNC_MASTER 异步复制Master
    #- SYNC_MASTER 同步双写Master
    #- SLAVE
    brokerRole=SLAVE
    #刷盘方式
    #- ASYNC_FLUSH 异步刷盘
    #- SYNC_FLUSH 同步刷盘
    flushDiskType=ASYNC_FLUSH
    #checkTransactionMessageEnable=false
    #发消息线程池数量
    #sendMessageThreadPoolNums=128
    #拉消息线程池数量
    #pullMessageThreadPoolNums=128
broker-b.properties及broker-b-s.properties与上述类似,修改broker名即可。
1.2部署(2个虚拟机交叉部署主备)
1)在192.168.159.134机器启动namesrv
[yhh@localhost ~/yhh/rocketmq/distribution/target/apache-rocketmq]$nohup sh bin/mqnamesrv &2)在192.168.159.134机器启动broker-a,broker-b-s
[yhh@localhost ~/yhh/rocketmq/distribution/target/apache-rocketmq]$ nohup sh bin/mqbroker -c conf/2m-2s-async/broker-a.properties &[yhh@localhost ~/yhh/rocketmq/distribution/target/apache-rocketmq]$ nohup sh bin/mqbroker -c conf/2m-2s-async/broker-b-s.properties &3)在192.168.159.136机器启动namesrv
[yhh@localhost ~/yhh/rocketmq/distribution/target/apache-rocketmq]$nohup sh bin/mqnamesrv &2)在192.168.159.134机器启动broker-b,broker-a-s
[yhh@localhost ~/yhh/rocketmq/distribution/target/apache-rocketmq]$ nohup sh bin/mqbroker -c conf/2m-2s-async/broker-b.properties &[yhh@localhost ~/yhh/rocketmq/distribution/target/apache-rocketmq]$ nohup sh bin/mqbroker -c conf/2m-2s-async/broker-a-s.properties &| 2.测试 |
1)jps

2)sh bin/mqadmin clusterList –n 192.168.159.134:9876

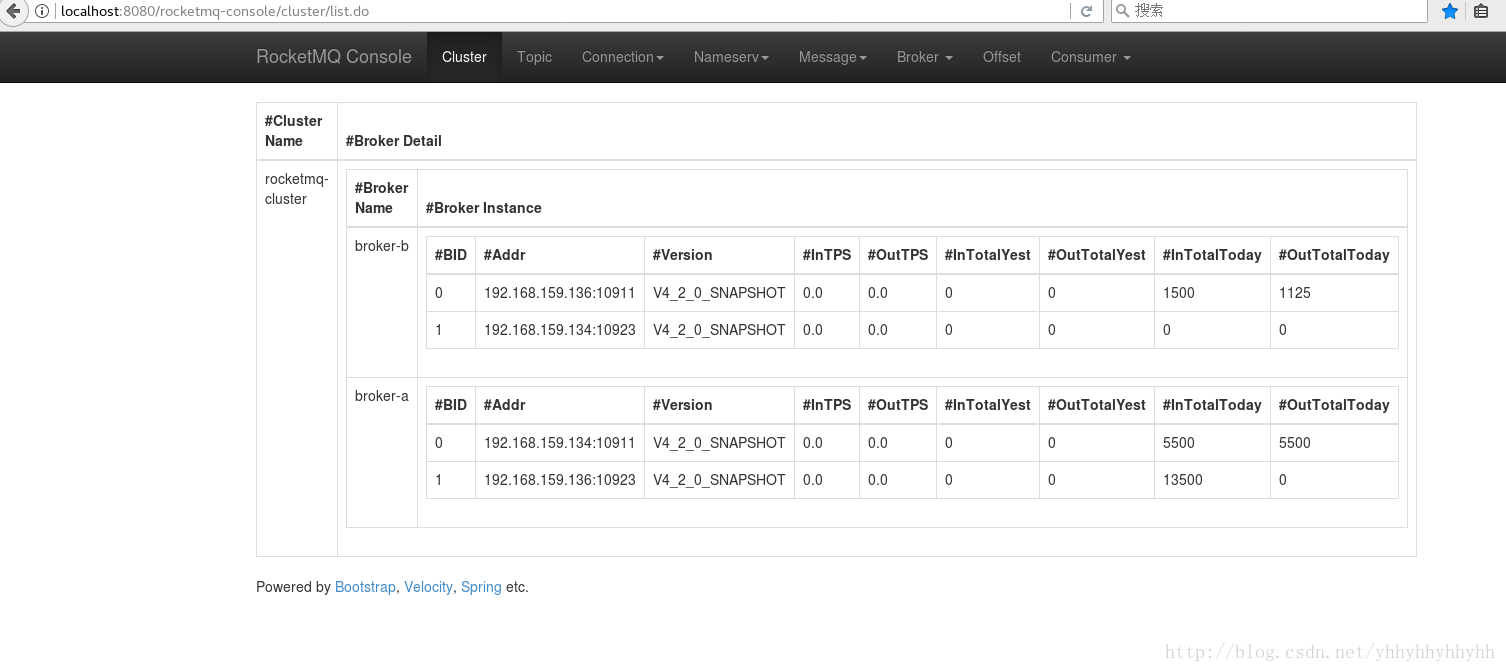
3)rocketmq-consolle控制台查看
rocketmq-consolle.war下载:
1.将rocketmq-consolle.war放在tomact下的webapp下:
2.修改config.properties
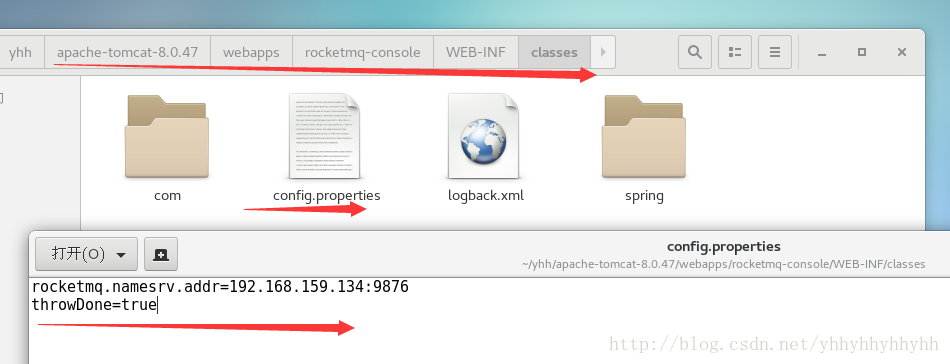
3.启动
rocketmq-consolle:
http://localhost:8080/rocketmq-console/cluster/list.do
下篇测试一下rocketmq的各种特性,
集群消费:广播消费:均摊消费:顺序消费:超时消息:重试消息:事物消息:主机挂,生产组不能发送,消费组可以继续从备机消费:线程数和队列数对性能的影响。