文章来源:Github
Four adversarial image crafting algorithms are implemented with Tensorflow. The four attacking algorithms can be found in attacks folder. The implementation adheres to the principle tensor-in, tensor-out. They all return a Tensorflow operation which could be run through sess.run(...).
使用Tensorflow实现了四种对抗性图像制作算法。 攻击文件夹中可以找到四种攻击算法。 实施遵循原则tensor-in, tensor-out。 它们都返回一个Tensorflow操作,可以通过sess.run(...)运行。
-
Fast Gradient Sign Method (FGSM) basic/iterative 快速梯度符号方法(FGSM)
fgsm(model, x, eps=0.01, epochs=1, clip_min=0.0, clip_max=1.0)
论文5.Explaining and Harnessing Adversarial Examples:https://arxiv.org/abs/1412.6572/
论文4.Adversarial examples in the physical world:https://arxiv.org/abs/1607.02533
-
Target class Gradient Sign Method (TGSM)目标类梯度符号方法
tgsm(model, x, y=None, eps=0.01, epochs=1, clip_min=0.0, clip_max=1.0)
-
When y=None, this implements the least-likely class method.
-
If yis an integer or a list of integers, the source image is modified towards label y.
论文4.Adversarial examples in the physical world: https://arxiv.org/abs/1607.02533
-
Jacobian-based Saliency Map Approach (JSMA) 基于雅可比的显着性图方法
jsma(model, x, y, epochs=1.0, eps=1., clip_min=0.0, clip_max=1.0, pair=False, min_proba=0.0)
y is the target label, could be an integer or a list. when epochsis a floating number in the range [0, 1], it denotes the maximum percentage distortion allowed and epochsis automatically deduced. min_probadenotes the minimum confidence of target image. If pair=True, then modifies two pixels at a time.
- y是目标标签,可以是整数或列表。 当epochsis在[0,1]范围内的浮点数时,它表示允许的最大失真百分比和自动推断出的epochsis。 min_proba表示目标图像的最小置信度。 如果pair = True,则一次修改两个像素。
论文21.The Limitations of Deep Learning in Adversarial Settings: https://arxiv.org/abs/1511.07528
-
Saliency map difference approach (SMDA) 显着图差异法
smda(model, x, y, epochs=1.0, eps=1., clip_min=0.0, clip_max=1.0, min_proba=0.0)
Interface is the same as jsma. This algorithm differs from the JSMA in how the saliency score is calculated. In JSMA, saliency score is calculated as dt/dx * (-do/dx), while in SMDA, the saliency score is dt/dx - do/dx, thus the name “saliency map difference”.
- 接口与jsma相同。 该算法与JSMA的不同之处在于如何计算显着性得分。 在JSMA中,显着性得分计算为dt / dx *( - do / dx),而在SMDA中,显着性得分为dt / dx - do / dx,因此名称为“显着性图差异”。
The model
Notice that we have model as the first parameter for every method. The modelis a wrapper function. It should have the following signature:
请注意,我们将模型作为每个方法的第一个参数。 该模型是一个包装函数。 它应该有以下签名:
def model(x, logits=False):

# x is the input to the network, usually a tensorflow placeholder y = your_model(x) logits_ = ... # get the logits before softmax if logits:

return y, logits

return y
We need the logits because some algorithms (FGSM and TGSM) rely on the logits to compute the loss.
我们需要logits,因为一些算法(FGSM和TGSM)依赖于logits来计算损失。
How to Use
Implementation of each attacking method is self-contained, and depends only on tensorflow. Copy the attacking method file to the same folder as your source code and import it.
The implementation should work on any framework that is compatiblewith Tensorflow. I provide example code for Tensorflow and Keras in the folder tf_example and keras_example, respectively. Each code example is also self-contained.
每种攻击方法的实现都是自包含的,并且仅取决于张量流。 将攻击方法文件复制到与源代码相同的文件夹并导入。
该实现应该适用于与Tensorflow兼容的任何框架。 我分别在文件夹tf_example和keras_example中提供了Tensorflow和Keras的示例代码。 每个代码示例也是自包含的。
https://github.com/gongzhitaao/tensorflow-adversarial
本地下载路径为 C:\Users\Josie\AppData\Local\Programs\Python\Python35\Scripts\1\tensorflow-adversarial-master
And example code with the same file name implements the same function. For example, tf_example/ex_00.py and keras_example/ex_00.py implement exactly the same function, the only difference is that the former uses Tensorflow platform while the latter uses Keras platform.
具有相同文件名的示例代码实现相同的功能。 例如,tf_example / ex_00.py和keras_example / ex_00.py实现完全相同的功能,唯一的区别是前者使用Tensorflow平台而后者使用Keras平台。
https://github.com/gongzhitaao/tensorflow-adversarial/blob/master/tf_example/ex_00.py
https://github.com/gongzhitaao/tensorflow-adversarial/blob/master/keras_example/ex_00.py
Results
-
ex_00.py trains a simple CNN on MNIST. Then craft adversarial samples from test data vis FGSM. The original label for the following digits are 0 through 9 originally, and the predicted label with probability are shown below each digit.
- ex_00.py在MNIST上训练一个简单的CNN。 然后从FGSM的测试数据中制作对抗样本。 以下数字的原始标签最初为0到9,并且具有概率的预测标签显示在每个数字下方。

-
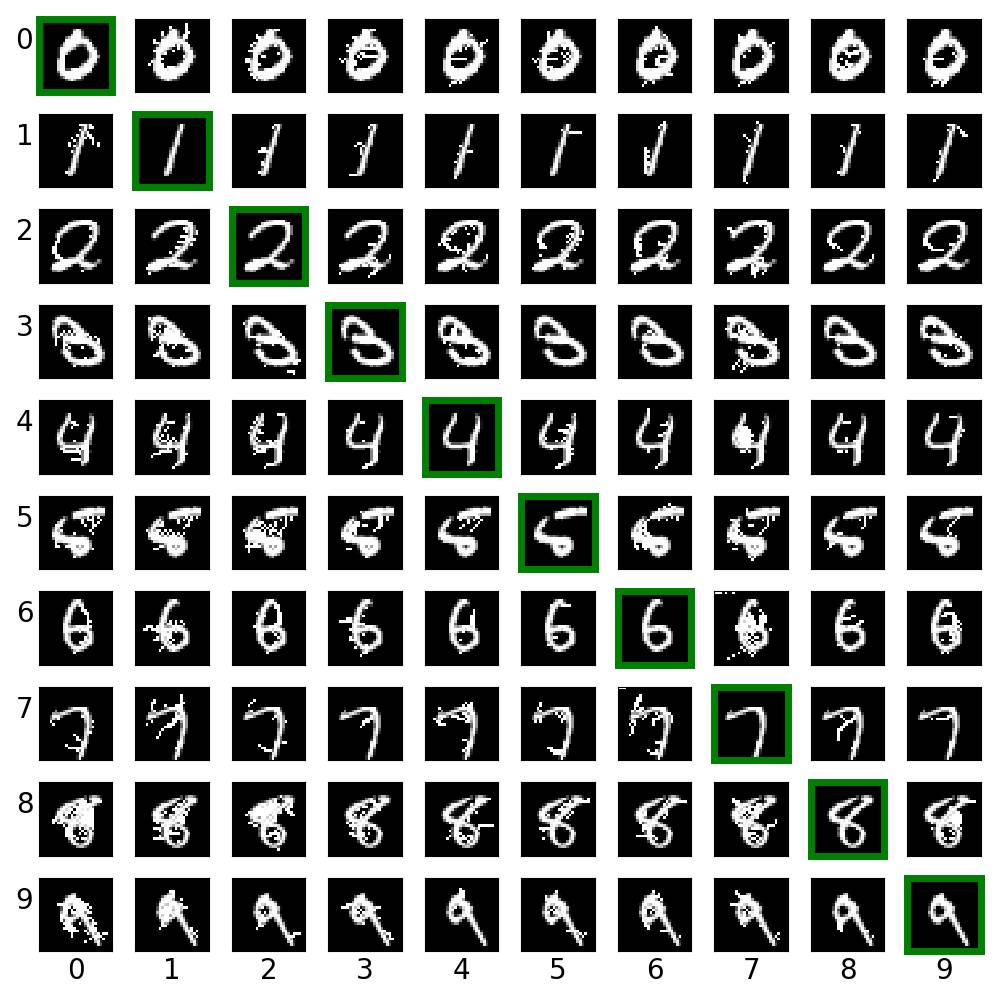
ex_01.py creates cross label adversarial images via saliency map approach (JSMA). For each row, the digit in green box is the clean image. Other images on the same row are created from it.
- ex_01.py通过显着图方法(JSMA)创建交叉标签对抗图像。 对于每一行,绿色框中的数字是干净的图像。 从中创建同一行上的其他图像。
-
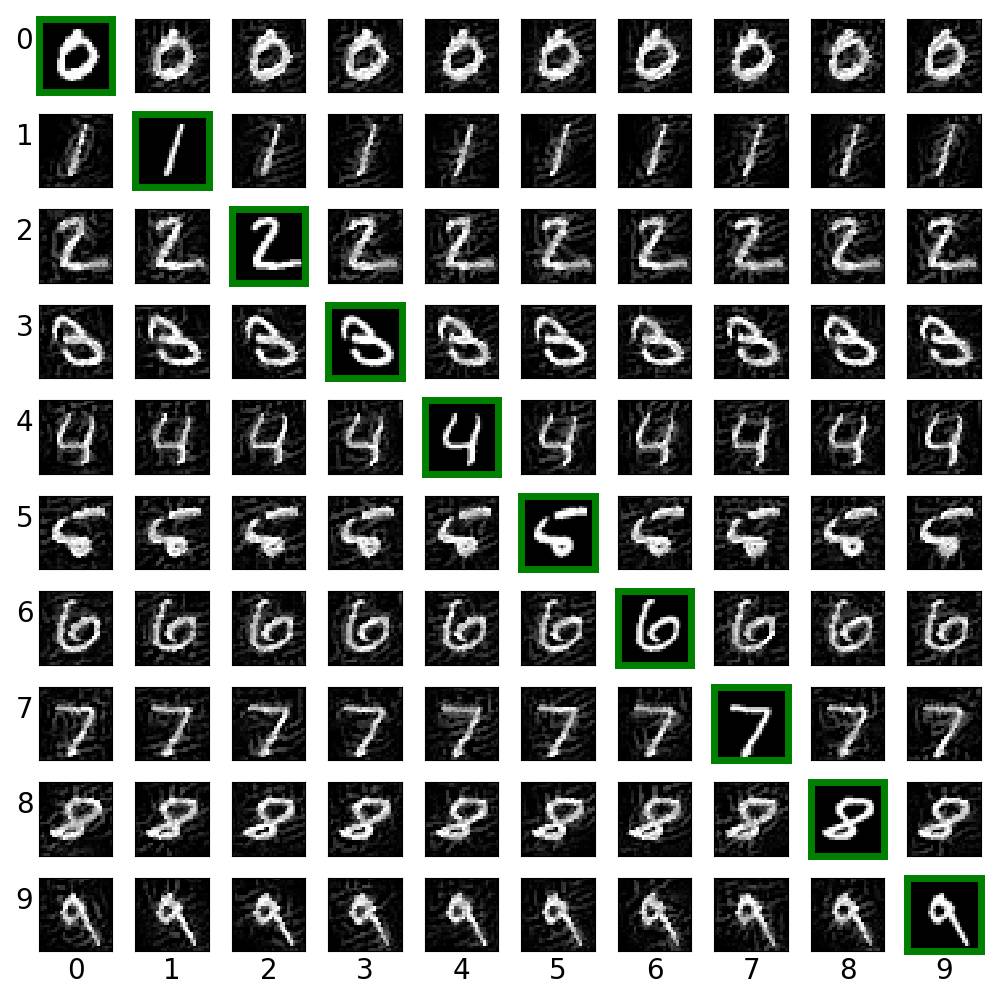
ex_02.py creates cross label adversarial images via target class gradient sign method (TGSM).
- ex_02.py通过目标类梯度符号方法(TGSM)创建交叉标签对抗图像。
-
ex_03.py creates digits from blank images via saliency different algorithm (SMDA).
- ex_03.py通过显着性不同算法(SMDA)从空白图像创建数字。

-
These images look weird. And I have no idea why I could not reproduce the result in the original paper. My guess is that
However various experiments seem to suggest that my implementation work properly. I have to try more examples to figure out what is going wrong here.
-
这些图像看起来很奇怪。 我不知道为什么我无法在原始论文中重现结果。 我的猜测是
然而,各种实验似乎表明我的实施工作正常。 我必须尝试更多的例子来弄清楚这里出了什么问题。
-
either my model is too simple to catch the features of the dataset, 我的模型太简单了,无法捕捉到数据集的特征
-
there is a flaw in my implementation.我的实施存在缺陷。
-
ex_04.py creates digits from blank images via paired saliency map algorithm, i.e., modify two pixels at one time (refer to the original paper for rational http://arxiv.org/abs/1511.07528).ex_04.py通过成对的显着图算法从空白图像创建数字,即一次修改两个像素(论文21.The Limitations of Deep Learning in Adversarial Settings)

-
ex_05.py trains a simple CNN on MNIST and then crafts adversarial samples via LLCM. The original label for the following digits are 0 through 9 originally, and the predicted label with probability are shown below each digit.ex_05.py 在MNIST上训练一个简单的CNN,然后通过LLCM制作对抗样本。 以下数字的原始标签最初为0到9,并且具有概率的预测标签显示在每个数字下方。

-
ex_06.py trains a CNN on CIFAR10 and then crafts adversarial image via FGSM.
- ex_06.py在CIFAR10上训练CNN,然后通过FGSM制作对抗图像。

Related Work
-
openai/cleverhans
https://github.com/openai/cleverhans