一、FTP服务端的搭建立
1.安装并开启ftp服务
[root@rhel7 Desktop]# yum install vsftpd.x86_64
[root@rhel7 ~]# systemctl status vsftpd
● vsftpd.service - Vsftpd ftp daemon
   Loaded: loaded (/usr/lib/systemd/system/vsftpd.service; disabled; vendor preset: disabled)
   Active: inactive (dead)
[root@rhel7 ~]# systemctl restart vsftpd
[root@rhel7 ~]# systemctl status vsftpd
● vsftpd.service - Vsftpd ftp daemon
   Loaded: loaded (/usr/lib/systemd/system/vsftpd.service; disabled; vendor preset: disabled)
   Active: active (running) since Thu 2018-11-01 00:18:22 CST; 2s ago
  Process: 2983 ExecStart=/usr/sbin/vsftpd /etc/vsftpd/vsftpd.conf (code=exited, status=0/SUCCESS)
 Main PID: 2989 (vsftpd)
   CGroup: /system.slice/vsftpd.service
           └─2989 /usr/sbin/vsftpd /etc/vsftpd/vsftpd.conf

Nov 01 00:18:21 rhel7.2 systemd[1]: Starting Vsftpd ftp daemon...
Nov 01 00:18:22 rhel7.2 systemd[1]: Started Vsftpd ftp daemon.
2.配置火墙策略
 [root@rhel7 Desktop]# systemctl status firewalld.service
● firewalld.service - firewalld - dynamic firewall daemon
   Loaded: loaded (/usr/lib/systemd/system/firewalld.service; enabled; vendor preset: enabled)
   Active: active (running) since Wed 2018-10-31 20:33:26 CST; 3h 33min ago
 Main PID: 661 (firewalld)
   CGroup: /system.slice/firewalld.service
           └─661 /usr/bin/python -Es /usr/sbin/firewalld --nofork --nopid

Oct 31 20:33:24 rhel7.2 systemd[1]: Starting firewalld - dynamic firewall daemon...
Oct 31 20:33:26 rhel7.2 systemd[1]: Started firewalld - dynamic firewall daemon.
[root@rhel7 Desktop]# firewall-cmd --permanent --add-service=ftp
success
[root@rhel7 Desktop]# firewall-cmd --reload
success
[root@rhel7 Desktop]# firewall-cmd --list-all
public (default, active)
  interfaces: eth0
  sources:
  services: dhcpv6-client ftp ssh
  ports:
  masquerade: no
  forward-ports:
  icmp-blocks:
  rich rules:
[root@rhel7 Desktop]# getenforce
Enforcing
[root@rhel7 Desktop]# vim /etc/sysconfig/selinux
[root@rhel7 Desktop]# reboot
服务端搭建完成
3.客户端测试
[kiosk@foundation69 ~]$ lftp 172.25.254.111
lftp 172.25.254.111:~> ls
drwxr-xr-x    2 0        0               6 Aug 03  2015 pub


二、通过ftp配置文件来管理用户
1.匿名用户的相关设置
anon_upload_enable=YES     ##允许匿名用户可以上传
anon_root=/linux           ##更改匿名用家目录
anon_umask=022             ##更改匿名用户上传文件默认权限(原始默认权限为600)
anon_world_readable_only=NO##允许匿名用户下载
anon_mkdir_write_enable=YES##允许匿名用户建立目录
anon_other_write_enable=YES##允许匿名用户删除
anon_max_rate=102400       ##限制速度
客户端测试
服务端设置
客户端测试
注意:已经修改了配置文件,但是为什么还是会报错,是因为目录权限不够,新建了一个目录更改目录组名,并给与组可写权限g+x,才能完成权限的赋予。
服务端端修改
客户端测试
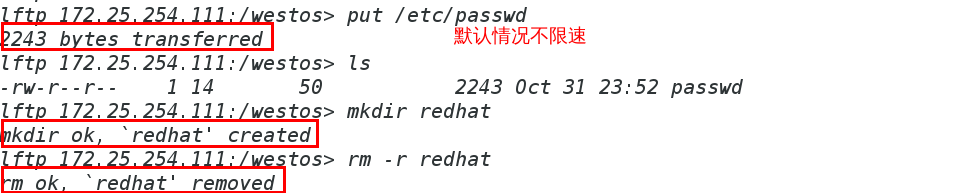
对默认情况下不进行用户登陆数限制和速率限制会、一般在实践应用中,我们会对其作出修改
在配置文件中添加
最大上传速率
anon_max_rate=102400
最大链接数
max_clients=1 表示最多有1个可以连接


三、ftp服务白名单的建立
建立白名单的机制是将临时黑名单关闭,及逻辑为双重否定为肯定。
白名单建立完成,仅user_list文件下所有用户可以登陆

四、FTP的虚拟用户搭建
1.建立虚拟用户
[root@rhel7 ~]# cd /etc/vsftpd/
[root@rhel7 vsftpd]# ls
ftpusers  user_list  vsftpd.conf  vsftpd_conf_migrate.sh
[root@rhel7 vsftpd]# vim xuni
[root@rhel7 vsftpd]# chmod 600 xuni
[root@rhel7 vsftpd]# ll xuni
-rw------- 1 root root 36 Nov  7 18:18 xuni
[root@rhel7 vsftpd]# db_load -T -t hash -f xuni xuni.db
[root@rhel7 vsftpd]# ls
ftpusers  user_list  vsftpd.conf  vsftpd_conf_migrate.sh  xuni  xuni.db
2.建立认证目录和修改加配置文件
3.客户端登陆测试


五、指定虚拟用户的家目录
1.搭建实验环境
2.修改配置文件
3.用户测试


六、虚拟用户的单个权限设定
1.环境搭建

2.测试
3.给虚拟用户指定登陆用户


