springboot+ jpa 以及spring+mybatis 都已经实现主从,这篇主要讲解下springboot +jpa的实现,两种方式的源码我都会贴上github地址。
github源码地址:
springboot + jpa : https://github.com/ShiLeiJava/separation2
spring boot+ mybatis :https://github.com/ShiLeiJava/separation
通过mysql实现主从配置的思路。
通过spring AOP @Before 通知,在线程进入service方法之前拿到service方法上面的自定义注解@ReadDataSource或者@WriteDataSource来判断,在ThreadLocal变量中设置是拿slave的key,还是拿Master的key。然后通过数据源proxy通过key来获取对应的数据源将其注入到jpa中。可以在这边配置多个slave,并对其做一些负载均衡。
一、项目配置
1、yml文件配置
  jpa:
    hibernate:
      naming:
        physical-strategy: org.springframework.boot.orm.jpa.hibernate.SpringPhysicalNamingStrategy
      ddl-auto: update  # 第一次简表create  后面用update
    show-sql: true
多数据源配置
#读写分离配置
mysql:
  datasource:
    readSize: 1  #读库个数
    type: com.alibaba.druid.pool.DruidDataSource
    write:
      driver-class-name: com.mysql.jdbc.Driver
      url: jdbc:mysql://192.168.1.114:3306/jpatest?useUnicode=true&characterEncoding=utf8&characterSetResults=utf8
      username: xxx
      password: xxx
    read:
      url: jdbc:mysql://192.168.1.138:3306/jpatest?useUnicode=true&characterEncoding=utf8&characterSetResults=utf8&useSSL=true
      username: xxxx
      password: xxxx
      driver-class-name: com.mysql.jdbc.Driver
其中readSize是代表读库的个数,在代理类中使用,可以对slave做一些负载均衡
2、数据库的配置
A、数据源配置
/**
 * Created by Leo_lei on 2018/11/8
 */
@Configuration
public class DataSourceConfiguration {

    private static Logger log = LoggerFactory.getLogger(DataSourceConfiguration.class);

    @Value("${mysql.datasource.type}")
    private Class<? extends DataSource> dataSourceType;


    //写库
    @Primary
    @Qualifier("writeDataSource")
    @Bean("writeDataSource")
    @ConfigurationProperties(prefix = "mysql.datasource.write")
    public DataSource writeDataSource(){
        log.info("-------------------- writeDataSource init ---------------------");
        return DataSourceBuilder.create().type(dataSourceType).build();
    }


    //读库
    @Qualifier("readDataSource")
    @Bean(name = "readDataSource")
    @ConfigurationProperties(prefix = "mysql.datasource.read")
    public DataSource readDataSourceOne() {
        log.info("-------------------- read DataSourceOne init ---------------------");
        return DataSourceBuilder.create().type(dataSourceType).build();
    }

}
@Qualifier注解是解决如果有多个实例或者不存在实例情况下会抛出异常,这样就无法启动项目。添加这个注解是为了更加细粒的注入。
B、本地线程上下文配置
/**
 * 本地线程,数据源上下文
 * Created by Leo_lei on 2018/11/8
 */
public class DataSourceContextHolder {

	private static Logger log = LoggerFactory.getLogger(DataSourceContextHolder.class);

	//线程本地环境
	private static final ThreadLocal<String> local = new ThreadLocal<String>();

    public static ThreadLocal<String> getLocal() {
        return local;
    }

    /**
     * 读库
     */
    public static void setRead() {
        local.set(DataSourceType.read.getType());
        log.info("数据库切换到读库...");
    }

    /**
     * 写库
     */
    public static void setWrite() {
        local.set(DataSourceType.write.getType());
        log.info("数据库切换到写库...");
    }

    public static String getReadOrWrite() {
        return local.get();
    }

    public static void clear(){
    	local.remove();
    }
}
每次访问API都是独立的线程,我们可以通过AOP,在执行Service方法前来设置本地线程变量ThreadLocal的值来设置当前访问哪个数据源。
C、定义的数据源类型
/**
 * Created by Leo_lei on 2018/11/8
 */
public enum  DataSourceType {

    read("read", "从库"),
    write("write", "主库");

    private String type;

    private String name;

    DataSourceType(String type, String name) {
        this.type = type;
        this.name = name;
    }

    public String getType() {
        return type;
    }

    public void setType(String type) {
        this.type = type;
    }

    public String getName() {
        return name;
    }

    public void setName(String name) {
        this.name = name;
    }
}
定义了读库和写库。这个主要是作为一个key,AOP的时候将这个key设置到ThreadLocal变量中,然后在数据源代理类proxy通过key去获取到当前要使用的数据源。
D、AOP配置 ---- 主要配置的是service层面的AOP
@Aspect
@EnableAspectJAutoProxy(exposeProxy=true,proxyTargetClass=true)
@Component
public class DataSourceAopInService implements PriorityOrdered {

private static Logger log = LoggerFactory.getLogger(DataSourceAopInService.class);

	@Before("execution(* com.leo.separation2.service..*.*(..)) "
			+ " and @annotation(com.leo.separation2.config.ReadDataSource) ")
	public void setReadDataSourceType() {
		//如果已经开启写事务了,那之后的所有读都从写库读
		if(!DataSourceType.write.getType().equals(DataSourceContextHolder.getReadOrWrite())){
			DataSourceContextHolder.setRead();
		}

	}

	@Before("execution(* com.leo.separation2.service..*.*(..)) "
			+ " and @annotation(com.leo.separation2.config.WriteDataSource) ")
	public void setWriteDataSourceType() {
	    DataSourceContextHolder.setWrite();
	}

	@Override
	public int getOrder() {
		return 1;
	}

}
这边有两个方法,@Before中的参数指的是,在service包下面,如果方法上有注解@ReadDataSource 或者@WirteDataSource,那么分别不同的方法设置不同的数据源
在读的AOP中,添加了一个判断,是为了解决如果已经写入过数据了,那么接下来的查询还是进入到读库,避免了写和读产生时间差的问题。
重写order方法,是为了Aop在事务之前执行。
E、实现代理类,获取到key。
public class DynamicDataSourceRouter extends AbstractRoutingDataSource {
    @Override
    protected Object determineCurrentLookupKey() {

        System.out.println("最终拿到的是:"+DataSourceContextHolder.getReadOrWrite());

        String typeKey = DataSourceContextHolder.getReadOrWrite();
//
        if(typeKey == null){
            return DataSourceType.write.getType();
        }

        if (typeKey.equals(DataSourceType.write.getType())){
            System.err.println("使用数据库write.............");
            return DataSourceType.write.getType();
        }

        //读库, 简单负载均衡
//                int number = count.getAndAdd(1);
//                int lookupKey = number % readSize;
//                System.err.println("使用数据库read-"+(lookupKey+1));
        return DataSourceType.read.getType()/*+(lookupKey+1)*/;

//        return DataSourceContextHolder.getReadOrWrite();
    }
}
这个类继承AbstractRoutingDataSource。通过ThreadLocal拿到当前线程在AOP中设置的类型key。然后去分别判断当前使用什么key去数据源的targerDataSource中找。if typeKey== null的话,则给他默认进入master。
这边还可以对slave 做一个简单的负载均衡。我例子中只使用了一个,我就不演示这个了,如果要实现这个,你需要在yml中加配置,还有在数据源配置中加入bean实现。
F、配置JPAConfiguration --- 最重要的一个 配置了。这个配置我也是研究了好久,踩了很多的坑配起来,并让springboot能够启动。
/**
 * Created by Leo_lei on 2018/11/13
 */
@Configuration
@EnableConfigurationProperties(JpaProperties.class)
@EnableJpaRepositories(
        entityManagerFactoryRef = "entityManagerFactory",
        transactionManagerRef = "transactionManager",
        value = "com.leo.separation2.dao")
@AutoConfigureAfter(DataSourceConfiguration.class)
public class JpaEntityManager {

    @Autowired
    private JpaProperties jpaProperties;  //加载yml中jpa的配置

    @Autowired
    @Qualifier("writeDataSource")
    private DataSource writeDataSource; //加载master配置
    @Autowired
    @Qualifier("readDataSource")
    private DataSource readDataSource; //加载slave配置

    /**
     * 配置数据源集合到 abstractRoutionDataSource中
     */
    @Bean(name = "routingDataSource")
    public AbstractRoutingDataSource routingDataSource() {
        DynamicDataSourceRouter proxy = new DynamicDataSourceRouter();
        Map<Object, Object> targetDataSources = new HashMap<>(2);
        targetDataSources.put(DataSourceType.write.getType(), writeDataSource);
        targetDataSources.put(DataSourceType.read.getType(), readDataSource);

        proxy.setDefaultTargetDataSource(writeDataSource); //将master数据源设置为缺省
        proxy.setTargetDataSources(targetDataSources);//将yml中配置的数据源到target
        return proxy;
    }


    @Bean(name = "entityManagerFactoryBean")
    public LocalContainerEntityManagerFactoryBean entityManagerFactoryBean(EntityManagerFactoryBuilder builder) {
        Map<String, String> properties = jpaProperties.getProperties();
        //要设置这个属性,实现 CamelCase -> UnderScore 的转换
        properties.put("hibernate.physical_naming_strategy",
                "org.springframework.boot.orm.jpa.hibernate.SpringPhysicalNamingStrategy");


        return builder
                .dataSource(routingDataSource())//关键:注入routingDataSource
                .properties(properties)
                .packages("com.leo.separation2.entity") //jpa实体包路径
                .persistenceUnit("myPersistenceUnit")
                .build();
    }

    @Primary
    @Bean(name = "entityManagerFactory")
    public EntityManagerFactory entityManagerFactory(EntityManagerFactoryBuilder builder) {
        return this.entityManagerFactoryBean(builder).getObject();
    }

    @Primary
    @Bean(name = "transactionManager")
    public PlatformTransactionManager transactionManager(EntityManagerFactoryBuilder builder) {
        return new JpaTransactionManager(entityManagerFactory(builder));
    }

}
那么就从开头讲解下吧:
@EnableJpaRepositories(
        entityManagerFactoryRef = "entityManagerFactory",
        transactionManagerRef = "transactionManager",
        value = "com.leo.separation2.dao")
实现自定义jpa配置,你需要从新定义一个entityManagerFactory,以及一个transationManager。
这个注解,是开启自定义的jpa配置,让springboot能够识别这个配置。 其中value值是指实体所在的包。而两个ref 一个是指
自定义EntityManagerFactory 的bean,一个是指TransactionManager bean,都是在下面定义的。
具体的我在配置里面加入了注解。
完成以上配置,那么你可以启动程序跑起来测试了。
二、测试
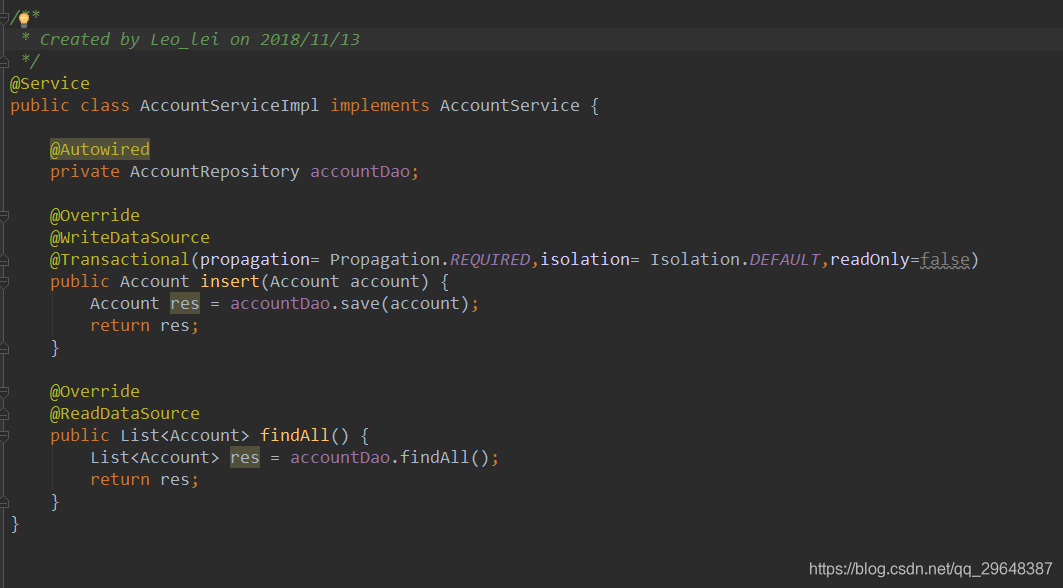
同时我在service层中添加了两个注解,然后封装成了API 通过postman http请求,访问成功,达到了自己预期的结果。大家可以去测试一下。
三、问题
1、在数据源配置文件中

在数据源配置文件中,你一定要添加@Qualifier这个注解,否则在启动项目的时候会报错,因为这个和JPAConfiguration的配置c中的

这两个实例造成了冲突。会在程序启动的时候报错。由于一个bean有多个实例,会产生报错。那么你加了 这个注解就不会产生这个问题了。
2、
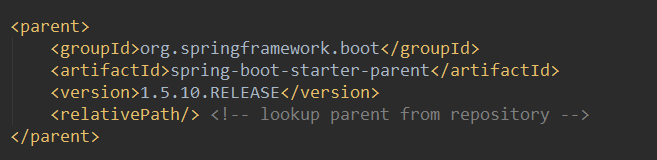
这是pom中的配置,如果version是2.xxxxx的时候启动会无法识别我们再JPAConfiguration中配置的entityManagerFactory这个bean。如果修改为1.5.10是没问题的。这个我也不知道是什么问题,可能根据hibernate的版本有关系,好像是hibernate5 如果要自定义配置需要进行注册。没去深究。如果有哪位大神知道,请评论指点下。
完成以上配置就可以运行起来这个了。同时我也实现了Springboot +mybatis实现主从分离,机制也是一样。就是数据库配置略有不同。大家如果需要可以在github上面下载我的源码。源码可以运行。