Producer
package base;

import com.rabbitmq.client.Channel;
import com.rabbitmq.client.Connection;
import com.rabbitmq.client.ConnectionFactory;

public class Send {

    private final static String QUEUE_NAME = "hello";

    public static void main(String[] args) {
        foo();
    }

    private static void foo() {
        ConnectionFactory factory = new ConnectionFactory();
        factory.setHost("localhost");
        Connection connection = null;
        try {
            connection = factory.newConnection();
            Channel channel = connection.createChannel();
            //声明一个我们将要发送数据进去的queue,然后向其发送数据。queue的声明是幂等的-只有不存在的话才会实际去创建
            //数据内容是byte数组
            channel.queueDeclare(QUEUE_NAME, false, false, false, null);
            for (int i = 0; i < 5; i++) {
                String message = "hello world"+i;
                channel.basicPublish("", QUEUE_NAME, null, message.getBytes());
                System.out.println("Sent:"+message);
            }
            channel.close();
            connection.close();
        } catch (Exception e) {
            e.printStackTrace();
        }
    }
}
Consumer
package base;

import java.io.UnsupportedEncodingException;

import com.rabbitmq.client.AMQP;
import com.rabbitmq.client.Channel;
import com.rabbitmq.client.Connection;
import com.rabbitmq.client.ConnectionFactory;
import com.rabbitmq.client.Consumer;
import com.rabbitmq.client.DefaultConsumer;
import com.rabbitmq.client.Envelope;

public class Recv {

    private final static String QUEUE_NAME = "hello";

    public static void main(String[] args) {
        foo();
    }

    private static void foo() {
        //向本地localhost建立一个和物理连接
        ConnectionFactory factory = new ConnectionFactory();
        factory.setHost("localhost");
        try {
            //tcp物理连接的一个抽象,关注协议版本和认证
            Connection connection = factory.newConnection();
            Channel channel = connection.createChannel();
            //这里同样声明queue,因为Producer可能先于Consumer运行,所以需要保证queue存在
            channel.queueDeclare(QUEUE_NAME, false, false, false, null);
            //定义一个消费者实现类来处理消息的上报
            DefaultConsumer consumer = new DefaultConsumer(channel) {
                @Override
                public void handleDelivery(String consumerTag, Envelope envelope, AMQP.BasicProperties properties, byte[] body) throws UnsupportedEncodingException {
                    String message = new String(body,"UTF-8");
                    System.out.println("Received:"+message);
                }
            };
            channel.basicConsume(QUEUE_NAME, true, consumer);

        } catch (Exception e) {
            e.printStackTrace();
        }
    }
}
运行结果
Producer
Sent:hello world0
Sent:hello world1
Sent:hello world2
Sent:hello world3
Sent:hello world4
Consumer
Received:hello world0
Received:hello world1
Received:hello world2
Received:hello world3
Received:hello world4
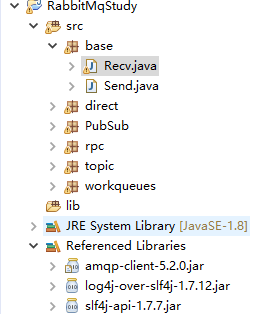
工程结构如下图:
主要引入了下面三个jar包,log4j和slf4j是为了解决编译问题