背景介绍
GPU 在以下方面有别于 CPU:
- CPU和GPU之所以大不相同,是由于其设计目标的不同,它们分别针对了两种不同的应用场景。CPU需要很强的通用性来处理各种不同的数据类型,同时逻辑判断又会引入大量的分支、跳转和中断的处理。这些都使得CPU的内部结构异常复杂。而GPU面对的则是类型高度统一的、相互无依赖的大规模数据和不需要被打断的纯净的计算环境。
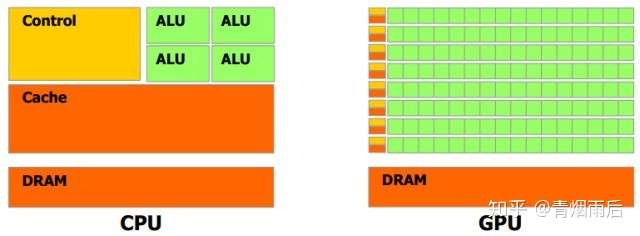
上图中,绿色的部分是计算单元(ALU),就是我们用来进行加减乘除运算的部分;橙红色的部分是存储单元(Cache),用来储存计算的相关数据;橙黄色部分是控制单元(Control)。由于GPU的工作对象数据结构相对简单,其绝大部分硬件资源用来进行计算,而CPU所面对的计算任务则要复杂的多,所以不得不花费相当多的资源在其他方面。
机器学习和深度学习在处理大的数据集的时候,如果使用传统的CPU服务器或工作站,只能采用out-of-core或者采用数据子集的方式进行训练,这往往意味着训练模型精准度的下降:比如out-of-core的方式,必须解决梯度下降是否合理的问题,传统方法是梯度截断以及最新的FTRL,以上方法都能解决一些问题,但是缺陷也比较明显:比如梯度截断很容易陷入梯度爆炸或者梯度消失、FTRL可适应的算法模型又比较少(出来的比较晚,在深度学习上基本没有应用,不过在on-line-learning方面有很好的前景);数据子集采用随机采样或者部分截取,会丢掉一些周期性的关键信息;而使用GPU的话,可以训练更大的数据集、更快的得到训练结果,这也意味着更快的迭代,更好的学习效果。
本文基于阿里给的一台GPU云主机,讲解如何在CentOS7.4上搭建以基于TensorFlow的深度学习环境。
环境搭建
安装zsh, oh-my-zsh
zsh与oh-my-zh可以极大的提高Linux shell环境的命令输入效率,更加强大的自动提示功能,各种强大的插件、主题。
zsh安装:
1. yum search zsh
2. yum install -y zsh.x86_64
oh-my-zsh安装
1. yum install git
2. sh -c "$(wget https://raw.github.com/robbyrussell/oh-my-zsh/master/tools/install.sh -O -)"
3. chsh -l:
4. chsh -s /bin/zsh
虚拟环境
pyenv是Python的虚拟环境管理插件,有这个插件,可以非常方便的安装不同版本的Python、anaconda。
$ git clone https://github.com/yyuu/pyenv.git ~/.pyenv     #使用 git 把 pyenv 下载到家目录
$ echo 'export PYENV_ROOT="$HOME/.pyenv"' >> ~/.zshrc     #然后需要修改环境变量,使用 Bash Shell 的输入
$ echo 'export PATH="$PYENV_ROOT/bin:$PATH"' >> ~/.zshrc
$ echo 'eval "$(pyenv init -)"' >> ~/.zshrc     #最后添加 pyenv init
$ exec $SHELL -l     #输入命令重启 Shell,然后就可以重启pyenv
pyenv-virtual 插件保证在使用pyenv locan anacon*设置目录环境的时候,能够在terminal显示正确的虚拟环境名称。
git clone https://github.com/yyuu/pyenv-virtualenv.git ~/.pyenv/plugins/pyenv-virtualenv
echo 'eval "$(pyenv virtualenv-init -)"' >> ~/.zshrc
source ~/.zshrc
安装anaconda
anaconda是一个打包好的Python科学计算包,里面包含Python以及大部分科学计算需要的安装包,比如pandas, matplotlib, statemodel等。
pyenv install --list | grep anaconda  #获取可以安装的anaconda版本
pyenv install anaconda3-5.1.0
安装显卡驱动
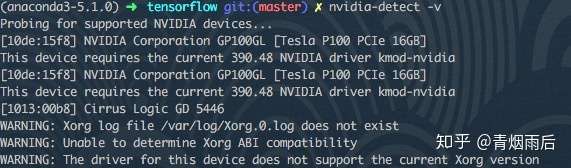
首先检查是否有支持英伟达CUDA的显卡:
1. lspci | grep -i nvidia
2. 00:08.0 3D controller: NVIDIA Corporation GP100GL [Tesla P100 PCIe 16GB] (rev a1)
3. 00:09.0 3D controller: NVIDIA Corporation GP100GL [Tesla P100 PCIe 16GB] (rev a1)
检查显卡驱动以及型号:
rpm --import https://www.elrepo.org/RPM-GPG-KEY-elrepo.org
rpm -Uvh http://www.elrepo.org/elrepo-release-7.0-2.el7.elrepo.noarch.rpm
yum install nvidia-detect
nvidia-detect -v
去NVIDIA官网下载对应型号、版本的显卡驱动。

禁用系统自带的显卡驱动:
#新建一个配置文件
sudo vim /etc/modprobe.d/blacklist-nouveau.conf
#sudo vim /usr/lib/modprobe.d/dist-blacklist.conf #上面的的命令最后失败的话使用这个

#写入以下内容
blacklist nouveau
options nouveau modeset=0

#保存并退出
:wq

#备份当前的镜像
sudo mv /boot/initramfs-$(uname -r).img /boot/initramfs-$(uname -r).img.bak

#建立新的镜像
sudo dracut /boot/initramfs-$(uname -r).img $(uname -r)

#重启
sudo reboot

#最后输入上面的命令验证
lsmod | grep nouveau

#如果还不行可以尝试下面的命令再重启:
sudo dracut --force
安装显卡驱动;
chmod +x NVIDIA-Linux-x86_64-390.48.run
sh NVIDIA-Linux-x86_64-390.48.run
可能会出现以下warning:
WARNING: nvidia-installer was forced to guess the X library path '/usr/lib' and X module path '/usr/lib/xorg/modules'; these paths were not queryable from the system. If X fails to find the NVIDIA X driver module, please install the `pkg-config` utility and the X.Org SDK/development package for your distribution and reinstall the driver.
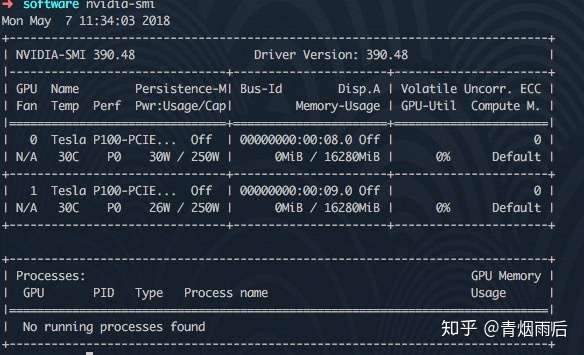
忽略不管。检测显卡是否安装成功:
nvidia-smi
安装CUDA
CUDA安装方式推荐使用runfile,使用rmp在线安装会出错,很难解决。下载时配置选择如下:
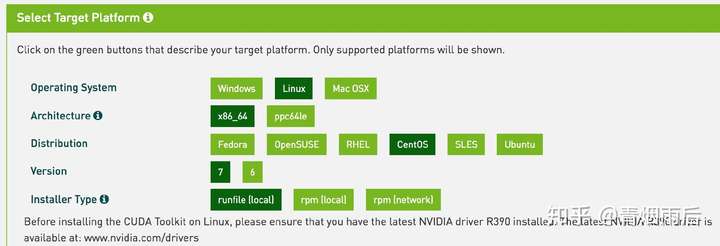
如果下载不动,可以手动更改DNS到1.1.1.1,传说中最快的DNS。
runfile中,实际上包含了三个文件:显卡驱动、CUDA、sample,我们这里只需要最后两个,所以先解压这个文件:
./cuda_7.5.18_linux.run --extract=$HOME
./cuda-linux64-rel-7.5.18-19867135.run
检测CUDA 安装是否成功:
./cuda-samples.9.1.85-23083092-linux.run ./software/cuda-sample
cd /usr/local/cuda/samples
make
cd bin/x86_64/linux/release/
./deviceQuery
#出现一大段结果,最后是
Result = PASS
#代表通过了

#最后检查
./bandwidthTest

#显示Result = PASS
安装CuDNN
CuDNN下载需要注册账号,这里就不一一举例,自行去NVIDIA官网下载CuDNN的压缩文件:

解压到以下目录:
tar -xvf cudnn-8.0-linux-x64-v6.0.tgz -C /usr/local
ldconfig
安装bazel
bazel是Google的打包工具,到https://github.com/bazelbuild/bazel/releases下载对应的bazel 版本安装。
源码编译安装TensorFlow
选择源码安装的方式,好处式可以自定义很多需求,谷歌给的编译好的wheel文件,是比较common的,很多功能我们并不需要,比如Google Cloud Platform support,也有一些很有用的功能考虑兼容性默认是关闭的,比如CPU加速计算指令,使用源码编译安装可以对这些进行更合理的选择。当然源码安装也有一个坏处,就是安装时间比较长。
进入TensorFlow源码目录,pyenv locan anaconda3*设置该目录的虚拟环境,保证我们的TensorFlow是安装在需要的虚拟环境里面去。
对应谷歌给出的目前编译安装通过的版本:
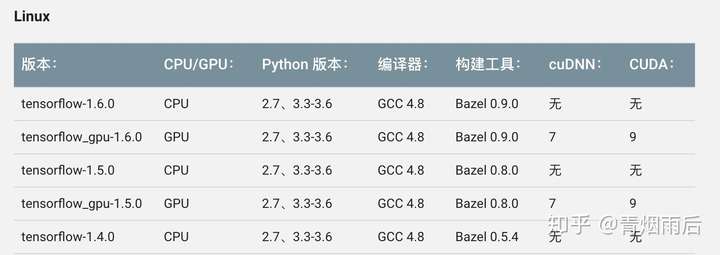
选择对应gcc与bazel版本。
本文使用以下脚本对TensorFlow进行编译安装:
#!/usr/bin/env bash

# Detect platform
if [ "$(uname)" == "Darwin" ]; then
        # MacOS
        raw_cpu_flags=`sysctl -a | grep machdep.cpu.features | cut -d ":" -f 2 | tr '[:upper:]' '[:lower:]'`
elif [ "$(uname)" == "Linux" ]; then
        # GNU/Linux
        raw_cpu_flags=`grep flags -m1 /proc/cpuinfo | cut -d ":" -f 2 | tr '[:upper:]' '[:lower:]'`
else
        echo "Unknown plaform: $(uname)"
        exit -1
fi

# check if VirtuelEnv activated
if [ -z "$VIRTUAL_ENV" ]; then
        echo "VirtualEnv is not activated"
        exit -1
fi

VENV_BIN=$VIRTUAL_ENV/bin
VENV_LIB=$VIRTUAL_ENV/lib

# bazel tf needs these env vars
export PYTHON_BIN_PATH=$VENV_BIN/python
export PYTHON_LIB_PATH=$VENV_LIB/`ls $VENV_LIB | grep python | grep -v lib`

COPT="--copt=-march=native"

for cpu_feature in $raw_cpu_flags
do
        case "$cpu_feature" in
                "sse4.1" | "sse4.2" | "ssse3" | "fma" | "cx16" | "popcnt" | "maes")
                    COPT+=" --copt=-m$cpu_feature"
                ;;
                "avx1.0")
                    COPT+=" --copt=-mavx"
                ;;
                *)
                        # noop
                ;;
        esac
done

bazel clean
./configure
bazel build -c opt $COPT -k //tensorflow/tools/pip_package:build_pip_package
bazel-bin/tensorflow/tools/pip_package/build_pip_package /tmp/tensorflow_pkg

pip install --upgrade /tmp/tensorflow_pkg/`ls /tmp/tensorflow_pkg/ | grep tensorflow`
该脚本支持mac, linux。脚本启动之后,会有以下选项提示:
INFO: Starting clean (this may take a while). Consider using --async if the clean takes more than several minutes.
WARNING: Running Bazel server needs to be killed, because the startup options are different.
You have bazel 0.13.0 installed.
Do you wish to build TensorFlow with jemalloc as malloc support? [Y/n]: n
No jemalloc as malloc support will be enabled for TensorFlow.

Do you wish to build TensorFlow with Google Cloud Platform support? [Y/n]: n
No Google Cloud Platform support will be enabled for TensorFlow.

Do you wish to build TensorFlow with Hadoop File System support? [Y/n]: n
No Hadoop File System support will be enabled for TensorFlow.

Do you wish to build TensorFlow with Amazon S3 File System support? [Y/n]: n
No Amazon S3 File System support will be enabled for TensorFlow.

Do you wish to build TensorFlow with Apache Kafka Platform support? [Y/n]: n
No Apache Kafka Platform support will be enabled for TensorFlow.

Do you wish to build TensorFlow with XLA JIT support? [y/N]: y
XLA JIT support will be enabled for TensorFlow.

Do you wish to build TensorFlow with GDR support? [y/N]: n
No GDR support will be enabled for TensorFlow.

Do you wish to build TensorFlow with VERBS support? [y/N]: n
No VERBS support will be enabled for TensorFlow.

Do you wish to build TensorFlow with OpenCL SYCL support? [y/N]: n
No OpenCL SYCL support will be enabled for TensorFlow.

Do you wish to build TensorFlow with CUDA support? [y/N]: y
CUDA support will be enabled for TensorFlow.

Please specify the CUDA SDK version you want to use, e.g. 7.0. [Leave empty to default to CUDA 9.0]: 9.1


Please specify the location where CUDA 9.1 toolkit is installed. Refer to README.md for more details. [Default is /usr/local/cuda]:


Please specify the cuDNN version you want to use. [Leave empty to default to cuDNN 7.0]: 7.1


Please specify the location where cuDNN 7 library is installed. Refer to README.md for more details. [Default is /usr/local/cuda]:


Do you wish to build TensorFlow with TensorRT support? [y/N]: n
No TensorRT support will be enabled for TensorFlow.

Please specify the NCCL version you want to use. [Leave empty to default to NCCL 1.3]:


Please specify a list of comma-separated Cuda compute capabilities you want to build with.
You can find the compute capability of your device at: https://developer.nvidia.com/cuda-gpus.
Please note that each additional compute capability significantly increases your build time and binary size. [Default is: 6.0,6.0]


Do you want to use clang as CUDA compiler? [y/N]: n
nvcc will be used as CUDA compiler.

Please specify which gcc should be used by nvcc as the host compiler. [Default is /usr/bin/gcc]:


Do you wish to build TensorFlow with MPI support? [y/N]: n
No MPI support will be enabled for TensorFlow.

Please specify optimization flags to use during compilation when bazel option "--config=opt" is specified [Default is -march=native]:

Would you like to interactively configure ./WORKSPACE for Android builds? [y/N]: n
Not configuring the WORKSPACE for Android builds.

Preconfigured Bazel build configs. You can use any of the below by adding "--config=<>" to your build command. See tools/bazel.rc for more details.
    --config=mkl            # Build with MKL support.
    --config=monolithic     # Config for mostly static monolithic build.
Configuration finished
Starting local Bazel server and connecting to it...
主要需要开启上面的几个选项:
1. JIT #开启Intel CPU 加速计算指令集
2. CUDA #版本号输入9.1
3. CuDNN #版本号输入7.1
4. #其它选项如上面的配置log所示
测试TensorFlow是否安装成功
运行以下代码,如果log中显示有GPU,说明安装成功:
import tensorflow as tf
sess = tf.Session(config=tf.ConfigProto(log_device_placement=True))
运行结果如下图所示:

说明安装成功。
安装Keras
Keras是在TensorFlow以及PyTorch(未来PyTorch会和Caffe2进一步合并)上面更抽象的一层,使用了layer的概念实现了很多深度学习的基本模型结构,比如Embedding, Pooling, DropOut, Dense等,也可以直接调用TensorFlow或者PyTorch的backend(二选一),使得深度学习的编码难度大幅降低。
pip install keras
好了,你可以开始愉快的机器学习之旅了~