Windows端:
输入下面指令
set HTTP_PROXY=http://127.0.0.1:1080
set HTTPS_PROXY=https://127.0.0.1:1080
然后:
curl.exe -vv www.google.com会有如下:
* Rebuilt URL to: www.google.com/
*   Trying 127.0.0.1...
* TCP_NODELAY set
* Connected to 127.0.0.1 (127.0.0.1) port 1080 (#0)
> GET http://www.google.com/ HTTP/1.1
> Host: www.google.com
> User-Agent: curl/7.55.1
> Accept: */*
> Proxy-Connection: Keep-Alive
>
< HTTP/1.1 200 OK
< Date: Sun, 30 Sep 2018 05:00:54 GMT
< Expires: -1
< Cache-Control: private, max-age=0
< Content-Type: text/html; charset=ISO-8859-1
< P3P: CP="This is not a P3P policy! See g.co/p3phelp for more info."
< Server: gws
< X-XSS-Protection: 1; mode=block
< X-Frame-Options: SAMEORIGIN
< Set-Cookie: 1P_JAR=2018-09-30-05; expires=Tue, 30-Oct-2018 05:00:54 GMT; path=/; domain=.google.com
< Set-Cookie: NID=140=raFGjxxCNdYyaiTPhO5I5KJ_A8HG98EWivfKYlhtidIqE_KksY8MJzJLTCMRE4xz1PFUDIGTcDLnaCI9brm0-cwALIyKra1x0nkpqyWe57H5ihq-4vyY0OfydlOHl4m-; expires=Mon, 01-Apr-2019 05:00:54 GMT; path=/; domain=.google.com; HttpOnly
< Accept-Ranges: none
< Vary: Accept-Encoding
< Connection: close
<
<!doctype html><html itemscope="" itemtype="http://schema.org/WebPage" lang="en"><head><meta content="Search the world's information, including webpages, images, videos and more. Google has many special features to help you find exactly what you're looking for." name="description"><meta content="noodp" name="robots"><meta content="text/html; charset=UTF-8" http-equiv="Content-Type"><meta content="/images/branding/googleg/1x/googleg_standard_color_128dp.png" itemprop="image"><title>Google</title><script nonce="OLUp6EEIFhGQShPxVk2zJg==">(function(){window.google={kEI:'hliwW9XVNcfYvASQj4OoAg',kEXPI:'0,1353747,57,1369
...
...
b=window.innerHeight;if(!a||!b){var c=window.document,d="CSS1Compat"==c.compatMode?c.documentElement:c.body;a=d.clientWidth;b=d.clientHeight}a&&b&&(a!=google.cdo.width||b!=google.cdo.height)&&google.log("","","/client_204?&atyp=i&biw="+a+"&bih="+b+"&ei="+google.kEI);}).call(this);})();</script><div id="xjsd"></div><div id="xjsi"><script nonce="OLUp6EEIFhGQShPxVk2zJg==">(function(){function c(b){window.setTimeout(function(){var a=document.createElement("script");a.src=b;google.timers&&google.timers.load.t&&google.tick&&google.tick("load",{gen204:"xjsls",clearcut:31});document.getElementById("xjsd").appendChild(a)},0)}google.dljp=function(b,a){google.xjsu=b;c(a)};google.dlj=c;}).call(this);if(!google.xjs){window._=window._||{};window._DumpException=window._._DumpException=function(e){throw e};window._F_installCss=window._._F_installCss=function(c){};google.dljp('/xjs/_/js/k\x3dxjs.hp.en_US.gfUd3gGLV_0.O/m\x3dsb_he,d/am\x3dYmA2/rt\x3dj/d\x3d1/rs\x3dACT90oHvOIimbVzFWVCBD4BW8X11VvhzZA','/xjs/_/js/k\x3dxjs.hp.en_US.gfUd3gGLV_0.O/m\x3dsb_he,d/am\x3dYmA2/rt\x3dj/d\x3d1/rs\x3dACT90oHvOIimbVzFWVCBD4BW8X11VvhzZA');google.xjs=1;}google.pmc={"sb_he":{"agen":true,"cgen":true,"client":"heirloom-hp","dh":true,"dhqt":true,"ds":"","ffql":"en","fl":true,"host":"google.com","isbh":28,"jsonp":true,"msgs":{"cibl":"Clear Search","dym":"Did you mean:","lcky":"I\u0026#39;m Feeling Lucky","lml":"Learn more","oskt":"Input tools","psrc":"This search was removed from your \u003Ca href=\"/history\"\u003EWeb History\u003C/a\u003E","psrl":"Remove","sbit":"Search by image","srch":"Google Search"},"ovr":{},"pq":"","refpd":true,"rfs":[],"sbpl":24,"sbpr":24,"scd":10,"sce":5,"stok":"LV27IvCUv9DJcQMYpc72Q-cfoQw","uhde":false},"d":{},"ZI/YVQ":{},"Qnk92g":{},"U5B21g":{},"DPBNMg":{},"YFCs/g":{}};google.x(null,function(){});(function(){var r=[];google.plm(r);})();(function(){var m=[]
;google.jsc && google.jsc.m(m);})();</script></div></body></html>* Closing connection 0
大家会用ping命令ping不通,因为Ping是ICMP协议,不是TCP/UDP协议,Ping不走,也无法走代理。
由于Linux下SS客户端仅代理socks5协议的流量(如果不是这个原因恳请指正)。所以想在LX终端使用代理,需要在SS的socks5流量前再接一个代理,允许http、https、ftp协议流量通过。
我们也假定本地socks5代理为127.0.0.1:1080
安装polipo
Debian下直接使用apt命令安装:
sudo apt update
sudo apt install polipo
编辑配置文件:
sudo nano /etc/polipo/config# This file only needs to list configuration variables that deviate
# from the default values. See /usr/share/doc/polipo/examples/config.sample
# and "polipo -v" for variables you can tweak and further information.
logSyslog = true
logFile = /var/log/polipo/polipo.log
proxyAddress = "0.0.0.0"
socksParentProxy = "127.0.0.1:1080"
socksProxyType = socks5
chunkHighMark = 50331648
objectHighMark = 16384
dnsQueryIPv6 = no按CTRL+X,Y保存退出。
重启polipo服务:
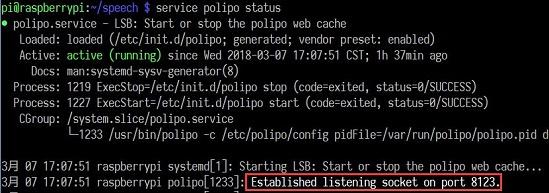
sudo service polipo restart启用代理
通过 service polipo status 命令,我们可以看到新的监听端口为8123。
因此,LX终端启用代理的命令为:
export http_proxy=http://127.0.0.1:8123
export https_proxy=http://127.0.0.1:8123
export ftp_proxy=http://127.0.0.1:8123
同样,直接输入上述命令设置的代理也是临时的。一个比较实用的方法是在~/.bashrc文件中设置环境,之后就不需要再手动设置了。
sudo nano ~/.bashrc在文件最后插入上述三条指令,保存。
测试 wget 指令: