ElasticSearch是什么
普通的检索: 从网页/文章中,找到对应的关键字信息。搜索引擎: 通过关键字,找到对应的网页,为了实现这个搜索引擎,在检索过程汇总,关键字可能出现标题,正文,摘要等等,需要在相应的多个字段中添加索引。
在数据库中检索的时候,使用like关键字,索引会失效,速度变慢。在搜索引擎中,为了提高检索效率,给多个字段添加索引的操作,称为全文索引。
搜索引擎所使用的索引的结构称之为倒排索引。即通过关键字,查找对应的文章,就是需要为关键字对应相关的文章建立索引的过程。之前官网为elasticsearch,太长了不便记忆了,就改为elastic.co,官网地址
1. ES和SOLR对比
- 接口
类似webservice的接口
REST风格的访问接口
- 分布式存储
solrCloud solr4.x才支持
es是为分布式而生的
- 支持的格式
solr xml json
es json

- 近实时搜索
2. ES和MySQL的对比
| MySQL |
ElasticSearch |
| database(数据库) |
index(索引库) |
| table(表) |
type(类型) |
| row(行) |
document(文档) |
| column(列) |
field(字段) |
ElasticSearch的安装配置
实际上ES的安装配置是非常简单的,没有繁琐的安装配置,可以称之为零配置,开箱即用。
说明一点:es新版本的操作必须要在普通用户下面进行操作

1. ES安装配置一(基于ElasticSearch2.3和CentOS6)
- 下载地址:
https://www.elastic.co/downloads/past-releases/elasticsearch-2-3-0
或者再github官网elastic项目下载都可以下载到各个版本的es
-
安装要求
JDK版本最低1.7
3. 安装
同一个安装包既可以在windows下使用,也可以在linux下使用,我们这里就在linux下来操作。
opt]# pwd
/opt
opt]# unzip soft/elasticsearch-2.3.0.zip
4. 验证
访问es的安装服务器,http://<es_ip>:9200

当页面出现这个状态的时候,就说明es安装成功了。
5. 配置文件说明
- logging.yml
日志配置文件,es也是使用log4j来记录日志的,所以logging.yml里的设置按普通log4j配置来设置就行了。
- elasticsearch.yml
es的基本配置文件,需要注意的是key和value的格式“:”之后需要一个空格。
修改如下配置之后,就可以从别的机器上进行访问了


修改cluster.name
![]()

修改node.name
![]()

Transport.tcp.port:9300 设置节点间交互的tcp端口,默认为9300
2. ES安装配置二(基于ElasticSearch6.2和CentOS6)
安装elasticsearch 5.x以上遇到的问题
- requires kernel 3.5+ with CONFIG_SECCOMP and CONFIG_SECCOMP_FILTER

centos6.x的内核太低,需要centos7或者升级centos6.x对应的内核至3.5以上。这里选择升级centos6.x对应的内核。
- 查看内核:
执行more /etc/issue和uname -a查看linux内核信息

可以看到内核信息太低,只有2.6左右,需要做升级。
- 升级
a. 导入public key
sudo rpm --import https://www.elrepo.org/RPM-GPG-KEY-elrepo.org
有如下错误:
![]()
无法在服务器使用curl命令访问https域名,原因是nss版本有点旧了,yum -y update nss更新一下,重新curl即可!

b. 安装ELRepo到CentOS
可以去http://elrepo.org/tiki/tiki-index.php 选择要安装的ELRepo。

一般会安装到最新版内核
~]$ sudo rpm -Uvh https://www.elrepo.org/elrepo-release-6-8.el6.elrepo.noarch.rpm

~]$ sudo yum --enablerepo=elrepo-kernel install kernel-lt -y

c. 编辑grub.conf文件,修改Grub引导顺序
sudo vim /etc/grub.conf

因为一般新安装的内核在第一个位置,所以设置default=0,表示启动新内核

重启之后查看linux内核
![]()
搞定!
2. max file descriptors [4096] for elasticsearch process is too low, increase to at least [65536]
![]()
编辑limits.conf 添加类似如下内容
sudo vim /etc/security/limits.conf
* soft nofile 65536
* hard nofile 131072
* soft nproc 2048
* hard nproc 4096

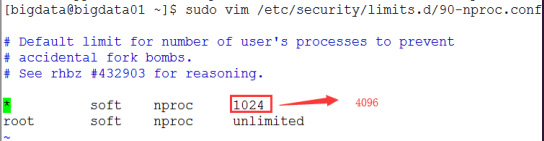
3.max number of threads [1024] for user [bigdata] is too low, increase to at least [4096]
![]()
进入/etc/security/limits.d/目录下修改配置文件90-nproc.conf
4.max virtual memory areas vm.max_map_count [65530] is too low, increase to at least [262144]
![]()
修改配置文件/etc/sysctl.conf
添加如下内容:vm.max_map_count = 262144

生效:~]$ sudo sysctl -p

5. system call filters failed to install; check the logs and fix your configuration or disable system call filters at your own risk(这个问题没遇到,遇到的可以采用下面方法)
![]()
这是在因为Centos6不支持SecComp,而ES5.2.0默认bootstrap.system_call_filter为true进行检测,所以导致检测失败,失败后直接导致ES不能启动。
在elasticsearch.yml中配置bootstrap.system_call_filter为false,注意要在Memory下面:
bootstrap.memory_lock: false
bootstrap.system_call_filter: false

重启电脑!
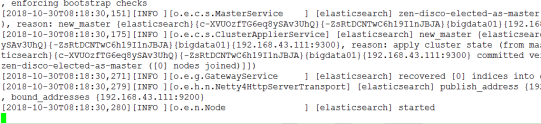
启动成功:

- 集群配置:
node.master: true
node.data: true
discovery.zen.ping.unicast.hosts: ["bigdata01", "bigdata02", "bigdata03"]
3. ES安装配置三(基于ElasticSearch6.5和CentOS7)
1: max file descriptors [4096] for elasticsearch process is too low, increase to at least [65536]
![]()
]$ sudo vim /etc/security/limits.conf
#ElasticSearch配置
* soft nofile 65536
* hard nofile 131072

2: max virtual memory areas vm.max_map_count [65530] is too low, increase to at least [262144]
![]()
]$ sudo vim /etc/sysctl.d/99-sysctl.conf
#ElasticSearch
vm.max_map_count = 262144

重启电脑!
bin]$ ./elasticsearch

启动成功:
