目录
步骤3 - 在Startup.cs文件中添加Identity Service
介绍
在开始阅读本文之前,请仔细阅读我之前的文章:ASP.NET Core 2.0身份和角色管理入门。
在我之前的文章中,我们已经详细讨论了如何在MVC应用程序中使用ASP.NET Core Identity来创建用户角色并根据用户角色显示菜单。
在本文中,我们将详细介绍如何在用户登录后显示基于角色的动态菜单。为此,我们将创建一个Menu Master表并插入一些记录以显示菜单和链接到URL的菜单,这些菜单是基于登录用户的角色的。
在这里,我们将看到如何实现:
- 创建默认管理员和经理用户
- 创建MenuMaster表并插入一些示例记录为Admin和Manager角色以显示菜单
- 将未经身份验证的用户重定向到登录页面
- 根据登录用户动态显示菜单
背景
先决条件
确保已在计算机上安装了所有必备组件。如果没有,那么一个接一个地下载并安装它们。
- 首先,从此链接下载并安装Visual Studio 2017
- SQL Server 2014或更高版本
使用代码
第1步 - 创建数据库
这是我们上一篇文章的延续; 正如我们告诉你的那样,我们将为ASP.NET Identity表和我们自己的新表使用公共数据库。
在我们之前的文章中,我们已经解释了如何创建用户角色,这里基于角色的菜单管理,我们需要在ASP.NET Roles表和我们的menu表之间建立关系。
让我们详细了解如何创建Menu表,其于ASP.NET Identity 中的AspNetRoles表是有关系的。
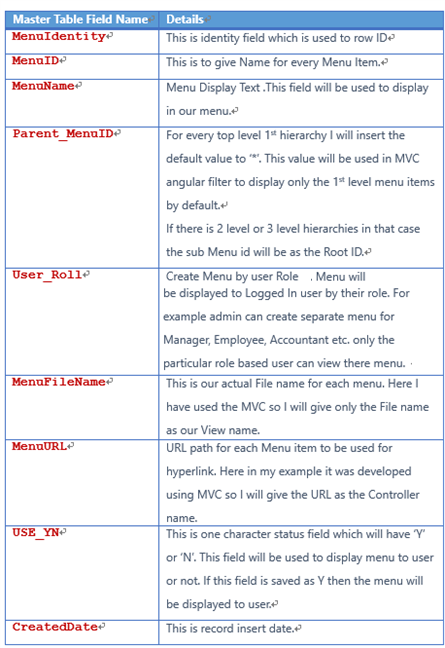
在这里,我们可以看到用于MenuMaster表的字段:
首先,我们将创建一个数据库,并使用我们的新数据库连接,在appsettings.json文件中设置连接字符串DefaultConnection。我们将使用此数据库创建ASP.NET Core Identity表。
创建数据库
运行以下脚本以创建数据库MenuMaster表和示例Menu插入行脚本。
USE MASTER
GO

-- 1) Check for the Database Exists. If the database exists, then drop and create new DB
IF EXISTS (SELECT [name] FROM sys.databases WHERE [name] = 'AttendanceDB' )
    DROP DATABASE AttendanceDB;
GO

CREATE DATABASE AttendanceDB;
GO

USE AttendanceDB
GO

IF EXISTS ( SELECT [name] FROM sys.tables WHERE [name] = 'MenuMaster' )
    DROP TABLE MenuMaster;
GO

CREATE TABLE MenuMaster
(
   MenuIdentity int identity(1,1),
   MenuID VARCHAR(30)  NOT NULL,
   MenuName VARCHAR(30)  NOT NULL,
   Parent_MenuID  VARCHAR(30)  NOT NULL,
   User_Roll [varchar](256) NOT NULL,
   MenuFileName VARCHAR(100) NOT NULL,
   MenuURL VARCHAR(500) NOT NULL,
   USE_YN Char(1) DEFAULT 'Y',
   CreatedDate datetime
   CONSTRAINT [PK_MenuMaster] PRIMARY KEY CLUSTERED
    (
      [MenuIdentity] ASC,
      [MenuID] ASC,
      [MenuName] ASC
    )WITH (PAD_INDEX  = OFF, STATISTICS_NORECOMPUTE  = OFF, IGNORE_DUP_KEY = OFF,
     ALLOW_ROW_LOCKS  = ON, ALLOW_PAGE_LOCKS  = ON) ON [PRIMARY]
) ON [PRIMARY]

select * from MenuMaster

-- Insert Admin User Details
Insert into MenuMaster(MenuID ,MenuName,Parent_MenuID,User_Roll,MenuFileName,MenuURL,USE_YN,CreatedDate)
    Values('AUSER','ADMIN Dashboard','*','ADMIN','INDEX','ADMINC','Y',getDate())

 Insert into MenuMaster(MenuID ,MenuName,Parent_MenuID,User_Roll,MenuFileName,MenuURL,USE_YN,CreatedDate)
    Values('AAbout','About Admin','*','ADMIN','INDEX','ADMINAC','Y',getDate())

Insert into MenuMaster(MenuID ,MenuName,Parent_MenuID,User_Roll,MenuFileName,MenuURL,USE_YN,CreatedDate)
    Values('LStock','Live Stock','AUSER','ADMIN','INDEX','StockC','Y',getDate())

Insert into MenuMaster(MenuID ,MenuName,Parent_MenuID,User_Roll,MenuFileName,MenuURL,USE_YN,CreatedDate)
    Values('Profile','User Details','AUSER','ADMIN','INDEX','MemberC','Y',getDate())

Insert into MenuMaster(MenuID ,MenuName,Parent_MenuID,User_Roll,MenuFileName,MenuURL,USE_YN,CreatedDate)
    Values('MUSER','Manager Dashboard','*','ADMIN','INDEX','ManagerC','Y',getDate())

 Insert into MenuMaster(MenuID ,MenuName,Parent_MenuID,User_Roll,MenuFileName,MenuURL,USE_YN,CreatedDate)
    Values('MAbout','About Manager','*','ADMIN','INDEX','ManagerAC','Y',getDate())

Insert into MenuMaster(MenuID ,MenuName,Parent_MenuID,User_Roll,MenuFileName,MenuURL,USE_YN,CreatedDate)
    Values('Accounts','Account Details','MUSER','ADMIN','INDEX','AccountC','Y',getDate())

    Insert into MenuMaster(MenuID ,MenuName,Parent_MenuID,User_Roll,MenuFileName,
                           MenuURL,USE_YN,CreatedDate)
    Values('Inventory','Inventory Details','MUSER','ADMIN','INDEX','InventoryC','Y',getDate())

-- Insert Manager User Details
Insert into MenuMaster(MenuID ,MenuName,Parent_MenuID,User_Roll,MenuFileName,MenuURL,USE_YN,CreatedDate)
    Values('MUSER','Manager Dashboard','*','Manager','INDEX','ManagerC','Y',getDate())

 Insert into MenuMaster(MenuID ,MenuName,Parent_MenuID,User_Roll,MenuFileName,MenuURL,USE_YN,CreatedDate)
    Values('MAbout','About Manager','*','Manager','INDEX','ManagerAC','Y',getDate())

Insert into MenuMaster(MenuID ,MenuName,Parent_MenuID,User_Roll,MenuFileName,MenuURL,USE_YN,CreatedDate)
    Values('Accounts','Account Details','MUSER','Manager','INDEX','AccountC','Y',getDate())

Insert into MenuMaster(MenuID ,MenuName,Parent_MenuID,User_Roll,MenuFileName,MenuURL,USE_YN,CreatedDate)
    Values('Inventory','Inventory Details','MUSER','Manager','INDEX','InventoryC','Y',getDate())


select * from MenuMaster;

select * from AspnetUserRoles;在这里,我们可以在Menu Master表中看到我们使用的格式,以根据用户角色插入显示菜单的记录。
- MenuID = 'AUSER' (我们将提供独特的菜单ID)。
- MenuName = 'ADMIN Dashboard' (我们将提供菜单显示文字),
- Parent_MenuID = '*’(如果这是主菜单,那么我们将在此处给出“ *”,否则我们将给出之前的记录MenuID以显示此记录以显示为子菜单)。
- User_Roll = 'ADMIN'(在这里,我们会给出用户角色,如果同样的菜单需要被用于基于像Admin,Manager,Accountant等等这样用户的多个角色,那么我们将使用不同的用户角色插入相同的菜单的详细信息。在我们的示例中,我们为Admin和Manager用户添加了与“Manager Dashboard”相同的菜单细节,因为两者都可以查看菜单和页面。)。
- MenuFileName = 'INDEX'(这里,在单击菜单时显示我们给出的View名字)。
- MenuURL = 'ADMINC'(这里,在单击菜单时显示我们给出的Controller名字)。
- USE_YN = 'Y' (这是一个可选字段,因为我们可以使用它来显示菜单或不显示)。
- CreatedDate = getDate() (这也是输入创建日期的可选项)。
在此演示应用程序中,当用户单击菜单时,我们已经有了所有需要的控制器和视图。
第2步 - 创建ASP.NET Core
安装我们的Visual Studio 2017后,单击开始,然后单击程序并选择Visual Studio 2017——单击Visual Studio 2017。单击新建,然后单击项目,选择Web,然后选择ASP.NET Core Web Application。输入您的项目名称并单击。
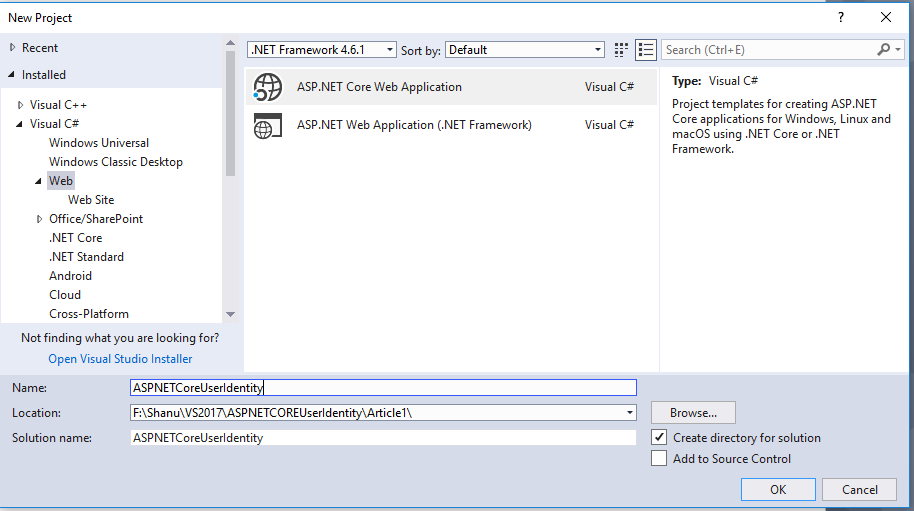
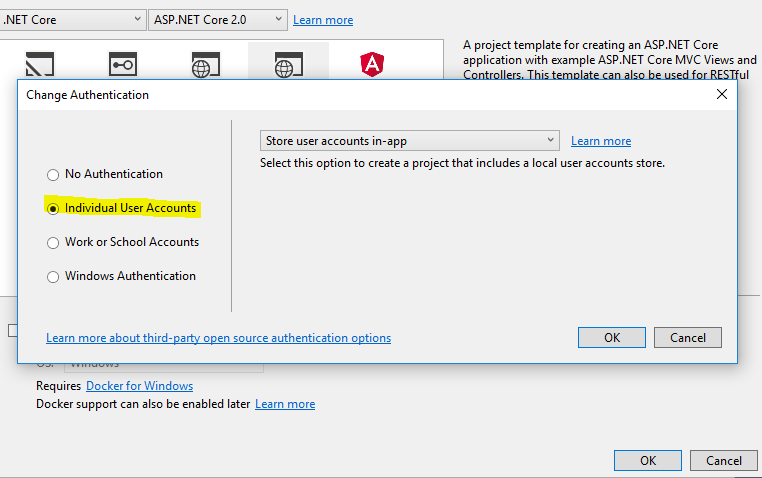
选择Web Application (Model-View-Controller),然后单击“更改身份验证”。
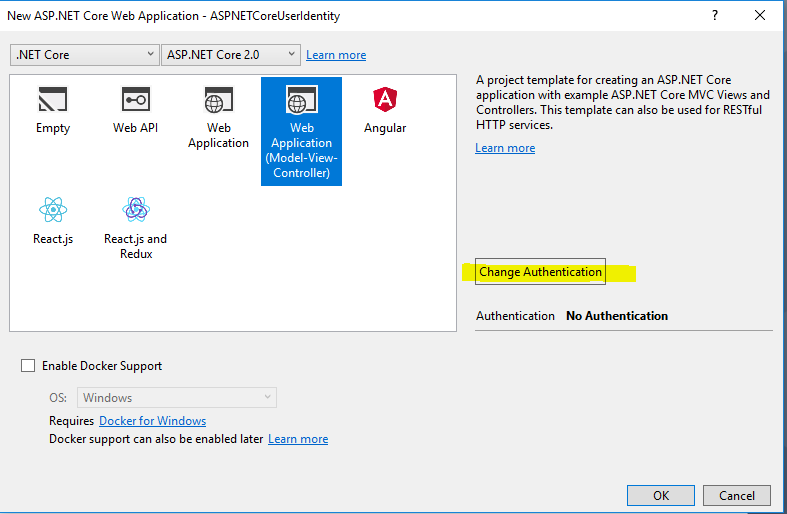
选择个人用户帐户,然后单击确定以创建项目。
更新appsettings.json
在appsettings.json文件中,我们可以找到DefaultConnection连接字符串。在连接字符串中,更改你的SQL Server名称,UID和PWD以在一个数据库中创建和存储所有用户详细信息。
"ConnectionStrings": {
    "DefaultConnection": "Server= YOURSERVERNAME;Database=InventoryDB;
     user id= YOURSQLUSERID;password=YOURSQLPASSWORD;Trusted_Connection=True;
     MultipleActiveResultSets=true"
},步骤3 - 在Startup.cs文件中添加Identity Service
默认情况下,在ASP.NET Core应用程序中,Identity Service将添加到Startup.cs文件中的 ConfigureServices方法中。您还可以在用户注册时另外添加密码强度,还可以使用以下代码设置默认登录页/注销页以及AccessDenaiedPath:
services.AddIdentity<ApplicationUser, IdentityRole>()
                .AddEntityFrameworkStores<ApplicationDbContext>()
                .AddDefaultTokenProviders();

            //Password Strength Setting
            services.Configure<IdentityOptions>(options =>
            {
                // Password settings
                options.Password.RequireDigit = true;
                options.Password.RequiredLength = 8;
                options.Password.RequireNonAlphanumeric = false;
                options.Password.RequireUppercase = true;
                options.Password.RequireLowercase = false;
                options.Password.RequiredUniqueChars = 6;

                // Lockout settings
                options.Lockout.DefaultLockoutTimeSpan = TimeSpan.FromMinutes(30);
                options.Lockout.MaxFailedAccessAttempts = 10;
                options.Lockout.AllowedForNewUsers = true;

                // User settings
                options.User.RequireUniqueEmail = true;
            });

            //Setting the Account Login page
            services.ConfigureApplicationCookie(options =>
            {
                // Cookie settings
                options.Cookie.HttpOnly = true;
                options.ExpireTimeSpan = TimeSpan.FromMinutes(30);
                options.LoginPath = "/Account/Login"; // If the LoginPath is not set here,
                                                      // ASP.NET Core will default to /Account/Login
                options.LogoutPath = "/Account/Logout"; // If the LogoutPath is not set here,
                                                        // ASP.NET Core will default to /Account/Logout
                options.AccessDeniedPath = "/Account/AccessDenied"; // If the AccessDeniedPath
                                 // is not set here, ASP.NET Core will default to /Account/AccessDenied
                options.SlidingExpiration = true;
});第4步:注册并创建用户
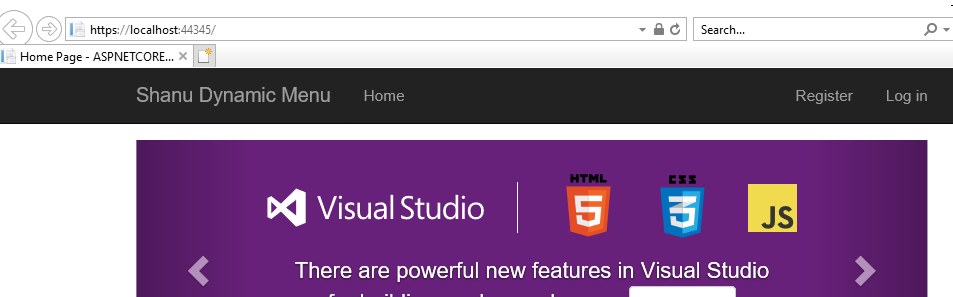
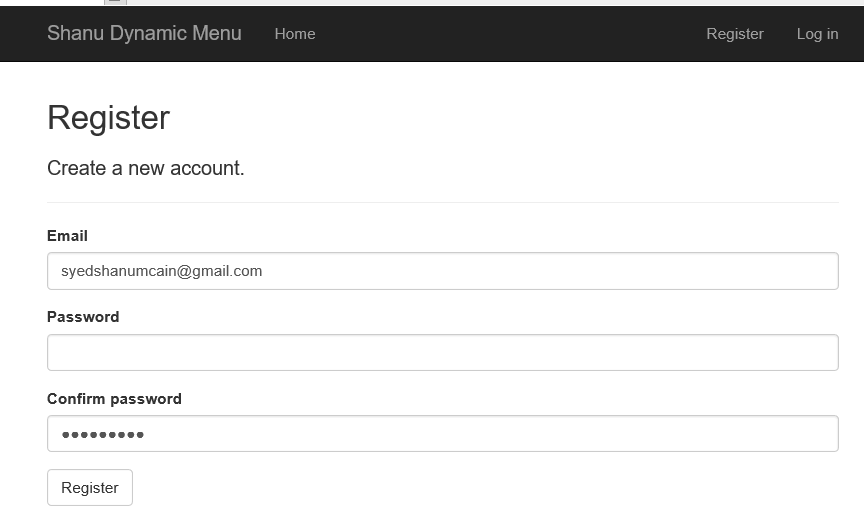
现在,我们的ASP.NET Core Web应用程序已准备好供用户在我们的网站上注册,且用户也可以在注册后登录我们的系统。我们将通过在后续步骤中向用户添加角色来执行授权。构建并运行应用程序以注册您的第一个默认管理员用户。
在这里,我们将注册两个用户,一个用户为Admin而另一个用户为Manager。我们将使用这些用户来添加角色。我们将创建2个用户[email protected]和[email protected]。注意:您可以根据需要创建用户,并在启动代码中更改用户详细信息,以便向用户添加角色。
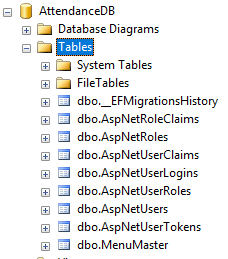
刷新数据库
刷新数据库时,我们可以看到所有Identity表都已创建。
第5步:创建角色并为角色分配用户
我们使用以下方法创建一个新角色“ Admin”和“ Manager”。我们会将最近注册的用户分配为“ Admin”和“ Manager”到我们的网站。打开Startup.cs文件,并在你的Startup.cs文件中添加此方法。
        private async Task CreateUserRoles(IServiceProvider serviceProvider)
        {
            var RoleManager = serviceProvider.GetRequiredService<RoleManager<IdentityRole>>();
            var UserManager = serviceProvider.GetRequiredService<UserManager<ApplicationUser>>();

            IdentityResult roleResult;

            //Adding Addmin Role
            var roleCheck = await RoleManager.RoleExistsAsync("Admin");
            if (!roleCheck)
            {
                //create the roles and seed them to the database
                roleResult = await RoleManager.CreateAsync(new IdentityRole("Admin"));
            }

            roleCheck = await RoleManager.RoleExistsAsync("Manager");
            if (!roleCheck)
            {
                //create the roles and seed them to the database
                roleResult = await RoleManager.CreateAsync(new IdentityRole("Manager"));
            }

            //Assign Admin role to the main User here we have given our
            //newly loregistered login id for Admin management
            ApplicationUser user = await UserManager.FindByEmailAsync("[email protected]");
            var User = new ApplicationUser();
            await UserManager.AddToRoleAsync(user, "Admin");

            user = await UserManager.FindByEmailAsync("[email protected]");
            await UserManager.AddToRoleAsync(user, "Manager");
}从Startup.cs文件中,我们可以找到该Configure方法。从这个Configure方法中调用我们的CreateUserRoles方法。当我们构建并运行我们的应用程序时,我们可以看到在ASPNetRole表中新的角色为“ Admin”和“ Manager”将创建。
第6步:创建Admin/Manager页面并设置授权
现在我们为ASP.NET Core Web应用程序提供了一个Admin / Manager用户作为下一步,让我们创建基于用户登录显示的控制器和视图。在前面的示例中,我们已经了解了如何在每个页面中设置角色授权,使用它,我们将创建所有需要的控制器和视图。在附带的示例演示应用程序中,您可以找到我们创建的所有控制器和视图,并根据您的需要创建自己的控制器和视图。
步骤7:使用依赖注入进行菜单显示
创建模型类
首先,我们将从Model文件夹中创建一个类开始。我们创建一个名为的MenuMaster类,其和数据库中给出表名是完全相同的。在MenuMaster类中,我们需要创建和Table字段一样名称的属性,如下:
    public class MenuMaster
    {
        [Key]
        public int MenuIdentity { get; set; }
        public string MenuID { get; set; }
        public string MenuName { get; set; }
        public string Parent_MenuID { get; set; }
        public string User_Roll { get; set; }
        public string MenuFileName { get; set; }
        public string MenuURL { get; set; }
        public string USE_YN { get; set; }
        public DateTime CreatedDate { get; set; }
    }
创建接口类
现在,我们是时候创建一个带有名称为GetMenuMaster(),GetMenuMaster(String UserRole)的方法的接口,我们将在我们的服务中实现这个接口,以从表中获取所有菜单细节,并且还使用另一个方法来根据用户角色获取菜单。要创建接口,请在model文件夹中添加一个新类,并将该类命名为“ IMenuMasterService”。
我们将把类更改为接口,因为我们将创建要在服务中实现的接口。
    public interface IMenuMasterService
    {
        IEnumerable<MenuMaster> GetMenuMaster();
        IEnumerable<MenuMaster> GetMenuMaster(String UserRole);
    }
创建服务
现在,让我们添加一个新的Services类文件夹,并将该类命名为“ MenuMasterService”。在这个类中,我们将实现我们的接口 IMenuMasterService。我们知道如果我们实现了接口,那么我们应该在我们的类中声明该接口方法。在此服务中,我们使用该接口方法,并返回包含Menu详细信息的列表,和按用户角色返回的Menu详细信息。我们将直接在View页面上注入此内容。
    public class MenuMasterService:IMenuMasterService
    {
        private readonly ApplicationDbContext _dbContext;

        public MenuMasterService(ApplicationDbContext dbContext)
        {
            _dbContext = dbContext;
        }

        public IEnumerable<MenuMaster> GetMenuMaster()
        {
            return _dbContext.MenuMaster.AsEnumerable();
        }

        public IEnumerable<MenuMaster> GetMenuMaster(string UserRole)
        {
            var result = _dbContext.MenuMaster.Where(m => m.User_Roll == UserRole).ToList();
            return result;
        }
    }
注册服务
我们需要将我们创建的服务注册到容器中。从项目中打开Startup.cs以将服务添加到容器中。
在Startup.cs类中,找到名为ConfigureServices的方法并添加您的服务“ MenuMasterService”,如下所示:
services.AddTransient<MenuMasterService, MenuMasterService>();在_Layout.cshtml页面中注入服务
现在,它更加简单和容易,因为我们可以直接在View页面中注入服务并将所有结果绑定到我们的视图页面。要在我们的View中注入服务,这里我们将使用现有的_Layout.cshtml页面。由于我们将在我们网站的顶部显示菜单并在我们的所有页面中使用,因此我们使用_Layout.cshtml页面将菜单结果绑定为基于用户登录的菜单。
在这里,首先我们检查用户是否已通过我们的网站验证,然后如果用户已登录,则我们获取登录用户的角色详细信息并根据用户角色绑定菜单。在这里,我们将2级菜单绑定为主菜单和子菜单。在我们的表结果中,我们检查所有的Parent_MenuID=” *” ,因为我们将带有parent_MenuID是“ *” 的显示为主菜单,在下一个内循环中,我们显示对应主菜单的子菜单。
<div class="navbar-collapse collapse">
 <ul class="nav navbar-nav">
   <li><a asp-area="" asp-controller="Home" asp-action="Index">Home</a></li>
 @if (User.Identity.IsAuthenticated)
        {
            var UserRoles = "";
            if (@User.IsInRole("Admin"))
            {
                UserRoles = "Admin";
            }
            else
            {
                UserRoles = "Manager";
            }
                @if (menus.GetMenuMaster(@UserRoles).Any())
                {
                @if (menus.GetMenuMaster(@UserRoles).Any())
                {
                @foreach (var menuNames in menus.GetMenuMaster(@UserRoles).Where
                            (n => n.Parent_MenuID == "*"))
                {
                        <li>
                            <a asp-area="" [email protected]
                               [email protected]>@menuNames.MenuName</a>
                            <ul class="sub-menu">
                                @foreach (var subMenu in menus.GetMenuMaster(@UserRoles).Where
                                         (n => n.Parent_MenuID == @menuNames.MenuID))
                                  {
                                    <li>
                                        <a asp-area="" [email protected]
                                         [email protected]>@subMenu.MenuName</a>
                                    </li>
                                   }
                            </ul>
                            </li>
                }
                }
                }
            }
  </ul>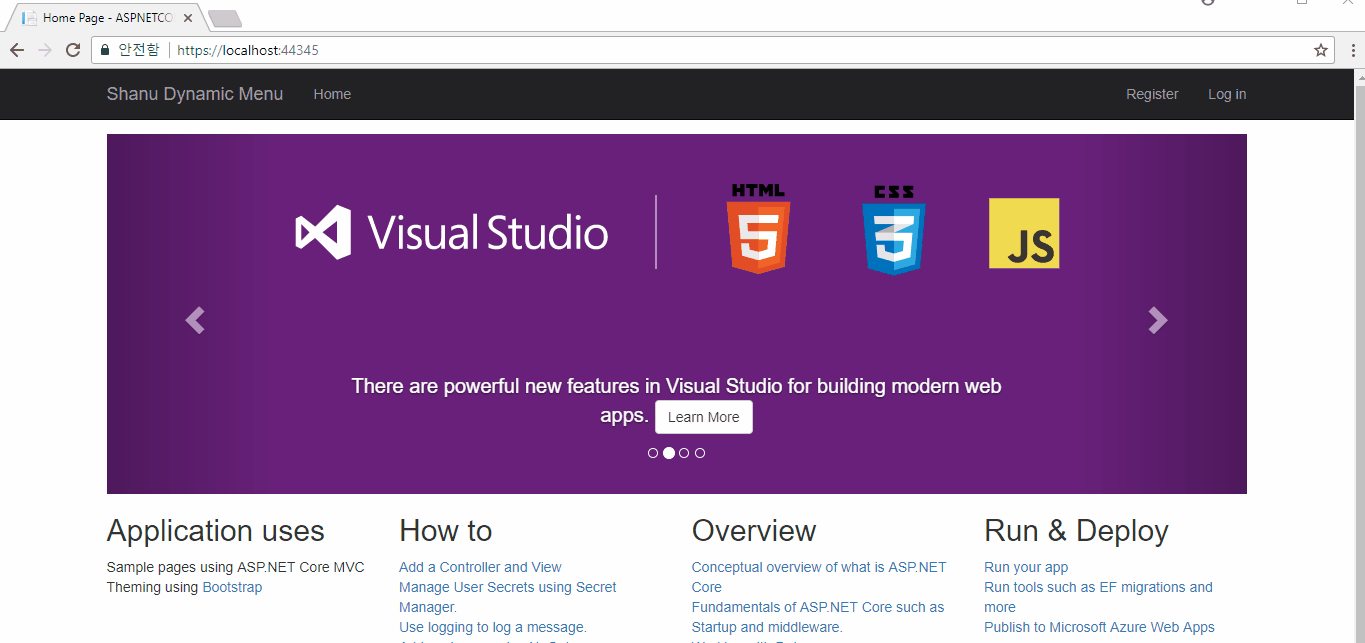
兴趣点
首先,AttendanceDB在SQL Server中创建一个示例数据库,然后运行脚本来创建MenuMaster表并插入样本记录。在appsettings.json文件中,DefaultConnection使用SQL Server Connections 更改连接字符串。在Startup.cs文件中,添加我们在本文中讨论的所有代码。这是一个简单的演示应用程序,我们已经固定了Admin和Manager角色,你可以根据你的要求进行更改,菜单和子菜单的CSS设计也不利于移动兼容性,你可以添加自己的bootstrap设计来实现你的菜单风格。希望大家都喜欢这篇文章。
原文地址:https://www.codeproject.com/Articles/1237650/ASP-NET-Core-User-Role-Base-Dynamic-Menu-Managemen