本文主要介绍Treble架构下的HAL&HIDL&Binder相关技术原理。Treble的详细资料文档,请参考Treble 官方文档。
1. Treble 简介
Android 8.0 版本的一项新元素是 Project Treble。这是 Android 操作系统框架在架构方面的一项重大改变,旨在让制造商以更低的成本更轻松、更快速地将设备更新到新版 Android 系统。Project Treble 适用于搭载 Android 8.0 及后续版本的所有新设备(这种新的架构已经在 Pixel 手机的开发者预览版中投入使用)。
1.1 系统更新
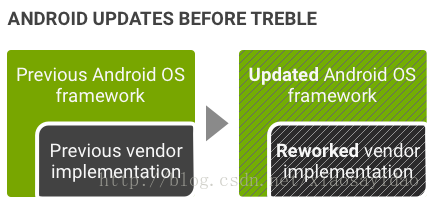
图 1. Treble 推出前的 Android 更新环境
Android 7.x 及更早版本中没有正式的供应商接口,因此设备制造商必须更新大量 Android 代码才能将设备更新到新版 Android 系统:
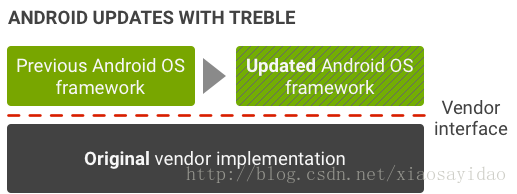
图 2. Treble 推出后的 Android 更新环境
Treble 提供了一个稳定的新供应商接口,供设备制造商访问 Android 代码中特定于硬件的部分,这样一来,设备制造商只需更新 Android 操作系统框架,即可跳过芯片制造商直接提供新的 Android 版本:
1.2 Android 经典架构
为了更好的了解Treble 架构里面的HAL,首先了解一下Android的经典架构。
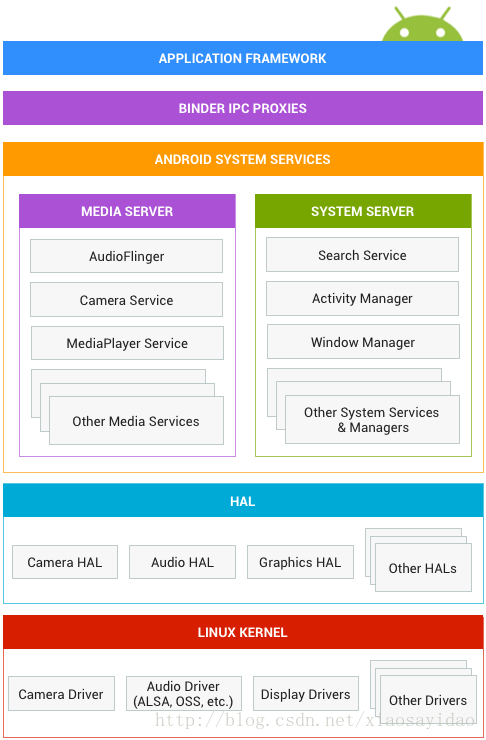
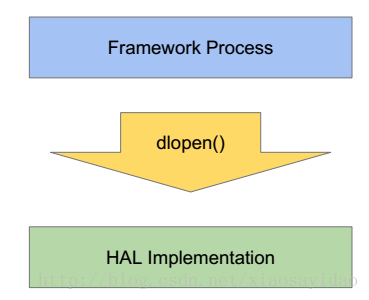
在Android O之前,HAL是一个个的.so库,通过dlopen来进行打开,库和framework位于同一个进程。如图所示:
1.3 Trebe 架构
为了能够让Android O之前的版本升级到Android O,Android设计了Passthrough模式,经过转换,可以方便的使用已经存在代码,不需要重新编写相关的HAL。HIDL分为两种模式:Passthrough和Binderized。
- Binderized: Google官方翻译成绑定试HAL。
- Passthrough:Google官方翻译成直通式HAL。
大致框架图如下,对于Android O之前的设备,对应图1,对于从之前的设备升级到O的版本,对应图2、图3. 对于直接基于Android O开发的设备,对应图4。
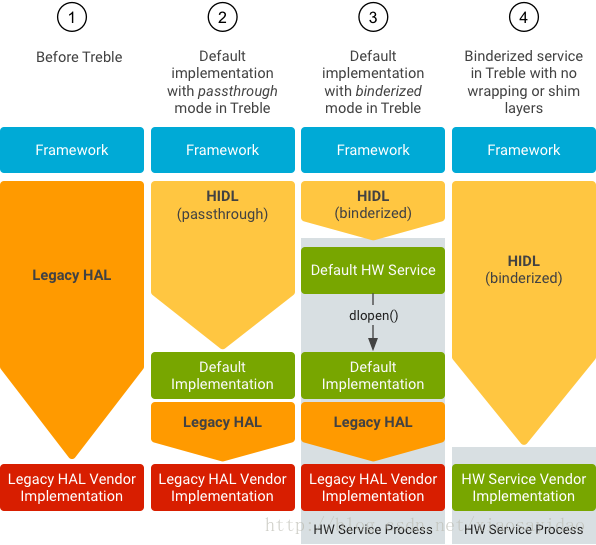
新的架构之下,framework和hal运行于不同的进程,所有的HAL采用新的HIDL技术来完成。
2. HIDL 深入理解
HIDL是一种接口定义语言,描述了HAL和它的用户之间的接口。接下来深入分析一下HIDL相关实现。
2.1 hidl-gen工具
在Treble架构中,经常会提到HIDL,首先介绍和HIDL相关的一个工具hidl-gen,系统定义的所有的.hal接口,都是通过hidl-gen工具转换成对应的代码。比如hardware/interfaces/power/1.0/IPower.hal,会通过hidl-gen转换成out/soong/.intermediates/hardware/interfaces/power/1.0/[email protected]_genc++/gen/android/hardware/power/1.0/PowerAll.cpp文件,为了深入了解,介绍相关原理,首先分析hidl-gen。
hidl-gen源码路径:system/tools/hidl,是在ubuntu上可执行的二进制文件。
使用方法:hidl-gen -o output-path -L language (-r interface-root) fqname
例子:
hidl-gen -Lmakefile -r android.hardware:hardware/interfaces -r android.hidl:system/libhidl/transport android.hardware.power@1.0
- 1
参数含义:
- -L: 语言类型,包括c++, c++-headers, c++-sources, export-header, c++-impl, java, java-constants, vts, makefile, androidbp, androidbp-impl, hash等。
hidl-gen可根据传入的语言类型产生不同的文件。 - fqname: 完全限定名称的输入文件。比如本例中
[email protected],要求在源码目录下必须有hardware/interfaces/power/1.0/目录。
- 对于单个文件来说,格式如下:
package@version::fileName,比如[email protected]::types.Feature。 - 对于目录来说。格式如下
package@version,比如[email protected]。
- 对于单个文件来说,格式如下:
- -r: 格式package:path,可选,对fqname对应的文件来说,用来指定包名和文件所在的目录到Android系统源码根目录的路径。如果没有制定,前缀默认是:android.hardware,目录是
Android源码的根目录。 - -o : 存放hidl-gen产生的中间文件的路径。我们查看hardware/interfaces/power/1.0/Android.bp,可以看到,-o参数都是写的
$(genDir),一般都是在out/soong/.intermediates/hardware/interfaces/power/1.0/下面,根据-L的不同,后面产生的路径可能不太一样,比如c++,那么就会就是out/soong/.intermediates/hardware/interfaces/power/1.0/[email protected]_genc++/gen,如果是c++-headers,那么就是out/soong/.intermediates/hardware/interfaces/power/1.0/[email protected]_genc++_headers/gen。
对于实例来说,fqname是:[email protected],包名是android.hardware,文件所在的目录是hardware/interfaces。例子中的命令会在out/soong/.intermediates/hardware/interfaces/power/1.0/下面产生对应的c++文件。
2.2 生成子hal的Android.mk和Android.bp文件
正如我们所知,所有的HIDL Interface 都是通过一个.hal文件来描述,为了方便编译生成每一个子hal。Google在系统默认提供了一个脚本update-makefiles.sh,位于hardware/interfaces/、frameworks/hardware/interfaces/、system/hardware/interfaces/、system/libhidl/。以hardware/interfaces/里面的代码为实例做介绍。
#!/bin/bash

source system/tools/hidl/update-makefiles-helper.sh

do_makefiles_update \
  "android.hardware:hardware/interfaces" \
  "android.hidl:system/libhidl/transport"
- 1
- 2
- 3
- 4
- 5
- 6
- 7
- 8
这个脚本的主要作用:根据hal文件生成Android.mk(makefile)和Android.bp(blueprint)文件。在hardware/interfaces的子目录里面,存在.hal文件的目录,都会产生Android.bp和Android.mk文件。详细分析如下:
a. source system/tools下面的update-makefiles-helper.sh,然后执行do_makefiles_update
b. 解析传入进去的参数。参数android.hardware:hardware/interfaces:
- android.hardware: android.hardware表示包名。
- hardware/interfaces:表示相对于根目录的文件路径。
会输出如下LOG:
Updating makefiles for android.hardware in hardware/interfaces.
Updating ….
c. 获取所有的包名。通过function get_packages()函数,获取hardware/interfaces路径下面的所有hal文件所在的目录路径,比如子目录power里面的hal文件的路径是power/1.0,加上当前的参数包名hardware/interfaces,通过点的方式连接,将nfc/1.0+hardware/interfaces里面的斜线转换成点,最终获取的包名就是 [email protected],依次类推获取所有的包名。
d. 执行hidl-gen命令.将c步骤里面获取的参数和包名还有类名传入hidl-gen命令,在hardware/interfaces/power/1.0目录下产生Android.mk和Android.bp文件。
Android.mk: hidl-gen -Lmakefile -r android.hardware:hardware/interfaces -r android.hidl:system/libhidl/transport [email protected]Android.bp: hidl-gen -Landroidbp -r android.hardware:hardware/interfaces -r android.hidl:system/libhidl/transport [email protected]
关于hidl-gen,后续章节会介绍。
e. 在hardware/interfaces的每个子目录下面产生Android.bp文件,文件内容主要是subdirs的初始化,存放当前目录需要包含的子目录。比如hardware/interfaces/power/下面的Android.bp文件。
@hardware/interfaces/power/Android.bp
// This is an autogenerated file, do not edit.
subdirs = [
    "1.0",
    "1.0/default",
    "1.0/vts/functional",
]
- 1
- 2
- 3
- 4
- 5
- 6
意思就是说,编译的时候,需要编译hardware/interfaces/power目录下面的三个子目录。
经过以上步骤,就会在对应的子目录产生Android.mk和Android.bp文件。这样以后我们就可以执行正常的编译命令进行编译了。比如mmm hardware/interfaces/power/,默认情况下,在源码中,Android.mk和Android.bp文件已经存在。
2.3 转换.hal 文件为代码
如前面所示,每个接口都是定义在.hal文件里面,比如hardware/interfaces/power/1.0/IPower.hal,通过hidl-gen生成的android.bp文件里面会定义
filegroup {
    name: "[email protected]_hal",
    srcs: [
        "types.hal",
        "IPower.hal",
    ],
}

genrule {
    name: "[email protected]_genc++",
    tools: ["hidl-gen"],
    cmd: "$(location hidl-gen) -o $(genDir) -Lc++-sources -randroid.hardware:hardware/interfaces -randroid.hidl:system/libhidl/transport [email protected]",
    srcs: [
        ":[email protected]_hal",
    ],
    out: [
        "android/hardware/power/1.0/types.cpp",
        "android/hardware/power/1.0/PowerAll.cpp",
    ],
}
- 1
- 2
- 3
- 4
- 5
- 6
- 7
- 8
- 9
- 10
- 11
- 12
- 13
- 14
- 15
- 16
- 17
- 18
- 19
- 20
可以看到在Android.bp里面,通过hidl-gen在out下面产生了types.cpp和PowerAll.cpp. 实际例子很多,不做详细介绍。
对于生成的PowerAll.cpp来说,我们可以看到,除了IPower.hal里面定义的函数之外,还生成了很多其他的方法,这个是hidl-gen默认产生,为了能够支持binder通信。在IPower.hal里面定义的setInteractive(bool interactive);,在PowerAll.cpp里面对应的是BpHwPower::setInteractive(bool interactive)。通过命名就可以知道,这个和Binder机制里面的命名一致。代码如下:
::android::hardware::Return<void> BpHwPower::setInteractive(bool interactive) {
    atrace_begin(ATRACE_TAG_HAL, "HIDL::IPower::setInteractive::client");
    #ifdef __ANDROID_DEBUGGABLE__
    if (UNLIKELY(mEnableInstrumentation)) {
        std::vector<void *> _hidl_args;
        _hidl_args.push_back((void *)&interactive);
        for (const auto &callback: mInstrumentationCallbacks) {
            callback(InstrumentationEvent::CLIENT_API_ENTRY, "android.hardware.power", "1.0", "IPower", "setInteractive", &_hidl_args);
        }
    }
    #endif // __ANDROID_DEBUGGABLE__

    ::android::hardware::Parcel _hidl_data;
    ::android::hardware::Parcel _hidl_reply;
    ::android::status_t _hidl_err;
    ::android::hardware::Status _hidl_status;

    _hidl_err = _hidl_data.writeInterfaceToken(IPower::descriptor);
    if (_hidl_err != ::android::OK) { goto _hidl_error; }

    _hidl_err = _hidl_data.writeBool(interactive);
    if (_hidl_err != ::android::OK) { goto _hidl_error; }

    _hidl_err = remote()->transact(1 /* setInteractive */, _hidl_data, &_hidl_reply);
    if (_hidl_err != ::android::OK) { goto _hidl_error; }

    _hidl_err = ::android::hardware::readFromParcel(&_hidl_status, _hidl_reply);
    if (_hidl_err != ::android::OK) { goto _hidl_error; }

    if (!_hidl_status.isOk()) { return _hidl_status; }

    atrace_end(ATRACE_TAG_HAL);
    #ifdef __ANDROID_DEBUGGABLE__
    if (UNLIKELY(mEnableInstrumentation)) {
        std::vector<void *> _hidl_args;
        for (const auto &callback: mInstrumentationCallbacks) {
            callback(InstrumentationEvent::CLIENT_API_EXIT, "android.hardware.power", "1.0", "IPower", "setInteractive", &_hidl_args);
        }
    }
    #endif // __ANDROID_DEBUGGABLE__

    _hidl_status.setFromStatusT(_hidl_err);
    return ::android::hardware::Return<void>();

_hidl_error:
    _hidl_status.setFromStatusT(_hidl_err);
    return ::android::hardware::Return<void>(_hidl_status);
}
- 1
- 2
- 3
- 4
- 5
- 6
- 7
- 8
- 9
- 10
- 11
- 12
- 13
- 14
- 15
- 16
- 17
- 18
- 19
- 20
- 21
- 22
- 23
- 24
- 25
- 26
- 27
- 28
- 29
- 30
- 31
- 32
- 33
- 34
- 35
- 36
- 37
- 38
- 39
- 40
- 41
- 42
- 43
- 44
- 45
- 46
- 47
- 48
经过以上步骤,.hal文件就转换成了对应的代码,而且具备了Binder通信的能力。
HIDL整个流程如图所示:

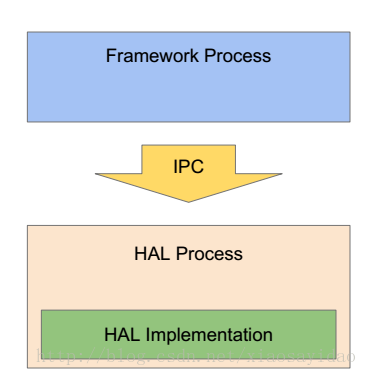
3. HAL通信机制(c++)
在Treble架构中,framework/vendor之间的通信通过HIDL接口和dev/hwbinder的IPC域来完成。而且HIDL接口有两种通信模式Passthrough和Binderized。接下来我们介绍两种模式下的交互原理。创建HAL服务器有两种模式:
- defaultPassthroughServiceImplementation
int main() {
    return defaultPassthroughServiceImplementation<IPower>();
}
- 1
- 2
- 3
- 4
- registerAsService
int main(int /* argc */, char* /* argv */ []) {
    sp<IDumpstateDevice> dumpstate = new DumpstateDevice;
    configureRpcThreadpool(1, true /* will join */);
    if (dumpstate->registerAsService() != OK) {
        ALOGE("Could not register service.");
        return 1;
    }
    joinRpcThreadpool();

    ALOGE("Service exited!");
    return 1;
}
- 1
- 2
- 3
- 4
- 5
- 6
- 7
- 8
- 9
- 10
- 11
- 12
- 13
接下来我们分别介绍两种类型的详细过程。
3.1 defaultPassthroughServiceImplementation
首先介绍Passthrough模式的HIDL实现机制。以hardware/interfaces/power/1.0作为例子。当编译hardware/interfaces/power/1.0的时候,会生成:
- 中间文件
PowerAll.cpp /vendor/bin/hw/[email protected]的可执行文件/vendor/lib/hw/[email protected]的库文件[email protected]会被拷贝到vendor.img里面的vendor/etc/init目录。rc文件的内容如下:
service power-hal-1-0 /vendor/bin/hw/android.hardware.power@1.0-service
    class hal
    user system
    group system
- 1
- 2
- 3
- 4
接下来我们就一步步分析,power Server是如何初始化的。
- 对于init的解析机制,本文不做描述,在开机过程的某一个阶段,系统会启动class是hal的服务,会执行
/vendor/bin/hw/[email protected],从而调用hardware/interfaces/power/1.0/default/service.cpp的main方法。代码如下:
int main() {
    return defaultPassthroughServiceImplementation<IPower>();
}
- 1
- 2
- 3
- 4
接下来会调用
@PowerAll.cpp
:android::sp<IPower> IPower::getService(const std::string &serviceName, const bool getStub) {
    using ::android::hardware::defaultServiceManager;
    using ::android::hardware::details::waitForHwService;
    using ::android::hardware::getPassthroughServiceManager;
    using ::android::hardware::Return;
    using ::android::sp;
    using Transport = ::android::hidl::manager::V1_0::IServiceManager::Transport;

    sp<IPower> iface = nullptr;
    // 获取HwServiceManager
    const sp<::android::hidl::manager::V1_0::IServiceManager> sm = defaultServiceManager();
    if (sm == nullptr) {
        ALOGE("getService: defaultServiceManager() is null");
        return nullptr;
    }
    // 获取当前Tranport类型,passthrough或者binderized
    Return<Transport> transportRet = sm->getTransport(IPower::descriptor, serviceName);

    if (!transportRet.isOk()) {
        ALOGE("getService: defaultServiceManager()->getTransport returns %s", transportRet.description().c_str());
        return nullptr;
    }
    Transport transport = transportRet;
    const bool vintfHwbinder = (transport == Transport::HWBINDER);
    const bool vintfPassthru = (transport == Transport::PASSTHROUGH);

    // 返回当前的接口类

    for (int tries = 0; !getStub && (vintfHwbinder || (vintfLegacy && tries == 0)); tries++) {
        if (tries > 1) {
            ALOGI("getService: Will do try %d for %s/%s in 1s...", tries, IPower::descriptor, serviceName.c_str());
            sleep(1);
        }
        if (vintfHwbinder && tries > 0) {
            waitForHwService(IPower::descriptor, serviceName);
        }
        Return<sp<::android::hidl::base::V1_0::IBase>> ret =
                sm->get(IPower::descriptor, serviceName);
        if (!ret.isOk()) {
            ALOGE("IPower: defaultServiceManager()->get returns %s", ret.description().c_str());
            break;
        }
        sp<::android::hidl::base::V1_0::IBase> base = ret;
        if (base == nullptr) {
            if (tries > 0) {
                ALOGW("IPower: found null hwbinder interface");
            }continue;
        }
        Return<sp<IPower>> castRet = IPower::castFrom(base, true /* emitError */);
    // ...
        iface = castRet;
        if (iface == nullptr) {
            ALOGW("IPower: received incompatible service; bug in hwservicemanager?");
            break;
        }
        return iface;
    }
    // 获取passthrough模式的类。
    if (getStub || vintfPassthru || vintfLegacy) {
        const sp<::android::hidl::manager::V1_0::IServiceManager> pm = getPassthroughServiceManager();
        if (pm != nullptr) {
            Return<sp<::android::hidl::base::V1_0::IBase>> ret =
                    pm->get(IPower::descriptor, serviceName);
            if (ret.isOk()) {
                sp<::android::hidl::base::V1_0::IBase> baseInterface = ret;
                if (baseInterface != nullptr) {
                    iface = new BsPower(IPower::castFrom(baseInterface));
                }
            }
        }
    }
    return iface;
}
- 1
- 2
- 3
- 4
- 5
- 6
- 7
- 8
- 9
- 10
- 11
- 12
- 13
- 14
- 15
- 16
- 17
- 18
- 19
- 20
- 21
- 22
- 23
- 24
- 25
- 26
- 27
- 28
- 29
- 30
- 31
- 32
- 33
- 34
- 35
- 36
- 37
- 38
- 39
- 40
- 41
- 42
- 43
- 44
- 45
- 46
- 47
- 48
- 49
- 50
- 51
- 52
- 53
- 54
- 55
- 56
- 57
- 58
- 59
- 60
- 61
- 62
- 63
- 64
- 65
- 66
- 67
- 68
- 69
- 70
- 71
- 72
- 73
- defaultPassthroughServiceImplementation(); @hardware/interfaces/power/1.0/default/service.cpp
- IPower::getService @PowerAll.cpp 从HwServiceManager里面获取注册的服务。默认情况下是没有注册这个服务的。
- defaultServiceManager @system/libhidl/transport/ServiceManagement.cpp 打开
/dev/hwbinder,通过binder通信,获取HwServiceManager服务端。 sm->getTransport 基本就是按照Binder通信的机制来实现相关的流程。通过
HwBinder调用服务端的getTransPort方法。
- BpHwServiceManager::getTransport @ServiceManagerAll.cpp
- BpHwBinder::transact
- IPCThreadState::self()->transact
- IPCThreadState::transact writeTransactionData waitForResponse
- IPCThreadState::executeCommand
ServiceManager::getTransport@system/hwservicemanager/ServiceManager.cpp
- getTransport @ system/hwservicemanager/Vintf.cpp 根据framework hal和device hal配置的manifest.xml里面的定义,来判断当前的传输类型是HwBinder还是Passthrough模式。在
vendor/manifest.xml里面,power配置的是hwbinder,所以最终就是hwBinder模式。(后续会讲解manifest.xml的原理)
由于我们采取的是defaultPassthroughServiceImplementation<IPower>();进行注册,所以getStub=true.所以会走到const sp<::android::hidl::manager::V1_0::IServiceManager> pm = getPassthroughServiceManager();
- getPassthroughServiceManager @ PowerAll.cpp 获取passthrough服务管理。
- 调用PassthroughServiceManager的get(const hidl_string& fqName, const hidl_string& name)函数 @ServiceManagement.cpp, 根据传入的fqName=([email protected]::IPower"),获取当前的接口名IPower,拼接出后面需要载入的函数名HIDL_FETCH_IPower和库名字[email protected],接着通过dlopen载入/vendor/lib/hw/[email protected],然后通过dlsym载入HIDL_FETCH_IPower函数。 代码如下:
@hardware/interfaces/power/1.0/default/Power.cpp
IPower* HIDL_FETCH_IPower(const char* /* name */) {
    const hw_module_t* hw_module = nullptr;
    power_module_t* power_module = nullptr;
    int err = hw_get_module(POWER_HARDWARE_MODULE_ID, &hw_module);
    if (err) {
        ALOGE("hw_get_module %s failed: %d", POWER_HARDWARE_MODULE_ID, err);
        return nullptr;
    }

    if (!hw_module->methods || !hw_module->methods->open) {
        power_module = reinterpret_cast<power_module_t*>(
            const_cast<hw_module_t*>(hw_module));
    } else {
        err = hw_module->methods->open(
            hw_module, POWER_HARDWARE_MODULE_ID,
            reinterpret_cast<hw_device_t**>(&power_module));
        if (err) {
            ALOGE("Passthrough failed to load legacy HAL.");
            return nullptr;
        }
    }
    return new Power(power_module);
}
- 1
- 2
- 3
- 4
- 5
- 6
- 7
- 8
- 9
- 10
- 11
- 12
- 13
- 14
- 15
- 16
- 17
- 18
- 19
- 20
- 21
- 22
- 23
- 24
通过hw_get_module就和Android O以前的Hal模式一致,这正是Passthrough复用原有hal的原理,测试用的是模拟器,所以最终获取的库文件是/system/lib/hw/power.ranchu.so,后续所有的和Power有关的接口调用,最终都是通过power.ranchu.so来实现功能。
接下来会调用registerReference("[email protected]::IPower","default"),接着调用BpHwServiceManager::registerPassthroughClient将fqName和服务名,注册进hwservicemanager的mServiceMap对象里面。
Return<void> ServiceManager::registerPassthroughClient(const hidl_string &fqName,
        const hidl_string &name) {
    pid_t pid = IPCThreadState::self()->getCallingPid();
    if (!mAcl.canGet(fqName, pid)) {
        /* We guard this function with "get", because it's typically used in
         * the getService() path, albeit for a passthrough service in this
         * case
         */
        return Void();
    }
    PackageInterfaceMap &ifaceMap = mServiceMap[fqName];
    if (name.empty()) {
        LOG(WARNING) << "registerPassthroughClient encounters empty instance name for "
                     << fqName.c_str();
        return Void();
    }
    HidlService *service = ifaceMap.lookup(name);
    if (service == nullptr) {
        auto adding = std::make_unique<HidlService>(fqName, name);
        adding->registerPassthroughClient(pid);
        ifaceMap.insertService(std::move(adding));
    } else {
        service->registerPassthroughClient(pid);
    }
    return Void();
}
- 1
- 2
- 3
- 4
- 5
- 6
- 7
- 8
- 9
- 10
- 11
- 12
- 13
- 14
- 15
- 16
- 17
- 18
- 19
- 20
- 21
- 22
- 23
- 24
- 25
- 26
返回
android::hidl::base::V1_0::IBase实例。new BsPower:首先会通过interfaceChain判断当前的interface是否支持转换,然后传入包名和接口名
"[email protected]", "IPower"构造出一个new BsPower的实例。IPower::registerAsService 接下来,调用
status_t status = service->registerAsService(name),首先会创建BnHwPower对象,然后将当前的service 添加进hwservicemanager里面。初始化BnHwPower的过程中, _hidl_mImpl实际上就是BsPower的引用。代码如下。 。
BnHwPower::BnHwPower(const ::android::sp<IPower> &_hidl_impl)
        : ::android::hidl::base::V1_0::BnHwBase(_hidl_impl, "[email protected]", "IPower") {
            _hidl_mImpl = _hidl_impl;
            auto prio = ::android::hardware::details::gServicePrioMap.get(_hidl_impl, {SCHED_NORMAL, 0});
            mSchedPolicy = prio.sched_policy;
            mSchedPriority = prio.prio;
}
- 1
- 2
- 3
- 4
- 5
- 6
- 7
然后调用如下步骤,将当前通信加入IPC Binder的线程池进行循环。
- android::hardware::joinRpcThreadpool at system/libhidl/transport/HidlTransportSupport.cpp:28 加入RpcThreadPool。
- android::hardware::joinBinderRpcThreadpool at system/libhidl/transport/HidlBinderSupport.cpp:188
- android::hardware::IPCThreadState::joinThreadPool at system/libhwbinder/IPCThreadState.cpp:497
- android::hardware::IPCThreadState::getAndExecuteCommand at system/libhwbinder/IPCThreadState.cpp:443
至此,[email protected]::IPower服务就启动成功了,可以响应客户端的请求了。
总结,通过defaultPassthroughServiceImplementation把当前的服务注册进HwServiceManager,每个服务都是一个HidlService。然后就可以等待客户端的调用。
3.2 registerAsService 创建HAL
根据Android源码网站介绍,[email protected]是属于绑定式HAL。接下来我们分析dumpstate服务初始化的流程。代码位于:hardware/interfaces/dumpstate/1.0/default/,查看service.cpp,代码如下:
int main(int /* argc */, char* /* argv */ []) {
    sp<IDumpstateDevice> dumpstate = new DumpstateDevice;
    configureRpcThreadpool(1, true /* will join */);
    if (dumpstate->registerAsService() != OK) {
        ALOGE("Could not register service.");
        return 1;
    }
    joinRpcThreadpool();

    ALOGE("Service exited!");
    return 1;
}
- 1
- 2
- 3
- 4
- 5
- 6
- 7
- 8
- 9
- 10
- 11
- 12
- 13
- IDumpstateDevice::registerAsService
- android::hardware::details::onRegistration(“[email protected]”, “IDumpstateDevice”, serviceName)
- tryShortenProcessName 设置当前进程的名字,长度最多为16。[email protected]
- BpHwServiceManager::add
- ServiceManager::add @system/hwservicemanager/ServiceManager.cpp 注意和binder的区别。将当前的
service添加进mInstanceMap。
- ServiceManager::add @system/hwservicemanager/ServiceManager.cpp 注意和binder的区别。将当前的
- 收到HwBinder驱动的 BR_TRANSACTION 消息,然后执行 BHwBinder::transact
- BnHwDumpstateDevice::onTransact
- joinRpcThreadpool(); 把当前的通信加入HwBinder的线程池进行循环。
至此,registerAsService 创建HAL Service就完成了。
3.2 Binderized 模式 client和服务端的交互
服务注册成功之后,客户端就可以调用相关服务提供的功能。
以点击屏幕为实例说明,当我们点击屏幕的时候,会调用com_android_server_power_PowerManagerService.cpp的android_server_PowerManagerService_userActivity函数,代码如下:
void android_server_PowerManagerService_userActivity(nsecs_t eventTime, int32_t eventType) {
    // Tell the power HAL when user activity occurs.
    gPowerHalMutex.lock();
    if (getPowerHal()) {
        Return<void> ret = gPowerHal->powerHint(PowerHint::INTERACTION, 0);
        processReturn(ret, "powerHint");
    }
    // ...
    }
}

// Check validity of current handle to the power HAL service, and call getService() if necessary.
// The caller must be holding gPowerHalMutex.
bool getPowerHal() {
    if (gPowerHalExists && gPowerHal == nullptr) {
        gPowerHal = IPower::getService();
        if (gPowerHal != nullptr) {
            ALOGI("Loaded power HAL service");
        } else {
            ALOGI("Couldn't load power HAL service");
            gPowerHalExists = false;
        }
    }
    return gPowerHal != nullptr;
}
- 1
- 2
- 3
- 4
- 5
- 6
- 7
- 8
- 9
- 10
- 11
- 12
- 13
- 14
- 15
- 16
- 17
- 18
- 19
- 20
- 21
- 22
- 23
- 24
- 25
- 26
在getPowerHal里面,通过IPower::getService();方法经过HwBinder通信,获取服务端的引用。主要包含如下步骤:
IPower::getService() 获取IPower的服务。返回远程服务的代理
gPowerHal,最终返回的是BpHwPower。
IPower::getService(const std::string &serviceName, const bool getStub)@PowerApp.cpp。- BpHwServiceManager::getTransport 获取当前的传输类型,
passthrough或者binderized。Power是binderized,返回对应的服务代理。 - sm->get(IPower::descriptor, serviceName) 从ServiceManager里面获取描述是
[email protected]::IPower,服务名是default的hidlservice的引用。 - IPower::castFrom(base, true /* emitError */)
- android::hardware::details::castInterface 将
hidlservice服务的引用转换成Binder对象。 - ::android::hardware::IInterface::asBinder(static_cast
3.4 pathrough 模式 client和服务端的交互
查询manifest.xml可以发现。android.hardware.graphics.mapper是passthrough的模式。
    <hal format="hidl">
        <name>android.hardware.graphics.mapper</name>
        <transport arch="32+64">passthrough</transport>
        <version>2.0</version>
        <interface>
            <name>IMapper</name>
            <instance>default</instance>
        </interface>
    </hal>
- 1
- 2
- 3
- 4
- 5
- 6
- 7
- 8
- 9
以hardware/interfaces/graphics/mapper/2.0/作为例子进行分析。
@frameworks/native/libs/ui/Gralloc2.cpp
Mapper::Mapper()
{
    mMapper = IMapper::getService();
    if (mMapper == nullptr || mMapper->isRemote()) {
        LOG_ALWAYS_FATAL("gralloc-mapper must be in passthrough mode");
    }
}
- 1
- 2
- 3
- 4
- 5
- 6
- 7
// static
::android::sp IMapper::getService(const std::string &serviceName, const bool getStub) {
using ::android::hardware::defaultServiceManager;
using ::android::hardware::details::waitForHwService;
using ::android::hardware::getPassthroughServiceManager;
using ::android::hardware::Return;
using ::android::sp;
using Transport = ::android::hidl::manager::V1_0::IServiceManager::Transport;
sp<IMapper> iface = nullptr;

const sp<::android::hidl::manager::V1_0::IServiceManager> sm = defaultServiceManager();
if (sm == nullptr) {
    ALOGE("getService: defaultServiceManager() is null");
    return nullptr;
}

Return<Transport> transportRet = sm->getTransport(IMapper::descriptor, serviceName);

if (!transportRet.isOk()) {
    ALOGE("getService: defaultServiceManager()->getTransport returns %s", transportRet.description().c_str());
    return nullptr;
}
Transport transport = transportRet;
const bool vintfHwbinder = (transport == Transport::HWBINDER);
const bool vintfPassthru = (transport == Transport::PASSTHROUGH);

// ...
if (getStub || vintfPassthru || vintfLegacy) {
    const sp<::android::hidl::manager::V1_0::IServiceManager> pm = getPassthroughServiceManager();
    if (pm != nullptr) {
        Return<sp<::android::hidl::base::V1_0::IBase>> ret =
                pm->get(IMapper::descriptor, serviceName);
        if (ret.isOk()) {
            sp<::android::hidl::base::V1_0::IBase> baseInterface = ret;
            if (baseInterface != nullptr) {
                iface = new BsMapper(IMapper::castFrom(baseInterface));
            }
        }
    }
}
return iface;
- 1
- 2
- 3
- 4
- 5
- 6
- 7
- 8
- 9
- 10
- 11
- 12
- 13
- 14
- 15
- 16
- 17
- 18
- 19
- 20
- 21
- 22
- 23
- 24
- 25
- 26
- 27
- 28
- 29
- 30
- 31
- 32
- 33
}
- 步骤和前面的一致,由于是passthrough的模式,调用
PassthroughServiceManager的get(const hidl_string& fqName, const hidl_string& name)函数@ServiceManagement.cpp, 根据传入的fqName=([email protected]::IMapper"),获取当前的接口名IMapper,拼接出后面需要载入的函数名HIDL_FETCH_IMapper和库名字[email protected],接着通过dlopen载入[email protected],然后通过dlsym载入HIDL_FETCH_IMapper函数。
这样就实现了passthrough模式下的通信了。
4. HAL 通信 (JAVA)
以hardware/interfaces/radio/1.0/作为例子:
当我们编译hardware/interfaces/radio/1.0/的时候,会编译出:
- android.hardware.radio-V1.0-java-static
- out/target/common/gen/JAVA_LIBRARIES/android.hardware.radio-V1.0-java-static_intermediates/android/hardware/radio/V1_0/IRadio.java
接下来我们以
@frameworks/opt/telephony/Android.mk 最为例子,直接引用android.hardware.radio-V1.0-java-static,然后就可以使用里面的相关代码。
LOCAL_PATH := $(call my-dir)
include $(CLEAR_VARS)

// ...
LOCAL_JAVA_LIBRARIES := voip-common ims-common
LOCAL_STATIC_JAVA_LIBRARIES := android.hardware.radio-V1.0-java-static \
    android.hardware.radio.deprecated-V1.0-java-static
LOCAL_MODULE_TAGS := optional
LOCAL_MODULE := telephony-common
// ...

include $(BUILD_JAVA_LIBRARY)
- 1
- 2
- 3
- 4
- 5
- 6
- 7
- 8
- 9
- 10
- 11
- 12
- 13
接下来我们看一下使用的地方。
@RIL.java
        try {
            mRadioProxy = IRadio.getService(HIDL_SERVICE_NAME[mPhoneId == null ? 0 : mPhoneId]);
            if (mRadioProxy != null) {
                mRadioProxy.linkToDeath(mRadioProxyDeathRecipient,
                        mRadioProxyCookie.incrementAndGet());
                mRadioProxy.setResponseFunctions(mRadioResponse, mRadioIndication);
            } else {
                riljLoge("getRadioProxy: mRadioProxy == null");
            }
        } catch (RemoteException | RuntimeException e) {
            mRadioProxy = null;
            riljLoge("RadioProxy getService/setResponseFunctions: " + e);
        }
- 1
- 2
- 3
- 4
- 5
- 6
- 7
- 8
- 9
- 10
- 11
- 12
- 13
- 14
首先会直接调用IRadio.getService来获取相关服务。
@IRadio.java
    public static IRadio getService(String serviceName) throws android.os.RemoteException {
        return IRadio.asInterface(android.os.HwBinder.getService("[email protected]::IRadio",serviceName));
    }
- 1
- 2
- 3
- 4
android.os.HwBinder.getService(“[email protected]::IRadio”,serviceName)
JNI
@frameworks/base/core/jni/android_os_HwBinder.cpp
static jobject JHwBinder_native_getService(
        JNIEnv *env,
        jclass /* clazzObj */,
        jstring ifaceNameObj,
        jstring serviceNameObj) {

    ///...

    auto manager = hardware::defaultServiceManager();

    // ...


    Return<IServiceManager::Transport> transportRet =
            manager->getTransport(ifaceNameHStr, serviceNameHStr);

    if (!transportRet.isOk()) {
        signalExceptionForError(env, UNKNOWN_ERROR, true /* canThrowRemoteException */);
        return NULL;
    }

    IServiceManager::Transport transport = transportRet;

    // ... java 类型的传输模式必须是HwBinder

    if (transport != IServiceManager::Transport::HWBINDER && !vintfLegacy) {
        LOG(ERROR) << "service " << ifaceName << " declares transport method "
                   << toString(transport) << " but framework expects hwbinder.";
        signalExceptionForError(env, UNKNOWN_ERROR, true /* canThrowRemoteException */);
        return NULL;
    }
    // 获取接口引用。
    Return<sp<hidl::base::V1_0::IBase>> ret = manager->get(ifaceNameHStr, serviceNameHStr);

    if (!ret.isOk()) {
        signalExceptionForError(env, UNKNOWN_ERROR, true /* canThrowRemoteException */);
        return NULL;
    }

    // 转换成Binder接口
    sp<hardware::IBinder> service = hardware::toBinder<
            hidl::base::V1_0::IBase, hidl::base::V1_0::BpHwBase>(ret);

    if (service == NULL) {
        signalExceptionForError(env, NAME_NOT_FOUND);
        return NULL;
    }

    LOG(INFO) << "Starting thread pool.";
    ::android::hardware::ProcessState::self()->startThreadPool();
    // 返回JHwRemoteBinder对象。
    return JHwRemoteBinder::NewObject(env, service);
}
- 1
- 2
- 3
- 4
- 5
- 6
- 7
- 8
- 9
- 10
- 11
- 12
- 13
- 14
- 15
- 16
- 17
- 18
- 19
- 20
- 21
- 22
- 23
- 24
- 25
- 26
- 27
- 28
- 29
- 30
- 31
- 32
- 33
- 34
- 35
- 36
- 37
- 38
- 39
- 40
- 41
- 42
- 43
- 44
- 45
- 46
- 47
- 48
- 49
- 50
- 51
- 52
- 53
以上步骤和C++里面的获取服务步骤类似。通过IRadio.getService()获取相关的服务,进入JNI的相关接口,获取HwServiceManager服务,然后获取当前HAL的类型(必须是Binderized),接下来获取服务对应的接口引用,接着将当前接口转换成Ibinder引用,然后创建JHwRemoteBinder对象返回给java层。
IRadio.asInterface(android.os.HwBinder.getService("[email protected]::IRadio",serviceName))
- 1
java层接着调用IRadio.asInterface将Hwbinder引用转换成IRadio对象。
这样就可以通过IRadio对象调用
5. Vendor Interface Object
5.1 manifest.xml 和 compatibility_matrix.xml
在system分区和vendor分区,分别存在manifest.xml和compatibility_matrix.xml。内容大致如下:
<manifest version="1.0" type="framework">
    <hal format="hidl">
        <name>android.frameworks.displayservice</name>
        <transport>hwbinder</transport>
        <version>1.0</version>
        <interface>
            <name>IDisplayService</name>
            <instance>default</instance>
        </interface>
    </hal>
    <hal format="hidl">
        <name>android.frameworks.schedulerservice</name>
        <transport>hwbinder</transport>
        <version>1.0</version>
        <interface>
            <name>ISchedulingPolicyService</name>
            <instance>default</instance>
        </interface>
    </hal>
    ...
</manifest>
- 1
- 2
- 3
- 4
- 5
- 6
- 7
- 8
- 9
- 10
- 11
- 12
- 13
- 14
- 15
- 16
- 17
- 18
- 19
- 20
- 21
分为两类:
- framework相关的,Google默认定义完成。
- device相关,有设备厂商自定义。
device可以通过DEVICE_MANIFEST_FILE和DEVICE_MATRIX_FILE指定自己的manifest.xml文件。如高通平台的项目:
DEVICE_MANIFEST_FILE := device/qcom/msm8937_64/manifest.xml
DEVICE_MATRIX_FILE   := device/qcom/common/compatibility_matrix.xml
- 1
- 2
默认的framework manifest定义和兼容性文件定义如下:
@build/core/config.mk
FRAMEWORK_MANIFEST_FILE := system/libhidl/manifest.xml
FRAMEWORK_COMPATIBILITY_MATRIX_FILE := hardware/interfaces/compatibility_matrix.xml
- 1
- 2
以上文件都是通过编译生成到对应的分区,编译脚本位于build/target/board/Android.mk。
通过对比可以发现,out下面生成的和源码里面存在的文件,并不是完全一致,在Android.mk里面可以发现,这几个文件都经过了out/host/linux-x86/bin/assemble_vintf转换,assemble_vintf会判断文件格式是否正确,并且会根据name按字母顺序排列。
以上两个xml都是在,在system/libvintf/parse_string.cpp里面进行解析。
在前面的介绍中,我们都讲到了一个重要的方法,就是transport
在system/libvintf/include/vintf/Transport.h定义
static const std::array<std::string, 3> gTransportStrings = {
    {
        "",
        "passthrough",
        "hwbinder",
    }
};
- 1
- 2
- 3
- 4
- 5
- 6
- 7
- 8
我们获取服务的时候,首先肯定要获取当前的HAL是什么类型。
6 其他技巧
打印当前的manifest信息
- mmm system/libvintf/
- adb push out/target/product/(产品名)/system/bin/vintf /system/bin/vintf
- adb shell vintf
本文主要介绍Treble架构下的HAL&HIDL&Binder相关技术原理。Treble的详细资料文档,请参考Treble 官方文档。