原文地址:https://412887952-qq-com.iteye.com/blog/2299732
(1). Shiro简单介绍
(2). 集成Shiro核心分析
(3). 无Shiro的Spring Boot
(4). 集成Shiro 进行用户授权
(5). Shiro缓存
(6). Shiro记住密码
(7). Shiro验证码
-------------------------------------------------------------------
(1). Shiro简单介绍
Shiro是Apache下的一个开源项目,我们称之为Apache Shiro。它是一个很易用与Java项目的的安全框架,提供了认证、授权、加密、会话管理,与 Spring Security 一样都是做一个权限的安全框架,但是与Spring Security 相比,在于 Shiro 使用了比较简单易懂易于使用的授权方式。
Apache Shiro 的三大核心组件 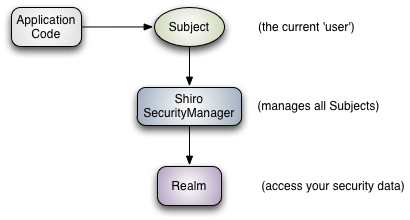
<!--[endif]-->
- Subject 当前用户操作
- SecurityManager 用于管理所有的Subject
- Realms 用于进行权限信息的验证,也是我们需要自己实现的。
我们需要实现Realms的Authentication 和 Authorization。其中 Authentication 是用来验证用户身份,Authorization 是授权访问控制,用于对用户进行的操作授权,证明该用户是否允许进行当前操作,如访问某个链接,某个资源文件等。
Apache Shiro 核心通过 Filter 来实现,就好像SpringMvc 通过DispachServlet 来主控制一样。
既然是使用 Filter 一般也就能猜到,是通过URL规则来进行过滤和权限校验,所以我们需要定义一系列关于URL的规则和访问权限。
另外我们可以通过Shiro 提供的会话管理来获取Session中的信息。Shiro 也提供了缓存支持,使用CacheManager 来管理。
完整架构图:

Shiro是很强大的一个安全框架,这里只是抛装引玉下,还有很多的需要大家自己去学习Shiro。
(2). 集成Shiro核心分析
集成Shiro的话,我们需要知道Shiro框架大概的一些管理对象。
第一:ShiroFilterFactory,Shiro过滤器工厂类,具体的实现类是:ShiroFilterFactoryBean,此实现类是依赖于SecurityManager安全管理器。
第二:SecurityManager,Shiro的安全管理,主要是身份认证的管理,缓存管理,cookie管理,所以在实际开发中我们主要是和SecurityManager进行打交道的,ShiroFilterFactory主要配置好了Filter就可以了。当然SecurityManager并进行身份认证缓存的实现,我们需要进行对应的编码然后进行注入到安全管理器中。
第三:Realm,用于身份信息权限信息的验证。
第四:其它的就是缓存管理,记住登录之类的,这些大部分都是需要自己进行简单的实现,然后注入到SecurityManager让Shiro的安全管理器进行管理就好了。
(3). 无Shiro的Spring Boot
我们先编写一个无Shiro的简单的框架,在这个框架中我们可以访问到index,login,userInfo,userInfoAdd。
这个步骤对于有Spring Boot基础的就应该很简单了,在这里简单的介绍下:
(a) 新建一个maven java project,取名为spring-boot-shiro1
(b) 在pom.xml中引入基本依赖,在这里还没有引入shiro等的依赖:
<project xmlns="http://maven.apache.org/POM/4.0.0"xmlns:xsi="http://www.w3.org/2001/XMLSchema-instance"
xsi:schemaLocation="http://maven.apache.org/POM/4.0.0 http://maven.apache.org/xsd/maven-4.0.0.xsd">
<modelVersion>4.0.0</modelVersion>
<groupId>com.kfit</groupId>
<artifactId>spring-boot-shiro1</artifactId>
<version>0.0.1-SNAPSHOT</version>
<packaging>jar</packaging>
<name>spring-boot-shiro1</name>
<url>http://maven.apache.org</url>
<properties>
<project.build.sourceEncoding>UTF-8</project.build.sourceEncoding>
<java.version>1.8</java.version>
</properties>
<!--
spring boot 父节点依赖,
引入这个之后相关的引入就不需要添加version配置,
spring boot会自动选择最合适的版本进行添加。
-->
<parent>
<groupId>org.springframework.boot</groupId>
<artifactId>spring-boot-starter-parent</artifactId>
<version>1.3.3.RELEASE</version>
</parent>
<dependencies>
<!-- spring boot web支持:mvc,aop... -->
<dependency>
<groupId>org.springframework.boot</groupId>
<artifactId>spring-boot-starter-web</artifactId>
</dependency>
<!-- thmleaf模板依赖. -->
<dependency>
<groupId>org.springframework.boot</groupId>
<artifactId>spring-boot-starter-thymeleaf</artifactId>
</dependency>
</dependencies>
</project>
在这里只引入了Spirng Boot的web依赖以及对thymleaf模板引擎的依赖。
(c) 编写网页文件:
index.html,login.html,userInfo.html,userInfoAdd.html
这个文件存在在src/main/resouces/templates, 这几个文件中都是简单的代码,只有登录界面中有账号和密码:
index.html:
<!DOCTYPE html>
<html>
<head>
<meta charset="UTF-8" />
<title>Insert title here</title>
</head>
<body>
<h3>index</h3>
</body>
</html>
login.html :
<!DOCTYPE html>
<html>
<head>
<meta charset="UTF-8" />
<title>Insert title here</title>
</head>
<body>
错误信息:<h4 th:text="${msg}"></h4>
<form action="" method="post">
<p>账号:<input type="text" name="username" value="admin"/></p>
<p>密码:<input type="text" name="password" value="123456"/></p>
<p><input type="submit" value="登录"/></p>
</form>
</body>
</html>
其它的页面都是简单的一个标签而已:
<h3>用户查询界面</h3>
<h3>用户添加界面</h3>
请自行编码。
(d)编写启动类
编写启动类com.kfit.App.java:
package com.kfit;
import org.springframework.boot.SpringApplication;
import org.springframework.boot.autoconfigure.SpringBootApplication;
/**
* 启动类.
* @author Angel(QQ:412887952)
* @version v.0.1
*/
@SpringBootApplication
publicclass App {
/**
* 参数里VM参数设置为:
-javaagent:.\lib\springloaded-1.2.4.RELEASE.jar -noverify
* @param args
*/
publicstaticvoid main(String[] args) {
SpringApplication.run(App.class, args);
}
}
这样类似的代码我们已经介绍很多了,没有什么可以过多的介绍了,
这时候我们右键run as 运行App.java类访问index,login页面,会报Error Page,因为我们还没编写Controller处理类呢。
(e)编写HomeController类
在com.kfit.root.controller新建HomeController类:
package com.kfit.root.controller;
import org.springframework.stereotype.Controller;
import org.springframework.web.bind.annotation.RequestMapping;
import org.springframework.web.bind.annotation.RequestMethod;
@Controller
publicclass HomeController {
@RequestMapping({"/","/index"})
public String index(){
return"/index";
}
@RequestMapping(value="/login",method=RequestMethod.GET)
public String login(){
return"login";
}
}
在这里我们并没有把UserInfo对应的处理也在页面进行编码了,因为之后我们创建了UserInfo之后,打算新建一个UserInfoController进行处理,所以这里就没有相应的userInfo的跳转处理。
这时候我们在运行我们的程序就应该可以访问index,login页面了。
现在我们的程序还有问题,就是index页面在没有登录的时候,就可以进行访问了,我们希望是如果直接访问index页面,如果没有登录的话,直接跳转到login进行登录。