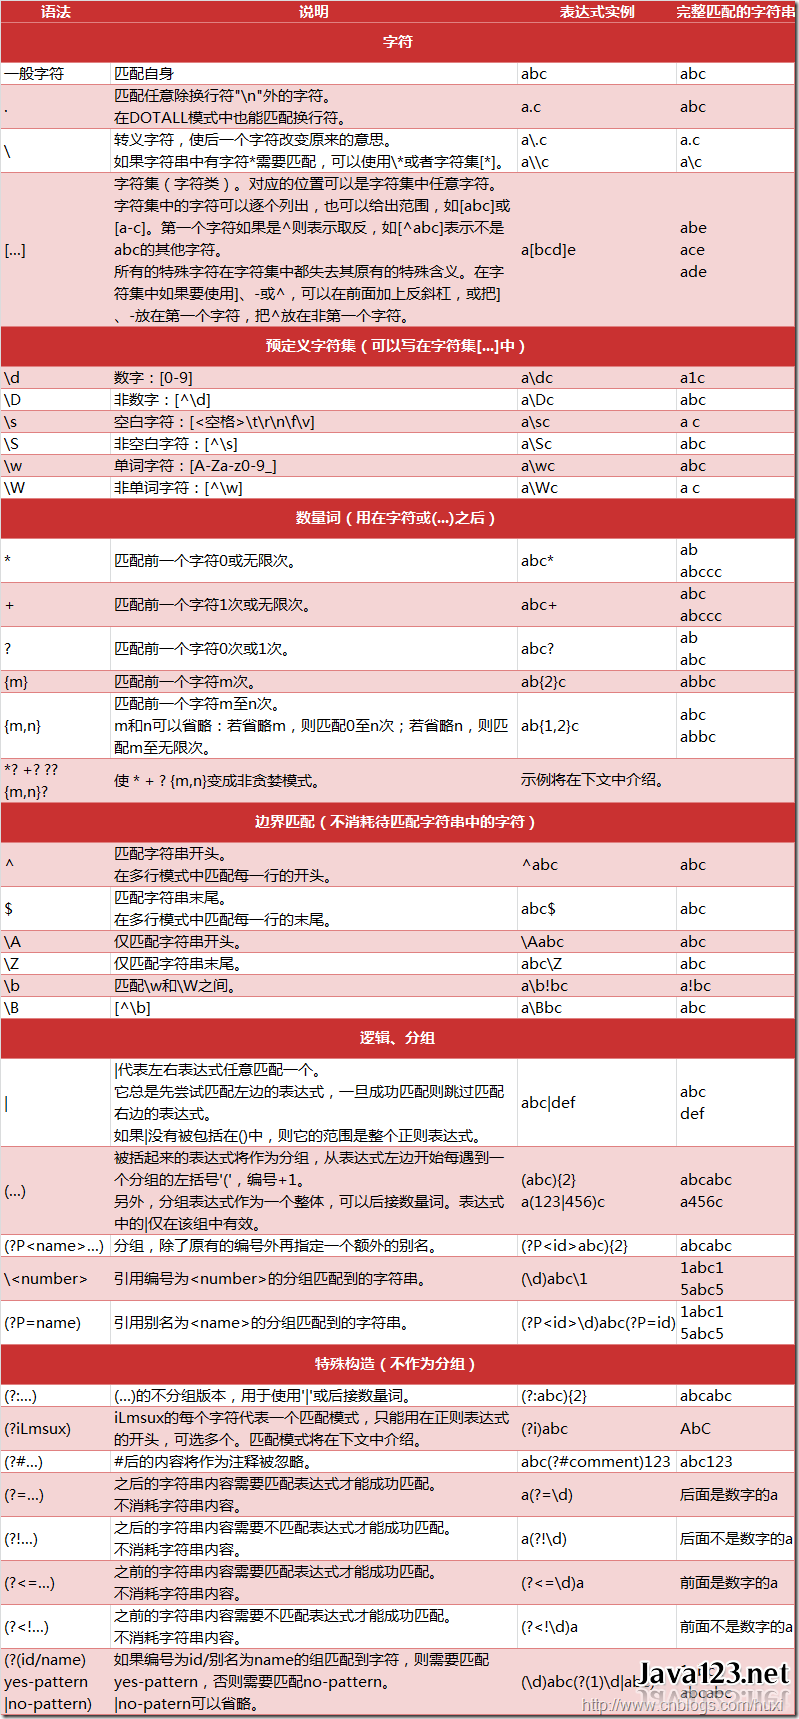
最初我会经常看一下自己的CSDN博客的总访问量、排名以及一些文章的访问量(看着这些量与日俱增心里很满足,哈哈),后来想学习一下爬虫,正好可以用来记录自己的CSDN博客的信息。在Google上第一条推荐教程是莫烦,之前在网易云上也跟着莫烦学了一下matplotlib,觉得蛮不错,于是就跟着莫烦来学习,B站上有视频,GitHub地址。正则表达式很重要,查阅参看小抄,另附需要转义的字符以及
以上链接有赘余,实际上直接re.findall(r'\'(.*)\'', string)就可以string中单引号及其之间的内容,.*在正则表达式中表示匹配除了'\n'之外的任何字符0次或无限次,在DOTALL中也可以匹配'\n'。
在学完3.3节之后我成功爬取了自己博客的信息。
1.1了解网页结构
知晓HTML的内容有超链接、标题、段落以及相应标签……
from urllib.request import urlopen
import re

# if has Chinese, apply decode()  有中文,就要用到decode(),读取结果是网页的HTML,urllib是python自带模块
html = urlopen("https://morvanzhou.github.io/static/scraping/basic-structure.html").read().decode('utf-8')
print(html)

# 爬取HTML中的title
res = re.findall(r"<title>(.+?)</title>", html)
print("\nPage title is: ", res[0])

# 爬取段落<p>
res = re.findall(r"<p>(.*?)</p>", html, flags=re.DOTALL)    # re.DOTALL if multi line
print("\nPage paragraph is: ", res[0])

# 爬取网页中所有超链接 href
res = re.findall(r'href="(.*?)"', html)
print("\nAll links: ", res)
2beautifulsoup解析网页:基础

安装beautifulsoup直接pip install beautifulsoup4 官方文档有中文文档和英文文档
安装之后运行会报错:
bs4.FeatureNotFound: Couldn't find a tree builder with the features you requested: lxml. Do you need to install a parser library?
错误原因是python3没有该解释器(解析器知识),在cmd安装之即可:pip install lxml。参考解决方法
代码:
from bs4 import BeautifulSoup
from urllib.request import urlopen

# if has Chinese, apply decode()
html = urlopen("https://morvanzhou.github.io/static/scraping/basic-structure.html").read().decode('utf-8')
# print(html)

# 将HTML要加载进 BeautifulSoup, 以 lxml的这种形式加载. 除了 lxml, 其实还有很多形式的解析器, 不过大家都推荐使用 lxml 的形式.
#然后 soup 里面就有着这个 HTML 的所有信息. 如果你要输出 <h1> 标题, 可以就直接 soup.h1.
soup = BeautifulSoup(html, features='lxml')
print(soup.h1)
print('\n', soup.p)

all_href = soup.find_all('a') # 这一行找到的是所有 <a>的信息,若想要单纯的链接,还需进一步操作
print(all_href)
all_href = [l['href'] for l in all_href] # 列表解析,这里才是去掉冗余信息之后的链接信息,这是lxml的功劳
print('\n', all_href)
2.2beautifulsoup网页解析 CSS
左图是HTML ,右图是HTML+CSS,CSS可以使网页变得丰富多彩. 文字有了颜色, 字体, 位置也多样了,整个布局会很好看。


CSS 主要用途就是装饰你 “骨感” HTML 页面. 如果将 HTML 比喻成没穿衣服的人, 那 CSS 就是五颜六色的衣服. 穿在人身上让人有了气质. CSS 的规则很多, 好在如果你只是需要爬网页, 你并不需要学习 CSS 的这些用法或规则, (如果你想, 你可以看到这里), 你只需要注意 CSS 的CLASS就可以了,之后可以用CLASS的信息来筛选HTML中想要的内容了。
from bs4 import BeautifulSoup
from urllib.request import urlopen

# if has Chinese, apply decode()
html = urlopen("https://morvanzhou.github.io/static/scraping/list.html").read().decode('utf-8')
print(html)

soup = BeautifulSoup(html, features='lxml')

# 找到其中tag是<li>的信息,并且有class=month
month = soup.find_all('li', {"class": "month"})
for m in month:
    print(m.get_text())

# 找到其中tag是<ul>的信息,并且有class=month
jan = soup.find('ul', {"class": 'jan'})
d_jan = jan.find_all('li')              # 在jan中找到tag是<li>的信息
for d in d_jan:
    print(d.get_text())
2.3beautifulsoup解析网页:正则表达
正则表达式能用简单的规则匹配到多样化的文本信息,在这一部分学习前有必要看下它的教程,不需要完全记住,需要的时候回来看一下。正则表达式要在前面加r否则就是普通字符串:比如ptn = r'r[au]n'是一个正则表达式,它能匹配到ran和run,而ptn = 'r[au]n'就只是一个单纯的字符串。。。。。好吧,我试了下下面两种都匹配成功,不报错,不加r也能匹配
import re
string1 = 'dog runs to cat'
print(re.search('r[au]n', string1)) # <_sre.SRE_Match object; span=(4, 7), match='run'>
print(re.search(r'r[au]n', string1)) # <_sre.SRE_Match object; span=(4, 7), match='run'>
from bs4 import BeautifulSoup
from urllib.request import urlopen
import re
# if has Chinese, apply decode()
html = urlopen("https://morvanzhou.github.io/static/scraping/table.html").read().decode('utf-8')
print(html)
soup = BeautifulSoup(html, features='lxml')
# 找到所有tag是<img>信息,并且其src属性中含有子串'.jpg',属性是通过lxml解析到的
# 如这一行: <img src="https://morvanzhou.github.io/static/img/course_cover/scraping.jpg">
img_links = soup.find_all("img", {"src": re.compile('.*?\.jpg')}) # 正则表达式
for link in img_links:
print(link['src'])
# 找到所有tag是<img>信息,并且其src属性中含有子串'https://morvan.',属性是通过lxml解析到的
# 如这一行: <a href="https://morvanzhou.github.io/tutorials/data-manipulation/scraping/">
course_links = soup.find_all('a', {'href': re.compile('https://morvan.*')}) # 正则表达式
for link in course_links:
print(link['href'])2.4小练习:爬百度百科
#Here we build a scraper to crawl Baidu Baike from this page onwards. We store a historical webpage that we have already visited to keep tracking it.
from bs4 import BeautifulSoup
from urllib.request import urlopen
import re
import random

# Select the last sub url in "his", print the title and url.
base_url = "https://baike.baidu.com" # 百度百科
his = ["/item/%E7%BD%91%E7%BB%9C%E7%88%AC%E8%99%AB/5162711"] # 网络爬虫

# Find all sub_urls for baidu baike (item page), randomly select a sub_urls and store it in "his". If no valid sub link is found, than pop last url in "his".
url = base_url + his[-1] # -1是选取列表中的最后一个元素

# Put everthing together. Random running for 20 iterations. See what we end up with.
html = urlopen(url).read().decode('utf-8')
soup = BeautifulSoup(html, features='lxml')
print(soup.find('h1').get_text(), 'url: ', his[-1])  # find是选择第一次出现的'h1',find_all是选择所有出现的'h1'

# find valid urls 获取网页内tag是<a>,且属性target中有_blank, 说或者href中有正则表达式里指定内容的有效地址(通过分析网页的HTML,选择适合的正则表达式,来获取目标内容)
sub_urls = soup.find_all("a", {"target": "_blank", "href": re.compile("/item/(%.{2})+$")}) #

if len(sub_urls) != 0: # 如果爬取到地址
    his.append(random.sample(sub_urls, 1)[0]['href'])  # 随机抽取一个url追加到his--history   random.sample(obj, 1)是从obj中随机抽取一个值
else: # no valid sub link found如果没爬取到地址
    his.pop() # 删除his中最后一个元素
print(his)

# 以上是试验,下面真正开始前进20次,看整个过程都爬取到些什么

his = ["/item/%E7%BD%91%E7%BB%9C%E7%88%AC%E8%99%AB/5162711"] # 初始化   his指向'网络爬虫'条目的URL

for i in range(20):
    url = base_url + his[-1]

    html = urlopen(url).read().decode('utf-8') # 读取网页HTML内容
    soup = BeautifulSoup(html, features='lxml') # 用lxml解析器解析之
    print(i, soup.find('h1').get_text(), '    url: ', his[-1]) # i次爬取  爬取的HTML标题  HTML的网页地址

    # find valid urls
    sub_urls = soup.find_all("a", {"target": "_blank", "href": re.compile("/item/(%.{2})+$")})  # 爬取有效链接

    if len(sub_urls) != 0: # 爬取到地址就随机将其一追加至his
        his.append(random.sample(sub_urls, 1)[0]['href'])
    else:
        # no valid sub link found
        his.pop()  # 删除his中最后一个元素
3.1post登录cookies
之前 我们通常使用 Python 的自带模块 urllib, 来提交网页请求. 这个模块能满足我们大部分的需求, 但是为了满足你日益膨胀的其他需求, 比如向网页发送信息, 上传图片等等, 我们还有一个伟大的 Python 外部模块 requests, 来有效的处理这些问题.
获取网页的方式
其实在加载网页的时候, 有几种类型, 而这几种类型就是你打开网页的关键. 最重要的类型 (method) 就是 get 和 post (当然还有其他的, 比如 head, delete). 刚接触网页构架的朋友可能又会觉得有点懵逼了. 这些请求的方式到底有什么不同? 他们又有什么作用?
我们就来说两个重要的, get, post, 95% 的时间, 你都是在使用这两个来请求一个网页.
post- 账号登录
- 搜索内容
- 上传图片
- 上传文件
- 往服务器传数据 等
get- 正常打开网页
- 不往服务器传数据
这样看来, 很多网页使用 get 就可以了, 比如 莫烦Python 里的所有页面, 都是只是 get 发送请求. 而 post, 则是我们给服务器发送个性化请求, 比如将你的账号密码传给服务器, 让它给你返回一个含有你个人信息的 HTML.
比如下图:请求http://pythonscraping.com/pages/files/form.html时用的方法是get,填写firstname和lastname,提交数据之后,请求的是http://pythonscraping.com/pages/files/processing.php,用的方法是post,数据来源是我们在上一个页面填写的内容。于是在下面代码中可以看到,我们在请求后一个网页的时候,给他传入数据,就能完成这个post方法。

cookies那里不知道为什么提交不成功,session那里profile页面已经阵亡了,没成功
import requests
import webbrowser
# 在百度中 https://www.baidu.com/s?wd=%E8%8E%AB%E7%83%A6Python
param = {"wd": "莫烦python"}
r = requests.get('http://www.baidu.com/s', params=param) # params参数的值将会与前面一段组合成完整的URL,完成在百度中搜索'莫烦python'
print(r.url)
# webbrowser.open(r.url) # 在默认浏览器中打开网址

# 带数据的post
data = {'firstname': 'Morvan', 'lastname': 'Zhou'}
r = requests.post('http://pythonscraping.com/pages/files/processing.php', data=data)
'''在默认浏览器中打开网址,这里以为网页会显示Hellow, Morvan Zhou!结果不是,结果与在浏览器中直接打开
http://pythonscraping.com/pages/files/processing.php的结果是一样的,我想着可能就如后面莫烦所说cookies
一样,下面这一行与上一行已经不是一个连续的过程了,下面一行就相当于是提交了空信息,下面传文件也是类似的情况'''
# webbrowser.open(r.url)  # r.url = 'http://pythonscraping.com/pages/files/processing.php'
print(r.text)

# 传文件的post
file = {'uploadFile': open(r'C:\Users\WW\Pictures\mine\successful.jpg', 'rb')}
r = requests.post('http://pythonscraping.com/pages/files/processing2.php', files=file)
# webbrowser.open(r.url) # 在默认浏览器中打开网址,显示提交失败,因为这不是连续的过程,这一次打开就相当于提交了空信息
print(r.text)

# payload = {'username': 'Morvan', 'password': 'password'}
# r = requests.post('http://pythonscraping.com/pages/cookies/welcome.php', data=payload)
# print(r.text) # 没成功 logged in wrong 不晓得为什么
# print(r.cookies.get_dict()) # cookies保存了我们的用户名和密码的信息
# r = requests.get('http://pythonscraping.com/pages/cookies/profile.php', cookies=r.cookies) # 这个链接好像已经不支持了
# print(r.text)

# 每次登陆网页,当需要到下一个请求的时候就要重新登陆,很麻烦;于是程序员用一连串的session(会话)来控制cookies,这就比较简单了,不用传入cookies的信息,而是以登陆的状况来访问页面
session = requests.Session()
payload = {'username': 'Morvan', 'password': 'password'}
r = session.post('http://pythonscraping.com/pages/cookies/welcome.php', data=payload)
print(r.cookies.get_dict())
r = session.get("http://pythonscraping.com/pages/cookies/profile.php") # 这个页面已经不被支持了
print(r.text)
3.2下载文件
# 去网页的HTML中找到文件地址然后下载,可用几种不同方法下载
import os
save_path = r'H:\learning like never feel tired\Scraping python\3.2download_pics'
os.makedirs(save_path, exist_ok=True)

# 查看HTML后得到网页地址
IMAGE_URL = "https://morvanzhou.github.io/static/img/description/learning_step_flowchart.png"

# Download the image url using urlretrieve
from urllib.request import urlretrieve
urlretrieve(IMAGE_URL, save_path + r'\image1.png')      # whole document

# Using requests.get to download at once
import requests
r = requests.get(IMAGE_URL)
with open(save_path+ r'\image2.png', 'wb') as f:
    f.write(r.content)                      # whole document

# Set stream = True in get() function. This is more efficient.
r = requests.get(IMAGE_URL, stream=True)    # stream loading

with open(save_path + r'\image3.png', 'wb') as f:
    for chunk in r.iter_content(chunk_size=32):
        f.write(chunk)
3.3小练习:下载国家地理美图
试了一下国家地理会接受浏览器的安全检查,导致读到的HTML是安全检查的HTML,不是我们想要的,于是我将目标网站换成了中国国家地理网站,目标是下载下面这些图:

图片对应的标签如下,解析时发现依然只用ul和class就能提取到属于目标图片的ul部分,id属性可以忽略:

我在莫烦的源代码上稍做了些修改:
# Download amazing pictures from national geographic
from bs4 import BeautifulSoup
import requests

URL = "http://www.dili360.com/" # 中国国家地理网站

# find list of image holder
html = requests.get(URL).text
print(html)
soup = BeautifulSoup(html, 'lxml')
img_ul = soup.find_all('ul', {"class": "style-1"}) # 用ul和class提取目标图片所属的HTML
print(img_ul)

# Create a folder for these pictures
import os
save_path = r'H:\learning like never feel tired\Scraping python\3.3download_btf_pics'
os.makedirs(save_path, exist_ok=True)

# Find all picture urls and download them.
for ul in img_ul:
    imgs = ul.find_all('img') # 找到目标片段中的img标签
    name_lst = ul.find_all('h4') # 用首页看到的图片名为图片命名
    for img, name in zip(imgs, name_lst):
        url = img['src'] # 在img标签中选择'src'属性,得到对应图片的url
        r = requests.get(url, stream=True) # 用上一节stream loading方法来下载图片,从地址中获取文件流
        # image_name = url.split('/')[-1] # 用url中图片名字作为存储图片的名字
        image_name = str(name).split(r'>')[1].split('<')[0]+'.jpg' # 分割字符串,并重新拼接成.jpg形式的图片名
        with open(save_path+r'\%s' % image_name, 'wb') as f:
            for chunk in r.iter_content(chunk_size=128):
                f.write(chunk)
        print('Saved %s' % image_name)

正则表达式很重要,小抄出处: