最近公司客户端做了升级功能,感觉学到了不少东西,因此做下记录,以备后续查看。
检查版本更新可以放在splash页面,也可以放在主页面。

上图是更新app的思维导图,画的不是很好,大家能看懂就好哈。 我在网上找了一个更加清楚的流程图,大家可以看下这个,说的更详细。
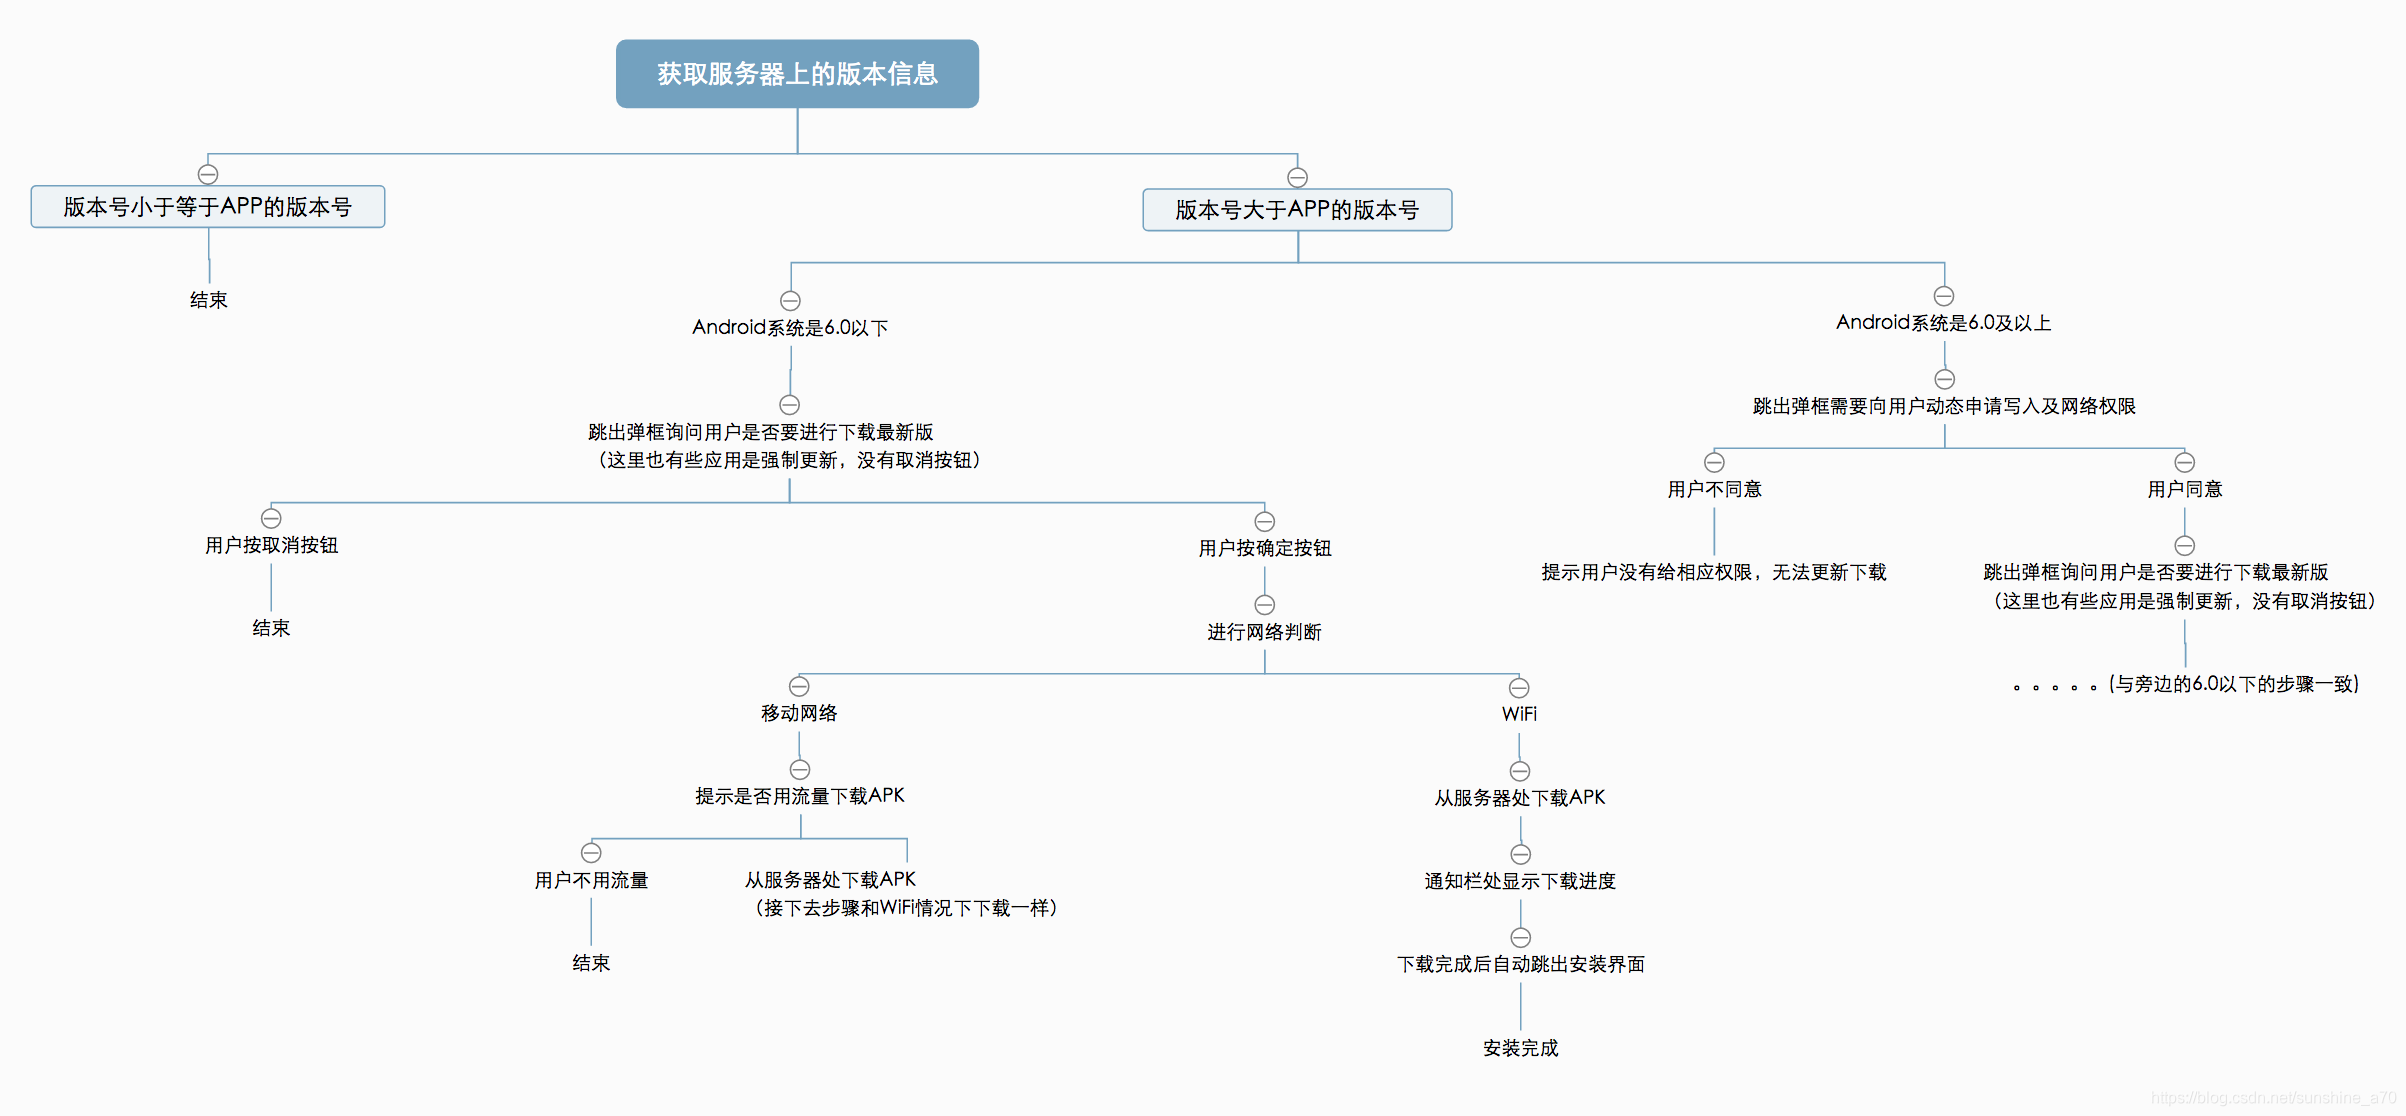
检查更新的步骤大体分为以下三步:
1.首先判断网络是否连通,如果网络连通则走更新app线程,否则跳过更新app线程。
2.更新线程首先获取服务器app版本号,如果版本号大于本地版本号时,提示用户更新本地app版本。
3.更新版本时,首先从服务器下载app最新版本到手机,接着安装替换旧版本。
(1)判断网络是否连通,且不在wifi状态下时提示用户是否用流量下载更新
public static int getNetworkState(Context context) {
      //得到连接管理器对象
    ConnectivityManager connectivityManager = (ConnectivityManager) context
        .getSystemService(Context.CONNECTIVITY_SERVICE);
    NetworkInfo networkInfo = connectivityManager.getActiveNetworkInfo();
    if (networkInfo != null && networkInfo.isConnected()) {
         if (networkInfo.getType() == ConnectivityManager.TYPE_WIFI) {
         return NETWORK_WIFI;
    } else if (networkInfo.getType() == ConnectivityManager.TYPE_MOBILE) {
        return NETWORK_MOBILE;
    }
} else {
    return NETWORK_NONE;
}
return NETWORK_NONE;
}
(2)网络请求服务器获取服务器版本号,和本地版本号做对比
请求网络工具类:
public class RequestServer {
private static String TAG = "url";
public static String RequestServer(String urlString) {
    BufferedReader br = null;
    HttpURLConnection conn = null;
    StringBuilder sb = new StringBuilder();
    try {
        URL reqURL = new URL(urlString);
        conn = (HttpURLConnection) reqURL.openConnection();
        conn.setRequestMethod("GET");
        conn.setConnectTimeout(10000);
        //打开网络通讯输入流
        int code = conn.getResponseCode();
        LogUtil.e("code","code:"+code);
        if (code != 200){
            return null;
        }
        //Log.e("chen", "code:" + code);
        InputStream is = conn.getInputStream();
        //通过InputStream is 创建InputStreamReader对象
        InputStreamReader isr = new InputStreamReader(is, "utf-8");
        //通过InputStreamReader isr 创建BufferReader对象
        br = new BufferedReader(isr);
        String line;
        while ((line = br.readLine()) != null) {
            sb.append(line);
        }
    } catch (Exception e) {
        e.printStackTrace();
    } finally {
        if (conn != null) {
            conn.disconnect();
        }
        if (br != null) {
            try {
                br.close();
            } catch (IOException e) {
                e.printStackTrace();
            }
        }
    }
    //return "{"msg":"绑定成功","return":true}
    return sb.toString();
  }
}
拿到服务器数据并解析出服务器软件版本号,如果大于本地版本号,则提示用户下载更新app。
try {
    LogUtil.d(TAG, "json=" + json);
    JSONObject jsonObject = new JSONObject(json);
    apkPath = jsonObject.optString("installUrl");
    LogUtil.d(TAG, "apkPath=" + apkPath);
    must = jsonObject.optBoolean("must");
    updateContent = jsonObject.optString("changelog");
    versionCode = jsonObject.optInt("version");
    LogUtil.d(TAG, "versionCode=" + versionCode);
    if (versionCode > localVersionCode) {
        myHander.sendEmptyMessage(UPDATE_VERSION);
    }
} catch (JSONException e) {
    e.printStackTrace();
}
(3)下载安装最新app
 /**
 * 版本下载线程
 * 实现Runnable接口
 */
private class downloadApkSdk implements Runnable {
    private ProgressDialog dialog;
    public downloadApkSdk(ProgressDialog dialog) {
        this.dialog = dialog;
    }

    @Override
    public void run() {
        Logger.e(TAG, "DownloadApk is running");
        String sdPath;
        try {
        //  sdPath = Environment.getRootDirectory() + "/";   //目录在/system 或者 /storage/sdcard0下
        //  sdPath = getFilesDir() + "/";       //目录在/data/data/files下面
        //  sdPath = getCacheDir() + "/";       //目录在/data/data/cache下面
            sdPath = Environment.getExternalStorageDirectory() + "/";      //目录在/storage/sdcard0下 或 /storage/emulated/0/
            LogUtil.d("file", "path" + sdPath);
            File file = new File(sdPath);
            if (!file.exists() || file == null) {
                file.mkdir();
            }
            mSavePath = sdPath + "yuntuiClient";
            File dir = new File(mSavePath);
            if (!dir.exists()) {
                LogUtil.d("dir", "path" + dir.getPath());
                dir.mkdir();
            }
            LogUtil.d("downloadApk", apkPath);
            URL url = new URL(apkPath);
            HttpURLConnection conn = (HttpURLConnection) url.openConnection();
            conn.connect();
            int length = conn.getContentLength();
            InputStream is = conn.getInputStream();
            LogUtil.d(TAG, "mSavePath = " + mSavePath);
            File apkFile = new File(mSavePath, versionName);
            LogUtil.d("path", "path =" + apkFile.getPath());

            FileOutputStream fos = new FileOutputStream(apkFile);
            int count = 0;
            byte[] buffer = new byte[1024];
            while (!mIsCancel) {
                int numread = is.read(buffer);
                count += numread;        // 计算进度条的当前位置
                int mProgress = (int) (((float) count / length) * 100);  // 更新进度条
                dialog.setProgress(mProgress);
                if (numread < 0) {
                    dialog.dismiss();
                    installAPK(apkFile);
                    break;
                }
                fos.write(buffer, 0, numread);
            }
            fos.close();
            is.close();
        } catch (Exception e) {
            e.printStackTrace();
        }
    }
}


/**
*下载完成,提示用户安装
*@param apkFile
*/

private void installAPK(File apkFile) {
//更改权限
try {
    String command = "chmod 777 " + apkFile.getAbsolutePath();
    Log.i("lgx", "apkPath = " + apkFile.getAbsolutePath());
    Runtime runtime = Runtime.getRuntime();
    Process proc = runtime.exec(command);
} catch (IOException e) {
    Log.i("lgx", "chmod fail!!!!");
    e.printStackTrace();
}

if (Build.VERSION.SDK_INT >= 24) {//判断版本是否在7.0以上
    Uri apkUri = FileProvider.getUriForFile(context, "com.nxyuntui.yuntuiclient.fileprovider", apkFile);
    Intent install = new Intent(Intent.ACTION_VIEW);
    install.setFlags(Intent.FLAG_ACTIVITY_NEW_TASK);
    install.addFlags(Intent.FLAG_GRANT_READ_URI_PERMISSION);//添加这一句表示对目标应用临时授权该Uri所代表的文件
    install.setDataAndType(apkUri, "application/vnd.android.package-archive");
    startActivity(install);
} else {
    Uri uri = Uri.parse("file://" + apkFile);
    Intent intent = new Intent(Intent.ACTION_VIEW);
    intent.addFlags(Intent.FLAG_ACTIVITY_NEW_TASK);
    intent.putExtra(Intent.EXTRA_NOT_UNKNOWN_SOURCE, true); //表明不是未知来源
    intent.setDataAndType(uri, "application/vnd.android.package-archive");
    startActivity(intent);
}
}
(4)这种更新涉及到文件存储,设备的存储卡权限,即WRITE_EXTERNAL_STORAGE,注意Android 6.0以上需要动态申请此权限。
/**
*申请sd卡的读写权限
*/
public void requestSDcard() {
if (Build.VERSION.SDK_INT >= 23) {
    int REQUEST_CODE_CONTACT = 101;
    String[] permissions = {Manifest.permission.WRITE_EXTERNAL_STORAGE};   //验证是否许可权限
    for (String str : permissions) {
        if (this.checkSelfPermission(str) != PackageManager.PERMISSION_GRANTED) {   //申请权限
            this.requestPermissions(permissions, REQUEST_CODE_CONTACT);
            return;
        }
    }
}

/**向用户申请对应权限
*@param requestCode
*@param permissions
*@param grantResults
*/
@Override
public void onRequestPermissionsResult(int requestCode, @NonNull String[] permissions, @NonNull int[] grantResults) {
   super.onRequestPermissionsResult(requestCode, permissions, grantResults);
   if (requestCode == REQUESTCODE) {
       if (permissions[0].equals(Manifest.permission.WRITE_EXTERNAL_STORAGE) && grantResults[0]
            == PackageManager.PERMISSION_GRANTED) {    //用户同意
        downloadApkSdk();
       } else {
        //用户不同意
        Toast.makeText(context, "存储权限不允许,将无法更新客户端!", Toast.LENGTH_LONG).show();
       }
    }
}
(5)兼容7.0以上版本,上面安装方法里面已经做了7.0以上版本和以下版本不通的兼容,还有Manifest文件部分需要兼容的如下:
AndroidManifest.xml中加入:
<provider
    android:name="android.support.v4.content.FileProvider"
    android:authorities="com.nxyuntui.yuntuiclient.fileprovider"
    android:exported="false"
    android:grantUriPermissions="true">
    <meta-data
        android:name="android.support.FILE_PROVIDER_PATHS"
        android:resource="@xml/file_paths" />
</provider>
注意: android:authorities=“com.nxyuntui.yuntuiclientTest.fileprovider” 里面的com.nxyuntui.yuntuiclientTest是你自己的包名。
file_paths文件如下:
<?xml version="1.0"  encoding="utf-8"?>
<resources>
    <paths>
      <external-path path="yuntuiClient/" name="download"/> <!--目录在/storage/sdcard0或者/storage/emulated/0下-->
      <files-path path="yuntuiClient/" name="download"/> <!--目录在/data/data/files下-->
      <cache-path path="yuntuiClient/" name="download"/> <!--目录在/data/data/cache下-->
    </paths>
</resources>
注意: path和name都可以自己定义,即 path=“yuntuiClient/” name=“download”,上面三个路径选择符合条件的一个作为下载路径即可。
需要注意的地方,后续如果还有会继续更新。其实网上也有封装好的通过浏览器更新的工具,这个很简单,一句话就好了,github上面也有对应项目,可以看看。
转载请标明出处,谢谢!