转载自: http://segmentfault.com/a/1190000000667272
一、需求/目标
用QML已经有一段时间了,我想通过博客记录自己是如何使用QML的,算是写点自己的经验吧,希望对未接触过QML但对它有兴趣的人提供点中文资料,仅此而已。
为了写起来有思路,我们来实现一个能在Android手机上运行的APP,暂且叫这个APP为“135Todo”吧,它是一个待办事项类的软件,类似的现成的软件很多,这类软件最基本的功能应该包含新建事项、标识事项是否完成、删除事项、对事项设置处理时间和优先级。我用过目前很流行的一些APP,但感觉都不是很合个人心意,我很赞同的一点是:“时间管理,不是真的去管理时间,更准确的说应该是效率管理,通过管理来提升做事效率。”软件或手机,它只不过是一个工具,我们用它来计划待办事项,目的是想提高办事效率,所以我们应该把注意力放在事情上面,而不是软件上,所以过于依赖软件功能、花哨界面的话,就显得有点本末倒置了。没有最好的,只有适合自己的,我最近在尝试一种时间管理方法,叫:“1-3-5 Rule”(1-3-5法则,这也是我们要做的APP的名字来源),关于它的详细情况有兴趣请自行google一下,我只简单的介绍,也当是APP的需求点吧:
1、一天中最多处理9件事情,1件最重要的,雷打不动,最多不超过3件次重要的,还有最多不超过5件的琐碎的事。
2、第1点是原则性的但不是强制性的,如果琐碎的事情太多,超过5件也是可以的。如果觉得一天有多件很重要的事情,那么可以指定1件最重要的,其它暂定为次重要的,待最重要的事情完成后,可以把次重要的事情提到最重要的位置。简言之,这样的待办事项列表是很灵活的,当一些事项处理完了并且时间时间允许,自己可以随时增加新的事项进来,而一天也只是一个象征时间,可以是一周或一个月。
3、除了以下描述的3种优先级,还有临时想起的事情、突然冒出的想法、心血来潮的计划,也是常有之事,所以我个人补充了一点,就是可以随时增加这类事项,它的状态是未计划的、未分解的、或有待提上日程的。
通过以上需求,我们的APP看起来可能像这样:
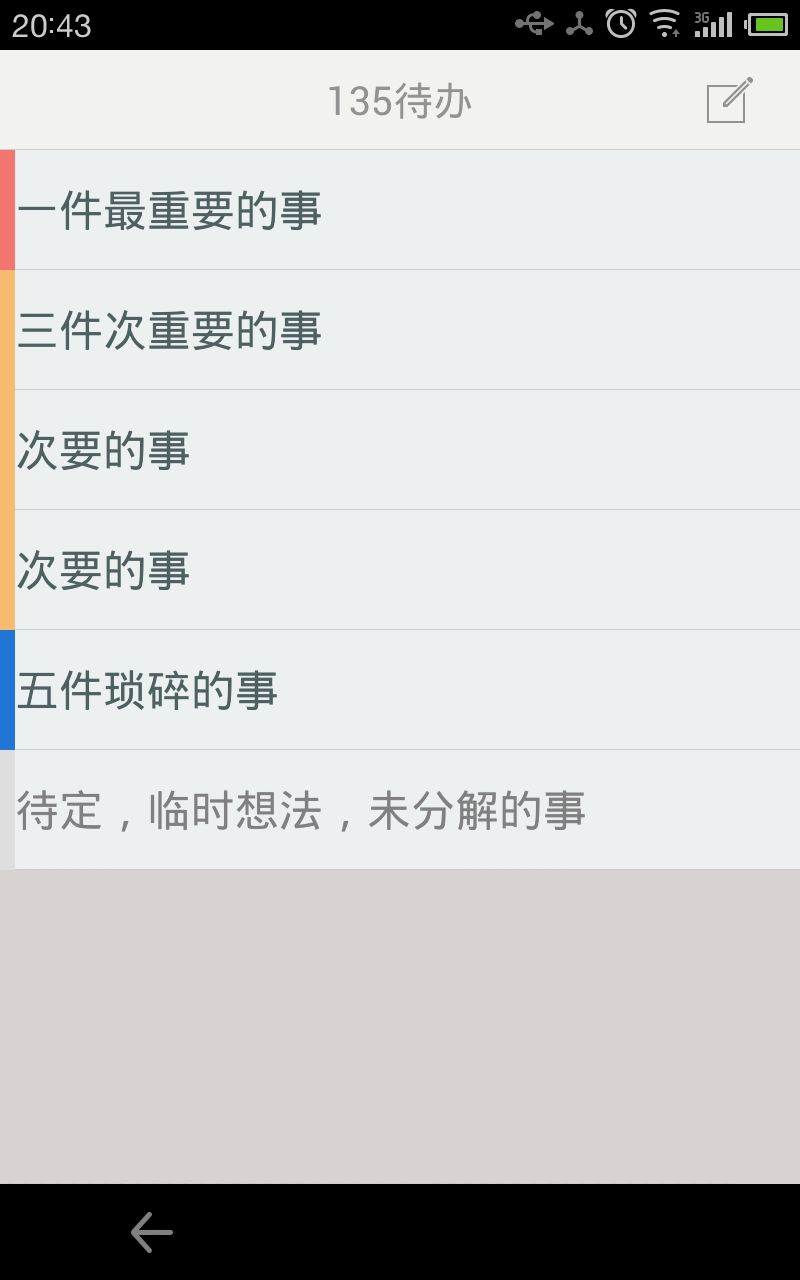
新建事项的状态:
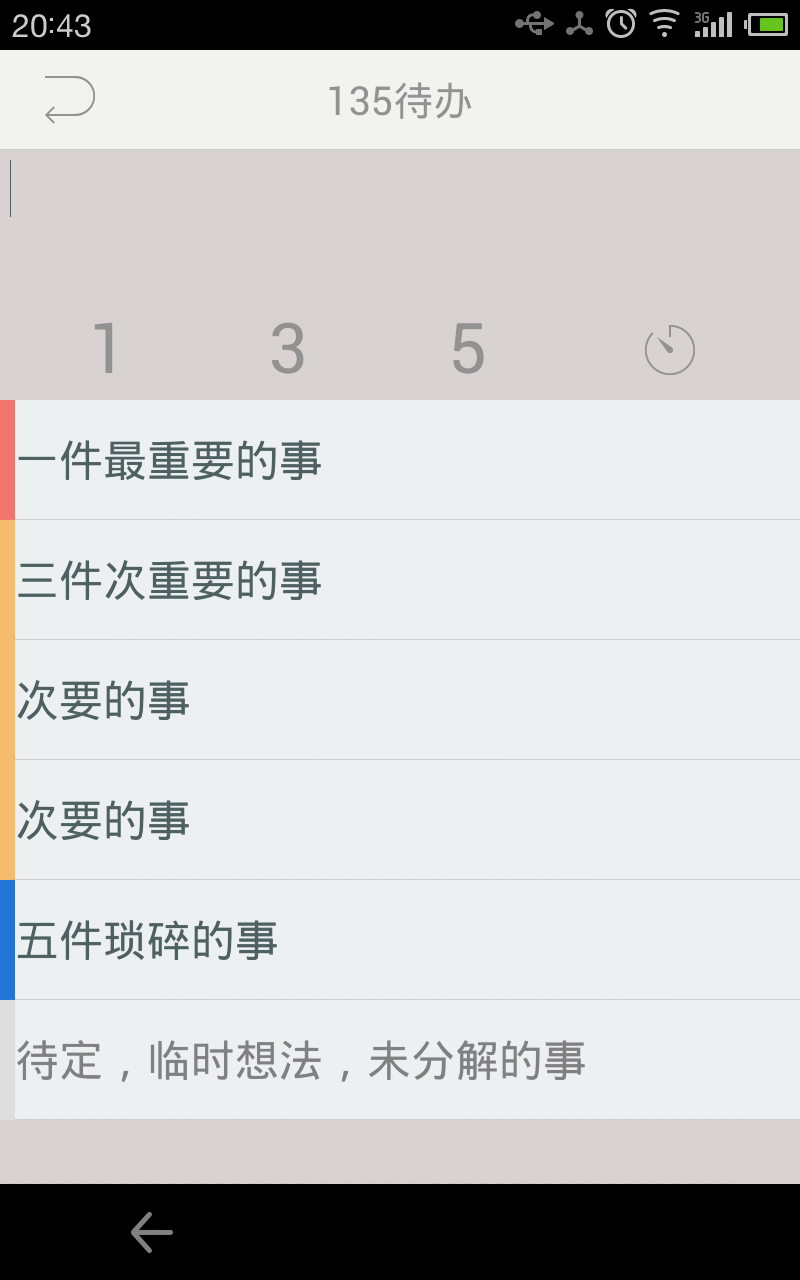
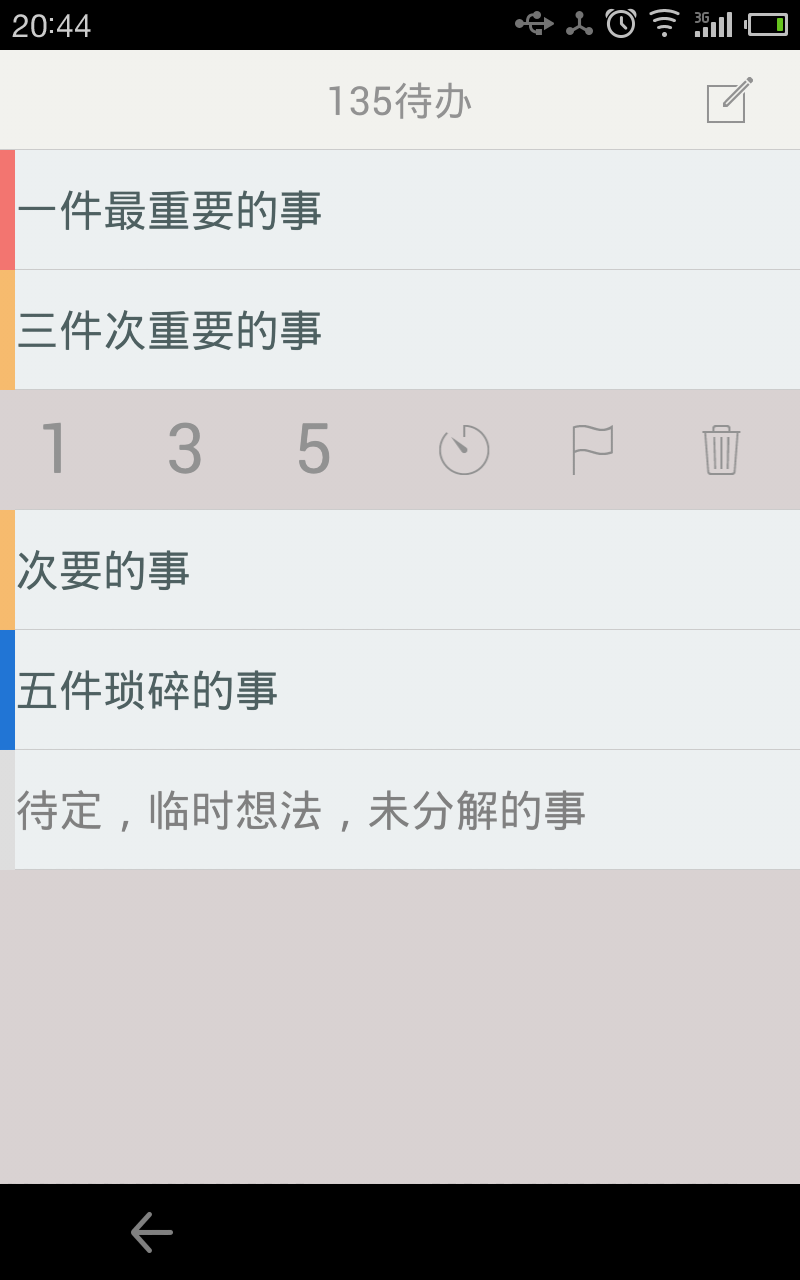
长按一条事项,事项会变成菜单,可以修改优先级等(模仿了Pocket):
二、代码组织
新建工程
1、启动QtCreator,新建项目,选择“Qt Quick Application”,这样代码可以混合C++和QML,基础功能用C++实现,界面和操作在QML完成。
2、工程的构建套件要选择Android for armxxx类型的,请事先在选项->Android下配置好JDK、Android SDK、Android NDK的路径。
注:本文用的QtSDK版本是:qt-opensource-linux-x64-android-5.3.1,5.3.1版本默认生成的代码模板相对以前的版本变得简洁,有些不一样。
混合使用C++和QML
我们使用C++完成数据的读取和保存,有必要的话,还可以做一些与Java层或Android Java SDK交互的事情,这个以后我们再研究。然后,QML专门负责界面布局、用户交互和响应。
C++与QML的交互
- C++可以调用QML中定义的function,但原则上,我不会这么做,因为很多时候,由QML调用C++接口来完成事情就可以了。两者随意的相互调用会导致软件流程混乱,不易维护。
- QML可以通过C++对象,获取它的属性和调用它的接口,同时也可以接收它的信号,下面我们也是通过这些方法来完成软件功能的。
首先,我们定义一个C++的类叫TodoCpp,要继承QObject,为QML层提供基础的功能接口,代码:
#ifndef TODOCPP_H
#define TODOCPP_H

#include <QObject>
#include <QSettings>
class TodoCpp : public QObject
{
    Q_OBJECT
public:
    explicit TodoCpp(QObject *parent = 0);

signals:

public slots:
    //从文件中读出事项列表,并以List方式返回
    QVariantList getItems();

    //把事项列表保存到文件
    void saveItems(const QVariantList& list);

private:
    //使用ini文件来保存待办事项列表
    QSettings* settings;
};

#endif // TODOCPP_H
为了让QML层可以使用C++对象,我们需求在main函数中增加几行代码:
#include <QGuiApplication>
#include <QQmlApplicationEngine>
#include <QQmlContext>
#include "todocpp.h"

int main(int argc, char *argv[])
{
    QGuiApplication app(argc, argv);

    QQmlApplicationEngine engine;

    //创建对象并暴露给QML,QML可以使用名字todocpp来使用对象
    TodoCpp cpp;
    engine.rootContext()->setContextProperty("todocpp", &cpp);

    engine.load(QUrl(QStringLiteral("qrc:///main.qml")));

    return app.exec();
}
C++提供基础服务
-
数据保存路径:一般情况,我们想保存在存储器上如sdcard,系统不一定有/mnt/sdcard这个目录,所以我们需要使用可移植性更好的方法,我发现最新的Qt版本包含了QStandardPaths这个类,提供了获取系统上各种路径的接口,我们要的就是一个可以保存数据的地方,当APP卸载时,数据不会被删除,因为重装APP后,数据还在,所以我使用了如下的方法来获取这样的路径:
QString path = QStandardPaths::standardLocations(QStandardPaths::GenericDataLocation).first(); -
数据持久化:通常有两种方式:DB和文件,考虑到软件的简单性,直接用ini文件存储待办事项列表(包含每个事项的属性),QSettings这个强大的类,提供了对ini文件的读写操作,构造QSettings的代码如下:
settings = new QSettings(path.append("/todo1-2-3.ini"), QSettings::IniFormat);
QSettings还提供了读写一个列表到ini文件的接口,如:
beginReadArray、setArrayIndex、endArray、beginWriteArray,具体用法见下代码。 -
C++和QML之间的数据传递格式: 我们希望把事项列表存放在一个QList中,并且作为getItems()的返回值,如果QML调用getItems()后,能够直接使用这个list,那是很美好的事情,要知道,QML那里用的是javascript,庆幸的是,真的可以办到,就是使用QVariantMap或QVariantList。所以便有了如下的代码,我们把待办事项一个个转换成QVariantMap,然后所有待办事项再放入QVariantList就可以了,同时我们也约定,从QML传下来的参数,也是同样的格式,代码如下:
QVariantList TodoCpp::getItems()
{
    QVariantList list;

    int size = settings->beginReadArray("items");
    for (int i = 0; i < size; ++i) {
        settings->setArrayIndex(i);
        QVariantMap m;
        m.insert("text", settings->value("text", "").toString());
        m.insert("pri", settings->value("pri", 99).toInt());
        m.insert("done", settings->value("done", false).toBool());

        if(!m.value("text").toString().isEmpty())
            list.push_back(m);
    }
    settings->endArray();

    return list;
}

void TodoCpp::saveItems(const QVariantList &list)
{
    settings->beginWriteArray("items");
    for (int i = 0; i < list.size(); ++i) {
        settings->setArrayIndex(i);

        if(!list.at(i).toMap().value("text").toString().isEmpty()){
            settings->setValue("text", list.at(i).toMap().value("text").toString());
            settings->setValue("pri", list.at(i).toMap().value("pri", 99).toInt());
            settings->setValue("done", list.at(i).toMap().value("done", false).toBool());
        }
    }
    settings->endArray();
    settings->sync();
}
现在,在main.qml中,添加代码,获取列表并解析:
Component.onCompleted: {
        var l  = todocpp.getItems();
        console.debug(JSON.stringify(l));
        for(var i=0; i<l.length; ++i){
            //这里直接使用l[i].text, l[i].pri拿属性
        }
    }
在qml中要保存一个新的事项列表,可以这样:
function saveItems(){
var l = [];
for(var i=0; i<listmodel.count; ++i){
    l.push({'pri': listmodel.get(i).iPri,
               'text': listmodel.get(i).iText,
               'done': listmodel.get(i).iDone });
}

todocpp.saveItems(l);
}
三、调试运行
打开项目属性->运行,点开Deploy configurations详情,选择Deploy local Qt libraries to temporary directory,这样当我们第一次高度时,会把Qt依赖库push到Android系统的一个临时目录下,以后调试时可以大大提升速度。
启动调试,按QtCreator左侧栏的运行按钮,或按Ctrl+R,弹出设备选择窗口,如果我们的目标设备出现一串问号,那是因为adb server没有足够的权限,Ubuntu Linux下以超级用户权限重新启动adb服务:
sudo adb kill-server
sudo adb devices
四、UI
1、准备素材。可以到http://www.iconpng.com/找些合适的按钮,放在项目/assets目录,然后新建个Qt资源文件叫assets.qrc,把准备好的图片加入到资源文件中。
2、主界面结构规划。从截图中可以把UI规划成3部分,从上往下分别是:顶端的标题栏(Titlebar,含左侧的返回按钮和右侧的新建按钮)、增加事项、事项列表,所以mail.qml的框架看起来差不多这样:
import QtQuick 2.2
import QtQuick.Window 2.1

Window {
    id: window
    visible: true

    //这里的width和height设置,不影响APP的显示,因为在QQmlApplicationEngine
    //默认会让Window最大化显示。
    //这里设置的值的还是有意义的,比如通常我会在开发初期,编写UI时,
    //会用Desktop的构建套件,直接在开发环境的PC上启动来看UI的效果,
    //这样比用设备调试快多了,这种方法还有另一个好处,就是在编写
    //自动适应屏幕大小的UI时,我可以直接拖动窗口大小来看效果。
    //所以这里的width和height值设置为目标设备的通用分辨率。
    width: 480
    height: 1024

    //背景颜色
    Rectangle {
        id: backgroundColor
        anchors.fill: parent
        color: "#D9D2D2"
    }

    Column{
        anchors.fill: parent
        //标题栏
        Titlebar{
            id: titlebar
        }
        //增加事项
        AddView {
            id: addview
            width: parent.width
        }
        //已添加的事项列表
        TodoListView {
            id: list
            width: parent.width
            height: window.height - titlebar.height - addview.height
        }
    }
    //UI构建完成后,读取待办事项列表,并显示出来
    Component.onCompleted: {
        var l  = todocpp.getItems();
        console.debug(JSON.stringify(l));
        for(var i=0; i<l.length; ++i){
            list.insertItem(l[i]);
        }
    }
    //这里可以捕捉Android系统的返回按键事件,如果需要按两次返回就退出软件的话,可以在这里做
    //    Keys.onReleased: {
    //        if (event.key == Qt.Key_Back) {
    //             event.accepted = true;
    //        }
    //    }
}
3、标题栏(Titlebar)元素对应Titlebar.qml,我通常会把界面分解成容易理解和维护的控件或子界面,这些控件和子界面,以及一些可以重用的东西(如按钮),都以独立的qml文件存在,如果软件较复杂的话,应该建立qml文件夹和子文件夹分别存放这些qml,提高可维护性。由于程序简单,我只是把qml文件都放在工程根目录下。Titlebar.qml代码如下:
import QtQuick 2.0

Rectangle {
    id: titlebar
    width: parent.width
    height: 100
    color: "#f2f2ee"

    property int pageIndex: 0

    state: "default"

    Text {
        anchors.centerIn: parent
        text: qsTr("135待办")
        font.pointSize: 20
        color: "#929292"
    }

    ActionButton {
        anchors {
            left: parent.left; leftMargin: 20
            verticalCenter: parent.verticalCenter
        }

        visible: titlebar.state == "adding"
        icon: "assets/reverse_arrow.png"
        onClicked: titlebar.state = "default"
    }

    ActionButton {
        anchors {
            right: parent.right; rightMargin: 20
            verticalCenter: parent.verticalCenter
        }

        visible: titlebar.state == "default"
        icon: "assets/new.png"
        onClicked: titlebar.state = "adding"
    }

    Line {
        anchors {
            left: parent.left
            right: parent.right
            bottom: parent.bottom
        }
    }
}
主要想说明一下的是按钮的状态变化处理。打开软件,进入默认状态:标题栏右边有个“新建”按钮,点击它,进入新建事项状态。新建状态下:“新建”按钮应该被隐藏,标题栏的左边要出现“返回”按钮,点“返回”按钮将取消新建状态,回到默认状态。其实,应该说这是状态间的切换,而每种状态,都会有不同的按钮或者是界面的变化,而对于外部(标题栏其它界面部分:AddView等)它们也只要关注Titlebar的状态变化,然后对不同的状态做反应即可,如mail.qml中,我们添加代码如下:
Titlebar{
            id: titlebar
            onStateChanged: {
                if(state == "default")
                    addview.hide();
                else if(state == "adding")
                    addview.show();
            }
        }
addview就是新建面板,我们通过Titlebar的状态,来控制新建面板的打开和隐藏。
4、我们做一个可重用的按钮,它可以是一个图标按钮,也可以是文字按钮,也可以是两者的叠加:)而且文字的大小将根据按钮的大小自动缩放,ActionButton.qml代码:
import QtQuick 2.0

Rectangle {
    id: root
    width: 100
    height: 100

    property alias text: txt.text
    property alias icon: img.source
    signal clicked();

    color: mouse.pressed? "#8FE2D2" : "transparent"


    Image {
        id: img
        anchors.centerIn: parent
        fillMode: Image.PreserveAspectFit
    }

    Text {
        id: txt
        anchors.fill: parent
        anchors.margins: 8
        color: "#929292"
        font.pointSize: 50
        fontSizeMode: Text.Fit
    }

    MouseArea {
        id: mouse
        anchors.fill: parent
        onClicked: root.clicked()
    }
}
对于Line.qml(线)控件,QML没有现成的类型,我是这样来实现的:)
Rectangle {
    id: line
    height: 1
    color: "#CCCCCC"
}
5、TodoListView,这是界面的主体,显示待办事项列表,它的实现还有几点值得说一说的:
(1)根根据优先级从上往下排序,并分组显示,每个事项前边用一个颜色条表示优先级。
(2)长近某条事项,将进入编辑状态,编辑状态下,将切换出动作按钮,包括重新设置优先级,完成,重做,删除。如果改为了优先级,需要把事项条目移动到相应的位置(遵从排序原则)。完成状态下,条目将出现一条划线。
(3)当一个条目处于编辑状态,当用户再长按其它条目或者翻滚列表,本条目要回复为非编辑状态。
(4)当用户按下某个条目的时候,应该要有按下的提示(条目颜色变为高亮),但是,用户翻滚列表的动作也会让手指所在的条目产生按下事件,所以我们要做点工作区别这两者:使用Timer,计算用户按下的时间,如果是100ms之内的,就忽略,否则才认为是按下了。
(5)当列表有变化,比如增加、移动、删除、状态切换,如果加之一些动画过渡效果,会让用户体验顿时不一样。为一个ListView增加动画效果是很容易的事情,完整的代码如下:
import QtQuick 2.0

Item {
    id: root

    function insertItem(item){
        for(var i=0; i<listmodel.count; ++i){
            if(listmodel.get(i).iPri > item.pri){
                listmodel.insert(i, {'iText': item.text,
                                     'iPri': item.pri,
                                     'iDone': item.done,
                                     'iColor': addview.getColor(item.pri) });
                return;
            }
        }

        //not found
        listmodel.append({'iText': item.text,
                             'iPri': item.pri,
                             'iDone': item.done,
                             'iColor': addview.getColor(item.pri) });
    }

    function saveItems(){
        var l = [];
        for(var i=0; i<listmodel.count; ++i){
            l.push({'pri': listmodel.get(i).iPri,
                       'text': listmodel.get(i).iText,
                       'done': listmodel.get(i).iDone });
        }

        todocpp.saveItems(l);
    }

    function changePri(index, newPri){
        list.currentIndex = -1;
        listmodel.setProperty(index, 'iDone', false);
        listmodel.setProperty(index, 'iPri', newPri);
        listmodel.setProperty(index, 'iColor', addview.priColorMap[newPri]);

        var moved = false;
        for(var i=0; i < listmodel.count; ++i){
            if(i != index &&
                    listmodel.get(i).iPri > newPri){
                if(index > i)
                    listmodel.move(index, i, 1);
                else
                    listmodel.move(index, i - 1, 1);
                moved = true;
                break;
            }
        }

        if(!moved)
            listmodel.move(index, listmodel.count - 1, 1);

        root.saveItems();
    }

    clip: true

    ListView {
        id: list
        anchors.fill: parent


        clip: true
        model: ListModel {
            id: listmodel
        }

        delegate: Component {
            Item {
                id: wrapper
                width: list.width
                height: 120

                Row {
                    id: actionBar
                    anchors.centerIn: parent

                    spacing: (parent.width - 100 * 6) / 7

                    ActionButton {
                        text: "1"
                        onClicked: {
                            root.changePri(index, 1);
                        }
                    }
                    ActionButton {
                        text: "3"
                        onClicked: {
                            root.changePri(index, 3);
                        }
                    }
                    ActionButton {
                        text: "5"
                        onClicked: {
                            root.changePri(index, 5);
                        }
                    }
                    ActionButton {
                        icon: "assets/timer.png"
                        onClicked: {
                            root.changePri(index, 99);
                        }
                    }
                    ActionButton {
                        visible: iDone
                        icon: "assets/reset.png"
                        onClicked: {
                            list.currentIndex = -1;
                            listmodel.setProperty(index, "iDone", false);
                            root.saveItems();
                        }
                    }
                    ActionButton {
                        visible: !iDone
                        icon: "assets/flag.png"
                        onClicked: {
                            list.currentIndex = -1;
                            listmodel.setProperty(index, "iDone", true);
                            root.saveItems();
                        }
                    }
                    ActionButton {
                        icon: "assets/trash.png"
                        onClicked: {
                            list.currentIndex = -1;
                            listmodel.remove(index);
                            root.saveItems();
                        }
                    }
                }

                Item {
                    id: contentRow
                    x: 0
                    width: parent.width
                    height: parent.height
                    Row {
                        anchors.fill: parent
                        Rectangle {
                            id: colorRect
                            width: 15
                            height: parent.height
                            color: iColor
                        }

                        Rectangle {
                            width: parent.width - colorRect.width
                            height: parent.height
                            color:  contentMouse.realPressed? "#8FE2D2": "#ECF0F1"
                            Text {
                                id: txt
                                anchors.verticalCenter: parent.verticalCenter
                                width: parent.width
                                height: parent.height - 60
                                text: iText
                                fontSizeMode: Text.Fit
                                font.pointSize: 50
                                color: iPri == 99 || iDone? "grey" : "#4E6061"
                                wrapMode: Text.WrapAtWordBoundaryOrAnywhere
                                font.strikeout: iDone
                            }
                        }
                    }


                    MouseArea {
                        id: contentMouse
                        anchors.fill: parent
                        property bool realPressed: false
                        onPressAndHold: {
                            realPressed = false;
                            list.currentIndex = index;
                        }

                        onPressed: {
                            pressedTimer.restart();
                        }
                        onReleased: {
                            pressedTimer.stop();
                            realPressed = false;
                        }

                        onCanceled: {
                            pressedTimer.stop();
                            realPressed = false;
                        }

                        Timer {
                            id: pressedTimer
                            repeat: false
                            interval: 100
                            onTriggered: contentMouse.realPressed = true
                        }
                    }
                }

                Line {
                    anchors {
                        left: parent.left; leftMargin: 15
                        right: parent.right
                        bottom: parent.bottom
                    }
                }


                state: ""
                states: [
                    State {
                        name: "showAction"
                        when: list.currentIndex == index
                        PropertyChanges {
                            target: contentRow
                            x: contentRow.width
                        }
                    }
                ]

                transitions: [
                    Transition {
                        from: "*"
                        to: "*"

                        ParallelAnimation {
                            id: actionShowAnim
                            NumberAnimation {
                                target: contentRow
                                property: "x"
                                duration: 200
                            }
                        }
                    }
                ]

            }

        }

        move: Transition {
            NumberAnimation {
                property: "y"
                duration: 500
            }
        }

        remove: Transition {
            ParallelAnimation {
                NumberAnimation { property: "opacity"; to: 0; duration: 500 }
                NumberAnimation { property: "x"; from: 0; to: root.width; duration: 500 }
            }
        }

        add: Transition {
            NumberAnimation {
                property: "y"
                from: 0
                duration: 500
            }
        }

        displaced: Transition {
            NumberAnimation {
                property: "y"
                duration: 500
            }
        }

        currentIndex: -1
        onDragStarted: {
            currentIndex = -1;
        }
    }
}
代码中有一个我自己不太满意的地方,就是changePri这个函数,在移动列表条目的时候,需要做一些额外的判断,因为move函数的行为看起来不是我所期望的那样,不知道有没更好的优化方法。
6、新建事项面板:AddView.qml,代码:
import QtQuick 2.0

Item {
    id: root

    signal added(var intent);

    readonly property var priColorMap: {
        1: "#F37570",
                3: '#F6BB6E',
                5: '#2175D5',
                99: '#DEDEDE'
    }

    function getColor(pri){
        switch(pri){
        case 1:
        case 3:
        case 5:
        case 99:
            return root.priColorMap[pri];
        default:
            return root.priColorMap[99];
        }
    }

    function show(){
        state = "show";
    }

    function hide(){
        state = "";
    }

    state: ""
    height: 0
    clip: true

    states: [
        State {
            name: "show"
            PropertyChanges {
                target: root
                height: 250
                focus: true
            }
            PropertyChanges {
                target: input
                focus: true
            }
        }
    ]

    transitions: [
        Transition {
            from: ""
            to: "show"
            PropertyAnimation { target: root; property:"height"; duration: 200 }
        },
        Transition {
            from: "show"
            to: ""
            SequentialAnimation {
                ScriptAction {
                    script: {
                        Qt.inputMethod.hide();
                    }
                }
                PropertyAnimation { target: root; property:"height"; duration: 200 }
            }
        }
    ]


    Column {
        anchors {
            left: parent.left; right: parent.right
        }

        Item {
            width: parent.width
            height: root.height - btnRow.height
            TextInput {
                id: input
                anchors { fill: parent; margins: 10 }
                color: "#4E6061"
                font.pointSize: 24
                wrapMode: TextInput.WrapAtWordBoundaryOrAnywhere
                focus: false
            }
        }

        Row {
            id: btnRow
            anchors {
                horizontalCenter: parent.horizontalCenter
            }

            spacing: (parent.width - 100 * 4) / 5
            ActionButton {
                text: "1"
                onClicked: {
                    root.added({'text': input.text, 'pri': 1});
                    input.text = "";
                }
            }
            ActionButton {
                text: "3"
                onClicked: {
                    root.added({'text': input.text, 'pri': 3});
                    input.text = "";
                }
            }
            ActionButton {
                text: "5"
                onClicked: {
                    root.added({'text': input.text, 'pri': 5});
                    input.text = "";
                }
            }
            ActionButton {
                icon: "assets/timer.png"
                onClicked: {
                    root.added({'text': input.text, 'pri': 99});
                    input.text = "";
                }
            }
        }
    }
}
我们通常增加一个信号added来告诉使用者,有一个新的事项添加了,事项的数据通过intent参数传出,所以在main.qml中,我们会监听这个信号,并把新建的事项插入列表:
AddView {
            id: addview
            width: parent.width
            onAdded: {
                titlebar.state = "default"; //恢复标题栏的状态
                if(intent.text !== ""){
                    intent.done = false;
                    list.insertItem(intent);
                    list.saveItems();
                }
            }
        }
7、关于QML布局的补充说明:
我们从对齐布局中看到两种方式,一种是使用属性绑定如width: parent.width,另一种是使用anchors { left:parent.left; right:parent.right },根据文档说明,尽量使用后者,因为效率可能会比前者高点。对于父元素为Row或Column的话,只能使用前者来对齐。
本程序的界面结构比较简单,没有涉及子界面,所有控件和元素也是静态创建的,对于一个界面复杂的软件,子界面或界面的变化是需要动态创建的,这个以后我们通过复杂点的例子来探讨。
五、部署
1、以Release模式编译代码。
2、打开项目属性->运行,点开Deploy configurations详情,选择Bundle Qt libraries in APK,(也可以进行APK签名),完成后点菜单的构建->部署项目xxx,将在构建目录/android-build/bin/目录下生成release的APK,APK可以直接提供给用户下载或安装。