本篇开始讲解音频解码播放,该项目用Qt的音频类QAudioFormat, QAudioOutput等进行解码,先讲解一些关于音频的知识。
1.采样频率
指每秒钟取得声音样本的次数。采样的过程就是抽取某点的频率值,很显然,在一秒中内抽取的点越多,获取得频率信息更丰富,为了复原波形,采样频率越高,声音的质量也就越好,声音的还原也就越真实,但同时它占的资源比较多。由于人耳的分辨率很有限,太高的频率并不能分辨出来。22050 的采样频率是常用的,44100已是CD音质,超过48000或96000的采样对人耳已经没有意义。这和电影的每秒24帧图片的道理差不多。如果是双声道(stereo),采样就是双份的,文件也差不多要大一倍。
在数字音频领域,常用的采样率有:
32000 Hz - miniDV 数码视频 camcorder、DAT (LP mode)所用采样率
44100 Hz - 音频 CD, 也常用于 MPEG-1 音频(VCD,SVCD,MP3)所用采样率
47250 Hz - 商用 PCM 录音机所用采样率
48000 Hz - miniDV、数字电视、DVD、DAT、电影和专业音频所用的数字声音所用采样率
50000 Hz - 商用数字录音机所用采样率
96000 Hz或者 192000 Hz - DVD-Audio、一些 LPCM DVD 音轨、BD-ROM(蓝光盘)音轨、和 HD-DVD (高清晰度 DVD)音轨所用所用采样率
2.通道数
即声音的通道的数目。常见的单声道和立体声(双声道),现在发展到了四声环绕(四声道)和5.1声道。
3.采样位数
采样位数也叫采样大小或量化位数。它是用来衡量声音波动变化的一个参数,也就是声卡的分辨率或可以理解为声卡处理声音的解析度。它的数值越大,分辨率也就越高,录制和回放的声音就越真实。而声卡的位是指声卡在采集和播放声音文件时所使用数字声音信号的二进制位数,声卡的位客观地反映了数字声音信号对输入声音信号描述的准确程度。常见的声卡主要有8位和16位两种,如今市面上所有的主流产品都是16位及以上的声卡。
每个采样数据记录的是振幅, 采样精度取决于采样位数的大小:
1 字节(也就是8bit) 只能记录 256 个数, 也就是只能将振幅划分成 256 个等级;
2 字节(也就是16bit) 可以细到 65536 个数, 这已是 CD 标准了;
4 字节(也就是32bit) 能把振幅细分到 4294967296 个等级, 实在是没必要了.
需要本篇博客的源码,请【点击下载】 。
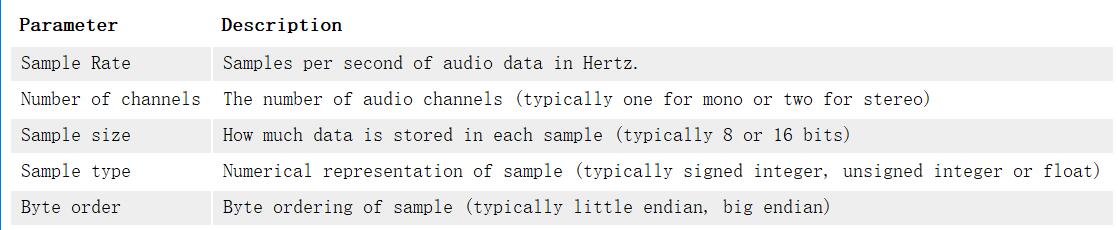
从Qt助手可以查找类QAudioFormat 的一些信息。
The QAudioFormat class stores audio stream parameter information.
The following table describes these in more detail.
封装一个关于音频的类MyAudio,头文件如下
MyAudio.h
#pragma once
#include <QtMultimedia/QAudioOutput>

class MyAudio
{
public:
	static MyAudio *GetObj()
	{
		static MyAudio mau;
		return &mau;
	}

	~MyAudio();

	void Stop();
	bool Start();
	void Play(bool isPlay);
	bool Write(const char *data, int datasize);
	int GetFree();

	int sampleRate = 48000;
	int sampleSize = 16;
	int channel = 2;

public:
	QAudioOutput *output = NULL;
	QIODevice *io = NULL;
	QMutex mutex;

protected:
	MyAudio();
};
MyAudio.cpp
#include "MyAudio.h"


MyAudio::MyAudio()
{
}


MyAudio::~MyAudio()
{
}

void MyAudio::Stop()
{
	mutex.lock();
	if (output)
	{
		output->stop();
		delete output;
		output = NULL;
		io = NULL;
	}

	mutex.unlock();
}

bool MyAudio::Start()
{
	Stop();
	mutex.lock();
	QAudioFormat fmt; //Qt音频的格式
	fmt.setSampleRate(this->sampleRate); //1秒采集48000个声音
	fmt.setSampleSize(this->sampleSize); //16位
	fmt.setChannelCount(this->channel);  //声道2双声道
	fmt.setCodec("audio/pcm");           //音频的格式
	fmt.setByteOrder(QAudioFormat::LittleEndian); //次序
	fmt.setSampleType(QAudioFormat::UnSignedInt); //样本的类别

	output = new QAudioOutput(fmt);
	io = output->start();
	mutex.unlock();
	return true;
}

void MyAudio::Play(bool isPlay)
{
	mutex.lock();
	if (!output)
	{
		mutex.unlock();
		return;
	}

	if (isPlay)
	{
		output->resume();
	}
	else
	{
		output->suspend();
	}

	mutex.unlock();
}

bool MyAudio::Write(const char *data, int datasize)
{
	if (!data || datasize <= 0)
		return false;
	mutex.lock();
	if (io)
	{
		mutex.unlock();
		io->write(data, datasize);
		return true;
	}

	mutex.unlock();
}

int MyAudio::GetFree()
{
	mutex.lock();
	if (!output)
	{
		mutex.unlock();
		return 0;
	}

	int free = output->bytesFree();
	mutex.unlock();

	return free;
}
代码分析
先设置音频的一些参数,根据以上音频的知识,设置采样频率,通道数等
int sampleRate = 48000;
int sampleSize = 16;
int channel = 2;
通过QAudioOutput类播放音频。
当然,在解码时也要,音频是视频都要进行解码,这样在播放时才能图像和声音同步,那么上一篇的解码函数DecodeFrame需要作修改。
void MyFFmpeg::DecodeFrame(const AVPacket *pkt)
{
	mtx.lock();
	if (!m_afc)
	{
		mtx.unlock();
		return;
	}

	if (m_yuv == NULL)
	{
		m_yuv = av_frame_alloc();
	}

	if (m_pcm == NULL)
	{
		m_pcm = av_frame_alloc();
	}

	AVFrame *frame = m_yuv;  //解码后m_yuv会改变
	if (pkt->stream_index == m_audioStream)
	{
		frame = m_pcm;
	}

	//根据索引 stream_index 来判断是音频还是视频
	int re = avcodec_send_packet(m_afc->streams[pkt->stream_index]->codec, pkt);
	if (re != 0)
	{
		mtx.unlock();
		return;
	}

	re = avcodec_receive_frame(m_afc->streams[pkt->stream_index]->codec, frame);
	if (re != 0)
	{
		//失败
		mtx.unlock();
		return;
	}
	mtx.unlock();
}
通过ffmpeg解码得到音频帧后,需要对音频帧进行解码,这个解码动作在线程run()方法中进行,音频解码如下:
int MyFFmpeg::ToPCM(char *out)
{
	mtx.lock();
	if (!m_afc || !m_pcm || !out)
	{
		mtx.unlock();
		return 0;
	}

	AVCodecContext *ctx = m_afc->streams[m_audioStream]->codec;
	if (m_aCtx == NULL)
	{
		m_aCtx = swr_alloc();
		swr_alloc_set_opts(m_aCtx, ctx->channel_layout,
			AV_SAMPLE_FMT_S16,
			ctx->sample_rate,
			ctx->channels,
			ctx->sample_fmt,
			ctx->sample_rate,
			0, 0);

		swr_init(m_aCtx);
	}

	uint8_t *data[1];
	data[0] = (uint8_t *)out;
	int len = swr_convert(m_aCtx, data, 10000, (const uint8_t **)m_pcm->data, m_pcm->nb_samples);
	if (len <= 0)
	{
		mtx.unlock();
		return 0;
	}

	int outsize = av_samples_get_buffer_size(NULL, ctx->channels, m_pcm->nb_samples, AV_SAMPLE_FMT_S16, 0);
	mtx.unlock();

	return outsize;
}
解码之后需要通过电脑的声卡等设备进行播放,本项目是用Qt开发的,那么就需要使用Qt输入输出设备的类QIODevice,需要调用以下函数,将声音写入设备,进行播放。
qint64 write(const char *data);查看Qt助手的解释:Writes data from a zero-terminated string of 8-bit characters to the device. //将数据从零终止的8位字符字符串写入设备。上面的类MyAudio中的方法
bool MyAudio::Write(const char *data, int datasize)
既是播放声音。
那么如何实现视频暂停呢,这个更简单,因为我们的解码是在子线程中进行的,只要停止运行子线程即可。解码线程截图如下;
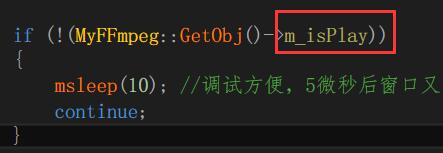
只要控制m_isPlay的真假,即可实现线程阻塞,视频暂停。代码如下:
void FFVideoPlyer::slotPlay()
{
	if (ui.btn_Play->text() == QString::fromLocal8Bit("暂停"))
	{
		MyFFmpeg::GetObj()->m_isPlay = false; //线程阻塞,视频暂停
		ui.btn_Play->setText(QString::fromLocal8Bit("播放"));
	}
	else
	{
		MyFFmpeg::GetObj()->m_isPlay = true;  //线程运行,视频播放
		ui.btn_Play->setText(QString::fromLocal8Bit("暂停"));
	}
}过多的解析不说了,本篇博客的源码,请打开链接:项目源码,自行学习。