前提:多表数据


create table dep(
    id int primary key auto_increment,
    name varchar(16),
    work varchar(16)
);
create table emp(
    id int primary key auto_increment,
    name varchar(16),
    salary float,
    dep_id int
);
insert into dep values(1, '市场部', '销售'), (2, '教学部', '授课'), (3, '管理部', '开车');
insert into emp(name, salary, dep_id) values('egon', 3.0, 2),('yanghuhu', 2.0, 2),('sanjiang', 10.0, 1),('owen', 88888.0, 2),('liujie', 8.0, 1),('yingjie', 1.2, 0);
一:笛卡尔积(交叉连接)
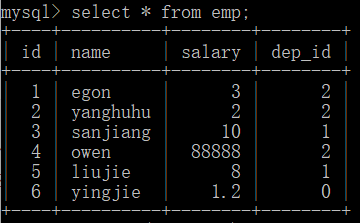
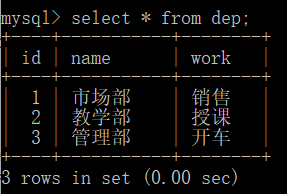
需求:查看每位员工的部门的所有信息
select * from emp;
+----+----------+--------+--------+
| id | name     | salary | dep_id |
+----+----------+--------+--------+
|  1 | egon     |      3 |      2 |
|  2 | yanghuhu |      2 |      2 |
|  3 | sanjiang |     10 |      1 |
|  4 | owen     |  88888 |      2 |
|  5 | liujie   |      8 |      1 |
|  6 | yingjie  |    1.2 |      0 |
+----+----------+--------+--------+

select * from dep;
+----+-----------+--------+
| id | name      | work   |
+----+-----------+--------+
|  1 | 市场部    | 销售   |
|  2 | 教学部    | 授课   |
|  3 | 管理部    | 开车   |
+----+-----------+--------+

子查询,最终结果只能显示单表的信息,但需求是同时能够显示两张表的信息==>先将两张表合成一张表
select * from emp where dep_id in (select id from dep);
+----+----------+--------+--------+
| id | name     | salary | dep_id |
+----+----------+--------+--------+
|  1 | egon     |      3 |      2 |
|  2 | yanghuhu |      2 |      2 |
|  3 | sanjiang |     10 |      1 |
|  4 | owen     |  88888 |      2 |
|  5 | liujie   |      8 |      1 |
+----+----------+--------+--------+

笛卡尔积:集合 X{a, b} * Y{o, p, q} => Z{{a, o}, {a, p}, {a, q}, {b, o}, {b, p}, {b, q}}
交叉查询:select * from emp, dep; | select * from emp course join dep;
'''
做了筛选,结果<==完整数据,非笛卡尔积
select * from emp, dep where db2.emp.dep_id = db2.dep.id;  # 同sql语句上表现是从两张表拿数据
+----+----------+--------+--------+----+-----------+--------+
| id | name     | salary | dep_id | id | name      | work   |
+----+----------+--------+--------+----+-----------+--------+
|  1 | egon     |      3 |      2 |  2 | 教学部    | 授课   |
|  2 | yanghuhu |      2 |      2 |  2 | 教学部    | 授课   |
|  3 | sanjiang |     10 |      1 |  1 | 市场部    | 销售   |
|  4 | owen     |  88888 |      2 |  2 | 教学部    | 授课   |
|  5 | liujie   |      8 |      1 |  1 | 市场部    | 销售   |
+----+----------+--------+--------+----+-----------+--------+

注意:同时查询两张表形成新的表,可以称之为虚拟表,原表与表之间可能存在重复字段,同时使用时需要明确所属表,必要时还需明确所需数据库

'''
二:多表连接=>虚拟的单表
2.1内连接
inner join on
内连接:
    结果为两张表有对应关系的数据(emp有dep没有,emp没有dep有的记录均不会被虚拟表展示)
    语法:左表 inner join 右表 on 两表有关联的字段的条件,on就是产生对于关系的(连接的依据)
eg:select * from emp inner join dep on emp.dep_id = dep.id;
+----+----------+--------+--------+----+-----------+--------+
| id | name     | salary | dep_id | id | name      | work   |
+----+----------+--------+--------+----+-----------+--------+
|  1 | egon     |      3 |      2 |  2 | 教学部    | 授课   |
|  2 | yanghuhu |      2 |      2 |  2 | 教学部    | 授课   |
|  3 | sanjiang |     10 |      1 |  1 | 市场部    | 销售   |
|  4 | owen     |  88888 |      2 |  2 | 教学部    | 授课   |
|  5 | liujie   |      8 |      1 |  1 | 市场部    | 销售   |
+----+----------+--------+--------+----+-----------+--------+
2.2左连接
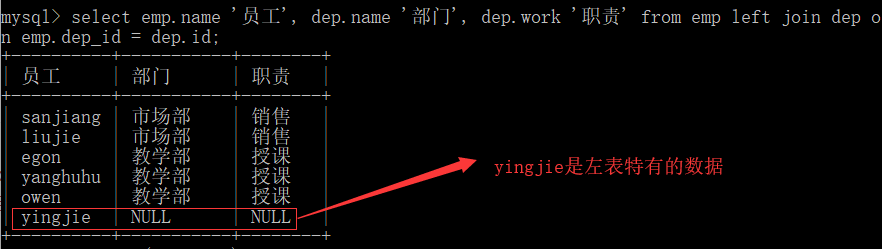
left join on
左连接:在内连接的基础上还保留左表特有的记录
语法:左表 left join 右表 on 两表有关联的字段条件
eg:select emp.name '员工', dep.name '部门', dep.work '职责' from emp left join dep on emp.dep_id = dep.id;
+----------+-----------+--------+
| 员工     | 部门      | 职责   |
+----------+-----------+--------+
| sanjiang | 市场部    | 销售   |
| liujie   | 市场部    | 销售   |
| egon     | 教学部    | 授课   |
| yanghuhu | 教学部    | 授课   |
| owen     | 教学部    | 授课   |
| yingjie  | NULL      | NULL   |
+----------+-----------+--------+
左表: 右表:
2.3右连接
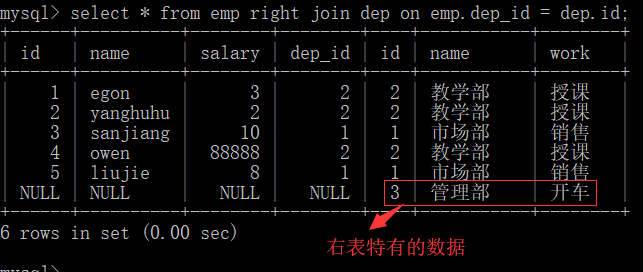
right join on
右连接:在内连接的基础上还保留右表特有的记录
语法:左表 right join 右表 on 两表有关联的字段的条件
eg:select * from emp right join dep on emp.dep_id = dep.id;
+------+----------+--------+--------+----+-----------+--------+
| id | name | salary | dep_id | id | name | work |
+------+----------+--------+--------+----+-----------+--------+
| 1 | egon | 3 | 2 | 2 | 教学部 | 授课 |
| 2 | yanghuhu | 2 | 2 | 2 | 教学部 | 授课 |
| 3 | sanjiang | 10 | 1 | 1 | 市场部 | 销售 |
| 4 | owen | 88888 | 2 | 2 | 教学部 | 授课 |
| 5 | liujie | 8 | 1 | 1 | 市场部 | 销售 |
| NULL | NULL | NULL | NULL | 3 | 管理部 | 开车 |
+------+----------+--------+--------+----+-----------+--------+
在连接语法join前面就是左表,之后就是右表
采用的是left关键词就是左连接,right关键词就是右连接,inner关键词就是内连接
2.4全连接
全连接:在内连接的基础上分别保留着左表及右表特有的记录
语法:mysql没有full join on 语法,但是可以通过去重达到效果
eg:
select * from emp left join dep on emp.dep_id = dep.id
union
select * from emp right join dep on emp.dep_id = dep.id;

+------+----------+--------+--------+------+-----------+--------+
| id   | name     | salary | dep_id | id   | name      | work   |
+------+----------+--------+--------+------+-----------+--------+
|    3 | sanjiang |     10 |      1 |    1 | 市场部    | 销售   |
|    5 | liujie   |      8 |      1 |    1 | 市场部    | 销售   |
|    1 | egon     |      3 |      2 |    2 | 教学部    | 授课   |
|    2 | yanghuhu |      2 |      2 |    2 | 教学部    | 授课   |
|    4 | owen     |  88888 |      2 |    2 | 教学部    | 授课   |
|    6 | yingjie  |    1.2 |      0 | NULL | NULL      | NULL   |
| NULL | NULL     |   NULL |   NULL |    3 | 管理部    | 开车   |
+------+----------+--------+--------+------+-----------+--------+

'''
1.查询每一位员工对应的工作职责
# 每一位员工 => 左表为emp表, 那么左表的所有数据均需要被保留, 所有采用左连接
           => 左表为dep表, 那么右表的所有数据均需要被保留, 所有采用右连接
# select emp.name, dep.work from emp left join dep on emp.dep_id = dep.id;
select emp.name, dep.work from dep right join emp on emp.dep_id = dep.id;

+----------+--------+
| name     | work   |
+----------+--------+
| sanjiang | 销售   |
| liujie   | 销售   |
| egon     | 授课   |
| yanghuhu | 授课   |
| owen     | 授课   |
| yingjie  | NULL   |
+----------+--------+

2.查询每一个部门下的员工们及员工职责
# select max(dep.name), max(dep.work), group_concat(emp.name) from emp right join dep on emp.dep_id = dep.id group by dep_id;

# 分析过程
# 每一个部门 => dep的信息要被全部保留, 需要分组
# 员工职责 => dep.work, 由于分组不能直接被查询 => 需要用聚合函数处理
# 员工们 => emp.name做拼接 => group_concat(emp.name)
# 分组的字段 => 部门 => emp.dep_id => emp.dep_id可以直接被查询,但没有显示意义 => dep.name用来显示 => dep.name需要用聚合函数处理


select max(dep.name), max(dep.work), group_concat(emp.name) from dep left join emp on  emp.dep_id = dep.id group by emp.dep_id;

# 注: on在where条件关键词之左
'''
三:Navicat
1.安装Navicat
2.连接数据库,并建库
3.创建表、设置字段、插入数据
4.新建查询
四:Python使用mysql
模块pymysql
按照并导入pymysql:pip3 install pymysql
通过pymysql操作数据库分四步
1.建立连接
conn = pymysql.connect(host="localhost", port=3306, db='db2', user='root', password='root')

2.设置字典类型游标
cursor = conn.cursor(pymysql.cursors.DictCursor)

3.执行sql语句并使用执行结果
# 书写sql语句
sql = 'select * from emp'
# 执行sql语句, 有返回值, 返回值为得到的记录行数
line = cursor.execute(sql)
print(line)

# 使用执行的结果:
        fetchone()当前游标往后获取一行记录
        fetchall()当前游标往后所有的记录
        scroll(num, mode="relative|absolute")
                relative: 游标从当前位置往后移动num行
                ablolute: 游标从头往后移动num行, 一般可以结合line来使用能定位到任意位置
tag = cursor.fetchone() # 第一条
print(tag)
print(tag['salary'])
tag = cursor.fetchone() # 第二条
print(tag)
cursor.scroll(1, mode='relative') # 偏移第三条
# cursor.scroll(line - 1, mode='absolute') # 指针绝对, 游标永远从头开始偏移
tags = cursor.fetchall() # 第四条到最后
print(tags)

4.断开连接
cursor.close()
conn.close()
'''
过程:

1. 建立连接
2. 设置一个可以执行sql语句的对象 - 游标
3. 通过该对象执行sql语句得到执行结果
4. 端口连接

'''
import pymysql
# 1. 建立连接
conn = pymysql.connect(host="localhost", port=3306, db='db2', user='root', password='root')
# 2. 设置游标
cursor = conn.cursor(pymysql.cursors.DictCursor)  # 设置游标的具体类型, DictCursor拿到字段名
# 3. 执行sql语句
sql = 'select * from emp'

res = cursor.execute(sql)  # 结果的行数
print(res)

# 需求: 具体的一条条记录
tag = cursor.fetchone()
print(tag)
print(tag['salary'])
tag = cursor.fetchone()
print(tag)

# cursor.scroll(1, mode='relative') # 指针相对于上一次位置往后偏移1条记录
cursor.scroll(res - 1, mode='absolute') # 指针绝对, 游标永远从头开始偏移

tags = cursor.fetchall()
print(tags)


cursor.close()
conn.close()
五:pymysql处理sql注入
什么是sql注入:
    通过书写sql包含(注释相关的)特殊字符,让原有的sql执行顺序发生改变,从而改变执行得到的sql

目的:
   绕过原有的sql安全认证,达到对数据库攻击的目的

没有处理sql注入的写法:
 sql = 'select * from user where usr="%s" and pwd="%s"' % (usr, pwd)
res = cursor.execute(sql)

# sql注入
# 1.知道用户名:  abc" -- hehe | ooo
# select * from user where usr="abc" -- hehe" and pwd="ooo"
# 2.不知道用户名 aaa" or 1=1 -- hehe | 000
# select * from user where usr="aaa" or 1=1 -- hehe" and pwd="000"

# 处理sql注入:
sql = 'select * from user where usr=%s and pwd=%s'
res = cursor.execute(sql, (usr, pwd))
'''
sql语法中
注释: /**/  | --  | #

什么是sql注入:
通过书写sql包含(注释相关的)特殊字符, 让原有的sql执行顺序发生改变, 从而改变执行得到的sql

目的:
绕过原有的sql安全认证, 达到对数据库攻击的目的
'''
import pymysql
conn = pymysql.connect(host='localhost', port=3306, user='root', passwd='root', db='db2')
cursor = conn.cursor(pymysql.cursors.DictCursor)

# 登录

# 得到用户输入的账户密码
usr = input("请输入用户名: ") #abc
pwd = input("请输入密码: ") #123

# sql注入
# 1.知道用户名:  abc" -- hehe | ooo
# select * from user where usr="abc" -- hehe" and pwd="ooo"
# 2.不知道用户名 aaa" or 1=1 -- hehe | 000
# select * from user where usr="aaa" or 1=1 -- hehe" and pwd="000"

# 处理方式
# 对输入的账户密码做完全处理 => 不可能形成达到sql注入的特殊语法 => 正则

# 和数据库的账户密码进行配对
# sql = 'select * from user where usr="%s" and pwd="%s"' % (usr, pwd)
# select * from user where usr="abc" and pwd="123"
# res = cursor.execute(sql)

# pymysql已经处理了sql注入
sql = 'select * from user where usr=%s and pwd=%s'
res = cursor.execute(sql, (usr, pwd))

# print(res)
if res:
    print('login success')
else:
    print('login failed')

cursor.close()
conn.close()
六:增、删、改
增:
增加sql的语句:
sql1 = 'insert into user(usr, pwd) values (%s, %s)'

在内存中一次插入一条:
cursor.execute(sql1, ("opq", "123"))

在内存中插入多条
cursor.executemany(sql1, [("aaa", "000"), ("bbb", "111")])

将内存中的数据提交到硬盘中:
conn.commit()


删:
sql2 = 'delete from user where usr=%s'
cursor.execute(sql2, ("aaa"))
conn.commit()


改:
sql3 = 'update user set pwd=%s where usr=%s'
res = cursor.execute(sql3, ("222", "bbb"))
conn.commit()
import pymysql
conn = pymysql.connect(host='localhost', port=3306, user='root', passwd='root', db='db2')
cursor = conn.cursor(pymysql.cursors.DictCursor)

# 增
# sql1 = 'insert into user(usr, pwd) values (%s, %s)'
# cursor执行sql语句,在内存中完成了对数据的插入, 但不能将数据存放到硬盘
# 会将id完成自增
# 插入单条
# res = cursor.execute(sql1, ("opq", "123"))
# 插入多条
#res = cursor.executemany(sql1, [("aaa", "000"), ("bbb", "111")])
# print(res)
# 将内存中的数据提交给硬盘, 完成真实意义上的数据存储
# conn.commit()

# 删
# sql2 = 'delete from user where usr=%s'
# res = cursor.execute(sql2, ("aaa"))
# print(res)
# conn.commit()

# 改
sql3 = 'update user set pwd=%s where usr=%s'
res = cursor.execute(sql3, ("222", "bbb"))
conn.commit()

cursor.close()
conn.close()