1.fcn.utils.label_colormap
传入的参数N表示要分类的数目,生成的cmap时N*3的数组,3表示该类的(R G B)的值
def label_colormap(N=256):
    cmap = np.zeros((N, 3))
    for i in six.moves.range(0, N):
        id = i
        r, g, b = 0, 0, 0
        for j in six.moves.range(0, 8):
            r = np.bitwise_or(r, (bitget(id, 0) << 7 - j))
            g = np.bitwise_or(g, (bitget(id, 1) << 7 - j))
            b = np.bitwise_or(b, (bitget(id, 2) << 7 - j))
            id = (id >> 3)
        cmap[i, 0] = r
        cmap[i, 1] = g
        cmap[i, 2] = b
    cmap = cmap.astype(np.float32) / 255
    return cmap
如图所示,我们要对吧图像分为5类,每类的R G B值如图所示

2.label2rgb
lbl是使用网路预测的语义分割的结果(一般时单通道 和原图一样大小 每个像素的值时0-N)
def label2rgb(lbl, img=None, label_names=None, n_labels=None,
              alpha=0.5, thresh_suppress=0):
    if label_names is None:
        if n_labels is None:
            n_labels = lbl.max() + 1  # +1 for bg_label 0
    else:
        if n_labels is None:
            n_labels = len(label_names)
        else:
            assert n_labels == len(label_names)
#cmap生成的颜色导图,是N*3矩阵(N时要分类的数目,3表示RGB 3通道),表示每一类用那种RGB颜色表示
    cmap = label_colormap(n_labels)
    cmap = (cmap * 255).astype(np.uint8)
#lbl_viz根据cmap的颜色表和lbl语义分割结果,将lbl的类值转换为RGB3通道的值,即lbl_viz是 3通道×图像大小,每个像素是该像素的类的RGB值
    lbl_viz = cmap[lbl]
    lbl_viz[lbl == -1] = (0, 0, 0)  # unlabeled
#img时输入的原图,如果有输入的原图,则将语义分割后可视化的结果和原图按照输入参数alpha组合
    if img is not None:
        img_gray = skimage.color.rgb2gray(img)
        img_gray = skimage.color.gray2rgb(img_gray)
        img_gray *= 255
        lbl_viz = alpha * lbl_viz + (1 - alpha) * img_gray
        lbl_viz = lbl_viz.astype(np.uint8)
#如果不需要命名,则直接将生成的结果返回
    if label_names is None:
        return lbl_viz
#如果需要命名等,则继续处理label_naems
    # cv2 is required only if label_names is not None
    import cv2
    if cv2 is None:
        warnings.warn('label2rgb with label_names requires OpenCV (cv2), '
                      'so ignoring label_names values.')
        return lbl_viz

    np.random.seed(1234)
    for label in np.unique(lbl):
        if label == -1:
            continue  # unlabeled

        mask = lbl == label
        if 1. * mask.sum() / mask.size < thresh_suppress:
            continue
        mask = (mask * 255).astype(np.uint8)
        y, x = scipy.ndimage.center_of_mass(mask)
        y, x = map(int, [y, x])

        if lbl[y, x] != label:
            Y, X = np.where(mask)
            point_index = np.random.randint(0, len(Y))
            y, x = Y[point_index], X[point_index]

        text = label_names[label]
        font_face = cv2.FONT_HERSHEY_SIMPLEX
        font_scale = 0.7
        thickness = 2
        text_size, baseline = cv2.getTextSize(
            text, font_face, font_scale, thickness)

        def get_text_color(color):
            if color[0] * 0.299 + color[1] * 0.587 + color[2] * 0.114 > 170:
                return (0, 0, 0)
            return (255, 255, 255)

        color = get_text_color(lbl_viz[y, x])
        cv2.putText(lbl_viz, text,
                    (x - text_size[0] // 2, y),
                    font_face, font_scale, color, thickness)
    return lbl_viz
效果如下图(原图上叠加了分类后的图像)
当使用label2rgb时指定label_names时,就会在图像的类别中显示label_names
   import PIL.Image
    import numpy as np
    import scipy.misc
    lbl = PIL.Image.open('/home/mlxuan/project/DeepLearning/data/image_Segmentation/dataAug/label/r0.png')
    img = PIL.Image.open('/home/mlxuan/project/DeepLearning/data/image_Segmentation/dataAug/src/r0.BMP')
    lbl = np.array(lbl)
    img = np.array(img)
    _ = label2rgb(lbl=lbl,img=img,label_names=['1','2','3','4','5','6','7','8','9','0'])
    scipy.misc.imsave('./t.jpg', _)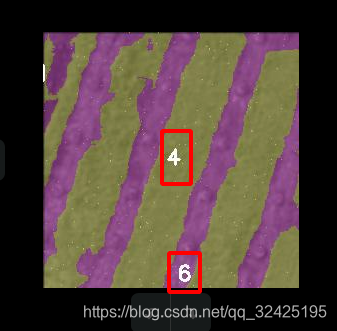
label2rgn调用label_colormap(),生成颜色索引图cmap
2.
混淆矩阵
_fast_hist(label_true, label_pred, n_class)