lnmp官网有详细的安装教程:https://lnmp.org/install.html
- 1, 安装命令:
创建文件夹指向命令
wget http://soft.vpser.net/lnmp/lnmp1.5.tar.gz -cO lnmp1.5.tar.gz && tar zxf lnmp1.5.tar.gz && cd lnmp1.5 && ./install.sh lnmp
第一步选择MySQL版本:
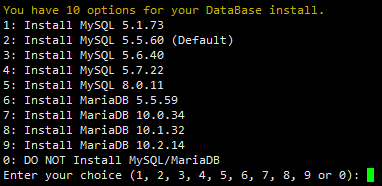
选择:4
输入数据库密码:*****
询问是否需要启用MySQL InnoDB,InnoDB引擎默认为开启,一般建议开启,直接回车或输入 y ,如果确定确实不需要该引擎可以输入 n,(MySQL 5.7+版本无法关闭InnoDB),输入完成,回车进入下一步。

第二部选择:PHP版本
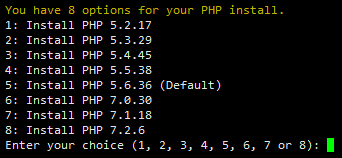

注意:选择PHP 7+版本时需要自行确认PHP版本是否与自己的程序兼容。
输入要选择的PHP版本的序号,回车进入下一步,选择是否安装内存优化:
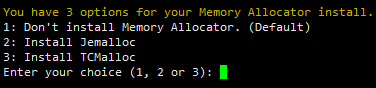
不用输入直接回车就可以了
之后就等待安装完毕就可以了

安装完毕

- 2,配置项目
把项目搬到 /home/wwwroot/default/
给项目目录全部的权限 chmod -R 777 项目目录名称
##添加网站(虚拟主机)##
- 寻找nginx 运行环境 ps -ef|grep nginx

nginx的配置文建目录/usr/local/nginx/conf/nginx.conf
nginx 启动命令 /usr/local/nginx/sbin/nginx -s reload
- 配置虚拟主机

nginx 配置文件中的 server{
********
}
这个里面就是项目访问配置项
在文件的最后找到
调用vhost 目录下的 所有.conf结尾的文件,所以我们多个项目配置就在vhost下面创建配置文件就可以了
- 添加配置项
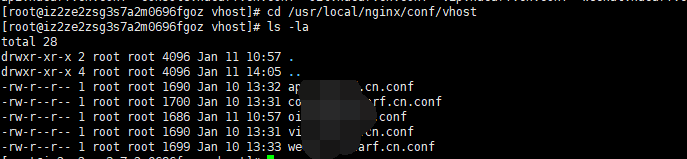
文件都.conf结尾就可以了
粘贴一个thinkPHP项目的配置内容

需要复制的
server {
listen 80;
server_name *****.cn;
index index.shtml index.html index.htm index.php;
root /home/wwwroot/default/yd_api/www;
fastcgi_connect_timeout 600;
fastcgi_send_timeout 600;
fastcgi_read_timeout 600;
error_page 405 =200 $uri;
error_page 500 502 503 504 /50x.html;
client_max_body_size 50M;
location = /50x.html {
root html;
}
location ~ \.php$ {
#fastcgi_pass 127.0.0.1:9000;
fastcgi_pass unix:/tmp/php-cgi.sock;
fastcgi_index index.php;
fastcgi_param SCRIPT_FILENAME $document_root$fastcgi_script_name;
include fastcgi_params;
}
location / {
#ThinkPHP Rewrite
if (!-e $request_filename){
rewrite ^/(.*)$ /index.php?s=$1 last;
}
}
location ~* ^.+\.(jpg|jpeg|gif|png|css|bmp|js)
{
access_log /home/wwwlogs/*****.cn.log;
expires 30d;
}
}
一下是laravel项目的配置项

server
{
listen 80;
#listen [::]:80;
server_name *****.cn ;
index index.html index.htm index.php default.html default.htm default.php;
root /home/wwwroot/default/v3.3.1/public;
try_files $uri $uri/ @rewrite;
location @rewrite {
rewrite ^/(.*)$ /index.php?_url=/$1;
}
location ~ \.php$ {
fastcgi_pass unix:/tmp/php-cgi.sock;
# fastcgi_pass 127.0.0.1:9000;
fastcgi_index index.php;
fastcgi_param SCRIPT_FILENAME $document_root$fastcgi_script_name;
include fastcgi_params;
}
location ~* ^/(css|img|js|flv|swf|download)/(.+)$ {
root /home/wwwroot/default/v3.3.1/public;
}
location ~ .*\.(gif|jpg|jpeg|png|bmp|swf)$
{
expires 30d;
allow all;
}
location ~ /\.ht {
deny all;
}
location ~* \.env {
allow all;
}
location ~* ^.+\.(jpg|jpeg|gif|png|bmp|css|js|swf|txt|ttf|woff)$ {
access_log off;
break;
}
access_log /home/wwwlogs/*****.cn.log;
error_log /home/wwwlogs/****.error.log;
}
- 配置好之后可以重启 lnmp:lnmp restart

这个可以重启lnmp上安装的所有的环境
之后访问项目目录就可以了。
如果访问失败 报505 404 错误之类的,可以去项目配置文件的打印log中就看具体的报错原因,
- log


查看最新的5条报错log
这边报了一个open_basedir 目录访问权限的问题,解决方案是:
lnmp 添加虚拟机会给你创建一个.usr.ini 的目录访问权限的文件,把里面的内容修改成 到项目上一级就可以了,不用指定某一个具体的项目,这样就不会产生访问不了的情况


这个是个举例子,要学会打入log