写在前面
被Adrian Rosebrock圈粉后,就一直期待他的更新,作者每周一更新,考虑到时差问题(作者在美国),一般北京时间周二才能看到。
作者根据读者留言中的问题写下了这篇博客,迫不及待的学习了一番,发现过一遍是无法完全理解的,还需要重复。
看来搞研究不是闭门造车,要有分享精神和必要的交流,成人成己。
Introduction
在本教程中,您将了解Keras .fit和.fit_generator函数的工作原理,包括它们之间的差异。为了帮助您获得实践经验,我已经提供了一个完整的示例,向您展示如何从头开始实现Keras数据生成器。
今天的博客文章的灵感来自PyImageSearch读者——Shey。
Shey问道:
嗨!阿德里安,谢谢你的教程。我有条不紊地经历过每一个人。他们真的帮助我学习深度学习。
我对Keras“.fit_generator”函数有疑问。
我注意到你在博客文章中使用了很多,但是我不确定这个函数与Keras的标准“.fit”函数有什么不同。
它有什么不同?我怎么知道何时使用?以及如何为“.fit_generator”函数创建数据生成器?
Shey问了一个很好的问题。
Keras深度学习库包括三个独立的函数,可用于训练您自己的模型:
.fit.fit_generator.train_on_batch
如果你是Keras和深度学习的新手,在试图确定你应该使用哪种函数时,你可能会觉得有点不知所措。如果你需要使用你自己的自定义数据,这种混乱只会更加复杂。
为了帮助掀开关于Keras fit和fit_generator函数的迷云,我将花费本教程讨论:
- Keras的
.fit,.fit_generator和.train_on_batch函数之间的区别 - 在训练自己的深度学习模型时,何时使用每个函数
- 如何实现自己的Keras数据生成器,并在使用
.fit_generator训练模型时使用它 - 在训练完成后评估网络时,如何使用
.predict_generator函数
如何使用Keras fit和fit_generator(动手教程)
在今天的教程的第一部分中,我们将讨论Keras的.fit,.fit_generator和.train_on_batch函数之间的差异。
我将向您展示一个“非标准”图像数据集的示例,它根本不包含任何实际的PNG,JPEG等图像!相反,整个图像数据集由两个CSV文件表示,一个用于训练,第二个用于评估。
我们的目标是实现能够在此CSV图像数据上训练网络的Keras生成器(不用担心,我将向您展示如何从头开始实现这样的生成器功能)。
最后,我们将训练和评估我们的网络。
何时使用Keras的fit,fit_generator和train_on_batch函数?
这三个功能基本上可以完成相同的任务,但他们如何去做这件事是非常不同的。
让我们逐个探索这些函数,查看函数调用的示例,然后讨论它们彼此之间的差异。
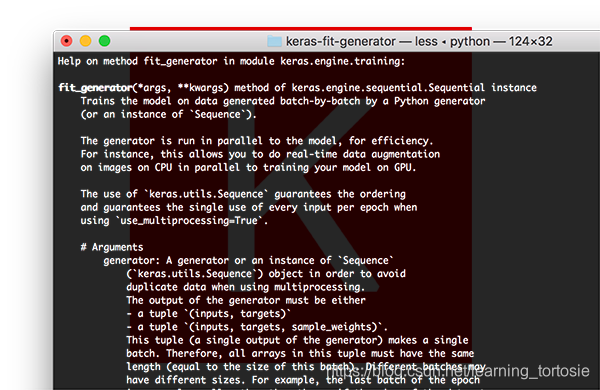
Keras .fit函数
函数签名:

调用.fit:
model.fit(trainX, trainY, batch_size=32, epochs=50)
在这里您可以看到我们提供的训练数据(trainX)和训练标签(trainY)。
然后,我们指示Keras允许我们的模型训练50个epoch,同时batch size为32。
对.fit的调用在这里做出两个主要假设:
- 我们的整个训练集可以放入RAM
- 没有数据增强(即不需要Keras生成器)
相反,我们的网络将在原始数据上训练。
原始数据本身将适合内存,我们无需将旧批量数据从RAM中移出并将新批量数据移入RAM。
此外,我们不会使用数据增强动态操纵训练数据。
Keras fit_generator函数
对于小型,简单化的数据集,使用Keras的.fit函数是完全可以接受的。
这些数据集通常不是很具有挑战性,不需要任何数据增强。
但是,真实世界的数据集很少这么简单:
- 真实世界的数据集通常太大而无法放入内存中
- 它们也往往具有挑战性,要求我们执行数据增强以避免过拟合并增加我们的模型的泛化能力
在这些情况下,我们需要利用Keras的.fit_generator函数:
# initialize the number of epochs and batch size
EPOCHS = 100
BS = 32

# construct the training image generator for data augmentation
aug = ImageDataGenerator(rotation_range=20, zoom_range=0.15,
	width_shift_range=0.2, height_shift_range=0.2, shear_range=0.15,
	horizontal_flip=True, fill_mode="nearest")

# train the network
H = model.fit_generator(aug.flow(trainX, trainY, batch_size=BS),
	validation_data=(testX, testY), steps_per_epoch=len(trainX) // BS,
	epochs=EPOCHS)
我们首先初始化将要训练的网络的epoch和batch size。
然后我们初始化aug,这是一个Keras ImageDataGenerator对象,用于图像的数据增强,随机平移,旋转,调整大小等。
执行数据增强是正则化的一种形式,使我们的模型能够更好的被泛化。
但是,应用数据增强意味着我们的训练数据不再是“静态的” ——数据不断变化。
根据提供给ImageDataGenerator的参数随机调整每批新数据。
因此,我们现在需要利用Keras的.fit_generator函数来训练我们的模型。
顾名思义,.fit_generator函数假定存在一个为其生成数据的基础函数。
该函数本身是一个Python生成器。
Keras在使用.fit_generator训练模型时的过程:
- Keras调用提供给
.fit_generator的生成器函数(在本例中为aug.flow) - 生成器函数为
.fit_generator函数生成一批大小为BS的数据 .fit_generator函数接受批量数据,执行反向传播,并更新模型中的权重- 重复该过程直到达到期望的epoch数量
您会注意到我们现在需要在调用.fit_generator时提供steps_per_epoch参数(.fit方法没有这样的参数)。
为什么我们需要steps_per_epoch?
请记住,Keras数据生成器意味着无限循环,它永远不会返回或退出。
由于该函数旨在无限循环,因此Keras无法确定一个epoch何时开始的,并且新的epoch何时开始。
因此,我们将训练数据的总数除以批量大小的结果作为steps_per_epoch的值。一旦Keras到达这一步,它就会知道这是一个新的epoch。
Keras train_on_batch函数
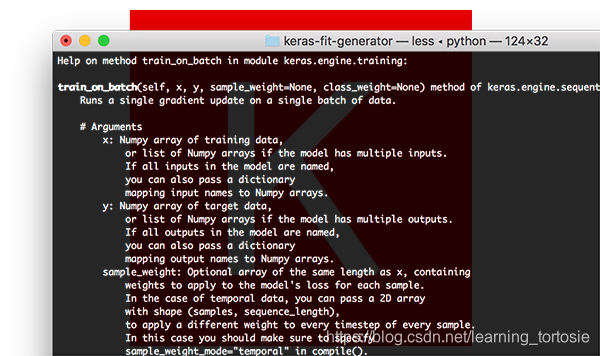
对于寻求对Keras模型进行精细控制( finest-grained control)的深度学习实践者,您可能希望使用.train_on_batch函数:
model.train_on_batch(batchX, batchY)
train_on_batch函数接受单批数据,执行反向传播,然后更新模型参数。
该批数据可以是任意大小的(即,它不需要提供明确的批量大小)。
您也可以生成数据。此数据可以是磁盘上的原始图像,也可以是以某种方式修改或扩充的数据。
当您有非常明确的理由想要维护自己的训练数据迭代器时,通常会使用.train_on_batch函数,例如数据迭代过程非常复杂并且需要自定义代码。
如果你发现自己在询问是否需要.train_on_batch函数,那么很有可能你可能不需要。
在99%的情况下,您不需要对训练深度学习模型进行如此精细的控制。相反,您可能只需要自定义Keras .fit_generator函数。
也就是说,如果你需要它,知道存在这个函数是很好的。
如果您是一名高级深度学习从业者/工程师,并且您确切知道自己在做什么以及为什么这样做,我通常只建议使用.train_on_batch函数。
图像数据集作为CSV文件?
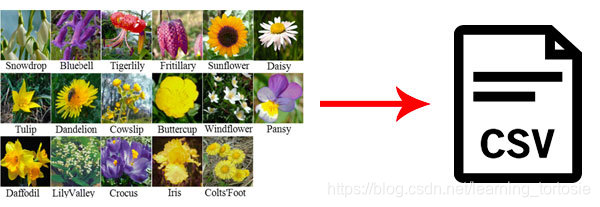
将在这里使用的数据集是Flowers-17数据集,它是17种不同花种的集合,每个类别有80个图像。
我们的目标是培训Keras卷积神经网络,以正确分类每种花卉。
但是,这个项目有点不同:
- 不是使用存储在磁盘上的原始图像文件
- 而是将整个图像数据集序列化为两个CSV文件(一个用于训练,一个用于评估)
要构建每个CSV文件,我:
- 循环输入数据集中的所有图像
- 将它们调整为 64×64 像素
- 将 64x64x3 = 12,288 个RGB像素的强度展平为单个列表
- 在CSV文件中写入12,288个像素值和类标签(每行一个)
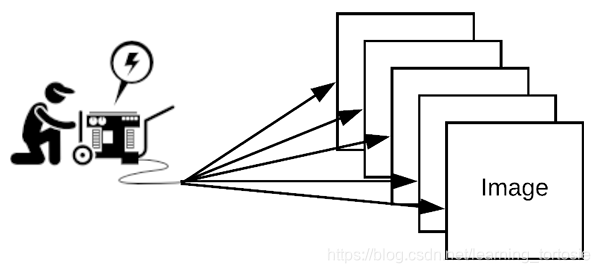
我们的目标是现在编写一个自定义Keras生成器来解析CSV文件,并为.fit_generator函数生成批量图像和标签。
等等,如果您已有图像,为什么还要使用CSV文件呢?
今天的教程是一个如何为.fit_generator函数实现自己的Keras生成器的示例。
在现实世界中,数据集并不适合您:
- 您可能有非结构化的图像目录
- 您可以使用图像和文本
- 您的图像可以按特定格式序列化,无论是CSV文件,Caffe或TensorFlow记录文件等
在这些情况下,您需要知道如何编写自己的Keras生成器函数。
请记住,这不是特定的数据格式 - 这是编写您自己需要学习的Keras生成器的实际过程(这正是教程其余部分所涵盖的内容)。
项目结构
$ tree --dirsfirst
.
├── pyimagesearch
│   ├── __init__.py
│   └── minivggnet.py
├── flowers17_testing.csv
├── flowers17_training.csv
├── plot.png
└── train.py

1 directory, 6 files
今天我们将使用MiniVGGNet CNN。我们今天不会介绍其实现,因为我假设你已经知道如何实现CNN。如果没有,不用担心,只需参考我的Keras教程。
我们的序列化图像数据集包含在flowers17_training.csv和flowers17_testing.csv中。
我们将在接下来的两节中回顾训练脚本train.py。
实现自定义Keras fit_generator函数
我假设你的系统上安装了以下库:
- NumPy
- TensorFlow + Keras
- Scikit-learn
- Matplotlib
每个软件包都可以通过pip安装在虚拟环境中。如果安装了virtualenvwrapper,则可以使用mkvirtualenv创建环境并使用workon命令激活环境。从那里你可以使用pip来设置你的环境:
$ mkvirtualenv cv -p python3
$ workon cv
$ pip install numpy
$ pip install tensorflow # or tensorflow-gpu
$ pip install keras
$ pip install scikit-learn
$ pip install matplotlib
打开train.py文件并插入以下代码:
# set the matplotlib backend so figures can be saved in the background
import matplotlib
matplotlib.use("Agg")

# import the necessary packages
from keras.preprocessing.image import ImageDataGenerator
from keras.optimizers import SGD
from sklearn.preprocessing import LabelBinarizer
from sklearn.metrics import classification_report
from pyimagesearch.minivggnet import MiniVGGNet
import matplotlib.pyplot as plt
import numpy as np
第2-12行导入我们所需的包和模块。由于我们将训练图保存到磁盘,因此第 3行会适当地设置matplotlib的后端。
值得注意的是,导入包括ImageDataGenerator,它包含数据增强和图像生成器功能,以及我们将要训练的CNN MiniVGGNet。
让我们定义csv_image_generator函数:
def csv_image_generator(inputPath, bs, lb, mode="train", aug=None):
	# open the CSV file for reading
	f = open(inputPath, "r")
在第1行,我们定义了csv_image_generator。此功能负责读取我们的CSV数据文件并将图像加载到内存中。它为我们的Keras .fit_generator函数生成批量数据。
因此,该函数接受以下参数:
inputPath:CSV数据集文件的路径bs:批量大小,我们将使用32lb:包含我们的类标签的标签二进制文件对象mode:(默认为“train”)当且仅当mode ==“eval”时,才会进行特殊调整以不通过aug对象应用数据扩充(如果提供了一个)aug:(默认为None)如果指定了扩充对象,那么我们将在生成图像和标签之前应用它
在第3行,将打开CSV数据文件进行读取。
让我们开始循环遍历数据:
	# loop indefinitely
	while True:
		# initialize our batches of images and labels
		images = []
		labels = []
CSV文件中的每行数据都包含一个序列化为文本字符串的图像。我从Flowers-17数据集生成了文本字符串。此外,我知道这不是存储图像的最有效方式,但它对于此示例而言非常有用。
我们的Keras生成器必须无限循环,如第2行所定义。每次需要一批新数据时,.fit_generator函数将调用我们的csv_image_generator函数。
此外,Keras维护数据的缓存/队列,确保我们正在训练的模型始终具有要训练的数据。Keras不断保持这个队列的满载,所以即使你已经达到要训练的epoch总数,请记住Keras仍在为数据生成器提供数据,将数据保留在队列中。
始终确保您的函数返回数据,否则,Keras将错误地说它无法从您的生成器获取更多的训练数据。
在循环的每次迭代中,我们将我们的图像和标签重新初始化为空列表(第4-5行)。
将图像和标签附加到这些列表中,直到达到我们的批量大小:
		# keep looping until we reach our batch size
		while len(images) < bs:
			# attempt to read the next line of the CSV file
			line = f.readline()

			# check to see if the line is empty, indicating we have
			# reached the end of the file
			if line == "":
				# reset the file pointer to the beginning of the file
				# and re-read the line
				f.seek(0)
				line = f.readline()

				# if we are evaluating we should now break from our
				# loop to ensure we don't continue to fill up the
				# batch from samples at the beginning of the file
				if mode == "eval":
					break

			# extract the label and construct the image
			line = line.strip().split(",")
			label = line[0]
			image = np.array([int(x) for x in line[1:]], dtype="uint8")
			image = image.reshape((64, 64, 3))

			# update our corresponding batches lists
			images.append(image)
			labels.append(label)
让我们来看看这个循环:
- 首先,我们从文本文件对象中读取一行(第4行)
- 如果
line为空:- 重置文件指针并尝试读取一行(第11和12行)
- 如果处于评估模式,就从循环中退出(第17和18行)。
- 从CSV文件中解析图像和标签(第21-23行)。
- 调用
.reshape将的1维数组重塑为图像,该图像是64×64像素,带有3个颜色通道(第24行)。 - 最后,我们将图像和标签附加到各自的列表中,重复此过程,直到我们的一批图像已满(第27和28行)。
注意:在此处进行评估的关键是我们提供model.predict_generator的steps,确保测试集中的每个图像仅预测一次。我将在本教程后面介绍如何执行此过程。
准备好一批图像和对应的标签后,可以在产生批次之前采取两个步骤:
		# one-hot encode the labels
		labels = lb.transform(np.array(labels))

		# if the data augmentation object is not None, apply it
		if aug is not None:
			(images, labels) = next(aug.flow(np.array(images),
				labels, batch_size=bs))

		# yield the batch to the calling function
		yield (np.array(images), labels)
最后步骤包括:
- One-hot encoding
labels(第2行) - 必要时应用数据增强(第5-7行)
最后,我们的生成器根据请求“生成”图像数组和调用函数标签列表(第62行)。如果您不熟悉yield关键字,它将用作Python Generator函数,作为一种方便的快捷方式,而不是构建具有较少内存消耗的迭代器类。您可以在[此处[(https://wiki.python.org/moin/Generators)阅读有关Python生成器的更多信息。
初始化训练参数:
# initialize the paths to our training and testing CSV files
TRAIN_CSV = "flowers17_training.csv"
TEST_CSV = "flowers17_testing.csv"

# initialize the number of epochs to train for and batch size
NUM_EPOCHS = 75
BS = 32

# initialize the total number of training and testing image
NUM_TRAIN_IMAGES = 0
NUM_TEST_IMAGES = 0
在此示例训练脚本中,许多初始化都是硬编码的:
- 训练和测试的CSV文件路径(第2和3行)。
- 训练的epoch数量和batch size(第6和7行)。
- 两个变量将保存训练和测试图像的数量(第10和11行)。
下一个代码块:
# open the training CSV file, then initialize the unique set of class
# labels in the dataset along with the testing labels
f = open(TRAIN_CSV, "r")
labels = set()
testLabels = []

# loop over all rows of the CSV file
for line in f:
	# extract the class label, update the labels list, and increment
	# the total number of training images
	label = line.strip().split(",")[0]
	labels.add(label)
	NUM_TRAIN_IMAGES += 1

# close the training CSV file and open the testing CSV file
f.close()
f = open(TEST_CSV, "r")

# loop over the lines in the testing file
for line in f:
	# extract the class label, update the test labels list, and
	# increment the total number of testing images
	label = line.strip().split(",")[0]
	testLabels.append(label)
	NUM_TEST_IMAGES += 1

# close the testing CSV file
f.close()
这段代码很长,但有三个目的:
- 从训练数据集中提取所有标签,以便随后确定唯一标签。请注意,
labels是一个只允许唯一条目的集合(set)。 - 封装
testLabels列表。 - 计算
NUM_TRAIN_IMAGES和NUM_TEST_IMAGES。
构建LabelBinarizer对象并构造数据增强对象:
# create the label binarizer for one-hot encoding labels, then encode
# the testing labels
lb = LabelBinarizer()
lb.fit(list(labels))
testLabels = lb.transform(testLabels)

# construct the training image generator for data augmentation
aug = ImageDataGenerator(rotation_range=20, zoom_range=0.15,
	width_shift_range=0.2, height_shift_range=0.2, shear_range=0.15,
	horizontal_flip=True, fill_mode="nearest")
初始化训练和测试图像生成器:
# initialize both the training and testing image generators
trainGen = csv_image_generator(TRAIN_CSV, BS, lb,
	mode="train", aug=aug)
testGen = csv_image_generator(TEST_CSV, BS, lb,
	mode="train", aug=None)
注意细微的相似点和不同点:
- 对两个生成器都使用
mode =“train” - 只有
trainGen会执行数据增强
让我们用Keras初始化+编译我们的MiniVGGNet模型并开始训练:
# initialize our Keras model and compile it
model = MiniVGGNet.build(64, 64, 3, len(lb.classes_))
opt = SGD(lr=1e-2, momentum=0.9, decay=1e-2 / NUM_EPOCHS)
model.compile(loss="categorical_crossentropy", optimizer=opt,
	metrics=["accuracy"])

# train the network
print("[INFO] training w/ generator...")
H = model.fit_generator(
	trainGen,
	steps_per_epoch=NUM_TRAIN_IMAGES // BS,
	validation_data=testGen,
	validation_steps=NUM_TEST_IMAGES // BS,
	epochs=NUM_EPOCHS)
第4行,使用分类交叉熵(categorical_crossentropy),因为我们有超过2个类别,否则将使用二进制交叉熵(binary crossentropy )。
第9-14行,调用.fit_generator开始训练。
trainGen生成器对象负责向.fit_generator函数生成批量数据和标签。
评估训练结果:
# re-initialize our testing data generator, this time for evaluating
testGen = csv_image_generator(TEST_CSV, BS, lb,
	mode="eval", aug=None)

# make predictions on the testing images, finding the index of the
# label with the corresponding largest predicted probability
predIdxs = model.predict_generator(testGen,
	steps=(NUM_TEST_IMAGES // BS) + 1)
predIdxs = np.argmax(predIdxs, axis=1)

# show a nicely formatted classification report
print("[INFO] evaluating network...")
print(classification_report(testLabels.argmax(axis=1), predIdxs,
	target_names=lb.classes_))
继续并重新初始化testGen,这次将模式mode更改为“eval”以进行评估。
重新初始化后,我们使用.predict_generator函数和testGen进行预测。在此过程结束时,将继续获取最大预测索引。
使用testLabels和predIdxs,通过scikit-learn生成classification_report。分类报告很好地打印在终端上,以便在训练和评估结束时进行检查。
最后一步,使用训练历史字典H和matplotlib来生成图:
# plot the training loss and accuracy
N = NUM_EPOCHS
plt.style.use("ggplot")
plt.figure()
plt.plot(np.arange(0, N), H.history["loss"], label="train_loss")
plt.plot(np.arange(0, N), H.history["val_loss"], label="val_loss")
plt.plot(np.arange(0, N), H.history["acc"], label="train_acc")
plt.plot(np.arange(0, N), H.history["val_acc"], label="val_acc")
plt.title("Training Loss and Accuracy on Dataset")
plt.xlabel("Epoch #")
plt.ylabel("Loss/Accuracy")
plt.legend(loc="lower left")
plt.savefig("plot.png")
使用fit_generator训练Keras模型并使用predict_generator进行评估
打开终端,导航到源代码和数据集的路径下,然后执行以下命令:
$ python train.py
Using TensorFlow backend.
[INFO] training w/ generator...
Epoch 1/75
31/31 [==============================] - 5s - loss: 3.5171 - acc: 0.1381 - val_loss: 14.5745 - val_acc: 0.0906
Epoch 2/75
31/31 [==============================] - 4s - loss: 3.0275 - acc: 0.2258 - val_loss: 14.1294 - val_acc: 0.1187
Epoch 3/75
31/31 [==============================] - 4s - loss: 2.6691 - acc: 0.2823 - val_loss: 14.4892 - val_acc: 0.0781
...
Epoch 73/75
31/31 [==============================] - 4s - loss: 0.3604 - acc: 0.8720 - val_loss: 0.7640 - val_acc: 0.7656
Epoch 74/75
31/31 [==============================] - 4s - loss: 0.3185 - acc: 0.8851 - val_loss: 0.7459 - val_acc: 0.7812
Epoch 75/75
31/31 [==============================] - 4s - loss: 0.3346 - acc: 0.8821 - val_loss: 0.8337 - val_acc: 0.7719
[INFO] evaluating network...
             precision    recall  f1-score   support

   bluebell       0.95      0.86      0.90        21
  buttercup       0.50      0.93      0.65        15
  coltsfoot       0.71      0.71      0.71        21
    cowslip       0.71      0.75      0.73        20
     crocus       0.78      0.58      0.67        24
   daffodil       0.81      0.63      0.71        27
      daisy       0.93      0.78      0.85        18
  dandelion       0.71      0.94      0.81        18
 fritillary       0.90      0.86      0.88        22
       iris       1.00      0.79      0.88        24
 lilyvalley       0.80      0.73      0.76        22
      pansy       0.83      0.83      0.83        18
   snowdrop       0.71      0.68      0.70        22
  sunflower       1.00      0.94      0.97        18
  tigerlily       1.00      0.93      0.96        14
      tulip       0.50      0.31      0.38        16
 windflower       0.59      1.00      0.74        20

avg / total       0.80      0.77      0.77       340
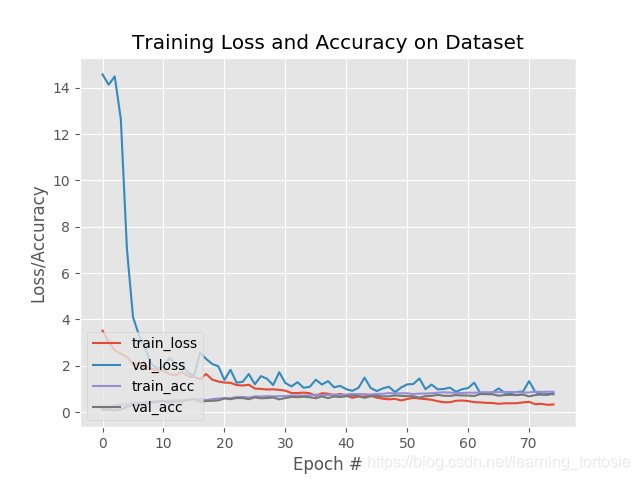
在这里,您可以看到我们的网络在评估集上获得了80%的准确度,这对于所使用的相对较浅的CNN非常可观。
最重要的是,您学会了如何利用:
- Data generators
.fit_generator.predict_generator
总结
在本教程中,您了解了Keras用于训练深度神经网络的三个主要函数之间的差异。
在自己的项目中实现自己的Keras生成器时,可以使用今天的示例代码作为模板。
我希望你喜欢今天的博文!