注意,此为转载,我只做为整理备份,原地址:https://blog.csdn.net/u014558668/article/details/79314878
---------------------------------------------------------------------------------------------------------------------------------
一、Nginx安装
Nginx版本:1.12.2
一、安装nginx依赖的软件
nginx是C写的,需要用GCC编译;nginx中的rewrite module需要PCRE;nginx中的gzip module需要zlib;nginx中的HTTP SSL module需要OpenSSL。
1)zlib源码安装:
zlib下载官网:http://www.zlib.net/
下载zlib最新版本1.2.11源码:
[root@szdev03 stalker]# wget http://prdownloads.sourceforge.net/libpng/zlib-1.2.11.tar.gz
解压并进入zlib代码根目录:
[root@szdev03 stalker]# tar zxvf zlib-1.2.11.tar.gz
[root@szdev03 stalker]# cd zlib-1.2.11
配置、编译、安装:
[root@szdev03 zlib-1.2.11]# ./configure
[root@szdev03 zlib-1.2.11]# make && make install
[root@szdev03 zlib-1.2.11]# whereis zlib
zlib: /usr/include/zlib.h /usr/share/man/man3/zlib.3.gz
---------------------
2)PCRE源码安装:
PCRE官网:http://www.pcre.org/
下载PCRE最新版本8.41源码:
[root@szdev03 stalker]# wget http://downloads.sourceforge.net/project/pcre/pcre/8.41/pcre-8.41.tar.gz
---------------------
解压并进入PCRE代码根目录:
[root@szdev03 stalker]# tar zxvf pcre-8.41.tar.gz
[root@szdev03 stalker]# cd pcre-8.41
配置、编译、安装:
[root@szdev03 pcre-8.41]# ./configure
[root@szdev03 pcre-8.41]# make
[root@szdev03 pcre-8.41]# make install
查看版本:
[root@szdev03 pcre-8.41]# pcre-config --version
8.41
说明安装成功。
---------------------
3)OpenSSL源码安装:
OpenSSL官网:https://www.openssl.org/
下载OpenSSL版本1.0.2n源码:
[root@szdev03 stalker]# wget https://www.openssl.org/source/openssl-1.0.2n.tar.gz
解压并进入openssl代码根目录:
[root@szdev03 stalker]# tar zxvf openssl-1.0.2n.tar.gz
[root@szdev03 stalker]# cd openssl-1.0.2n
配置、编译、安装:
[root@szdev03 openssl-1.0.2n]# ./config
[root@szdev03 openssl-1.0.2n]# make
[root@szdev03 openssl-1.0.2n]# make install
二、源码安装nginx
下载nginx最新稳定版本1.12.2源码:
[root@szdev03 stalker]# wget wget http://nginx.org/download/nginx-1.12.2.tar.gz
解压并进入nginx代码根目录:
[root@szdev03 stalker]# tar zxvf nginx-1.12.2.tar.gz
[root@szdev03 stalker]# cd nginx-1.12.2
[root@szdev03 nginx-1.12.2]# ./configure
[root@szdev03 nginx-1.12.2]# make
[root@szdev03 nginx-1.12.2]# make install
检查nginx.conf配置正确性:
[root@szdev03 ~]# /usr/local/nginx/sbin/nginx -t
nginx: the configuration file /usr/local/nginx/conf/nginx.conf syntax is ok
nginx: configuration file /usr/local/nginx/conf/nginx.conf test is successful
启动nginx:
[root@szdev03 ~]# /usr/local/nginx/sbin/nginx
---------------------
关闭nginx命令:
[root@szdev03 ~]# /usr/local/nginx/sbin/nginx -s stop
注意开启防火墙端口!!!
二、MySQL安装
MySQL版本:5.7.21
具体安装步骤详见:http://blog.csdn.net/u014558668/article/details/79310267
三、PHP安装
PHP版本:5.4.16
具体安装步骤详见:http://blog.csdn.net/u014558668/article/details/79315641
要让PHP以FastCGI的方式与nginx进行交互,需要有PHP-FPM模块的支持。
安装PHP-FPM
[root@localhost ~]# yum install php-fpm
[root@localhost ~]# php-fpm -v
PHP 5.4.16 (fpm-fcgi) (built: Nov 15 2017 16:35:28)
Copyright (c) 1997-2013 The PHP Group
Zend Engine v2.4.0, Copyright (c) 1998-2013 Zend Technologies
启动PHP-FPM
[root@localhost ~]# systemctl start php-fpm
以上安装完成后,接下来,配置Nginx支持PHP(FastCGI方式)。
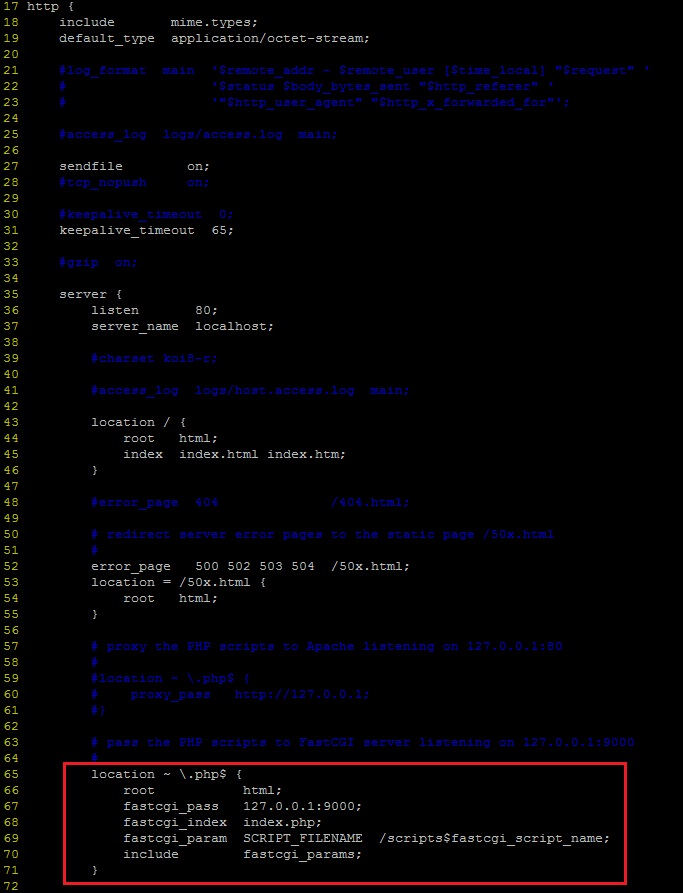
修改 /usr/local/nginx/conf/nginx.conf 把如下图红色框中的#去掉就可以了。
---------------------
------------------------------------------------------------------------------------------------------------------------------------------
这里面都是默认的,root是配置php程序放置的根目录。
还需要修改的就是fastcgi_param中的/scripts为$document_root
修改完成后,让nginx重新加载配置以生效:
[root@localhost conf]# ../sbin/nginx -s reload
接下来编辑一个测试的php程序,在nginx下的html目录下创建phpinfo.php文件,写上下面代码,保存。
[root@localhost html]# pwd
/usr/local/nginx/html
[root@localhost html]# ll
总用量 12
-rw-r--r--. 1 root root 537 2月 12 10:24 50x.html
-rw-r--r--. 1 root root 612 2月 12 10:24 index.html
-rw-r--r--. 1 root root 20 2月 12 11:57 phpinfo.php
[root@localhost html]# cat phpinfo.php
<?php
phpinfo();
?>
然后打开浏览器,输入对应的地址进行访问,看到如下页面,说明nginx和php都配置成功了
---------------------
作者:Do-Program
来源:CSDN
原文:https://blog.csdn.net/u014558668/article/details/79314878
版权声明:本文为博主原创文章,转载请附上博文链接!
