在这篇文章中初步介绍了工控蜜罐Conpot的部署和入门
0×01 引言
蜜罐通常伪装成看似有利用价值的信息系统,吸引黑客攻击。由于蜜罐事实上并未对网络提供任何有价值的服务,所以任何对蜜罐的尝试都是可疑的。蜜罐中还可能装有监控软件,用以监视黑客入侵后的举动。蜜罐在拖延黑客攻击真正目标上也有一定作用。
——WikiPedia
传统的Web蜜罐、服务蜜罐和数据库蜜罐能够通过模拟相关服务,欺骗黑客和漏洞扫描器的攻击,帮助我们获取网络空间中的潜在威胁和了解新型的攻击手段,是实现信息系统主动防御和攻击欺骗的重要部分。
针对工业控制系统的网络安全攻击日益增多,多起重要工控系统安全事件应引起重视。
——《2016年我国互联网网络安全态势综述》CNCERT

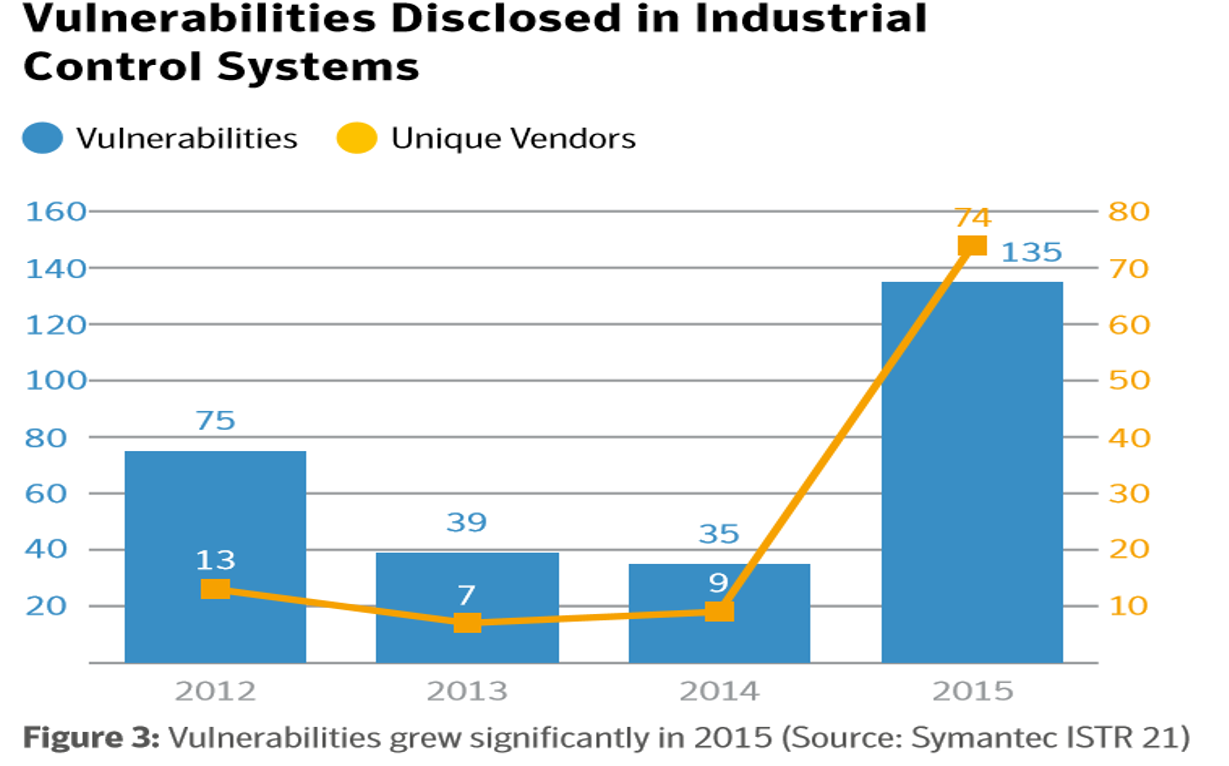
随着物联网的发展,研究人员发现了大量的工控设备漏洞,根据赛门铁克的报告,尤其是2015年,工控系统的漏洞被大量发现。一些黑客使用Shodan、Zoomeye、Fofa等搜索引擎,可以快速探查特定组织暴露在网络空间中的设备资产,我们使用工控蜜罐能够欺骗这些网络资产搜索引擎,作为以攻击者视角构建的陷阱,延迟和迷惑黑客的攻击,在提高主动防御能力、获取基础威胁情报和辅助决策支撑等方面提供帮助。
Conpot是一个由glaslos等人开发的,用于获得关于工控系统的威胁情报的开源ICS/SCADA蜜罐,本文将从Conpot展开,介绍其部署和使用的入门。
0×02 Conpot介绍
Conpot is a low interactive server side Industrial Control Systems honeypot designed to be easy to deploy, modify and extend. By providing a range of common industrial control protocols we created the basics to build your own system, capable to emulate complex infrastructures to convince an adversary that he just found a huge industrial complex. To improve the deceptive capabilities, we also provided the possibility to server a custom human machine interface to increase the honeypots attack surface. The response times of the services can be artificially delayed to mimic the behaviour of a system under constant load. Because we are providing complete stacks of the protocols, Conpot can be accessed with productive HMI’s or extended with real hardware. Conpot is developed under the umbrella of the Honeynet Project and on the shoulders of a couple of very big giants.
我大致地翻译了官方的介绍:
Conpot是一个部署在服务端的低交互ICS蜜罐,能够快速地部署、修改和拓展。开发者通过提供一系列的通用工控协议,使得我们能够非常快速地在我们的系统上构建一套复杂的工控基础设施用于欺骗未知的攻击者。为了提高这套蜜罐的欺骗性和迷惑性,开发者同时也提供了一个人机接口来增加这套蜜罐的攻击面。蜜罐的响应时间能够通过相关参数进行调节,由此模拟出当前负载下的响应时间。Conpot对协议栈有着完整的支持,因此它能够接收生产环境中的HMI或是直接拓展的真实硬件。最后要说明的是,Conpot是站在巨人的肩膀上,以Honeynet Project为基础开发的。
Conpot官方已经为Conpot打包了Docker镜像,可以作为容器快速部署。个人认为,使用docker来部署蜜罐/蜜网是现在的一个方向,不仅仅是这个工控蜜罐,包括其他的一些蜜罐,使用Docker能够为蜜罐提供基础的隔离环境,在较低资源占用下的大规模蜜罐/蜜网部署。安全人员可以把日志文件挂载到Host主机(在Conpot中,开发者使用HPFeeds来传输数据),通过这样来隐蔽蜜罐的行为监控,主流的Docker集群框架(如K8S等)已经为我们提供了很好的解决方案。
0×03 搭建相关环境和安装Conpot
在Docker上安装
对于入门者,如果不想安装Docker,可以直接在Daocloud注册账号,免费申请一台胶囊主机,他们提供的主机已经安装了Docker,所以直接pull镜像就能开撸。需要注意的是,免费提供的胶囊主机只有120分钟的生命周期!
以下是官方提供的几个部署方式,我测试了第一种部署方法,推荐用第一种Pre-Build镜像上手。如果需要自己定制docker镜像,可以参考基于Ubuntu安装的方法和官方的dockerfile,自行定制Dockerfile,用国内的源来下载和编译,官方的源比较容易翻车。
使用Pre-Build镜像运行
-
安装Docker
-
运行
docker pull honeynet/conpot -
运行
docker run -it -p 80:80 -p 102:102 -p 502:502 -p 161:161/udp --network=bridge honeynet/conpot:latest /bin/shPS. 可以根据自己的实际需要更改docker run中的参数,-p表示蜜罐暴露的端口号。 -
在容器中运行
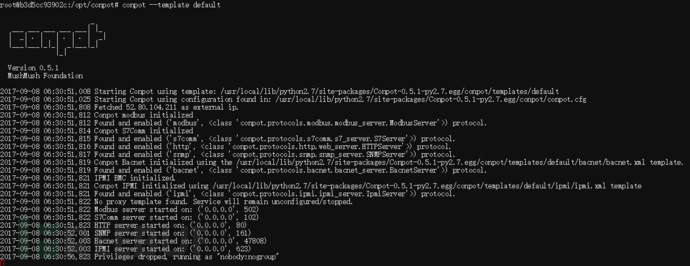
conpot --template default -
浏览器中打开HTTP://YOUR_IP_ADDR,开撸!
从源代码编译镜像,并使用Docker运行(这个方法使用了国外源,所以大概率会由于众所周知的网络原因翻车。)
-
安装Docker
-
从Github中clone相关repo
git clone https://github.com/mushorg/conpot.git -
进入程序目录
cd conpot -
运行
docker build -t conpot . -
运行
docker run -it -p 80:80 -p 102:102 -p 502:502 -p 161:161/udp --network=bridge conpot
在Ubuntu安装Conpot
1. 安装依赖sudo apt-get install libsmi2ldbl snmp-mibs-downloader python-dev libevent-dev libxslt1-dev libxml2-dev
2. 从PyPi安装Conpotpip install conpot
0×04 配置入门
在不指定参数的情况下,直接运行Conpot时,程序将使用以下的基础配置。
[modbus]
host = 0.0.0.0
port = 502

[snmp]
host = 0.0.0.0
port = 161

[http]
host = 0.0.0.0
port = 80

[sqlite]
enabled = False

[hpfriends]
enabled = False
host = hpfriends.honeycloud.net
port = 20000
ident = 3Ykf9Znv
secret = 4nFRhpm44QkG9cvD
channels = ["conpot.events", ]

[fetch_public_ip]
enabled = True
url = http://api-sth01.exip.org/?call=ip
尽管Conpot官方提供了一个能够模拟安装若干拓展的Siemens S7-200 CPU蜜罐配置文件,能够欺骗攻击者或是漏洞扫描应用基于MODBUS、HTTP、SNMP 和 s7comm 等协议展开攻击。可是现在的搜索引擎(比如shadon)已经能够识别出一些简单蜜罐的,也就是说,这种陷阱已经无法诱骗攻击者了。所以说在更多情况下,我们需要定制自己的需求。
Conpot一共支持bacnet、enip、guardian_ast、http、ipmi、kamstrup、misc、modbus、s7comm和snmp等10个协议。
我们可以先尝试着配置一个单一协议的IPMI(智能平台管理接口)蜜罐,开始上手。
-
运行
mkdir ipmi,cd ipmi -
创建template.xml文件,配置模板的基础信息。
vim template.xml
    <core>
      <template>
          <!-- General information about the template -->
          <entity name="unit">371</entity>
          <entity name="vendor">IPMI</entity>
          <entity name="description">Creates a simple IPMI device</entity>
          <entity name="protocols">IPMI</entity>
          <entity name="creator">Lukas Rist</entity>
      </template>
      <databus>
          <!-- Core value that can be retrieved from the databus by key -->
          <key_value_mappings>
            <key name="SystemName">
                <value type="value">"Technodrome"</value>
            </key>
          </key_value_mappings>
      </databus>
    </core>
3. mkdir ipmi,cd ipmi,vim ipmi.xml。新建ipmi文件夹,配置ipmi协议的详细信息。
     <ipmi enabled="True" host="0.0.0.0" port="623">
       <device_info>
           <device_name>SystemName</device_name>
       </device_info>
       <user_list>
           <user>
               <user_name>Administrator</user_name>
               <password>Password</password>
               <privilege>4</privilege>
               <active>true</active>
               <fixed>true</fixed>
           </user>
       </user_list>
     </ipmi>
通过上面这个例子,我们就能只要照着配置出IPMI的蜜罐,其中设备名称使用的是我们在template.xml的databus中配置的SystemName,然后设置了IPMI协议中的用户的相关信息。最终文件夹的结构就是如下图所示。

完成后返回到最初的template目录,运行conpot --template ./ipmi,conpot就会自动加载ipmi文件夹里的配置文件,生成蜜罐。
0×05 进阶配置
Conpot内部添加了很多有用的特性,比如使用随机数来设置应答时间和应答内容等等。下面介绍一下Conpot配置HTTP协议。在HTTP的配置中,你可以定制Web服务的各种特性,包括控制响应代码和响应页面的发生的时间和方式。
首先是进行全局的配置,config里面的变量已经注释地比较清楚了,update_header_date是用来在HTTP的响应header里面加入时间的功能,要和下面的date一起配合着用,tarpit是为了模拟工控系统低性能而设置的响应延迟。
<global>
    <config>
        <!-- what protocol shall we use by default? -->
        <entity name="protocol_version">HTTP/1.1</entity>
        <!-- if we find any date header to be delivered, should we update it to a real value? -->
        <entity name="update_header_date">true</entity>
        <!-- should we disable the HTTP HEAD method? -->
        <entity name="disable_method_head">false</entity>
        <!-- should we disable the HTTP TRACE method? -->
        <entity name="disable_method_trace">false</entity>
        <!-- should we disable the HTTP OPTIONS method? -->
        <entity name="disable_method_options">false</entity>
        <!-- TARPIT: how much latency should we introduce to any response by default? -->
        <entity name="tarpit">0</entity>
    </config>

    <!-- these headers will be sent with each response -->
    <headers>
        <!-- this date header will be updated, if enabled above -->
        <entity name="Date">Sat, 28 Apr 1984 07:30:00 GMT</entity>
    </headers>
</global>
进行了全局的配置以后,下面是配置htdocs,类似于写常用的Web路由,每一个node都相当于在配置一个URL,可以进行302跳转或者是返回html页面,所以在这里面可以具体地配置每个URL。同时也能在node内定义tarpit,如果在具体的node中定义了tarpit,那么这个延迟将会在这个node中覆盖之前在全局的定义
<!-- how should the different URI requests be handled -->
<htdocs>
    <node name="/">
        <!-- force response status code to 302 -->
        <status>302</status>
        <headers>
            <!-- these headers will be sent along with this response -->
            <entity name="Content-Type">text/html</entity>
            <entity name="Location">/index.html</entity>
        </headers>
    </node>
    <node name="/index.html">
        <!-- this tarpit will override the globally set tarpit for this node -->
        <tarpit>0.0;0.3</tarpit>
        <headers>
            <entity name="Last-Modified">Tue, 19 May 1993 09:00:00 GMT</entity>
            <entity name="Content-Type">text/html</entity>
            <entity name="Set-cookie">path=/</entity>
        </headers>
    </node>
</htdocs>
以上就是node中比较常用的配置方法了,下面是状态码的配置,这里的配置和上面的htdocs比较类似,可以直接参照node中的设置来对status进行设置。需要注意的是,错误的状态码进行响应时不应该设置延迟。
<statuscodes>
    <status name="400">
            <!-- 400 (BAD REQUEST) errors should be super fast and responsive -->
            <tarpit>0</tarpit>
            <entity name="Content-Type">text/html</entity>
    </status>
</statuscodes>
0×06 吐槽和瞎扯
Conpot作为一个非常容易上手的工控蜜罐,比较适合用来练练手,而且部署也非常方便,只要自己写一个dockerfile就能够批量部署了。但是如果攻击者有做过anti-honeypot的相关研究,这种低交互的蜜罐还是很容易被识破的,这个项目的issue中就有对这一点的吐槽和嘲讽。

但是这种低交互的蜜罐绝不是没有用的,在一些特定场景下,这种低交互的蜜罐能够完成很多高交互蜜罐没法完成的工作。比如说在生产环境中配置高交互蜜罐和低交互蜜罐混合在一起的蜜网,然后通过低交互的蜜罐迷惑攻击者,让攻击者误以为高交互蜜罐是生产环境。在这种情况下,低交互蜜罐同样是起到了攻击欺骗的作用,但是这种欺骗又脱离了狭义上的攻击欺骗的范畴,可以说是非常套路了。

另外一个方面的优势在于,这种低交互的蜜罐不管是开发成本还是部署成本都是非常低的。做到大规模的部署,让它去捕捉攻击者的试探行为本身就能作为威胁情报体系的一部分。我在32核/32G的服务器上,尝试部署了150个蜜罐,系统的内存占用仍然在一个较低的水平,因此,只要分别给这150个容器分发IP,它们直接就能组成蜜网。如果对这些设备进行精细化的配置,就可以复制出一整套生产环境,能够产生更强的迷惑性,提供更具价值的威胁情报信息。下面这个图就是我在服务器上运行conpot容器的截图,实际上,稳定之后CPU的占用很小,内存占用大约在14GB左右,这种资源的使用仍然是可以接受的,可以使用一些TCP端口转发的工具,把这些蜜罐暴露在公网中。

最后,我的博客是https://pingch.top,上面你可以找到我的邮箱,欢迎交流。
参考文献:
https://github.com/mushorg/conpot
https://www.wikiwand.com/zh-cn/%E8%9C%9C%E7%BD%90_(%E9%9B%BB%E8%85%A6%E7%A7%91%E5%AD%B8)