版权声明:本文为博主原创文章,未经博主允许不得转载。 https://blog.csdn.net/qq_36892341/article/details/86644580
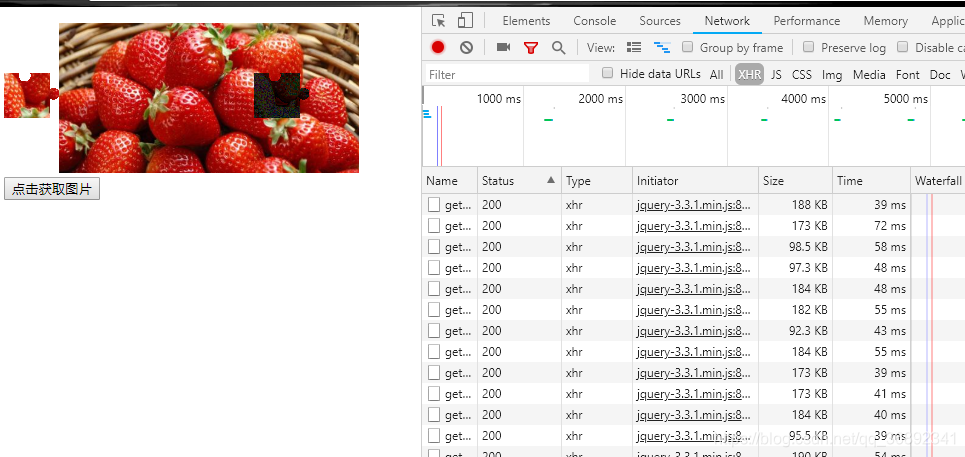
这是我简单做出的效果图,处理300X150px的校验图,并把图片发到前端,用时50毫秒左右,速度还是非常快的。
原理:
1.利用java从大图中随机抠出一张小图,并在大图上给抠出小图的位置加阴影,然后把这两张图片返回给前端;
2.前端获取图片,用户滑动小图到阴影的位置,获取小图滑动的距离,返回给java后台进行校验;
3.校验通过,返回校验通过编号;
4.前端调登录接口,把账号、密码、和校验编号传到Java后台进行登录。
实现:
1.计算需要的小图轮廓,用二维数组来表示,二维数组有两张值,0和1,其中0表示没有颜色,1有颜色,如下图,我要抠图的轮廓是这样的:
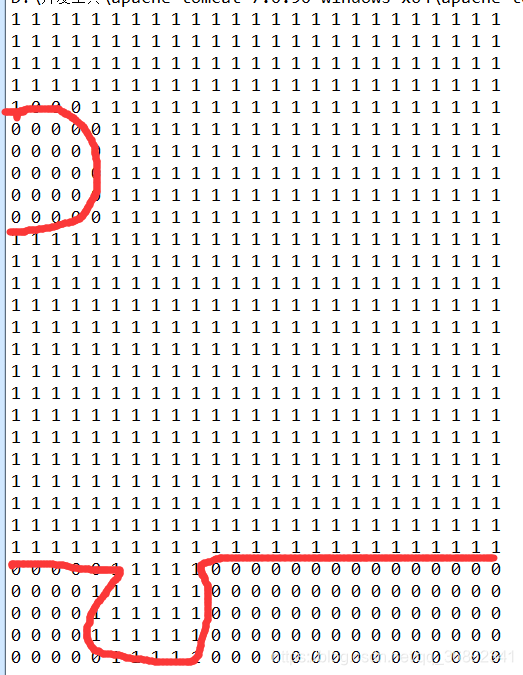
左边和下边有有半圆,这个根据圆的公式就可以了,代码示例:
扫描二维码关注公众号,回复:
5072771 查看本文章

static int targetLength=55;//小图长
	static int targetWidth=45;//小图宽
	static int circleR=6;//半径
	static int r1=3;//距离点


	/**
	 *
	* @Createdate: 2019年1月24日上午10:52:42
	* @Title: getBlockData
	* @Description: 生成小图轮廓
	* @author mzl
	* @return int[][]
	* @throws
	 */
	private static int[][] getBlockData() {

		int[][] data = new int[targetLength][targetWidth];
		double x2 = targetLength-circleR;

		//随机生成圆的位置
		double h1 = circleR + Math.random() * (targetWidth-3*circleR-r1);
		double po = circleR*circleR;

		double xbegin = targetLength-circleR-r1;
		double ybegin = targetWidth-circleR-r1;

		for (int i = 0; i < targetLength; i++) {
			for (int j = 0; j < targetWidth; j++) {
				double d3 = Math.pow(i - x2,2) + Math.pow(j - h1,2);
				double d2 = Math.pow(j-2,2) + Math.pow(i - h1,2);
				if ((j <= ybegin && d2 <= po)||(i >= xbegin && d3 >= po)) {
					data[i][j] = 0;
				}  else {
					data[i][j] = 1;
				}

			}
		}
		return data;
	}
2.根据计算处理的小图轮廓,在大图上抠图
/**
	 *
	* @Createdate: 2019年1月24日上午10:51:30
	* @Title: cutByTemplate
	* @Description: 生成小图片、给大图片添加阴影
	* @author mzl
	* @param oriImage
	* @param targetImage
	* @param templateImage
	* @param x
	* @param y void
	* @throws
	 */
	private static void cutByTemplate(BufferedImage oriImage,BufferedImage targetImage, int[][] templateImage, int x,int y){
		for (int i = 0; i < targetLength; i++) {
			for (int j = 0; j < targetWidth; j++) {
				int rgb = templateImage[i][j];
				// 原图中对应位置变色处理
				int rgb_ori = oriImage.getRGB(x + i, y + j);

				if (rgb == 1) {
                    //抠图上复制对应颜色值
					targetImage.setRGB(i, j, rgb_ori);
                    //原图对应位置颜色变化
					oriImage.setRGB(x + i, y + j, rgb_ori & 0x363636 );
				}else{
					//这里把背景设为透明
					targetImage.setRGB(i, j, rgb_ori & 0x00ffffff);
				}
			}
		}
	}
3.把大图小图转base64码,方便返回给前端
	/**
	 *
	* @Createdate: 2019年1月24日上午11:49:42
	* @Title: createImage
	* @Description: 获取大图,小图Base64码
	* @author mzl
	* @param url
	* @return Map<String,String>
	* @throws
	 */
	public static Map<String,String> createImage(String url,int L,int W,Map<String,String> resultMap){
		 	try {
		 		BufferedImage bufferedImage = ImageIO.read(new FileInputStream(url));
		 		BufferedImage target= new BufferedImage(targetLength, targetWidth, BufferedImage.TYPE_4BYTE_ABGR);
		 		cutByTemplate(bufferedImage,target,getBlockData(),L,W);
		 		resultMap.put("b", getImageBASE64(bufferedImage));//大图
		 		resultMap.put("s", getImageBASE64(target));//小图
			} catch (IOException e) {
				e.printStackTrace();
			}finally{
				return resultMap;
			}
	}


    /**
     *
    * @Createdate: 2019年1月24日上午11:14:19
    * @Title: getImageStr
    * @Description: 图片转BASE64
    * @author mzl
    * @param image
    * @return
    * @throws IOException String
    * @throws
     */
    public static String getImageBASE64(BufferedImage image) throws IOException {
		ByteArrayOutputStream out = new ByteArrayOutputStream();
		ImageIO.write(image,"png",out);
		byte[] b = out.toByteArray();//转成byte数组
        BASE64Encoder encoder = new BASE64Encoder();
        return encoder.encode(b);//生成base64编码
    }
到此图片验证关键代码完毕。