1、配置pom.xml文件
引入org.mybatis.generator包,注意灰底红色部分配置。
<plugin>
<groupId>org.mybatis.generator</groupId>
<artifactId>mybatis-generator-maven-plugin</artifactId>
<version>1.3.5</version>
<dependencies>
<dependency>
<groupId>org.mybatis.generator</groupId>
<artifactId>mybatis-generator-core</artifactId>
<version>1.3.2</version>
</dependency>
<dependency>
<groupId>mysql</groupId>
<artifactId>mysql-connector-java</artifactId>
<version>5.1.45</version>
</dependency>
</dependencies>
<executions>
<execution>
<id>mybatis generator</id>
<phase>package</phase>
<goals>
<goal>generate</goal>
</goals>
</execution>
</executions>
<configuration>
<!--允许移动生成的文件-->
<verbose>true</verbose>
<!--允许自动覆盖文件,生产环境注意修改成flase-->
<overwrite>true</overwrite>
<configurationFile>
src/main/resources/mybatis-generator.xml
</configurationFile>
</configuration>
</plugin>
2、创建数据库
创建用户表、密码表两张表,建表语句如下,
DROP TABLE IF EXISTS `user_info`;
CREATE TABLE `user_info` (
`id` int(11) NOT NULL AUTO_INCREMENT,
`name` varchar(64) DEFAULT '',
`gender` tinyint(4) DEFAULT '0' COMMENT '1代表男性,2代表女性',
`age` int(11) DEFAULT '0',
`telphone` varchar(255) DEFAULT '',
`register_mode` varchar(255) DEFAULT '' COMMENT 'byphone,byweichar, byalipay',
`third_party_id` varchar(64) DEFAULT '',
PRIMARY KEY (`id`)
) ENGINE=InnoDB AUTO_INCREMENT=1 DEFAULT CHARSET=utf8;
INSERT INTO `user_info` VALUES ('1', 'sunnytest', '1', '22', '18782892283', 'byphone', '手机号');
INSERT INTO `user_info` VALUES ('2', '杨松', '2', '21', '13672342323', 'byweichar', '微信');
DROP TABLE IF EXISTS `user_password`;
CREATE TABLE `user_password` (
`id` int(11) NOT NULL AUTO_INCREMENT,
`encrpt_password` varchar(128) DEFAULT '',
`user_id` int(11) DEFAULT '0',
PRIMARY KEY (`id`),
KEY `to_userid` (`user_id`),
CONSTRAINT `to_userid` FOREIGN KEY (`user_id`) REFERENCES `user_info` (`id`)
) ENGINE=InnoDB AUTO_INCREMENT=1 DEFAULT CHARSET=utf8;
INSERT INTO `user_password` VALUES ('1', '!QAzsdrw12', '1');
INSERT INTO `user_password` VALUES ('2', 'weiwxin', '2');
3、准备文件目录
创建一个文件:\src\main\resources\mapping
创建2个包:com.spring.sales.dao; com.spring.sales.dataObject;
4、配置执行文件
官网下载,修改配置,参考以下示例。
<?xml version="1.0" encoding="UTF-8"?>
<!DOCTYPE generatorConfiguration
PUBLIC "-//mybatis.org//DTD MyBatis Generator Configuration 1.0//EN"
"http://mybatis.org/dtd/mybatis-generator-config_1_0.dtd">
<!--mybatis-generator-maven-plugin生成数据库实体的配置文件-->
<generatorConfiguration>
<!--导入属性配置,前面我们写的一个配置文件,你也可以直接使用mybatis的jdbc的配置文件
<properties resource="jdbc.properties"></properties>-->
<!-- 数据库驱动,注意,这里必须要修改成你的数据库的驱动地址-->
<classPathEntry
location="D:\javaa\apache-maven-3.3.9\maven\respository\mysql\mysql-connector-java\5.1.45\mysql-connector-java-5.1.45.jar"/>
<context id="DB2Tables" targetRuntime="MyBatis3">
<commentGenerator>
<property name="suppressDate" value="true"/>
<!-- 是否去除自动生成的注释 true:是 : false:否 -->
<property name="suppressAllComments" value="true"/>
</commentGenerator>
<!--数据库链接URL,用户名、密码 -->
<jdbcConnection driverClass="com.mysql.jdbc.Driver" connectionURL="jdbc:mysql://172.16.16.71:3306/miaosha" userId="aaa" password="aaa123">
</jdbcConnection>
<javaTypeResolver>
<property name="forceBigDecimals" value="false"/>
</javaTypeResolver>
<!-- 生成模型的包名和位置,生成model模型,dataObject-->
<javaModelGenerator targetPackage="com.spring.sales.dataObject" targetProject="src/main/java">
<property name="enableSubPackages" value="true"/>
<property name="trimStrings" value="true"/>
</javaModelGenerator>
<!-- 生成映射文件的包名和位置,应的mapper.xml文件-->
<sqlMapGenerator targetPackage="mapping" targetProject="src/main/resources">
<property name="enableSubPackages" value="true"/>
</sqlMapGenerator>
<!-- 生成DAO的包名和位置,对应的Mapper接口类文件,daoMapper-->
<javaClientGenerator type="XMLMAPPER" targetPackage="com.spring.sales.dao" targetProject="src/main/java">
<property name="enableSubPackages" value="true"/>
</javaClientGenerator>
<!-- 要生成的表 tableName是数据库中的表名或视图名 domainObjectName是实体类名,这里举例,只配置了一个table,你可以配置多个-->
<table tableName="user_info" domainObjectName="UserDO" enableCountByExample="false"
enableUpdateByExample="false" enableDeleteByExample="false" enableSelectByExample="false" selectByExampleQueryId="false"/>
<table tableName="user_password" domainObjectName="UserPasswordDO" enableCountByExample="false"
enableUpdateByExample="false" enableDeleteByExample="false" enableSelectByExample="false" selectByExampleQueryId="false"/>
</context>
</generatorConfiguration>
5、启动,生成文件
启动命令参考:https://www.cnblogs.com/toutou/p/9771404.html

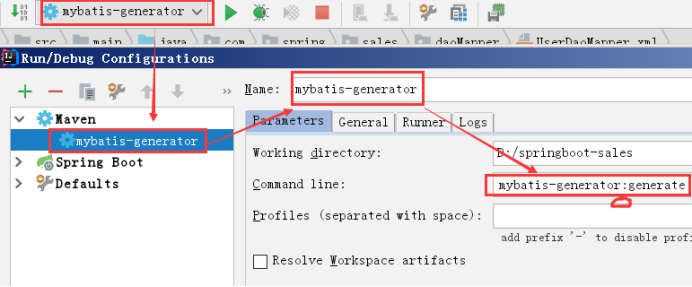
运行,即可生成需要的文件到指定目录。