版权声明:本文为博主原创文章,未经博主允许不得转载。 https://blog.csdn.net/qq_41264055/article/details/87455012
流程如下: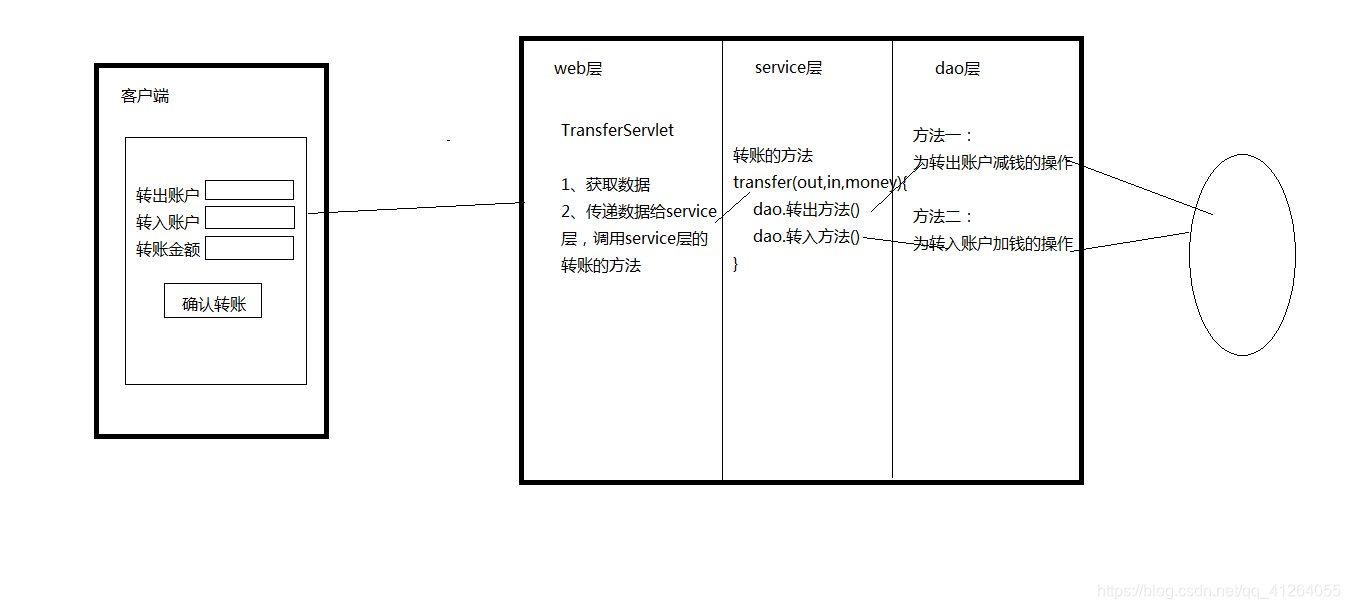
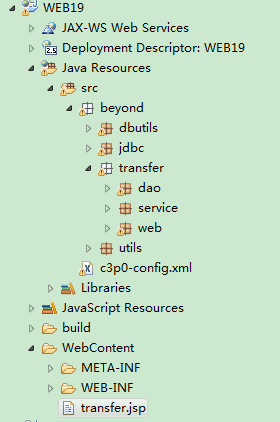
创建项目工程如下:
transfer包下的代码如下:
package beyond.transfer.dao;

import java.sql.Connection;
import java.sql.SQLException;

import org.apache.commons.dbutils.QueryRunner;

import beyond.utils.DataSourceUtils;

public class TransferDao {

	public void out(Connection conn,String out, double money) throws SQLException {

		QueryRunner runner = new QueryRunner();

		//不用穿参数
		//Connection conn = DataSourceUtils.getConnection();

		String sql = "update account set money= money-? where name=?";
		runner.update(conn, sql, money,out);

	}

	public void in(Connection conn,String in, double money) throws SQLException {

		QueryRunner runner = new QueryRunner();

		//不用穿参数
		//Connection conn = DataSourceUtils.getConnection();

		String sql = "update account set money= money+? where name=?";
		runner.update(conn, sql, money,in);

	}

}
package beyond.transfer.service;

import java.sql.Connection;
import java.sql.SQLException;

import beyond.transfer.dao.TransferDao;
import beyond.utils.DataSourceUtils;

public class TransferService {

	public boolean transfer(String out, String in, double money) {

		//创建dao层对象
		TransferDao dao = new TransferDao();

		boolean isTransferSuccess = true;
		Connection conn = null;
		try {
			//进行事务控制,开启事务
			conn = DataSourceUtils.getConnection();

			//不自动开启事务,也就是手动开启事务
			conn.setAutoCommit(false);

			//调用dao层的转出钱的方法,只需要知道 转钱的人是谁 跟 钱数 就行
			dao.out(conn,out,money);

			//调用dao层的转入钱的方法,只需要知道 转给谁 跟 钱数 就行
			dao.in(conn,in,money);
		} catch (SQLException e) {

			isTransferSuccess = false;

			try {
				//当出现事务错误,进行事务的回滚;回滚本身内部不包含提交的功能
				conn.rollback();
			} catch (SQLException e1) {
				e1.printStackTrace();
			}
			e.printStackTrace();
		}finally{
			try {
				conn.commit();
			} catch (SQLException e) {
				e.printStackTrace();
			}
		}

		return isTransferSuccess;

	}

}
package beyond.transfer.web;

import java.io.IOException;
import javax.servlet.ServletException;
import javax.servlet.http.HttpServlet;
import javax.servlet.http.HttpServletRequest;
import javax.servlet.http.HttpServletResponse;

import beyond.transfer.service.TransferService;

public class TransferServlet extends HttpServlet {

	public void doGet(HttpServletRequest request, HttpServletResponse response) throws ServletException, IOException {

		//接收转账的参数
		String out = request.getParameter("out");
		String in = request.getParameter("in");

		String moneyStr = request.getParameter("money");
		double money=Double.parseDouble(moneyStr);//进行将转账金额强转

		//调用业务层的转账方法
		TransferService service = new TransferService();
		boolean isTransferSuccess = service.transfer(out,in,money);


		//解决乱码问题
		response.setContentType("text/html;charset=UTF-8");


		if(isTransferSuccess){
			response.getWriter().write("转账成功!!!");
		}else{
			response.getWriter().write("转账失败!!!");
		}
	}

	public void doPost(HttpServletRequest request, HttpServletResponse response) throws ServletException, IOException {
		doGet(request, response);
	}
}
transfer.jsp代码如下:
<%@ page language="java" contentType="text/html; charset=UTF-8"
    pageEncoding="UTF-8"%>
<!DOCTYPE html PUBLIC "-//W3C//DTD HTML 4.01 Transitional//EN" "http://www.w3.org/TR/html4/loose.dtd">
<html>
<head>
<meta http-equiv="Content-Type" content="text/html; charset=UTF-8">
<title>Insert title here</title>
</head>
<body>
	<form action="${pageContext.request.contextPath}/transfer" method="post">
		传出账户:<input type="text" name="out"><br/>
		传入账户:<input type="text" name="in"><br/>
		转转金额:<input type="text" name="money"><br/>
		<input type="submit" value="确认转账"><br/>

	</form>
</body>
</html>
数据库创建如下:
CREATE TABLE `account` (
  `id` int(11) NOT NULL AUTO_INCREMENT,
  `name` varchar(30) DEFAULT NULL,
  `money` double DEFAULT NULL,
  UNIQUE KEY `id` (`id`)
) ENGINE=InnoDB AUTO_INCREMENT=3 DEFAULT CHARSET=utf8
dbutils包下代码如下:
package beyond.jdbc;

import java.sql.Connection;
import java.sql.DriverManager;
import java.sql.SQLException;
import java.sql.Statement;

public class JDBCDemo {
	public static void main(String[] args) {

		//通过jdbc去控制事务
		Connection conn = null;


		try {
			//1,注册驱动
			Class.forName("com.mysql.jdbc.Driver");

			//2,获得connection
			conn = DriverManager.getConnection("jdbc:mysql:///web19","root","wsq");//三个///代表本地一个端口

			//手动开启事务
			conn.setAutoCommit(false);//是否自动提交false,代表不自动提交也就是手动提交


			//3,获得操作数据库对象(执行平台)
			Statement stmt = conn.createStatement();

			//4,操作sql
			//stmt.executeUpdate("insert into account values(null,'zhangsan',3000)");
			int executeUpdate = stmt.executeUpdate("update account set money=5000 where name='sq'");


			//提交事务
			conn.commit();


			stmt.close();
			conn.close();
		} catch (Exception e) {
			try {
				conn.rollback();
			} catch (SQLException e1) {
				e1.printStackTrace();
			}
			e.printStackTrace();
		}
	}
}
jdbc包下代码如下:
package beyond.jdbc;

import java.sql.Connection;
import java.sql.DriverManager;
import java.sql.SQLException;
import java.sql.Statement;

public class JDBCDemo {
	public static void main(String[] args) {

		//通过jdbc去控制事务
		Connection conn = null;


		try {
			//1,注册驱动
			Class.forName("com.mysql.jdbc.Driver");

			//2,获得connection
			conn = DriverManager.getConnection("jdbc:mysql:///web19","root","wsq");//三个///代表本地一个端口

			//手动开启事务
			conn.setAutoCommit(false);//是否自动提交false,代表不自动提交也就是手动提交


			//3,获得操作数据库对象(执行平台)
			Statement stmt = conn.createStatement();

			//4,操作sql
			//stmt.executeUpdate("insert into account values(null,'zhangsan',3000)");
			int executeUpdate = stmt.executeUpdate("update account set money=5000 where name='sq'");


			//提交事务
			conn.commit();


			stmt.close();
			conn.close();
		} catch (Exception e) {
			try {
				conn.rollback();
			} catch (SQLException e1) {
				e1.printStackTrace();
			}
			e.printStackTrace();
		}
	}
}
utils包下代码如下:
package beyond.utils;

import java.sql.Connection;
import java.sql.ResultSet;
import java.sql.SQLException;
import java.sql.Statement;

import javax.sql.DataSource;

import com.mchange.v2.c3p0.ComboPooledDataSource;

public class DataSourceUtils {

	private static DataSource dataSource = new ComboPooledDataSource();

	private static ThreadLocal<Connection> tl = new ThreadLocal<Connection>();

	// 直接可以获取一个连接池
	public static DataSource getDataSource() {
		return dataSource;
	}

	public static Connection getConnection() throws SQLException{
		return dataSource.getConnection();
	}


	// 获取连接对象
	public static Connection getCuruentConnection() throws SQLException {

		Connection con = tl.get();
		if (con == null) {
			con = dataSource.getConnection();
			tl.set(con);
		}
		return con;
	}

	// 开启事务
	public static void startTransaction() throws SQLException {
		Connection con = getCuruentConnection();
		if (con != null) {
			con.setAutoCommit(false);
		}
	}

	// 事务回滚
	public static void rollback() throws SQLException {
		Connection con = getCuruentConnection();
		if (con != null) {
			con.rollback();
		}
	}

	// 提交并且 关闭资源及从ThreadLocall中释放
	public static void commitAndRelease() throws SQLException {
		Connection con = getCuruentConnection();
		if (con != null) {
			con.commit(); // 事务提交
			con.close();// 关闭资源
			tl.remove();// 从线程绑定中移除
		}
	}

	// 关闭资源方法
	public static void closeConnection() throws SQLException {
		Connection con = getCuruentConnection();
		if (con != null) {
			con.close();
		}
	}

	public static void closeStatement(Statement st) throws SQLException {
		if (st != null) {
			st.close();
		}
	}

	public static void closeResultSet(ResultSet rs) throws SQLException {
		if (rs != null) {
			rs.close();
		}
	}

}
c3p0-config.xml代码如下:
<?xml version="1.0" encoding="UTF-8"?>
<c3p0-config>
	<default-config>
		<property name="user">root</property>
		<property name="password">wsq</property>
		<property name="driverClass">com.mysql.jdbc.Driver</property>
		<property name="jdbcUrl">jdbc:mysql:///web19</property>
	</default-config>
</c3p0-config>
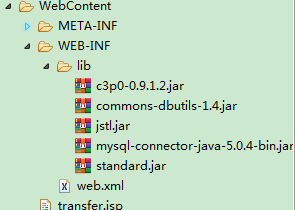
需要的一系列的jar包如下: