版权声明:本文为博主原创文章,未经博主允许不得转载。 https://blog.csdn.net/shrenk/article/details/85778433
首先使用Yeoman创建一个webpart项目如下:

使用Code打开项目,查看package.json文件如下:
{
  "name": "spfx-jest",
  "version": "0.0.1",
  "private": true,
  "engines": {
    "node": ">=0.10.0"
  },
  "scripts": {
    "build": "gulp bundle",
    "clean": "gulp clean",
    "test": "gulp test"
  },
  "dependencies": {
    "react": "16.3.2",
    "react-dom": "16.3.2",
    "@types/react": "16.4.2",
    "@types/react-dom": "16.0.5",
    "@microsoft/sp-core-library": "1.7.0",
    "@microsoft/sp-webpart-base": "1.7.0",
    "@microsoft/sp-lodash-subset": "1.7.0",
    "@microsoft/sp-office-ui-fabric-core": "1.7.0",
    "@types/webpack-env": "1.13.1",
    "@types/es6-promise": "0.0.33"
  },
  "devDependencies": {
    "@microsoft/sp-build-web": "1.7.0",
    "@microsoft/sp-tslint-rules": "1.7.0",
    "@microsoft/sp-module-interfaces": "1.7.0",
    "@microsoft/sp-webpart-workbench": "1.7.0",
    "gulp": "~3.9.1",
    "@types/chai": "3.4.34",
    "@types/mocha": "2.2.38",
    "ajv": "~5.2.2"
  }
}
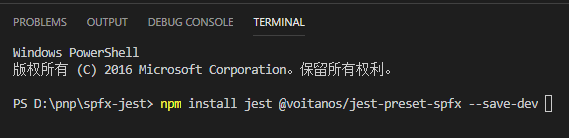
手动配置jest比较麻烦,这里使用一个开源的包(jest-preset-spfx)来帮助我们自动配置。打开Terminal,运行如下命令,安装jest-preset-spfx,安装jest以及相关的依赖包:
安装完成之后可以看到package.json文件中添加了jest以及test,test:watch命令:
{
  "name": "spfx-jest",
  "version": "0.0.1",
  "private": true,
  "engines": {
    "node": ">=0.10.0"
  },
  "scripts": {
    "build": "gulp bundle",
    "clean": "gulp clean",
    "test": "./node_modules/.bin/jest --config ./config/jest.config.json",
    "test:watch": "./node_modules/.bin/jest --config ./config/jest.config.json --watchAll"
  },
  "dependencies": {
    "react": "16.3.2",
    "react-dom": "16.3.2",
    "@types/react": "16.4.2",
    "@types/react-dom": "16.0.5",
    "@microsoft/sp-core-library": "1.7.0",
    "@microsoft/sp-webpart-base": "1.7.0",
    "@microsoft/sp-lodash-subset": "1.7.0",
    "@microsoft/sp-office-ui-fabric-core": "1.7.0",
    "@types/webpack-env": "1.13.1",
    "@types/es6-promise": "0.0.33"
  },
  "devDependencies": {
    "@microsoft/sp-build-web": "1.7.0",
    "@microsoft/sp-module-interfaces": "1.7.0",
    "@microsoft/sp-tslint-rules": "1.7.0",
    "@microsoft/sp-webpart-workbench": "1.7.0",
    "@types/chai": "3.4.34",
    "@types/mocha": "2.2.38",
    "@voitanos/jest-preset-spfx": "^1.1.0",
    "ajv": "~5.2.2",
    "gulp": "~3.9.1",
    "jest": "^23.6.0"
  }
}
然后在“jestDemo”文件夹中添加一个“tests"文件夹,然后创建两个文件如下:

其中”TestableService.ts"文件中包含需要测试的代码,既有同步方法也有异步方法:
export class TestableService {
    public add(operandA: number, operandB: number): number {
      return operandA + operandB;
    }

    public addAsync(operandA: number, operandB: number, callback: (result: number) => void): void {
      setTimeout(() => {
        callback(operandA + operandB);
      }, 1000);
    }

    public addPromise(operandA: number, operandB: number): Promise<number> {
      return new Promise<number>((resolve, reject) => {
        setTimeout(() => {
          const result = operandA + operandB;
          if (result !== 9){
            resolve(operandA + operandB);
          } else {
            reject(new Error('Forced reject when result =9'));
          }
        }, 1000);
      });
    }

  }
另一个文件“TeastableService.spec.ts"是测试代码,用于测试上述代码文件中定义的三个方法:
import 'jest';

import { TestableService } from './TestableService';

let sut: TestableService;

beforeEach(() => {
  this.sut = new TestableService();
});

test('add() returns the correct result', () => {
  const result = this.sut.add(5,2);
  expect(result).toEqual(7);
});

test('addAsync() returns the correct result', (done) => {
  this.sut.addAsync(5,2, (result) => {
    expect(result).toEqual(7);
    done();
  });
});

test('addPromise() returns correct result', () => {
  expect.assertions(1);

  return this.sut.addPromise(5,6)
    .then((result: number) => {
      expect(result).toEqual(11);
    });
});

test('addPromise() catches expected exception', () => {
  expect.assertions(1);

  return this.sut.addPromise(5,4)
    .then((result: number) => {
      expect(result).toEqual(11);
    })
    .catch((e:Error) => {
      expect(e.message).toEqual('Forced reject when result =9');
    });
});
最后在termimal中运行测试如下:
npm test运行结果如下:

注:此配置已经默认集成到PnP generator中,具体参见:https://blog.csdn.net/shrenk/article/details/86691035