一、FastDFS 简介
FastDFS是一个轻量级的开源分布式文件系统,主要解决了大容量的文件存储和高并发访问的问题,文件存取时实现了负载均衡,实现了软件方式的RAID,可以使用廉价的IDE硬盘进行存储,支持存储服务器在线扩容,支持相同内容的文件只保存一份,节约磁盘空间,只能通过Client API访问,不支持POSIX访问方式,特别适合大中型网站使用,用来存储资源文件(如:图片、文档、音频、视频等等)
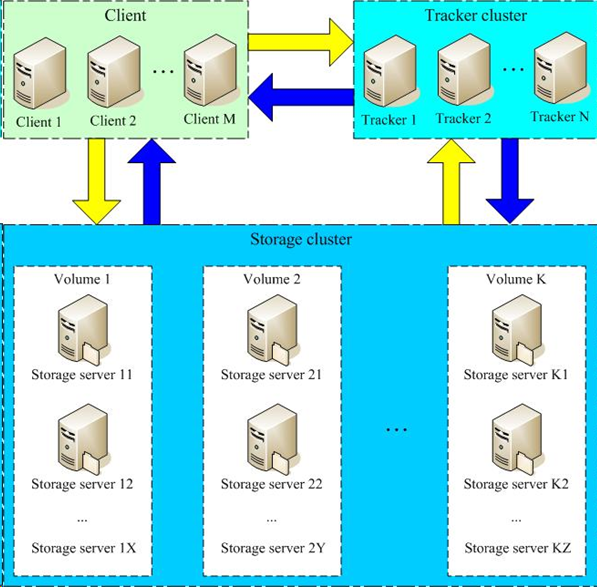
1.1 相关术语
Tracker Server:跟踪服务器,主要做调度工作,在访问上起负载均衡的作用。记录storage server的状态,是连接Client和Storage server的枢纽。Storage Server:存储服务器,文件和meta data都保存到存储服务器上group:组,也可称为卷。同组内服务器上的文件是完全相同的文件标识:包括两部分:组名和文 件名(包含路径)meta data:文件相关属性,键值对(Key Value Pair)方式,如:width=1024,heigth=768
1.2 FastDFS系统架构图
1.3 上传文件流程图
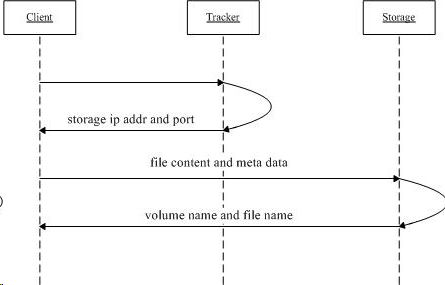
- client询问tracker上传到的storage,不需要附加参数;
- tracker返回一台可用的storage;
- client直接和storage通讯完成文件上传。
1.4 下载文件流程图
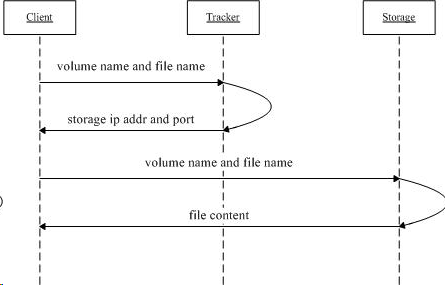 1. client询问tracker下载文件的storage,参数为文件标识(组名和文件名);
2. tracker返回一台可用的storage;
3. client直接和storage通讯完成文件下载
1.5 部署结构图
需要8个节点,前期暂时使用6个节点做集群,最后加入keepalived 做高可用
1.6 同步机制
- 同一组内的
storage server之间是对等的,文件上传、删除等操作可以在任意一台storage server上进行; - 文件同步只在同组内的
storage server之间进行,采用push方式,即源服务器同步给目标服务器; - 源头数据才需要同步,备份数据不需要再次同步,否则就构成环路了;
- 上述第二条规则有个例外,就是新增加一台storage server时,由已有的一台storage server将已有的所有数据(包括源头数据和备份数据)同步给该新增服务器
二、集群搭建
6个节点都关闭了防火墙,没有关闭防火墙,则需要开启对应端口。
| 节点IP | 作用 |
|---|---|
| 192.18.91.173 | tracker-group1 |
| 192.18.91.174 | tracker-group2 |
| 192.18.91.175 | storage-group1-1 |
| 192.18.91.176 | storage-group1-2 |
| 192.18.91.177 | storage-group2-1 |
| 192.18.91.178 | storage-group2-2 |
安装包如下:
- FastDFS_v5.05.tar.gz
- fastdfs-nginx-module_v1.16.tar.gz
- libfastcommon-master.zip
- ngx_cache_purge-2.3.tar.gz
- nginx-1.6.2.tar.gz
上传安装包到192.18.91.173 该节点的 /usr/local/software/
然后使用命令:将 /software 复制到其他节点
命令:scp -r software/ 192.168.91.174:/usr/local/
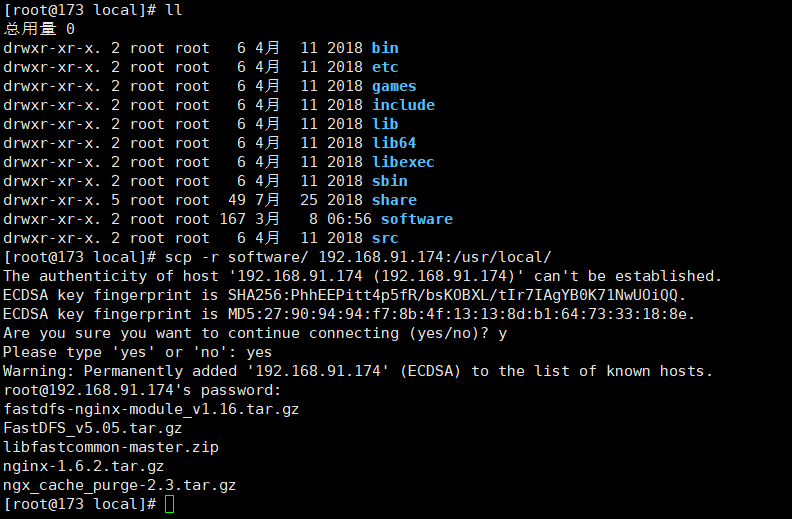 依次复制到其他节点上。
2.1 在6个节点上安装相关软件(公共部分)
注意:利用xshell【发送文本到当前xshell会话的全部会话】功能进行相同步骤安装
一、安装gcc
命令:yum -y install make cmake gcc gcc-c++
二、安装libfatscommon
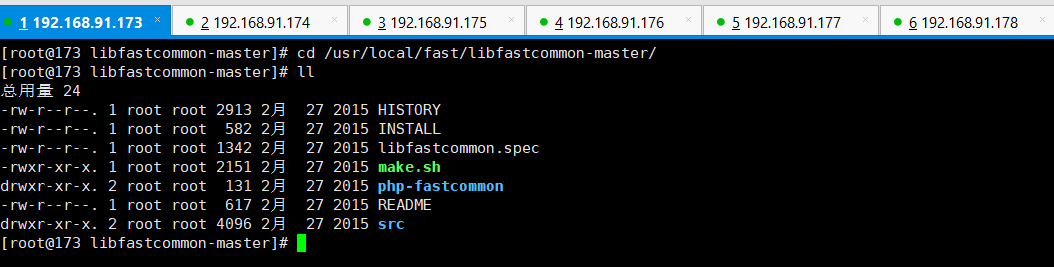
1 到/usr/local/software下 : cd /usr/local/software && ll
2 进行解压libfastcommon-master.zip: 命令:unzip libfastcommon-master.zip -d /usr/local/fast/
(如果没有unzip 命令则需要安装unzip :命令:yum -y install unzip)
3 进入目录:cd /usr/local/fast/libfastcommon-master/ && ll
 4 进行编译和安装:
命令:./make.sh
命令:./make.sh install
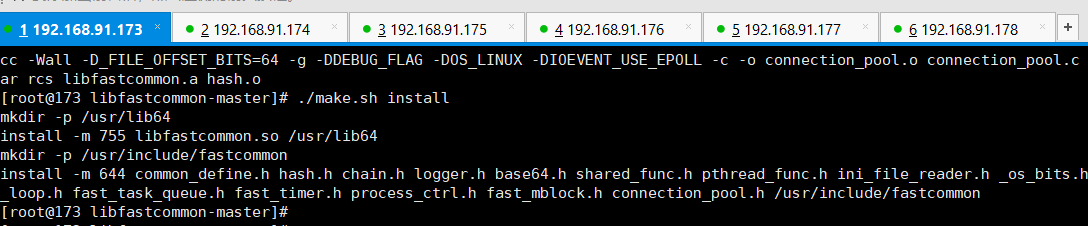 注意安装的路径:也就是说,我们的libfastcommon默认安装到了**/usr/lib64/**这个 位置
5 进行软件创建。FastDFS主程序设置的目录为/usr/local/lib/,所以我们需要创建/ usr/lib64/下的一些核心执行程序的软连接文件。
命令:mkdir /usr/local/lib/
命令:ln -s /usr/lib64/libfastcommon.so /usr/local/lib/libfastcommon.so
命令:ln -s /usr/lib64/libfastcommon.so /usr/lib/libfastcommon.so
命令:ln -s /usr/lib64/libfdfsclient.so /usr/local/lib/libfdfsclient.so
命令:ln -s /usr/lib64/libfdfsclient.so /usr/lib/libfdfsclient.so

三、安装FastDFS
1 进入到cd /usr/local/software && ll下,解压FastDFS_v5.05.tar.gz文件
命令:cd /usr/local/software && ll
命令:tar -zxvf FastDFS_v5.05.tar.gz -C /usr/local/fast/
2 安装编译
命令:cd /usr/local/fast/FastDFS/ && ll
编译命令:./make.sh
安装命令:./make.sh install
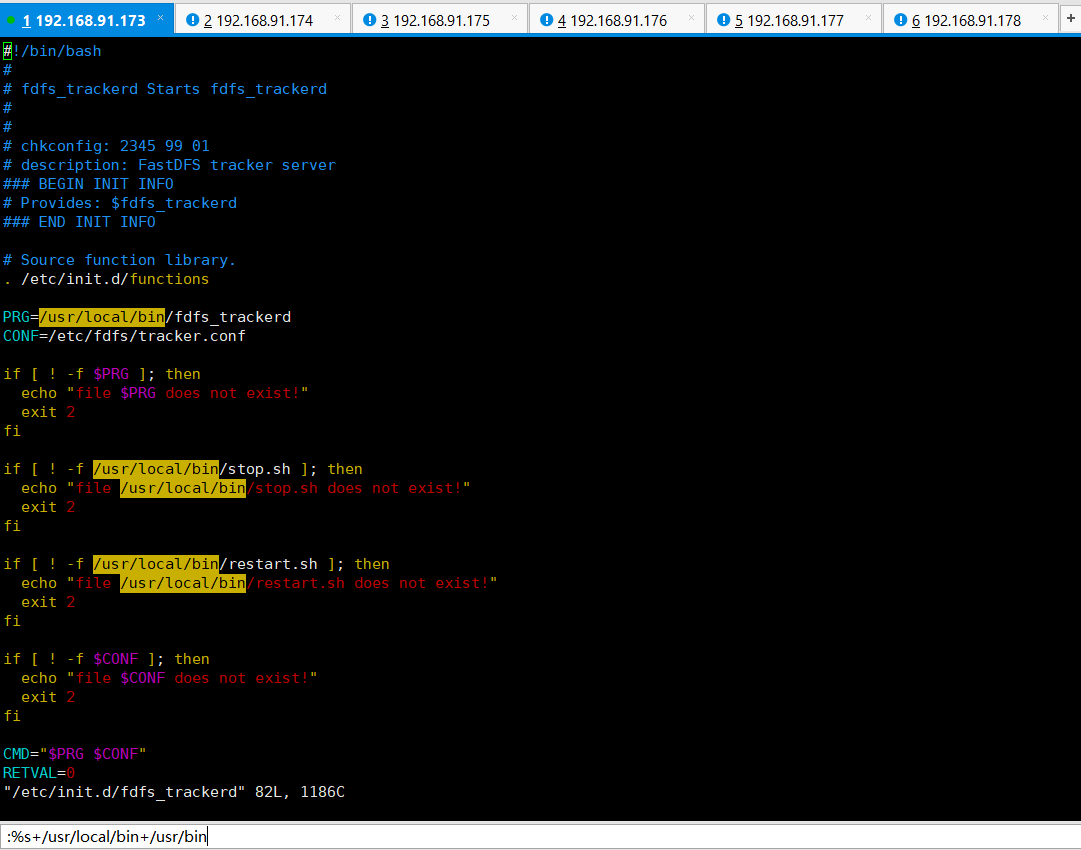
3 因为FastDFS服务脚本设置的bin目录为/usr/local/bin/下,但是实际我们安装在了/u sr/bin/下面。所以我们需要修改FastDFS配置文件中的路径,也就是需要修改俩 个配置文件:
命令:vim /etc/init.d/fdfs_storaged
进行全局替换命令:%s+/usr/local/bin+/usr/bin
命令:vim /etc/init.d/fdfs_trackerd
进行全局替换命令:%s+/usr/local/bin+/usr/bin
2.2 配置tracker服务器(两个节点)
192.16.91.173 和 192.16.91.174 做为跟踪器,进行配置。
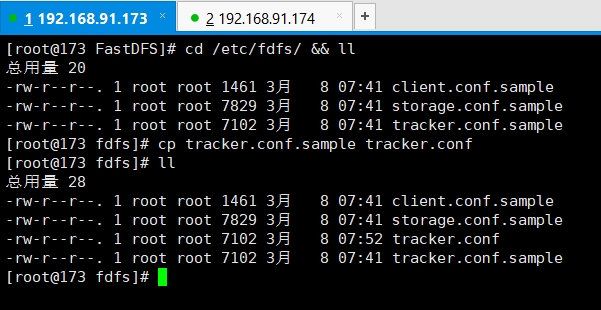
1 进入 cd /etc/fdfs/ && ll目录配置跟踪器文件
把tracker.conf.samp le文件进行cope一份:去修改tracker.conf文件
命令:cd /etc/fdfs/ && ll
命令:cp tracker.conf.sample tracker.conf
2 修改tracker.conf文件
命令:vim /etc/fdfs/tracker.conf
如下图所示:我们暂时修改配置文件里的base_path即可

修改为自己的路径地址:base_path=/fastdfs/tracker
补充:集群上传时组的选择策略:

scp -r tracker.conf 192.168.91.174:/etc/fdfs/
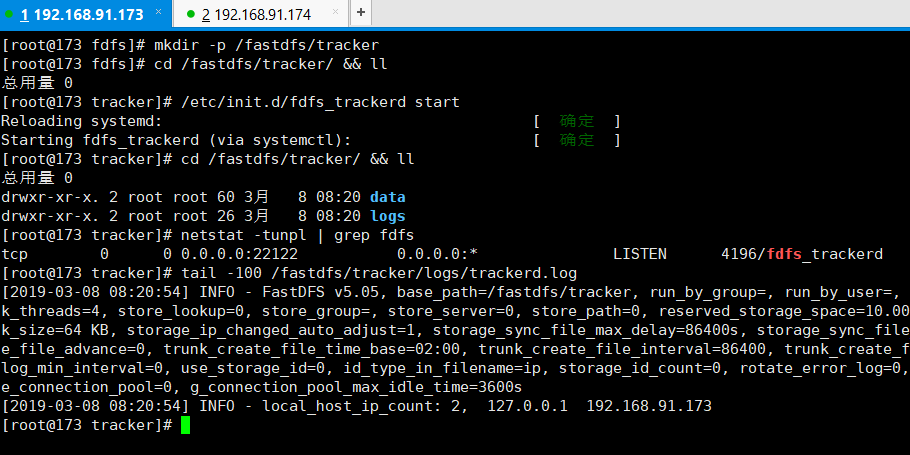
3 最后我们一定要创建之前定义好的目录(也就是/fastdfs/tracker):
命令:mkdir -p /fastdfs/tracker
4 启动跟踪器
目录命令:cd /fastdfs/tracker/ && ll
启动tracker命令:/etc/init.d/fdfs_trackerd start
查看进程命令:ps -el | grep fdfs 或者 netstat -tunpl | grep fdfs
查看启动日志命令:tail -100 /fastdfs/tracker/logs/trackerd.log
停止tracker命令:/etc/init.d/fdfs_trackerd stop
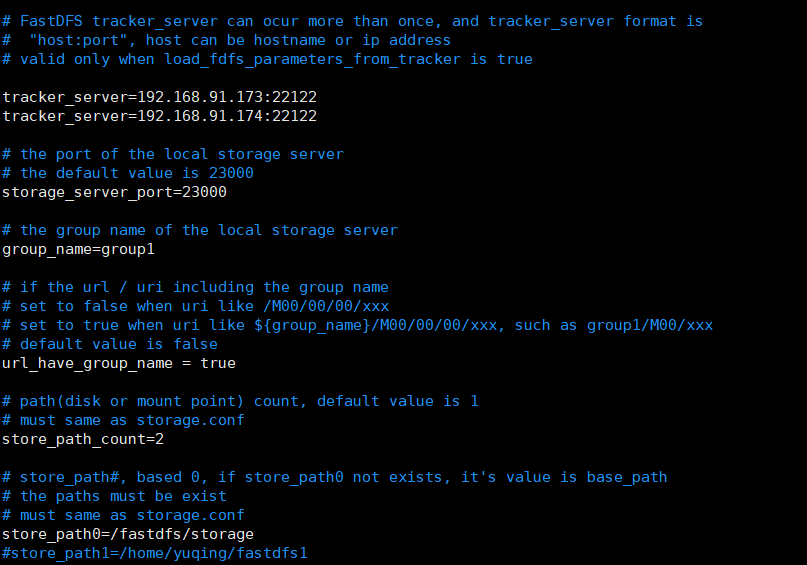
2.3 配置storage服务器(4个节点 175~178)
描述:4个节点中,同一组的配置应该是相同的。175和176 一组,177和178一组。
1 进入4个节点的配置文件目录:cd /etc/fdfs/,进行copy storage文件一份
命令:cd /etc/fdfs/ &&ll
命令:cp storage.conf.sample storage.conf
2 修改storage.conf文件
命令:vim /etc/fdfs/storage.conf
注意:175和176 为group1 。177和178为group2
修改内容:
| 修改项 | 描述 |
|---|---|
| disabled=false | 启用配置文件 |
| group_name=group1 | 组名,第一组为group1 第二组为group2 |
| port=23000 | storage端口,同一个组的storage端口必须相同 |
base_path=/fastdfs/storage |
设置storage的日志目录 |
| store_path_count=1 | 存储路径个数,需要和store_path个数匹配 |
store_path0=/fastdfs/storage |
设置存储路径 |
tracker_server=192.168.91.173:22122 |
tracker服务器的IP和端口 |
tracker_server=192.168.91.174:22122 |
tracker服务器的IP和端口 |
| http.server_port=8888 | 设置http端口 |
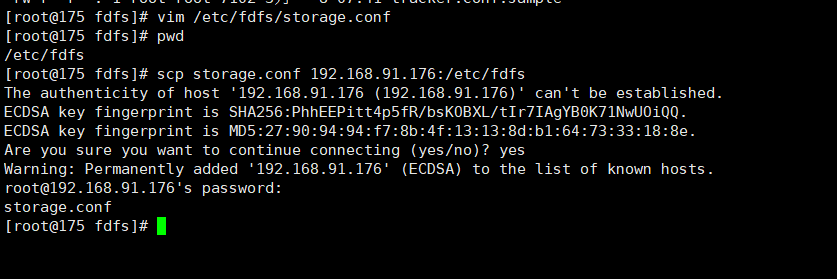 >修改后可以将其复制到同一组的另外一个节点 。同时复制到177 和 178 ,只需要在177和178修改group_name=group2 。
3 创建存储目录:mkdir -p /fastdfs/storage
4 启动存储(storage)
在启动storage之前,一定要先启动173和174两个跟踪器节点 (启动命令:/etc/init.d/fdfs_trackerd start)
启动命令:/etc/init.d/fdfs_storaged start
日志命令:tail -f /fastdfs/storage/logs/storaged.log
不能正常启动storage
ERROR - file: ../client/client_func.c, line: 158, conf file "/etc/fdfs/storage.conf", get item "tracker_server" fail
CRIT - exit abnormally!
可以使用这个命令试试:fdfs_storaged /etc/fdfs/storage.conf 进行启动。
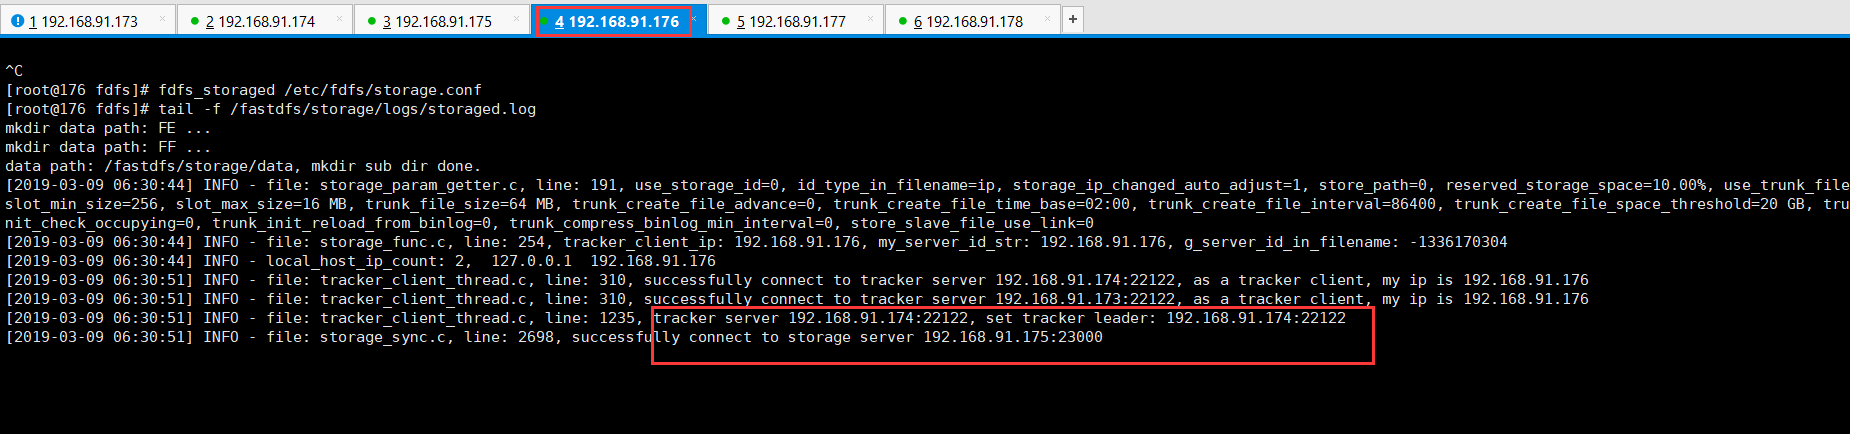 上图启动176后,发现跟踪器的leader是174。同时发现已经连接到了175了。
关闭storage命令:/etc/init.d/fdfs_storaged stop
2.4 测试验证
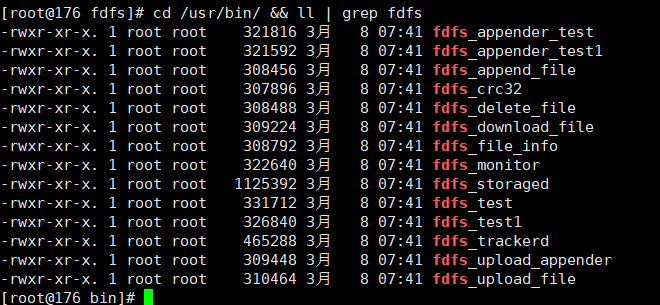
在 /usr/bin/ 目录下面有多个fdfs的相关命令
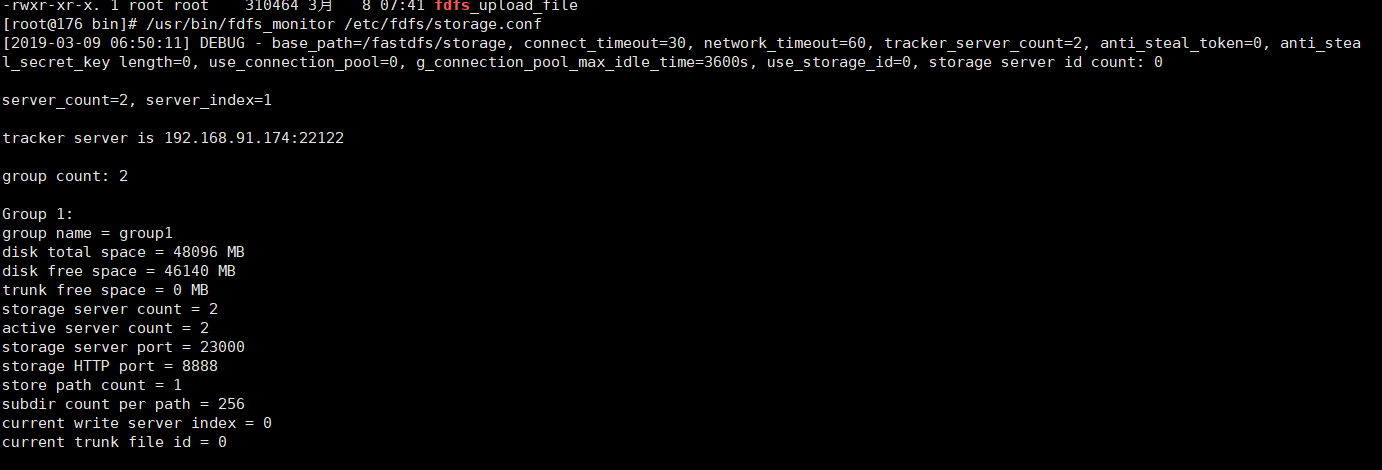
通过命令:/usr/bin/fdfs_monitor /etc/fdfs/storage.conf 就可以知道集群的结构信息。
1 我们先使用命令上传一个文件。使用任意一个跟踪器(tracker),这里选择192.168.91.173 这个
这个跟踪器。 复制一份client.conf
命令:cd /etc/fdfs/ && ll
命令:cp client.conf.sample client.conf
2 编辑client.conf文件
命令:vim /etc/fdfs/client.conf
修改内容:
base_path=/fastdfs/tracker
tracker_server=192.168.91.173:22122
tracker_server=192.168.91.174:22122
3 使用命令fdfs_upload_file进行上传操作。 先去所有存储节点上,查看存储文件下有,没有任何数据文件。如下:进入存储数据位置的的命令:cd /fastdfs/storage/data/00/00/
 4. 执行上传命令。使用 /usr/bin/fdfs_upload 命令,并指定client配置文件,以及要上传的文件即可。例如:
命令:/usr/bin/fdfs_upload_file /etc/fdfs/client.conf /usr/local/software/FastDFS_v5.05.tar.gz
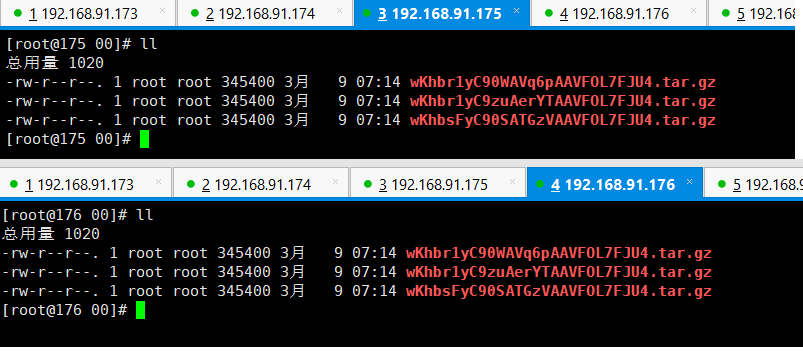
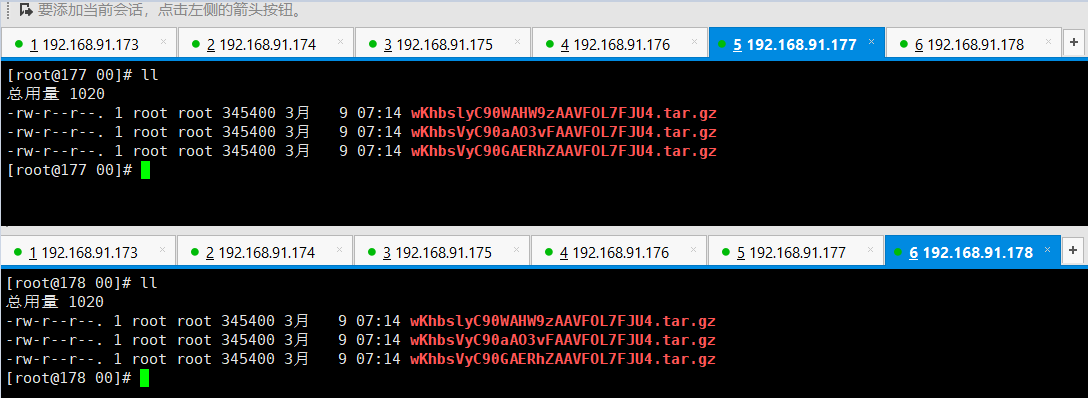
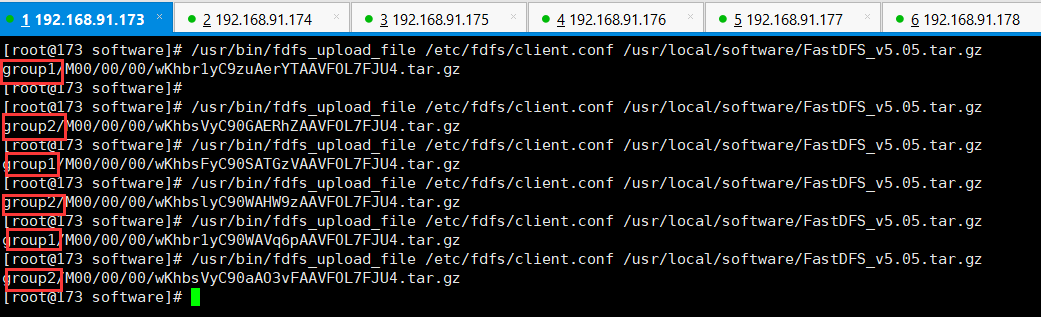 因为采用的是轮询算法。所以group1 和 group2 会轮流。 同时同一个组的storage中文件时保持一致的。
2.5 配置Nginx
首先4个存储节点(175-178)配置Nginx,然后两个跟踪器配置Nginx 。注意使用工具进行批量操作
1 首先4个存储节点下安装fastdfs-nginxmodule_v1.16.tar.gz
目录命令:cd /usr/local/software/ && ll
解压命令:tar -zxvf /usr/local/software/fastdfs-nginx-module_v1.16.tar.gz -C /usr/local/fast/
2 在安装 fastdfs-nginx-module 之前对其路径进行修改:
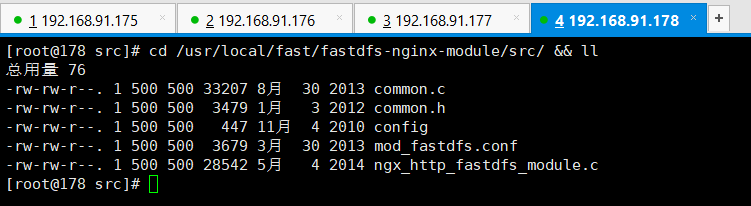
进入命令:cd /usr/local/fast/fastdfs-nginx-module/src/ && ll
编辑命令: vim /usr/local/fast/fastdfs-nginx-module/src/config
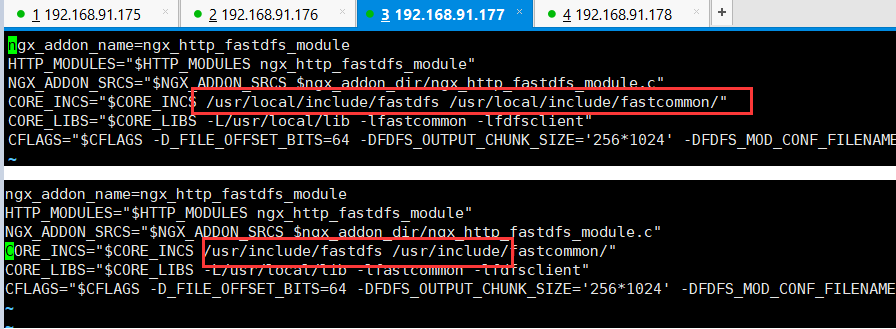
去掉下图中的local文件层次
3.四个存储节点安装Nginx的依赖包和安装nginx。并添加fastdfs 和 nginx整合
下载需要的依赖文件:
yum -y install pcre
yum -y install pcre-devel
yum -y install zlib
yum -y install zlib-devel
4 解压并安装nginx,加入fastdfs-nginx-module
命令:cd /usr/local/software && ll
命令:tar -zxvf nginx-1.6.2.tar.gz -C /usr/local/
进入到nginx目录命令:cd /usr/local/nginx-1.6.2/ && ll
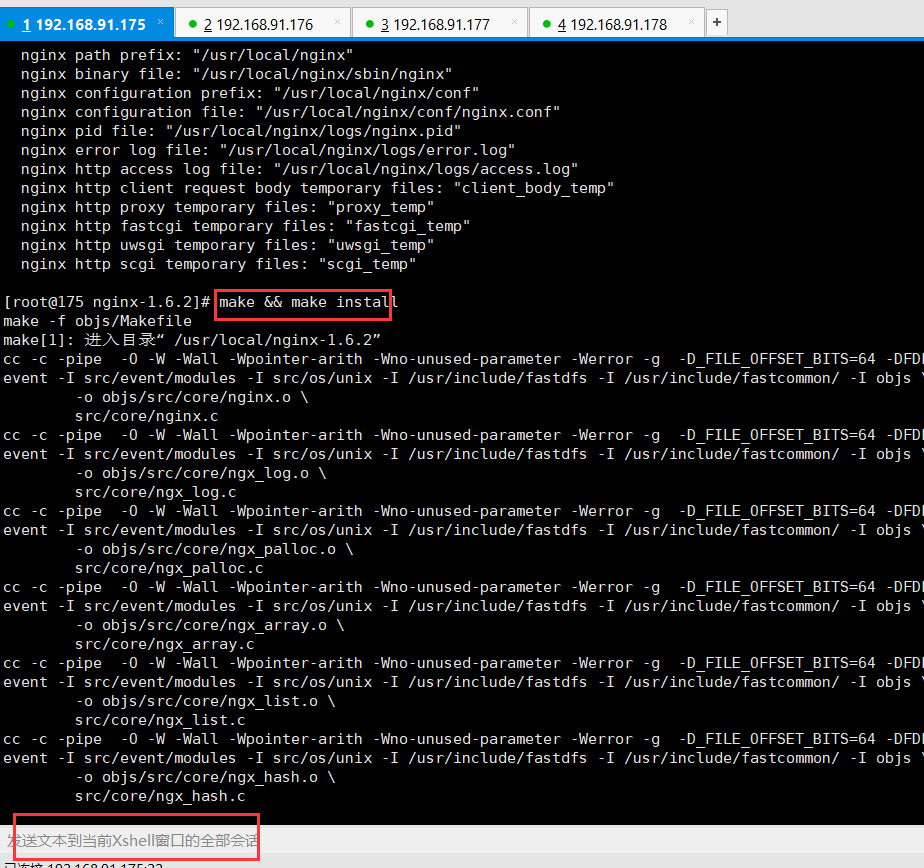
加入模块命令:./configure --add-module=/usr/local/fast/fastdfs-nginx-module/src/
编译命令:make && make install
5 复制fastdfs-ngin-module中的配置文件,到/etc/fdfs目录中,如图所示:
命令:cd /usr/local/fast/fastdfs-nginx-module/src/ && ll
copy命令:cp /usr/local/fast/fastdfs-nginx-module/src/mod_fastdfs.conf /etc/fdfs
进行修改 /etc/fdfs/ 目录下,我们刚刚copy过来的mod_fastdfs.conf 文件
命令:cd /etc/fdfs && ll
命令:vim /etc/fdfs/mod_fastdfs.conf
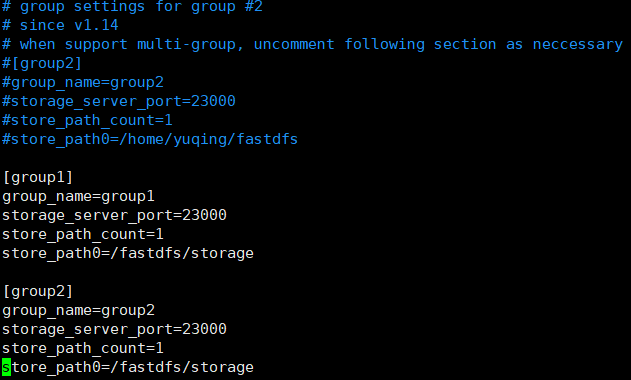
修改内容:比如连接超时时间、跟踪器路径配置、url的group配置、
第一组(175 176) 和第二组(177 178)节点修改内容,不同只有一个组名
connect_timeout=10
tracker_server=192.168.91.173:22122
tracker_server=192.168.91.174:22122
storage_server_port=23000
url_have_group_name = true
store_path0=/fastdfs/storage
group_name=group1 # 第一组为group_name=group1 第二组为group_name=group2
group_count=2
#在最后添加 [group1] 和 [group2]
[group1]
group_name=group1
storage_server_port=23000
store_path_count=1
store_path0=/fastdfs/storage
[group2]
group_name=group2
storage_server_port=23000
store_path_count=1
store_path0=/fastdfs/storage
使用scp 命令将这个修改的文件复制到其他三个节点上
命令:scp mod_fastdfs.conf 192.18.91.1766:/etc/fdfs/
 176和175一致,不用再修改。需要将177和178连个节点中的group进行修改。
6 复制FastDFS里的2个文件,到/etc/fdfs目录中 (四个节点都需要做)
目录命令:cd /usr/local/fast/FastDFS/conf/ && ll
copy命令:cp http.conf mime.types /etc/fdfs/ && cd /etc/fdfs/ && ll
 7 创建一个软连接,在/fastdfs/storage文件存储目录下创建软连接,将其链接到实际存放数据 的目录。
命令:ln -s /fastdfs/storage/data/ /fastdfs/storage/data/M00
8 修改Nginx配置文件(修改一个节点,使用scp到其他节点)
命令: cd /usr/local/nginx/conf && ll
命令: vim /usr/local/nginx/conf/nginx.conf
修改内容为:
 listen 8888;
 server_name localhost;
 location ~/group([0-9])/M00 {
       #alias /fastdfs/storage/data;
        ngx_fastdfs_module;
 }
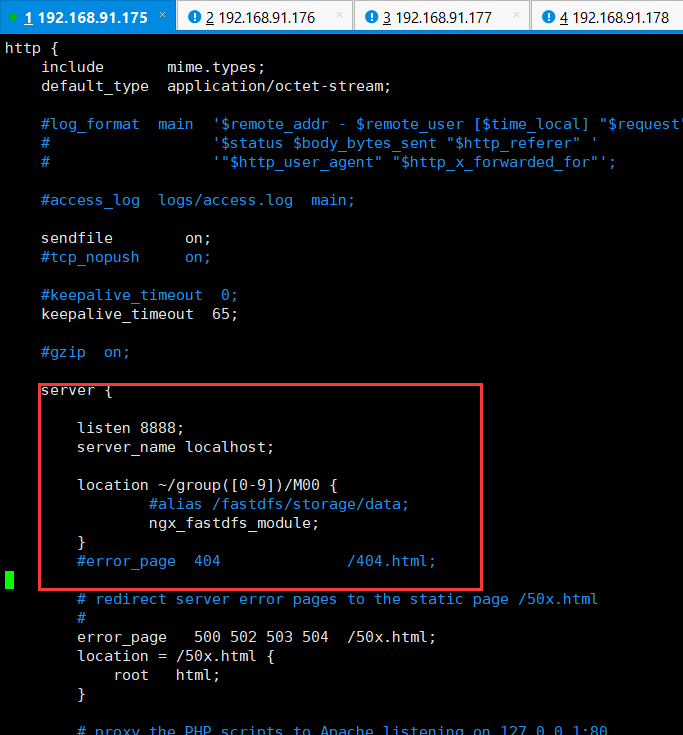
让后复制到其他节点上
命令:cd /usr/local/nginx/conf && ll
命令:scp nginx.conf 192.168.91.176:/usr/local/nginx/conf/
 9 最后检查防火墙,然后同时启动nginx服务
启动命令:/usr/local/nginx/sbin/nginx

启动后,不能访问页面,监控日志发现,/usr/local/nginx/logs 报错了,
.ERROR - file: ../storage/trunk_mgr/trunk_shared.c, line: 106, conf file must have item "store_path1"!
检查一下v /etc/fdfs/mod_fastdfs.conf 这个文件是不是配置正确。

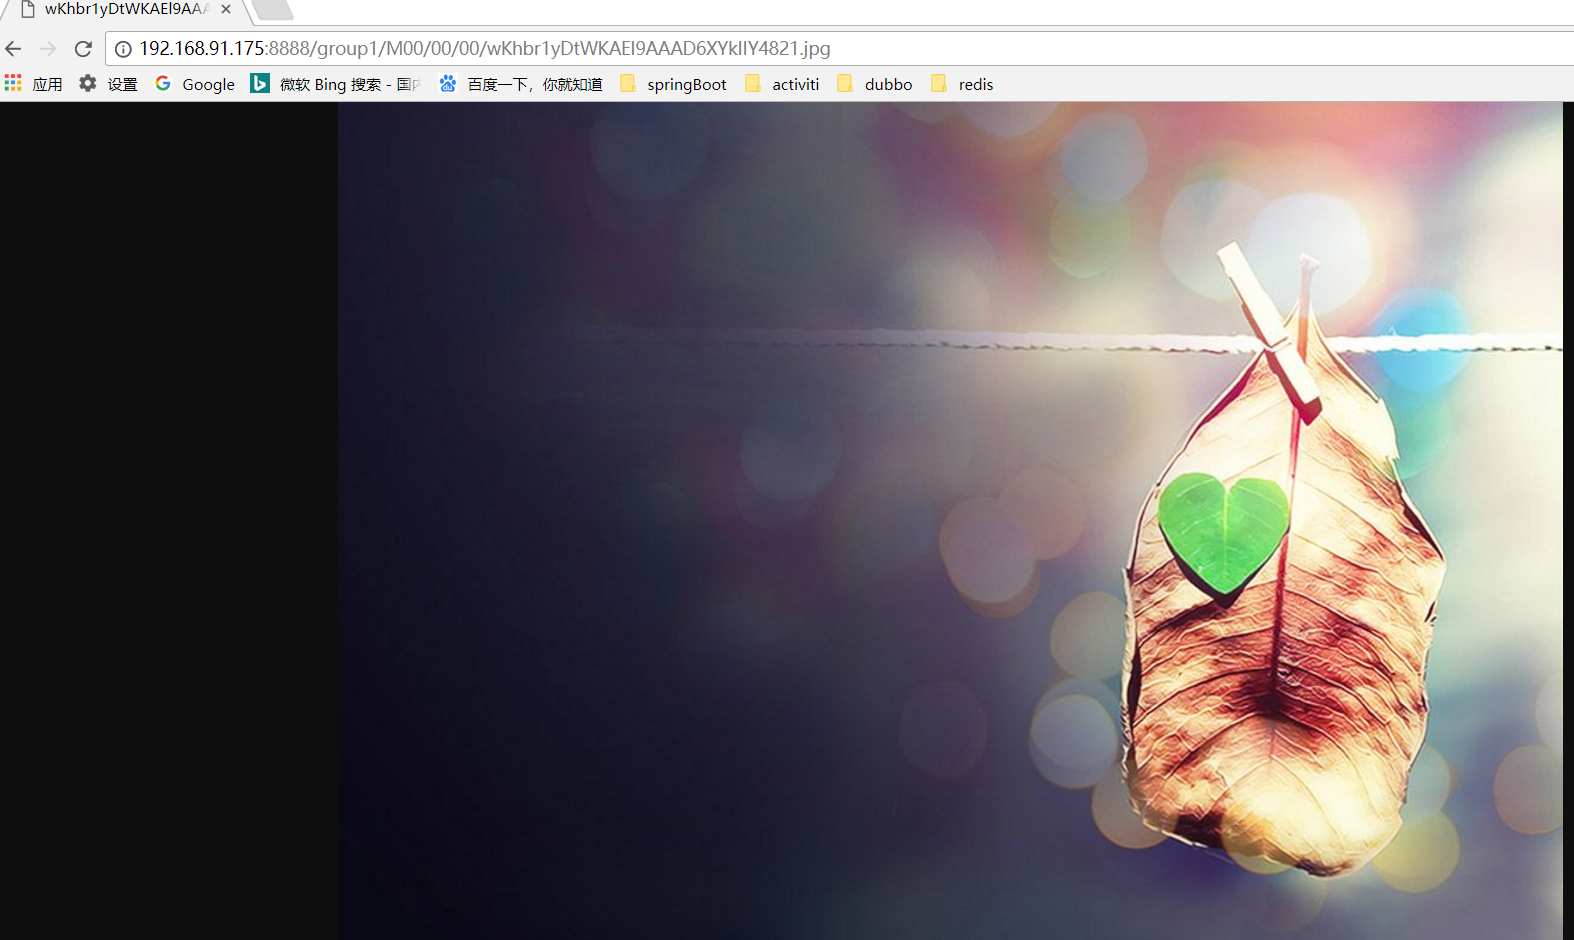
- 通过跟踪器的client上传文件,然后打开浏览器,可以通过nginx访问fastdfs的文件。例如:
文件上传:/usr/bin/fdfs_upload_file /etc/fdfs/client.conf /usr/local/software/2012031220134655.jpg
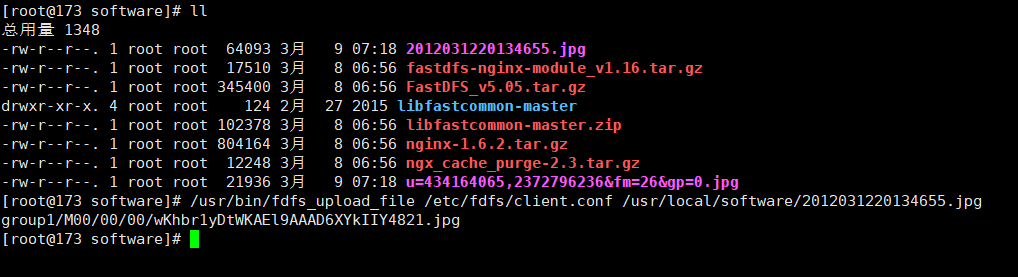
浏览器地址:http://192.168.91.175:8888/group1/M00/00/00/wKhbr1yDtWKAEl9AAAD6XYkIIY4821.jpg
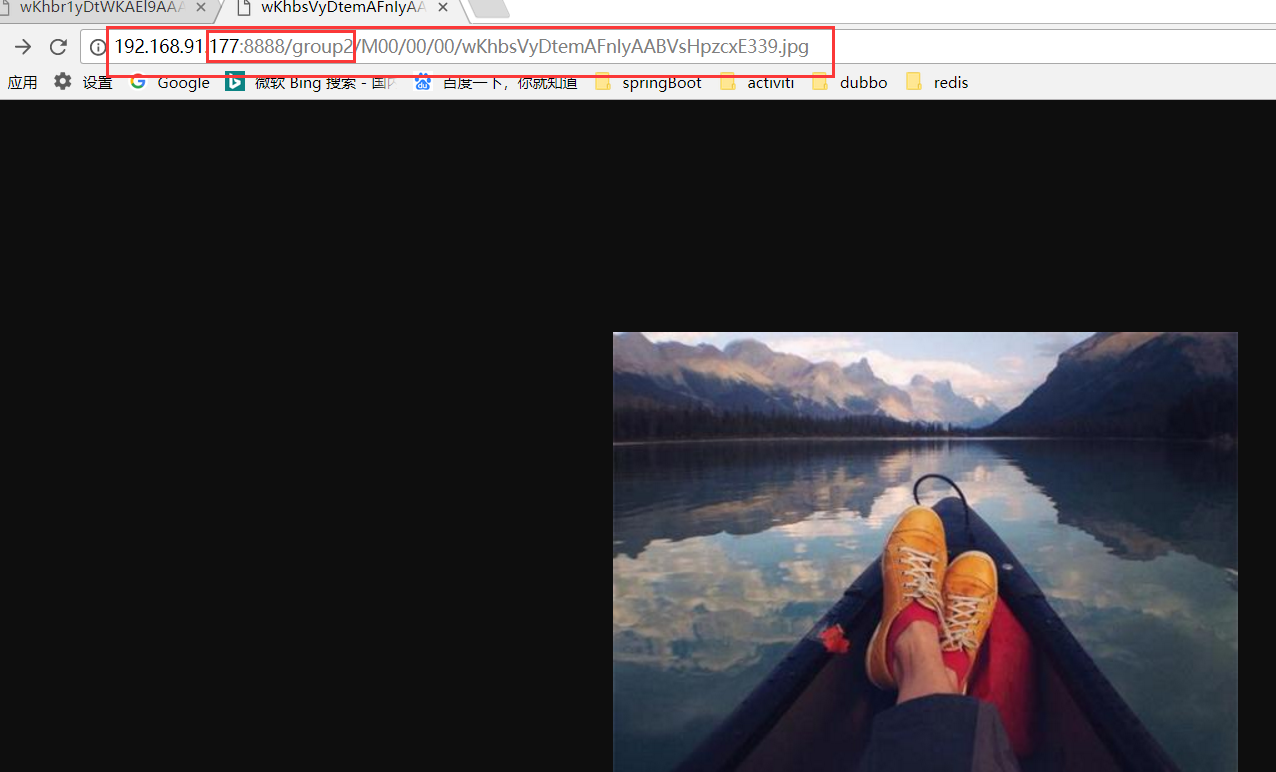
 可以继续上传,上传到group2了,这个时候换178 或者177进行访问
通过上诉步骤就基本完成fastdfs与nginx的整合了。
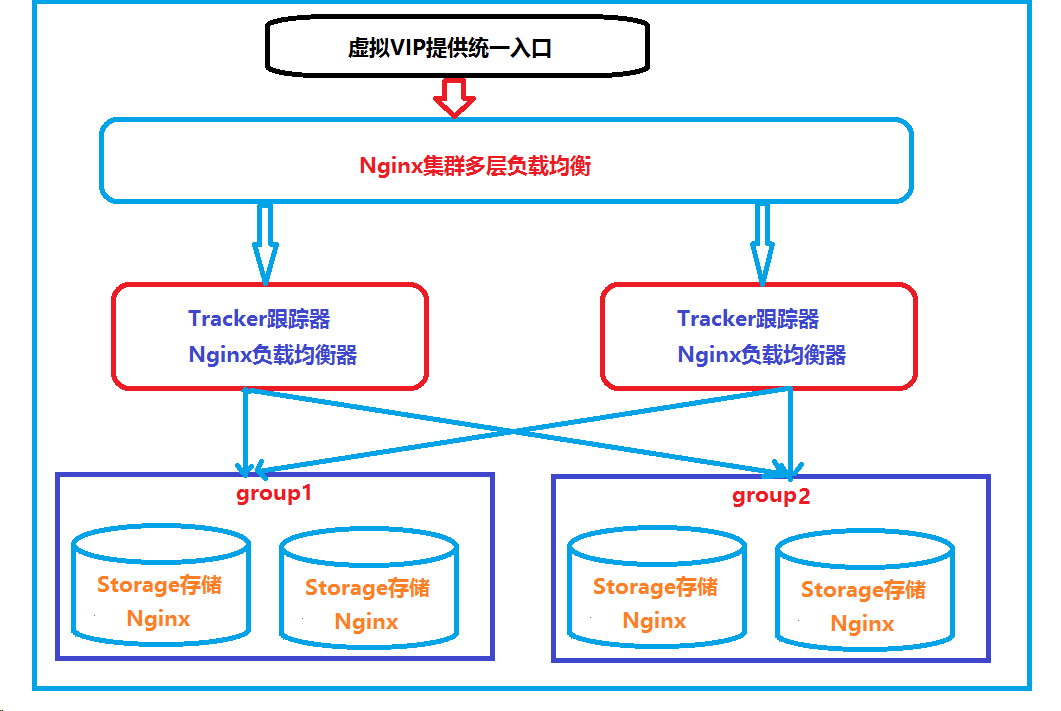
2.6 在跟踪器(tracker)上安装Nginx
缓存,负载均衡
在两个跟踪器(173 174)上安装Nginx,以提供反向代理服务,目的使用同一个IP地址对外提供服务。
现在只操作192.168.91.173 、192.168.91.174 这两个节点
1 上传Nginx缓存模块ngx_cache_purge-2.3.tar.gz (先去已经上传)
到 /usr/local/software 这个目录下解压 ngx_cache_purge-2.3.tar.gz 到 /usr/local/fast/
命令:cd /usr/local/software && ll
命令:tar -zxvf /usr/local/software/ngx_cache_purge-2.3.tar.gz -C /usr/local/fast/
2 下载需要的依赖文件
yum -y install pcre
yum -y install pcre-devel
yum -y install zlib
yum -y install zlib-devel
3 解压并安装nginx 加入ngx_cache_purge(加入缓存模块)
命令:cd /usr/local/software && ll
命令:tar -zxvf nginx-1.6.2.tar.gz -C /usr/local/
进入nginx目录命令:cd /usr/local/nginx-1.6.2/ && ll
加入模块命令: ./configure --add-module=/usr/local/fast/ngx_cache_purge-2.3
编译命令:make && make install
4 配置nginx 负载均和和缓存(173 174 节点配置)
命令:vim /usr/local/nginx/conf/nginx.conf 配置如下
#user  nobody;
worker_processes  1;

error_log  /usr/local/nginx/logs/error.log;
error_log  /usr/local/nginx/logs/error.log  notice;
error_log  /usr/local/nginx/logs/error.log  info;

pid        /usr/local/nginx/logs/nginx.pid;

events {
         worker_connections  1024;
        use epoll;
}

http {
    include       mime.types;
    default_type  application/octet-stream;

    log_format  main  '$remote_addr - $remote_user [$time_local] "$request" '
                      '$status $body_bytes_sent "$http_referer" '
                      '"$http_user_agent" "$http_x_forwarded_for"';

    access_log /usr/local/nginx/logs/access.log  main;

    sendfile        on;
    tcp_nopush      on;
    #tcp_nopush     on;

    #keepalive_timeout  0;
    keepalive_timeout  65;

    #gzip  on;
	#设置缓存
        server_names_hash_bucket_size   128;
        client_header_buffer_size       32k;
        large_client_header_buffers     4       32k;
        client_max_body_size    300m;

        proxy_redirect  off;
        proxy_set_header        Host    $http_host;
        proxy_set_header        X-Real-IP       $remote_addr;
        proxy_set_header        X-Forwarded-For $proxy_add_x_forwarded_for;
        proxy_connect_timeout   90;
        proxy_send_timeout      90;
        proxy_read_timeout      90;
        proxy_buffer_size       16k;
        proxy_buffers   4       64k;
        proxy_busy_buffers_size 128k;
        proxy_temp_file_write_size      128k;
	    # 设置缓存路径、存储方式、内存大小、磁盘空间大小、缓存时间等
        proxy_cache_path        /fastdfs/cache/nginx/proxy_cache levels=1:2
        keys_zone=http-cache:200m       max_size=1g     inactive=30d;
        proxy_temp_path /fastdfs/cache/nginx/proxy_cache/tmp;

        upstream fdfs_group1 {
                server 192.168.91.175:8888 weight=1  max_fails=2 fail_timeout=30s;
                server 192.168.91.176:8888 weight=1  max_fails=2 fail_timeout=30s;

        }

        upstream fdfs_group2 {
                server 192.168.91.177:8888 weight=1 max_fails=2 fail_timeout=30s;
                server 192.168.91.178:8888 weight=1 max_fails=2 fail_timeout=30s;

        }
    server {

        listen      8000;
        server_name  localhost;

        #charset koi8-r;

       access_log  /usr/local/nginx/logs/host.access.log  main;

       location / {
           root   html;
           index  index.html index.htm;
       }
		#group2的负载均衡配置
        location /group1/M00 {
                proxy_next_upstream http_502 http_504 error timeout invalid_header;
                proxy_cache http-cache;
                proxy_cache_valid 200 304 12h;
                proxy_cache_key $uri$is_args$args;
				#group1的服务配置
                proxy_pass http://fdfs_group1;
                expires 30d;

        }

		#group2的负载均衡配置
        location /group2/M00 {
                proxy_next_upstream http_502 http_504 error timeout invalid_header;
                proxy_cache http-cache;
                proxy_cache_valid 200 304 12h;
                proxy_cache_key $uri$is_args$args;
                proxy_pass http://fdfs_group2;
                expires 30d;
        }

        location ~/purge(/.*) {
                allow 127.0.0.1;
                allow 192.168.91.0/24;
                deny all;
                proxy_cache_purge http-cache $1$is_args$args;

        }

        error_page   500 502 503 504  /50x.html;

        location = /50x.html {
            root   html;
        }

    }
}
5 创建缓存目录
命令: mkdir -p /fastdfs/cache/nginx/proxy_cache/tmp
命令: mkdir -p /fastdfs/cache/nginx/proxy_cache
6 检查防火墙,启动nginx (注意nginx端口为8000)
命令:/usr/local/nginx/sbin/nginx
命令:ps -el | grep nginx
7 上传文件,打开浏览器,测试文件下载,端口改为8000
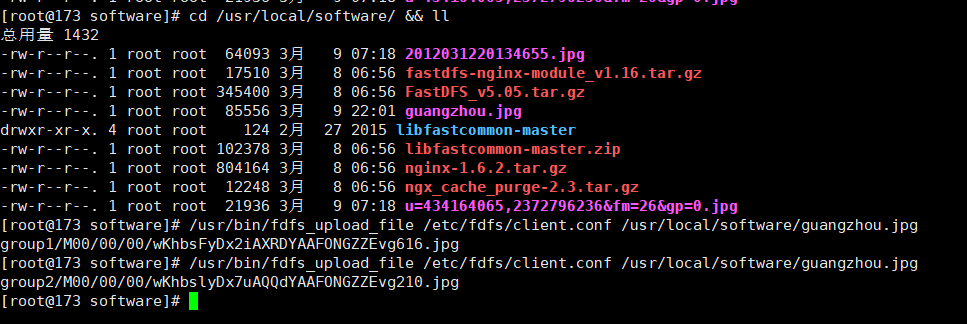
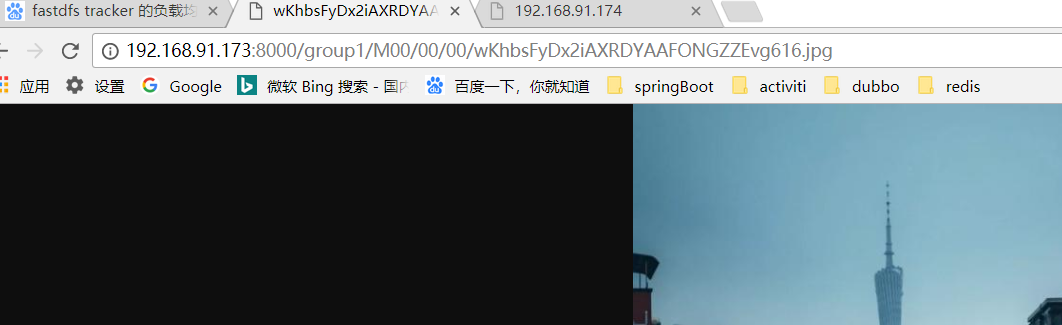
命令:cd /usr/local/software/ && ll
命令:/usr/bin/fdfs_upload_file /etc/fdfs/client.conf /usr/local/software/guangzhou.jpg
输入下面网址:都可以访问图片
http://192.168.91.173:8000/group1/M00/00/00/wKhbsFyDx2iAXRDYAAFONGZZEvg616.jpg
http://192.168.91.174:8000/group2/M00/00/00/wKhbslyDx7uAQQdYAAFONGZZEvg210.jpg
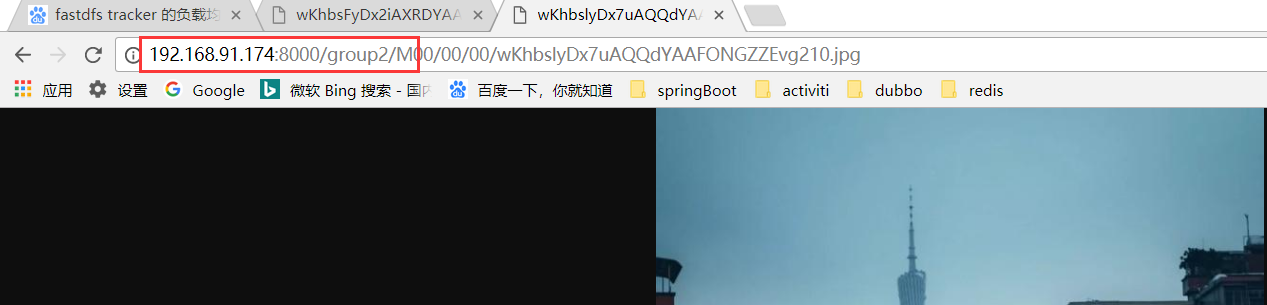
使用nginx 做 tracker的反向代理已经完成
2.7 安装keepalived,虚拟一个VIP ,对两个跟踪器做高可用配置
需要开启 nginx+keepalived实现高可用节点。对两台跟踪器的nginx节点,再次做一个负载均衡,从而实现分布式高可用文件系统。 修改两个节点的nginx.conf配置文件。
后续补充