本机所讲内容
1.flume多节点配置
2.实战_apache_hadoop_实时日志收集
flume多节点配置
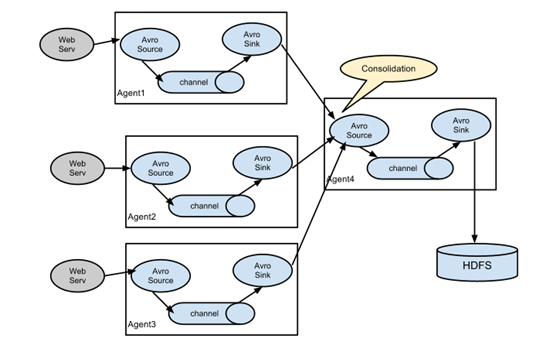
实验环境
10.10.21.58 cMaster    #从cslave1和cslave2接手数据
10.10.20.193 cslave1    #发送数据给cMaster
10.10.20.16 cslave2     #发送数据给cMaster
1.解压flume
tar xf apache-flume-1.8.0-bin.tar.gz -C /data/
mv apache-flume-1.8.0-bin flume-1.8.0
2.cMaster创建conf/pull.conf 配置文件
a1.sources= r1
a1.sinks= k1
a1.channels= c1

#Describe/configure the source
a1.sources.r1.type= avro      #source为avro类型
a1.sources.r1.channels= c1
a1.sources.r1.bind= cMaster    #绑定自己的主机名
a1.sources.r1.port= 44444

#Describe the sink
a1.sinks.k1.type= logger      #sink为logger类型
a1.sinks.k1.channel = c1

#Use a channel which buffers events in memory
a1.channels.c1.type= memory
a1.channels.c1.keep-alive= 10
a1.channels.c1.capacity= 100000
a1.channels.c1.transactionCapacity= 100000
3.cslave1和cslave2创建配置文件(conf/push.conf)
cslave1的配置文件
#me the components on this agent
a2.sources= r1
a2.sinks= k1
a2.channels= c1

#Describe/configure the source
a2.sources.r1.type= spooldir
a2.sources.r1.spoolDir= /tmp/hadoop/flume/logs
a2.sources.r1.channels= c1

#Use a channel which buffers events in memory
a2.channels.c1.type= memory
a2.channels.c1.keep-alive= 10
a2.channels.c1.capacity= 100000
a2.channels.c1.transactionCapacity= 100000

#Describe/configure the source
a2.sinks.k1.type= avro
a2.sinks.k1.channel= c1
a2.sinks.k1.hostname= cMaster
a2.sinks.k1.port= 44444
cslave2的配置文件
#me the components on this agent
a3.sources= r1
a3.sinks= k1
a3.channels= c1

#Describe/configure the source
a3.sources.r1.type= spooldir
a3.sources.r1.spoolDir= /tmp/hadoop/flume/logs    #源文件同步的目录
a3.sources.r1.channels= c1

#Use a channel which buffers events in memory
a3.channels.c1.type= memory
a3.channels.c1.keep-alive= 10
a3.channels.c1.capacity= 100000
a3.channels.c1.transactionCapacity= 100000

#Describe/configure the source
a3.sinks.k1.type= avro
a3.sinks.k1.channel= c1
a3.sinks.k1.hostname= cMaster      #sink到cMaster
a3.sinks.k1.port= 44444
4.创建目录(两个cslave节点)
mkdir /tmp/hadoop/flume/logs -p #源文件同步的目录
5.启动(需要先启动cMaster节点,然后在启动两个cslave节点)
cMaster:
./bin/flume-ng agent --conf conf --conf-file conf/pull.conf --name a1 -Dflume.root.logger=INFO,console #注意name是a1
cslave1:
./bin/flume-ng agent --conf conf --conf-file conf/push.conf --name a2 -Dflume.root.logger=INFO,console #name是a2
cslave2:
./bin/flume-ng agent --conf conf --conf-file conf/push.conf --name a3 -Dflume.root.logger=INFO,console #name是a3
6.测试:分别在cslave1和cslave2的/tmp/hadoop/flume/logs目录下面创建*.log文件

实战_apache_hadoop_实时日志收集