由于要进行渗透测试,所以这两天就在搭LAMP的环境(过程及其痛苦)
这里分享一些我遇到的问题。
首先介绍一下我的使用环境 VM虚拟机,ubuntu 与主机NAT连接
由于之前一直使用的是kali(默认root权限),而ubuntu 默认并不是root权限,所以使用命令行时 请在命令行前加上 sudo
安装Apache2
首先,我们需要安装Apache 2 Web服务器。
sudo apt-get install apache2 -y
之后验证apaqch2是否安装成功
ifconfig
查看主机ip

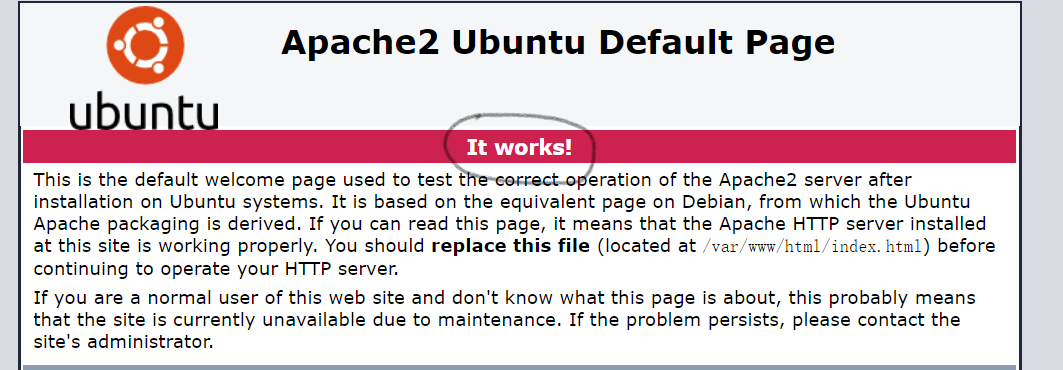
打开浏览器 输入上图中红线所标的IP地址
如果出现it work 说明安装成功
安装MySQL
运行以下命令安装MySQL。
sudo apt-get install mysql-server -y
然后我发现安装过程没有让我设置mysql的root账户密码
当我使用sudo mysql -u root -p的时候要我输入密码

真是一脸懵逼 空密码 123456 全试了一遍没用
解决办法:利用Ubuntu系统用户登录mysql,并修改root密码。
打开一个文件
sudo vim /etc/mysql/debian.cnf
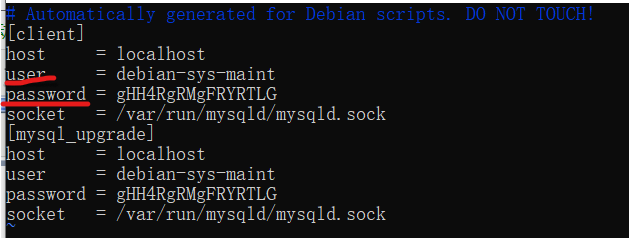
然后利用这个用户和密码登录mysql
sudo mysql -u debian-sys-maint -p
输入密码
成功进入mysql
输入 update mysql.user set authentication_string=password('password') where user='root'and Host = 'localhost';
( 括号中的passwoed就是你要设置的密码 不要丢了;号)
如果显示:
Query OK, 1 row affected, 1 warning (0.00 sec) Rows matched: 1 Changed: 1 Warnings: 1说明修改成功
运行 sudo service mysql restart 重启mysql服务
运行此命令以保护MySQL。
sudo mysql_secure_installation
这个脚本会问你几个问题。
第一个问题将要求您安装验证密码插件。
VALIDATE PASSWORD PLUGIN can be used to test passwords
and improve security. It checks the strength of password
and allows the users to set only those passwords which are
secure enough. Would you like to setup VALIDATE PASSWORD plugin?
Press y|Y for Yes, any other key for No: N
我通常会回答“N”这个问题,因为我知道我的密码是安全的。 如果您愿意,可以回答“Y”。
接下来,该脚本将要求您为根MySQL用户设置新密码。
New password:
Re-enter new password:
该脚本现在将要求您删除匿名用户。 回答“Y.”
By default, a MySQL installation has an anonymous user,
allowing anyone to log into MySQL without having to have
a user account created for them. This is intended only for
testing, and to make the installation go a bit smoother.
You should remove them before moving into a production
environment.
Remove anonymous users? (Press y|Y for Yes, any other key for No) : Y
接下来,它会询问您是否要远程禁止root登录。 我们应该总是回答“Y”。
Normally, root should only be allowed to connect from
'localhost'. This ensures that someone cannot guess at
the root password from the network.
Disallow root login remotely? (Press y|Y for Yes, any other key for No) : Y
它会要求您删除测试数据库并访问它。 回答“Y.”
By default, MySQL comes with a database named 'test' that
anyone can access. This is also intended only for testing,
and should be removed before moving into a production
environment.
Remove test database and access to it? (Press y|Y for Yes, any other key for No) : Y
接下来,它会要求您重新加载权限表。 回答“Y.”
Reloading the privilege tables will ensure that all changes
made so far will take effect immediately.
Reload privilege tables now? (Press y|Y for Yes, any other key for No) : Y
最后,脚本完成。
安装phpmyadmin(数据库图形管理界面)
sudo apt-get install phpmyadmin
安装过程中选择apache2。
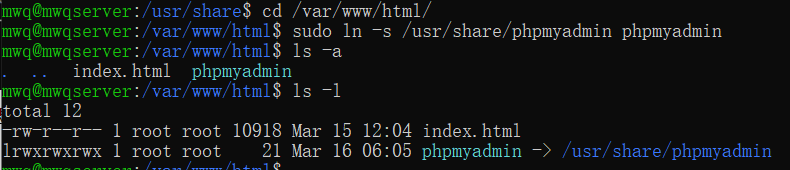
接着,安装完成后,去服务器目录下检查,发现并没有phpmyadmin,这样的文件或者文件夹

这是因为系统在安装软件时,默认将软件安装在了/usr/share/下,所以你的phpmyadmin在/usr/share下可以找到

所以,咱们必须建立一个软连接,使得第三步中显示的文件和/var/www/html下的某个文档链接起来,回到/var/www/html,输入一下代码
sudo ln -s /usr/share/phpmyadmin phpmyadmin
执行效果如图所示
之后打开浏览器输入
主机IP/phpmyadmin

用户名 root
密码 之前设置的
发现我登录不上phpmyadmin
(要死了)
造成问题的原因:
在运行MySQL 5.7(及更高版本)的Ubuntu系统中,根 MySQL用户auth_socket默认使用插件进行身份验证,而不是使用密码进行身
份验证。这在许多情况下允许更高的安全性和可用性,但是当您需要允许外部程序(例如phpMyAdmin)访问用户时,这也会使事情变
得复杂。
解决方法:
为了使用密码以root用户身份连接到MySQL ,您需要将其身份验证方法从中切换auth_socket为mysql_native_password
步骤:
sudo mysql
使用以下命令检查每个MySQL用户帐户使用的身份验证方法:
mysql> select user,authentication_string,plugin,host from mysql.user;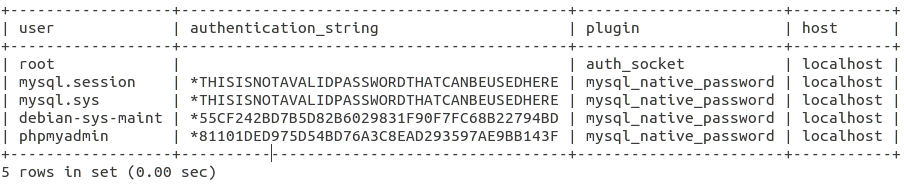
你可以看到root用户确实使用auth_socket插件进行了身份验证。要配置root帐户以使用密码进行身份验证,请运行以下ALTER USER命令。请务必更改password为您选择的强密码:
mysql> ALTER USER ‘root’@’localhost’ IDENTIFIED WITH mysql_native_password BY ‘password’;
如果你修改密码是出现报错:
ERROR 1819 (HY000): Your password does not satisfy the current policy requirements
你需要修改密码验证的规则等级:
mysql> show variables like ‘validate_password%’;

修改密码验证等级:
mysql> set GLOBAL validate_password_policy=LOW;
Query OK, 0 rows affected (0.00 sec)
修改root的密码:
mysql> ALTER USER ‘root’@’localhost’ IDENTIFIED WITH mysql_native_password BY ‘ilovexinji.com’;
Query OK, 0 rows affected (0.00 sec)
然后你查看root账号的身份验证方法:
mysql> select user,authentication_string,plugin,host from mysql.user;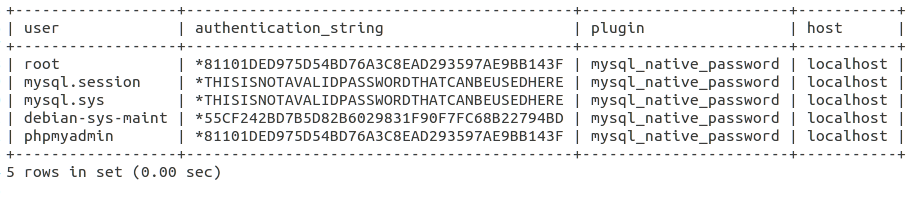
你已经修改密码成功了,重启mysql
退出mysql终端
mysql>\q
重启mysql
sudo service mysql restart
然后你就可以使用root账号登录PHPMyadmin了。
安装PHP
在Ubuntu 18.04上安装LAMP的最后一步是安装PHP超文本预处理器。
PHP添加了支持动态网页的服务器端网页处理。
运行以下命令以安装PHP。
apt install php -y
接下来,我们需要告诉Apache首先提供PHP页面。
打开/etc/apache2/mods-enabled/dir.conf文件并将添加index.php。
<IfModule mod_dir.c>
DirectoryIndex index.php index.html index.cgi index.pl index.xhtml index.htm
</IfModule>
最后,我们需要重新启动Apache Web服务器。
sudo service apache2 restart
我们应该确保PHP工作正常。
在/var/www/html中创建一个名为info.php的新文件。
cd /var/www/html
sudo vi info.php
使用以下内容调用info.php:
<?php
phpinfo();
?>
保存并退出该文件。
现在浏览到以下URL:
http://主机ip/info.php
您应该看到PHP信息页面。
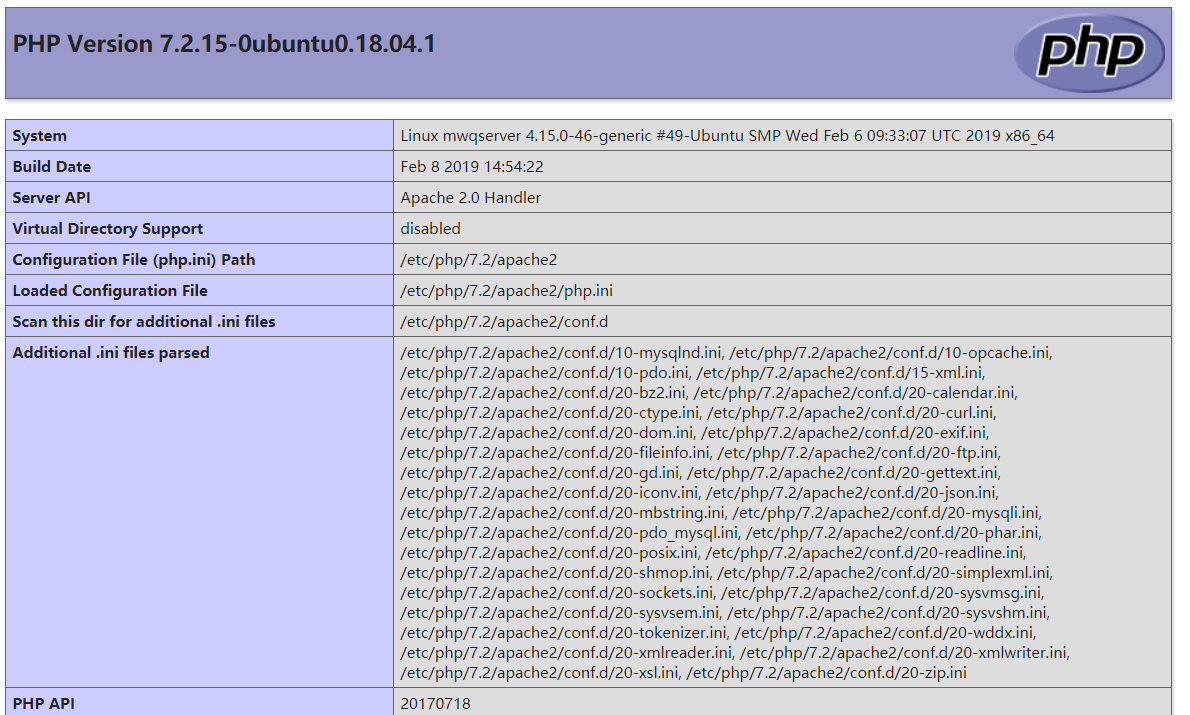
这样说明php也配置成功了
验证PHP正常工作后删除该文件。
sudo rm /var/www/html/info.php
附上LAMP的使用手册
https://oneinstack.com/docs/lampstack-image-guide/