今天在公司写这个东东,而且今天是在公司最后一天。还有点小小的伤感。
一:概述
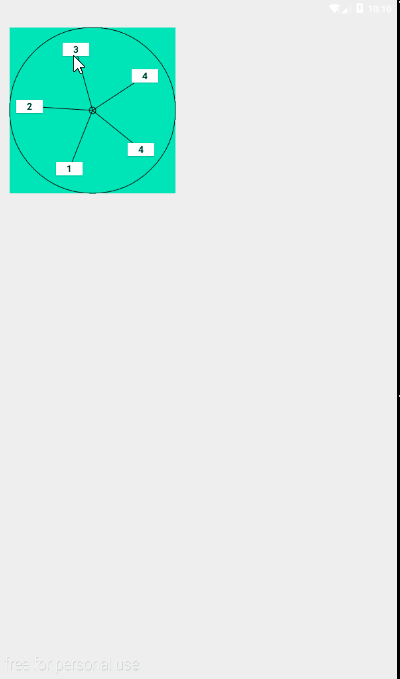
做了个圆形菜单,
圆形菜单:将控件按下面的方式排列。如果有四个子控件,那么两个控件之间就是90度,如果有5个子控件,那么两个控件和圆心之间的夹角是72度。
自定义Viewgroup重写onMeasure,和onLayout两个方法,因为有需要我也把ondraw重写了。
效果:
二:源码解析
首先我们看看onMeasure方法
 @Override
    protected void onMeasure(int widthMeasureSpec, int heightMeasureSpec) {
        super.onMeasure(widthMeasureSpec, heightMeasureSpec);

        int heightSize = MeasureSpec.getSize(heightMeasureSpec);
        int heightMode = MeasureSpec.getMode(heightMeasureSpec);
        int widthSize = MeasureSpec.getSize(widthMeasureSpec);
        int widthMode = MeasureSpec.getMode(widthMeasureSpec);

        int measureWidth, measureHeight;
        if (widthMode == MeasureSpec.EXACTLY && heightMode == MeasureSpec.EXACTLY) {
            measureWidth = widthSize;
            measureHeight = heightSize;
        } else {
            measureHeight = dip2px(getContext(), defaultSize);
            measureWidth = dip2px(getContext(), defaultSize);

            if (widthMode == MeasureSpec.EXACTLY) {
                measureWidth = widthSize;
            }
            if (heightMode == MeasureSpec.EXACTLY) {
                measureHeight = dip2px(getContext(), defaultSize);
            }
        }

        measureChildren(widthMeasureSpec, heightMeasureSpec);

        int size = Math.min(measureWidth, measureHeight);
        setRadius(size);
        setMeasuredDimension(size, size);
    }
如果这个菜单布局的属性是Match_parent,就 int size = Math.min(measureWidth, measureHeight);拿出较小的然后做成一个正方形的布局,因为布局中间是个圆,做成长方形没有必要。然后设置这个布局的长宽的时候都是这个size就是个正方形了。
如果属性是wrap_content就需要自适应了。默认的我们将长宽设置成250dp就行了。
我们得到了布局的尺寸了后,我们还要设置下中间圆的半径。
减去的30dp是为了让边上的子控件不跑出去。
private void setRadius(int size) {
   radius = (size / 2) - dip2px(getContext(), 30);
}
测量出了尺寸后就需要放子控件的位置。onLayout()方法需要我们重写。
  @Override
    protected void onLayout(boolean changed, int l, int t, int r, int b) {
        int width = getMeasuredWidth(), height = getMeasuredHeight();
        int size = Math.min(width, height);
        circleX = size / 2;
        circleY = size / 2;
        int childCount = getChildCount();
        double angle = 2 * Math.PI / childCount;

        for (int i = 0; i < childCount; ++i) {
            int childX = 0, childY = 0;
            //将子控件平均分布
            View child = getChildAt(i);
            double tempAngle = i * angle + baseAngle;
            double tempX = Math.sin(tempAngle) * radius;
            double tempY = Math.cos(tempAngle) * radius;
            // 判断在哪个象限 //然后调整控件的位置
            double angleWhere = tempAngle % (2 * Math.PI);
            if (angleWhere < Math.PI / 2 && angleWhere >= 0) {
                //第一象限 x + , y -
                childX = (int) (circleX + Math.abs(tempX));
                childY = (int) (circleY - Math.abs(tempY));
            } else if (angleWhere >= Math.PI / 2 && angleWhere < Math.PI) {
                //第二象限 x + , y +
                childX = (int) (circleX + Math.abs(tempX));
                childY = (int) (circleY + Math.abs(tempY));
            } else if (angleWhere >= Math.PI && angleWhere < (Math.PI * 3 / 2)) {
                //第三象限 x - , y +
                childX = (int) (circleX - Math.abs(tempX));
                childY = (int) (circleY + Math.abs(tempY));
            } else if (angleWhere >= (Math.PI * 3 / 2) && angleWhere < (Math.PI * 2)) {
                //第四象限 x - , y -
                childX = (int) (circleX - Math.abs(tempX));
                childY = (int) (circleY - Math.abs(tempY));
            } else {
            }
            //细调控件位置,将位置指向控件中心
            childX -= child.getMeasuredWidth() / 2;
            childY -= child.getMeasuredHeight() / 2;
            child.layout(childX, childY, childX + child.getMeasuredWidth(), childY + child.getMeasuredHeight());
        }
    }
因为放置控件的位置无非就是求出他的x,y坐标。
两个控件之间相差的夹角是 double angle = 2 * Math.PI / childCount;
然后还加了个偏移量baseAngle只要这个baseAngle变化了,那么这个圆形菜单就会转动。
然后根据这个
double tempAngle = i * angle + baseAngle;
计算出数学坐标系上的x,y
double tempX = Math.sin(tempAngle) * radius;
double tempY = Math.cos(tempAngle) * radius;
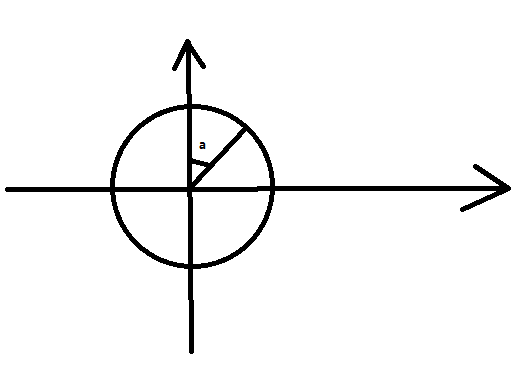
然后再转到我手机屏幕上的坐标系。这个圆形菜单的“坐标原点”就是圆心(circleX, circleY;),也就是这个布局的中心。需要将计算出数学上的x,y转换到这个坐标系中。
 if (angleWhere < Math.PI / 2 && angleWhere >= 0) {
     //第一象限 x + , y -
     childX = (int) (circleX + Math.abs(tempX));
     childY = (int) (circleY - Math.abs(tempY));
} else if (angleWhere >= Math.PI / 2 && angleWhere < Math.PI) {
     //第二象限 x + , y +
     childX = (int) (circleX + Math.abs(tempX));
     childY = (int) (circleY + Math.abs(tempY));
} else if (angleWhere >= Math.PI && angleWhere < (Math.PI * 3 / 2)) {
     //第三象限 x - , y +
     childX = (int) (circleX - Math.abs(tempX));
     childY = (int) (circleY + Math.abs(tempY));
} else if (angleWhere >= (Math.PI * 3 / 2) && angleWhere < (Math.PI * 2)) {
    //第四象限 x - , y -
    childX = (int) (circleX - Math.abs(tempX));
    childY = (int) (circleY - Math.abs(tempY));
}

//细调控件位置,将位置指向控件中心
childX -= child.getMeasuredWidth() / 2;
childY -= child.getMeasuredHeight() / 2;
child.layout(childX, childY, childX + child.getMeasuredWidth(), childY + child.getMeasuredHeight());
最后的细调控件的位置,是因为我们设置控件位置的时候都是以左上角的坐标为准。但是我想要的是以控件的中心为准,所以对childx,childy做了一些调整。
然后我们因为画了中心的原点,还画几个从中心出发连接子控件的连接线。所以我重写了onDraw方法。代码就不贴了。后面会留有github地址。
然后我们来看看我们处理的滑动事件。
我重写了ontouchevent方法。
先说说原理吧。
就是利用连续两次move事件的坐标和圆心之间形成的夹角差就我们滑动的角度,然后将角度的变化告诉baseAngle这个属性就行。
画图示意下:
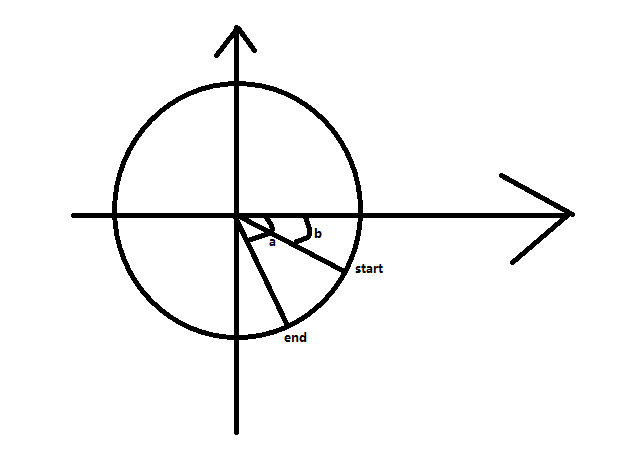
这个是第四象限中开始时和x轴的夹角是b,然后第二次事件中和x轴的夹角是a,那么a-b就是我们这两次事件中我们移动的夹角。
看看代码:
@Override
public boolean onTouchEvent(MotionEvent event) {

        switch (event.getAction()) {
            case MotionEvent.ACTION_DOWN:
                dX = event.getX();
                dY = event.getY();
                lastX = event.getX();
                lastY = event.getY();
                break;
            case MotionEvent.ACTION_MOVE:
                mX = event.getX();
                mY = event.getY();
                double start = getAngle(lastX, lastY);
                double end = getAngle(mX, mY);
                angle = end - start;
                quadrant = judgeQuadrant(mX, mY);
                if (quadrant == 1 || quadrant == 3) {
                    baseAngle -= angle;
                } else {
                    baseAngle += angle;
                }

                lastY = mY;
                lastX = mX;

                break;
            case MotionEvent.ACTION_UP:

                break;

        }
        requestLayout();
        return true;
}
其中需要判断象限judgeQuadrant(mX, mY);:
注意屏幕上的x,y坐标,并不是数学坐标系上的x,y坐标
屏幕上的坐标越往下y值越大,而数学上越往上y值越大。所以需要做以下转换。
 //判断在哪个象限
    private int judgeQuadrant(float x, float y) {
        x -= circleX;
        y -= circleY;
        if (y >= 0) {
            //是在数学坐标系的3,4象限范围 注意屏幕上的x,y不是数学上的x,y
            return x >= 0 ? 4 : 3;
        } else {
            return x >= 0 ? 1 : 2;
        }
    }
好了,写完了
这篇文章的手势滑动部分有参考
源码下载地址:
加个好友共同学习(不是公众号):

因为小弟水平有限,如果有写的有问题,希望指出。