Mybatis源码解析之核心类分析
Mybatis源码解析之初始化分析
Mybatis源码解析之执行流程解析
一、数据库连接的获取
Mybatis作为ORM框架,在上一篇博客中可以了解到在sql执行流程中会在BaseExecutor#getConnection(Log)中去获取数据库连接。
1. BaseExecutor#getConnection(Log)
protected Connection getConnection(Log statementLog) throws SQLException {
  Connection connection = transaction.getConnection();
  if (statementLog.isDebugEnabled()) {
    return ConnectionLogger.newInstance(connection, statementLog, queryStack);
  } else {
    return connection;
  }
}
2. Transaction#getConnection()
mybatis提供了两个类JdbcTransaction和ManagedTransaction实现了Transaction接口。
(1) JdbcTransaction#getConnection()
public Connection getConnection() throws SQLException {
 if (connection == null) {
    openConnection();
  }
  return connection;
}
protected void openConnection() throws SQLException {
  if (log.isDebugEnabled()) {
    log.debug("Opening JDBC Connection");
  }
  connection = dataSource.getConnection();
  if (level != null) {
    connection.setTransactionIsolation(level.getLevel());
  }
  setDesiredAutoCommit(autoCommmit);
}
(2)ManagedTransaction#getConnection()
public Connection getConnection() throws SQLException {
 if (this.connection == null) {
    openConnection();
  }
  return this.connection;
}
protected void openConnection() throws SQLException {
  if (log.isDebugEnabled()) {
    log.debug("Opening JDBC Connection");
  }
  this.connection = this.dataSource.getConnection();
  if (this.level != null) {
    this.connection.setTransactionIsolation(this.level.getLevel());
  }
}
可以看到在mybatis中最终是通过dataSource#getConnection()来获得数据库连接的。
二、DataSourceFactory
1. dataSource配置
数据源DataSource通过配置文件xml中的DataSource进行配置,如:
<environments default="test">
  	<environment id="test">
	  <transactionManager type="JDBC"></transactionManager>
	  <dataSource type="UNPOOLED">
        <property name="driver" value="${driver-class-name}"/>
        <property name="url" value="${url}"/>
        <property name="username" value="${username}"/>
        <property name="password" value="${password}"/>
	  </dataSource>
  	</environment>
  </environments>
表示mybatis使用的是UNPOOLED类型的数据源,并通过property指定驱动类、数据库url、用户名和密码。
mybatis支持3种数据源:UNPOOLED,POOLED,JNDI
参考自http://www.mybatis.org/mybatis-3/zh/configuration.html#environments
有三种内建的数据源类型(也就是 type=”[UNPOOLED|POOLED|JNDI]”):

UNPOOLED– 这个数据源的实现只是每次被请求时打开和关闭连接。虽然有点慢,但对于在数据库连接可用性方面没有太高要求的简单应用程序来说,是一个很好的选择。 不同的数据库在性能方面的表现也是不一样的,对于某些数据库来说,使用连接池并不重要,这个配置就很适合这种情形。UNPOOLED 类型的数据源仅仅需要配置以下 5 种属性:
driver – 这是 JDBC 驱动的 Java 类的完全限定名(并不是 JDBC 驱动中可能包含的数据源类)。
url – 这是数据库的 JDBC URL 地址。
username – 登录数据库的用户名。
password – 登录数据库的密码。
defaultTransactionIsolationLevel – 默认的连接事务隔离级别。
作为可选项,你也可以传递属性给数据库驱动。要这样做,属性的前缀为“driver.”,例如:
driver.encoding=UTF8
这将通过 DriverManager.getConnection(url,driverProperties) 方法传递值为 UTF8 的 encoding 属性给数据库驱动。

POOLED– 这种数据源的实现利用“池”的概念将 JDBC 连接对象组织起来,避免了创建新的连接实例时所必需的初始化和认证时间。 这是一种使得并发 Web 应用快速响应请求的流行处理方式。
除了上述提到 UNPOOLED 下的属性外,还有更多属性用来配置 POOLED 的数据源:
poolMaximumActiveConnections – 在任意时间可以存在的活动(也就是正在使用)连接数量,默认值:10
poolMaximumIdleConnections – 任意时间可能存在的空闲连接数。
poolMaximumCheckoutTime – 在被强制返回之前,池中连接被检出(checked out)时间,默认值:20000 毫秒(即 20 秒)
poolTimeToWait – 这是一个底层设置,如果获取连接花费了相当长的时间,连接池会打印状态日志并重新尝试获取一个连接(避免在误配置的情况下一直安静的失败),默认值:20000 毫秒(即 20 秒)。
poolMaximumLocalBadConnectionTolerance – 这是一个关于坏连接容忍度的底层设置, 作用于每一个尝试从缓存池获取连接的线程. 如果这个线程获取到的是一个坏的连接,那么这个数据源允许这个线程尝试重新获取一个新的连接,但是这个重新尝试的次数不应该超过 poolMaximumIdleConnections 与 poolMaximumLocalBadConnectionTolerance 之和。 默认值:3 (新增于 3.4.5)
poolPingQuery – 发送到数据库的侦测查询,用来检验连接是否正常工作并准备接受请求。默认是“NO PING QUERY SET”,这会导致多数数据库驱动失败时带有一个恰当的错误消息。
poolPingEnabled – 是否启用侦测查询。若开启,需要设置 poolPingQuery 属性为一个可执行的 SQL 语句(最好是一个速度非常快的 SQL 语句),默认值:false。
poolPingConnectionsNotUsedFor – 配置 poolPingQuery 的频率。可以被设置为和数据库连接超时时间一样,来避免不必要的侦测,默认值:0(即所有连接每一时刻都被侦测 — 当然仅当 poolPingEnabled 为 true 时适用)。

JNDI – 这个数据源的实现是为了能在如 EJB 或应用服务器这类容器中使用,容器可以集中或在外部配置数据源,然后放置一个 JNDI 上下文的引用。这种数据源配置只需要两个属性:
initial_context – 这个属性用来在 InitialContext 中寻找上下文(即,initialContext.lookup(initial_context))。这是个可选属性,如果忽略,那么 data_source 属性将会直接从 InitialContext 中寻找。
data_source – 这是引用数据源实例位置的上下文的路径。提供了 initial_context 配置时会在其返回的上下文中进行查找,没有提供时则直接在 InitialContext 中查找。
2. dataSource节点解析
根据前面几篇博客的解析可以知道,mybatis通过XMLConfigBuilder#parse()对配置文件进行解析,具体到dataSource节点,则是由XMLConfigBuilder#dataSourceElement(XNode)进行解析。
private DataSourceFactory dataSourceElement(XNode context) throws Exception {
  if (context != null) {
    String type = context.getStringAttribute("type");
    Properties props = context.getChildrenAsProperties();
    DataSourceFactory factory = (DataSourceFactory) resolveClass(type).newInstance();
    factory.setProperties(props);
    return factory;
  }
  throw new BuilderException("Environment declaration requires a DataSourceFactory.");
}
可以看到根据type属性找到对应的DataSourceFactory类,调用默认的无参构造器生成DataSourceFactory对象。
三、DataSource
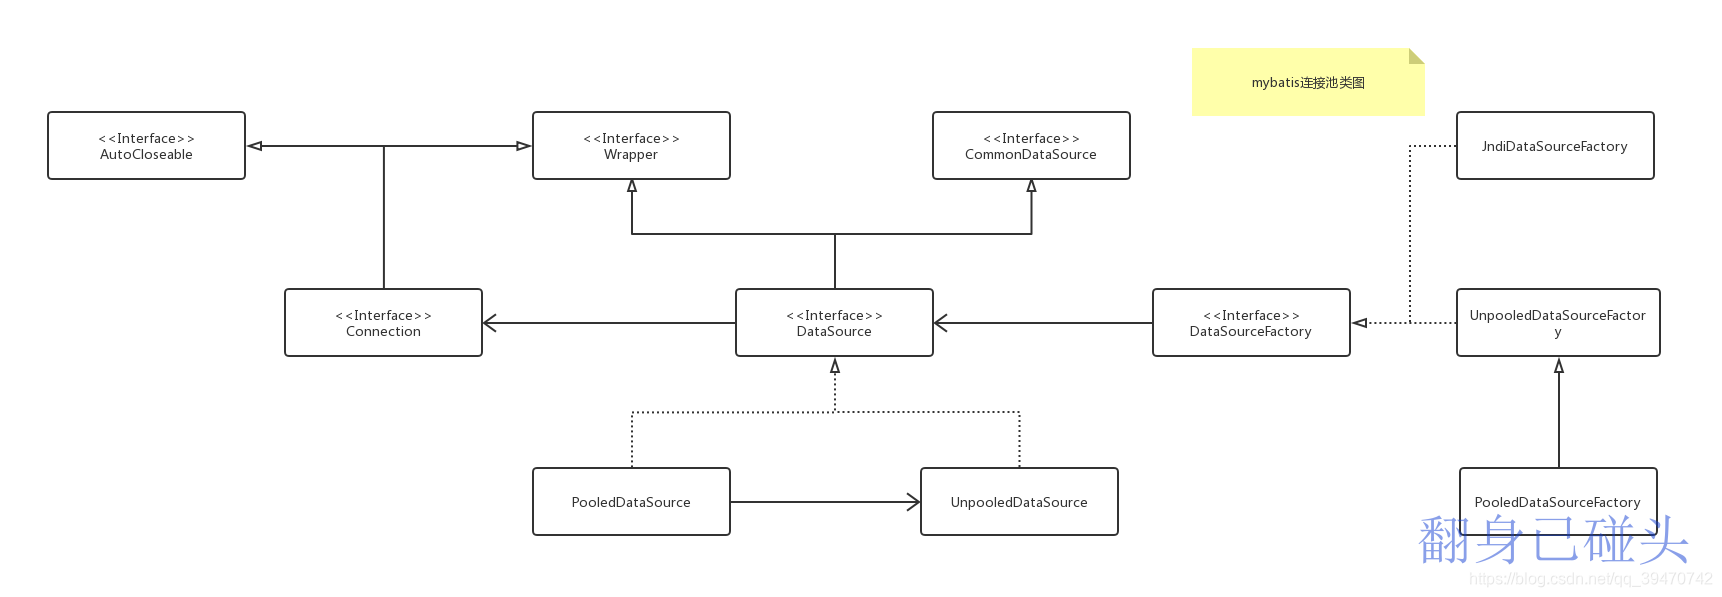
数据源DataSource虽然只有两个实现类,但是有3种类型POOLED, UNPOOLED, JNDI,这一点可以从DataSource的工厂类DataSourceFactory的3个实现类可以看出来。
1. JNDI
//JndiDataSourceFactory
@Override
public void setProperties(Properties properties) {
  try {
    InitialContext initCtx;
    Properties env = getEnvProperties(properties);
    if (env == null) {
      initCtx = new InitialContext();
    } else {
      initCtx = new InitialContext(env);
    }

    if (properties.containsKey(INITIAL_CONTEXT)
        && properties.containsKey(DATA_SOURCE)) {
      Context ctx = (Context) initCtx.lookup(properties.getProperty(INITIAL_CONTEXT));
      dataSource = (DataSource) ctx.lookup(properties.getProperty(DATA_SOURCE));
    } else if (properties.containsKey(DATA_SOURCE)) {
      dataSource = (DataSource) initCtx.lookup(properties.getProperty(DATA_SOURCE));
    }

  } catch (NamingException e) {
    throw new DataSourceException("There was an error configuring JndiDataSourceTransactionPool. Cause: " + e, e);
  }
}
可以看到JndiDataSourceFactory通过JNDI上下文找到数据源。
2. UNPOOLED
UnpooledDataSourceFactory返回的DataSource类型是UnpooledDataSource。
private Connection doGetConnection(Properties properties) throws SQLException {
  //加载驱动
  initializeDriver();
  //建立Connection
  Connection connection = DriverManager.getConnection(url, properties);
  //配置Connection
  configureConnection(connection);
  return connection;
}

private synchronized void initializeDriver() throws SQLException {
 if (!registeredDrivers.containsKey(driver)) {
    Class<?> driverType;
    try {
      if (driverClassLoader != null) {
        driverType = Class.forName(driver, true, driverClassLoader);
      } else {
        driverType = Resources.classForName(driver);
      }
      // DriverManager requires the driver to be loaded via the system ClassLoader.
      // http://www.kfu.com/~nsayer/Java/dyn-jdbc.html
      Driver driverInstance = (Driver)driverType.newInstance();
      DriverManager.registerDriver(new DriverProxy(driverInstance));
      registeredDrivers.put(driver, driverInstance);
    } catch (Exception e) {
      throw new SQLException("Error setting driver on UnpooledDataSource. Cause: " + e);
    }
  }
}
可以看到在UnpooledDataSource#getConnection()方法中,每次向UnpooledDataSource申请连接时,UnpooledDataSource都需要加载驱动、建立connection、配置connection的方式来返回connection对象。
3. POOLED
由于UNPOOLED每次只需sql时都需要重新创建连接,资源和时间消耗都比较大,因此对于需要频繁地跟数据库交互的应用程序,可以在创建了Connection对象,并操作完数据库后,可以不释放掉资源,而是将它放到内存中,当下次需要操作数据库时,可以直接从内存中取出Connection对象,不需要再创建了,这样就极大地节省了创建Connection对象的资源消耗。由于内存也是有限和宝贵的,这又对我们对内存中的Connection对象怎么有效地维护提出了很高的要求。我们将在内存中存放Connection对象的容器称之为 连接池(Connection Pool)。
PooledDataSourceFactory返回的DataSource类型是PooledDataSource,使用的就是连接池。
在连接池中将连接分成两种状态:active和idel,并由PooledDataSource的PoolState属性分别维护在activeConnections和idleConnections两个列表中。
PooledDataSource应用了生产者和消费者的模式。
当mybatis执行sql时首先从idle列表中申请一个空闲的连接,只有当idle列表为空时才通过UnpooledDataSource建立新连接。当然PooledDataSource并不允许无线建立新连接,但连接数目达到一定数量时,即使空闲列表为空,也不会建立新连接。而是从active列表中找出使用最久的一个连接,判断其是否超时。如果超时,则将该连接返回交给sql执行,否则线程等待。
当sql执行完成时PooledDataSource也不会直接关闭线程,而是将其加入到idle列表中并唤醒所有等待线程。同样的此时idle列表的连接数不能超过规定值,否则也只会关闭连接而不会加入到idle列表中。
PooledDataSource还对Connecion对象进行了封装,应用代理模式建立了InvocationHandler的实现类PooledConnection,内部维护了realConnection和proxyConnection两个链接,其中realConnection是通过驱动类建立的连接,proxyConnection是PooledDataSource返回的连接。
为了更好地区分PooledConnection,realConnection,proxyConnection,后续(1)(2)(3)的描述时若无特别说明,将pooledConnection称为连接,realConnection称为真正连接,proxyConnection称为代理连接。
(1)申请connection对象
申请connection对象的方法是PooledDataSource#getConnection()方法中,核心逻辑是PooledDataSource#popConnection(String, String)。
public Connection getConnection() throws SQLException {
  return popConnection(dataSource.getUsername(), dataSource.getPassword()).getProxyConnection();
}

private PooledConnection popConnection(String username, String password) throws SQLException {
  boolean countedWait = false;
  PooledConnection conn = null;
  long t = System.currentTimeMillis();
  int localBadConnectionCount = 0;

  while (conn == null) {
  synchronized (state) {
    if (!state.idleConnections.isEmpty()) {
      // Pool has available connection
      //idle列表不为空,表示有可用连接,直接选取第一个元素
      conn = state.idleConnections.remove(0);
      if (log.isDebugEnabled()) {
        log.debug("Checked out connection " + conn.getRealHashCode() + " from pool.");
      }
    } else {
      // Pool does not have available connection
      if (state.activeConnections.size() < poolMaximumActiveConnections) {
        // Can create new connection
        //active列表没有满,直接建立新连接
        conn = new PooledConnection(dataSource.getConnection(), this);
        if (log.isDebugEnabled()) {
          log.debug("Created connection " + conn.getRealHashCode() + ".");
        }
      } else {
        // Cannot create new connection
        //获得试用最久的连接,判断是否已经超时
        PooledConnection oldestActiveConnection = state.activeConnections.get(0);
        long longestCheckoutTime = oldestActiveConnection.getCheckoutTime();
        if (longestCheckoutTime > poolMaximumCheckoutTime) {
          // Can claim overdue connection
          //已经超时,将原连接一致废弃,根据其真正连接建立新连接
          state.claimedOverdueConnectionCount++;
          state.accumulatedCheckoutTimeOfOverdueConnections += longestCheckoutTime;
          state.accumulatedCheckoutTime += longestCheckoutTime;
          state.activeConnections.remove(oldestActiveConnection);
          if (!oldestActiveConnection.getRealConnection().getAutoCommit()) {
            try {
              oldestActiveConnection.getRealConnection().rollback();
            } catch (SQLException e) {
              /*
                 Just log a message for debug and continue to execute the following
                 statement like nothing happend.
                 Wrap the bad connection with a new PooledConnection, this will help
                 to not intterupt current executing thread and give current thread a
                 chance to join the next competion for another valid/good database
                 connection. At the end of this loop, bad {@link @conn} will be set as null.
               */
              log.debug("Bad connection. Could not roll back");
            }
          }
          conn = new PooledConnection(oldestActiveConnection.getRealConnection(), this);
          conn.setCreatedTimestamp(oldestActiveConnection.getCreatedTimestamp());
          conn.setLastUsedTimestamp(oldestActiveConnection.getLastUsedTimestamp());
          oldestActiveConnection.invalidate();
          if (log.isDebugEnabled()) {
            log.debug("Claimed overdue connection " + conn.getRealHashCode() + ".");
          }
        } else {
          // Must wait
          //没有超时,线程等待
          try {
            if (!countedWait) {
              state.hadToWaitCount++;
              countedWait = true;
            }
            if (log.isDebugEnabled()) {
              log.debug("Waiting as long as " + poolTimeToWait + " milliseconds for connection.");
            }
            long wt = System.currentTimeMillis();
            state.wait(poolTimeToWait);
            state.accumulatedWaitTime += System.currentTimeMillis() - wt;
          } catch (InterruptedException e) {
            break;
          }
        }
      }
    }
    if (conn != null) {
      // ping to server and check the connection is valid or not
      if (conn.isValid()) {
        if (!conn.getRealConnection().getAutoCommit()) {
          conn.getRealConnection().rollback();
        }
        conn.setConnectionTypeCode(assembleConnectionTypeCode(dataSource.getUrl(), username, password));
        conn.setCheckoutTimestamp(System.currentTimeMillis());
        conn.setLastUsedTimestamp(System.currentTimeMillis());
        state.activeConnections.add(conn);
        state.requestCount++;
        state.accumulatedRequestTime += System.currentTimeMillis() - t;
      } else {
        if (log.isDebugEnabled()) {
          log.debug("A bad connection (" + conn.getRealHashCode() + ") was returned from the pool, getting another connection.");
        }
        state.badConnectionCount++;
        localBadConnectionCount++;
        conn = null;
        //无效线程数过多,抛异常
        if (localBadConnectionCount > (poolMaximumIdleConnections + poolMaximumLocalBadConnectionTolerance)) {
          if (log.isDebugEnabled()) {
            log.debug("PooledDataSource: Could not get a good connection to the database.");
          }
          throw new SQLException("PooledDataSource: Could not get a good connection to the database.");
        }
      }
    }
  }
}
(2)释放connection对象
前面已经说过,PooledDataSource返回的连接时PooledConnection中的proxyConnection属性,而其通过代理模式在PooledConnection#invoke(Object, Method, Object[])对close方法进行了增强,处理逻辑主要在PooledDataSource#pushConnection(Connection)方法中。
public Object invoke(Object proxy, Method method, Object[] args) throws Throwable {
  String methodName = method.getName();
  if (CLOSE.hashCode() == methodName.hashCode() && CLOSE.equals(methodName)) {
    dataSource.pushConnection(this);
    return null;
  } else {
    try {
      if (!Object.class.equals(method.getDeclaringClass())) {
        // issue #579 toString() should never fail
        // throw an SQLException instead of a Runtime
        checkConnection();
      }
      return method.invoke(realConnection, args);
    } catch (Throwable t) {
      throw ExceptionUtil.unwrapThrowable(t);
    }
  }
}

protected void pushConnection(PooledConnection conn) throws SQLException {
 synchronized (state) {
   //连接从active列表中移除
    state.activeConnections.remove(conn);
    if (conn.isValid()) {
      //判断条件:idle列表没有满,且类型符合期望
      if (state.idleConnections.size() < poolMaximumIdleConnections && conn.getConnectionTypeCode() == expectedConnectionTypeCode) {
        state.accumulatedCheckoutTime += conn.getCheckoutTime();
        if (!conn.getRealConnection().getAutoCommit()) {
          conn.getRealConnection().rollback();
        }
        //连接加入idle列表
        PooledConnection newConn = new PooledConnection(conn.getRealConnection(), this);
        state.idleConnections.add(newConn);
        newConn.setCreatedTimestamp(conn.getCreatedTimestamp());
        newConn.setLastUsedTimestamp(conn.getLastUsedTimestamp());
        conn.invalidate();
        if (log.isDebugEnabled()) {
          log.debug("Returned connection " + newConn.getRealHashCode() + " to pool.");
        }
        //唤醒线程
        state.notifyAll();
      } else {
      	//不满足判断条件,直接关闭真正连接
        state.accumulatedCheckoutTime += conn.getCheckoutTime();
        if (!conn.getRealConnection().getAutoCommit()) {
          conn.getRealConnection().rollback();
        }
        conn.getRealConnection().close();
        if (log.isDebugEnabled()) {
          log.debug("Closed connection " + conn.getRealHashCode() + ".");
        }
        conn.invalidate();
      }
    } else {
      if (log.isDebugEnabled()) {
        log.debug("A bad connection (" + conn.getRealHashCode() + ") attempted to return to the pool, discarding connection.");
      }
      state.badConnectionCount++;
    }
  }
}
(3)流程图
