
Powermock介绍
简介
mock是模拟对象,用于模拟真实对象的行为。
Powermock主要用于打桩。比如:方法A的参数需要传入实例B,方法A需要调用B的某个方法B.C()。方法C因为耗时长或者根本没有实现或者其他不方便在单元测试中实现等原因,需要伪造返回,此时Powermock即可派上用场。
PowerMock扩展了EasyMock和Mockito框架,增加了对static和final方法mock支持等功能。这里主要基于PowerMock Mockito API进行介绍。
PowerMock支持JUnit和TestNG,这里基于JUnit。
介绍
本文地址:http://my.oschina.net/u/1433482/blog/645155 。
交流:python开发自动化测试群291184506 PythonJava单元白盒单元测试群144081101
英文原版书籍下载:https://bitbucket.org/xurongzhong/python-chinese-library/downloadss。
精品文章推荐:
性能测试艺术
Java单元测试之模拟利器-使用PowerMock进行Mock测试
安装
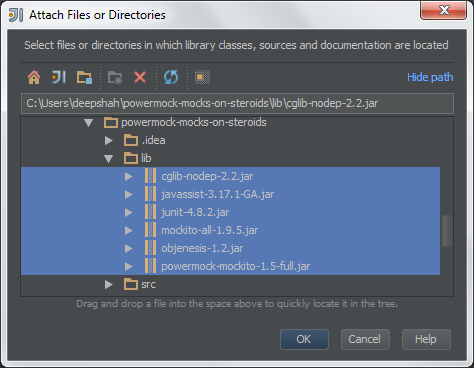
下载地址:https://github.com/jayway/powermock/wiki/Downloads。下载” Mockito and JUnit including dependencies”版本。当前版本为”powermock-mockito-junit-1.6.3.zip“。
IntelliJ IDEA的设置如下:
右击工程,选择“Open Module Settings”
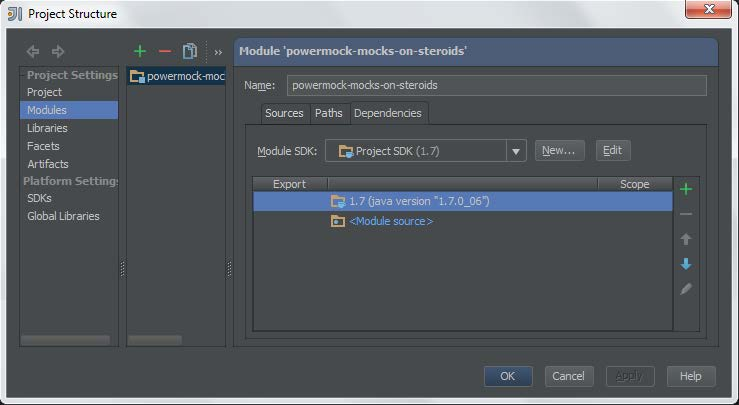
按下“ALT + Insert”,选择“Jars or directories…”, 插入jar包:
点击OK。
在”Module Settings”对话框中点击“Sources”标签,右击右边底部面板,选择“New Folder…”, 命名为test。
在”Module Settings”对话框中选择test,标识为Test Sources,关闭”Module Settings”对话框。
Eclipse中只需要上述jar包放在工程下的lib目录即可。
Maven在pom.xml添加如下内容:
    <dependency>
        <groupId>junit</groupId>
        <artifactId>junit</artifactId>
        <version>4.12</version>
        <scope>test</scope>
    </dependency>
    <dependency>
        <groupId>org.powermock</groupId>
        <artifactId>powermock-module-junit4</artifactId>
        <version>1.6.3</version>
        <scope>test</scope>
    </dependency>
    <dependency>
        <groupId>org.powermock</groupId>
        <artifactId>powermock-api-mockito</artifactId>
        <version>1.6.3</version>
        <scope>test</scope>
    </dependency>
  </dependencies>
快速入门
下面创建EmployeeController类用于给Employee类执行Create, Read, Update, and Delete (CRUD)。实际工作由EmployeeService完成。getProjectedEmployeeCount方法预计公司员工每年增加20%,并返回近似取整。
public class EmployeeController {

    private EmployeeService employeeService;

    public EmployeeController(EmployeeService employeeService) {

        this.employeeService = employeeService;
    }

    public int getProjectedEmployeeCount() {

        final int actualEmployeeCount = employeeService.getEmployeeCount();
        return (int) Math.ceil(actualEmployeeCount * 1.2);
    }

    public void saveEmployee(Employee employee) {

        employeeService.saveEmployee(employee);
    }
}
public class EmployeeService {
public int getEmployeeCount() {
throw new UnsupportedOperationException();
}
public void saveEmployee(Employee employee) {
throw new UnsupportedOperationException();
}
}
由于getEmployeeCount等方法没有真正实现,我们需要mock:
public class Employee {

}
import static org.junit.Assert.*;
import org.junit.Test;
import org.mockito.Mockito;
import org.powermock.api.mockito.PowerMockito;
public class EmployeeControllerTest {
@Test
public void shouldReturnProjectedCountOfEmployeesFromTheService() {
EmployeeService mock = PowerMockito.mock(EmployeeService.class);
PowerMockito.when(mock.getEmployeeCount()).thenReturn(8);
EmployeeController employeeController = new EmployeeController(mock);
assertEquals(10, employeeController.getProjectedEmployeeCount());
}
@Test
public void
shouldInvokeSaveEmployeeOnTheServiceWhileSavingTheEmployee() {
EmployeeService mock = PowerMockito.mock(EmployeeService.class);
EmployeeController employeeController = new EmployeeController(mock);
Employee employee = new Employee();
employeeController.saveEmployee(employee);
Mockito.verify(mock).saveEmployee(employee);
}
}
注意如果上述代码出现莫名其妙的错误,建议先确认所有文件已经保存,再不行重启Eclipse。
上面的saveEmployee(Employee)没有返回值,我们只需要用verify确认有调用即可。如果注释掉employeeController.saveEmployee(employee);就会有如下报错:
    Wanted but not invoked:
employeeService.saveEmployee(
    Employee@51081592
);
-> at EmployeeControllerTest.shouldInvokeSaveEmployeeOnTheServiceWhileSavingTheEmployee(EmployeeControllerTest.java:27)
Actually, there were zero interactions with this mock.
    at EmployeeControllerTest.shouldInvokeSaveEmployeeOnTheServiceWhileSavingTheEmployee(EmployeeControllerTest.java:27)
    at sun.reflect.NativeMethodAccessorImpl.invoke0(Native Method)
    at sun.reflect.NativeMethodAccessorImpl.invoke(Unknown Source)
    at sun.reflect.DelegatingMethodAccessorImpl.invoke(Unknown Source)
    at java.lang.reflect.Method.invoke(Unknown Source)
    at org.junit.runners.model.FrameworkMethod$1.runReflectiveCall(FrameworkMethod.java:50)
    at org.junit.internal.runners.model.ReflectiveCallable.run(ReflectiveCallable.java:12)
    at org.junit.runners.model.FrameworkMethod.invokeExplosively(FrameworkMethod.java:47)
    at org.junit.internal.runners.statements.InvokeMethod.evaluate(InvokeMethod.java:17)
    at org.junit.runners.ParentRunner.runLeaf(ParentRunner.java:325)
    at org.junit.runners.BlockJUnit4ClassRunner.runChild(BlockJUnit4ClassRunner.java:78)
    at org.junit.runners.BlockJUnit4ClassRunner.runChild(BlockJUnit4ClassRunner.java:57)
    at org.junit.runners.ParentRunner$3.run(ParentRunner.java:290)
    at org.junit.runners.ParentRunner$1.schedule(ParentRunner.java:71)
    at org.junit.runners.ParentRunner.runChildren(ParentRunner.java:288)
    at org.junit.runners.ParentRunner.access$000(ParentRunner.java:58)
    at org.junit.runners.ParentRunner$2.evaluate(ParentRunner.java:268)
    at org.junit.runners.ParentRunner.run(ParentRunner.java:363)
    at org.eclipse.jdt.internal.junit4.runner.JUnit4TestReference.run(JUnit4TestReference.java:86)
    at org.eclipse.jdt.internal.junit.runner.TestExecution.run(TestExecution.java:38)
    at org.eclipse.jdt.internal.junit.runner.RemoteTestRunner.runTests(RemoteTestRunner.java:459)
    at org.eclipse.jdt.internal.junit.runner.RemoteTestRunner.runTests(RemoteTestRunner.java:675)
    at org.eclipse.jdt.internal.junit.runner.RemoteTestRunner.run(RemoteTestRunner.java:382)
    at org.eclipse.jdt.internal.junit.runner.RemoteTestRunner.main(RemoteTestRunner.java:192)
另外有个非常用的MockSettings功能,用于设置mock名、实现额外接口(参见https://groups.google.com/forum/?fromgroups=#!topic/mockito/YM5EF0x90_4)、开启详细日志、注册listener用于mock时通知消息调用。比如:
EmployeeService mock = PowerMockito.mock(EmployeeService.class, Mockito.withSettings().name("EmployeeServiceMock").verboseLogging());从上面例子可以看出,mock常用于参数,如果是方法内部的局部变量偏多、逻辑过于复杂,mock将是比较痛苦的过程,甚至无从下手。
注意:Eclipse如果看不到lib,请选中工程目录,按F5刷新。lib中的每个jar,需要右键点击,选择”Build Path”->”Add to Build Path”, 添加完毕的效果图如下:

模拟静态方法
修改类Employee:
public class Employee {

    public static int count() {
        throw new UnsupportedOperationException();
    }
}
修改EmployeeService类的方法:
    public int getEmployeeCount() {
        return Employee.count();
    }
新建EmployeeServiceTest类:
import static org.junit.Assert.*;

import org.junit.Test;
import org.junit.runner.RunWith;
import org.powermock.api.mockito.PowerMockito;
import org.powermock.core.classloader.annotations.PrepareForTest;
import org.powermock.modules.junit4.PowerMockRunner;

@RunWith(PowerMockRunner.class)
@PrepareForTest(Employee.class)
public class EmployeeServiceTest {

    @Test
    public void shouldReturnTheCountOfEmployeesUsingTheDomainClass() {

        PowerMockito.mockStatic(Employee.class);
        PowerMockito.when(Employee.count()).thenReturn(900);

        EmployeeService employeeService = new EmployeeService();
        assertEquals(900, employeeService.getEmployeeCount());

    }
}@RunWith(PowerMockRunner.class)语句告诉JUnit用PowerMockRunner来执行测试。
@PrepareForTest(Employee.class)语句告诉PowerMock准备Employee类进行测试。适用于模拟final类或有final, private, static, native方法的类。
注意这里使用的是mockStatic而不是上面的mock。
下面我们模拟下返回void的静态方法。在Employee添加加薪方法:
    public static void giveIncrementOf(int percentage) {
        throw new UnsupportedOperationException();
    }
EmployeeService添加相应方法:
    public boolean giveIncrementToAllEmployeesOf(int percentage) {
        try{
            Employee.giveIncrementOf(percentage);
            return true;
        } catch(Exception e) {
            return false;
        }
    }
修改EmployeeServiceTest类
import static org.junit.Assert.*;

import org.junit.Test;
import org.junit.runner.RunWith;
import org.powermock.api.mockito.PowerMockito;
import org.powermock.core.classloader.annotations.PrepareForTest;
import org.powermock.modules.junit4.PowerMockRunner;

@RunWith(PowerMockRunner.class)
@PrepareForTest(Employee.class)
public class EmployeeServiceTest {

    @Test
    public void shouldReturnTrueWhenIncrementOf10PercentageIsGivenSuccessfully() {

        PowerMockito.mockStatic(Employee.class);
        PowerMockito.doNothing().when(Employee.class);
        Employee.giveIncrementOf(10);
        EmployeeService employeeService = new EmployeeService();
        assertTrue(employeeService.giveIncrementToAllEmployeesOf(10));

    }

    @Test
    public void shouldReturnFalseWhenIncrementOf10PercentageIsNotGivenSuccessfully() {

        PowerMockito.mockStatic(Employee.class);
        PowerMockito.doThrow(new IllegalStateException()).when(Employee.class);
        Employee.giveIncrementOf(10);
        EmployeeService employeeService = new EmployeeService();
        assertFalse(employeeService.giveIncrementToAllEmployeesOf(10));
    }
}
PowerMockito.doNothing方法告诉PowerMock下一个方法调用时什么也不做。
PowerMockito.doThrow方法告诉PowerMock下一个方法调用时产生异常。
PowerMock使用自定义类加载器和字节码操作来模拟静态方法。对于实例中没有mock的方法,也有默认返回值,比如返回int类型的方法,默认返回0。
PowerMockito.doNothing和PowerMockito.doThrow的语法可用于实例方法。
先在Employee类添加方法save:
    public void save() {
        throw new UnsupportedOperationException();
    }
创建测试EmployeeTest 类:
import static org.junit.Assert.*;

import org.junit.Test;
import org.powermock.api.mockito.PowerMockito;

public class EmployeeTest {

    @Test()
    public void shouldNotDoAnythingIfEmployeeWasSaved() {

        Employee employee = PowerMockito.mock(Employee.class);
        PowerMockito.doNothing().when(employee).save();
        try {
            employee.save();
        } catch(Exception e) {
            fail("Should not have thrown an exception");
        }
    }

    @Test(expected = IllegalStateException.class)
    public void shouldThrowAnExceptionIfEmployeeWasNotSaved() {

        Employee employee = PowerMockito.mock(Employee.class);
        PowerMockito.doThrow(new IllegalStateException()).when(employee).save();
        employee.save();
    }
}
注意这里doThrow和doNothing方法不会对下一行产生影响。
验证方法调用
验证断言方法是否调用。
修改EmployeeService类的saveEmployee方法。
    public void saveEmployee(Employee employee) {
        if(employee.isNew()) {
            employee.create();
            return;
        }
        employee.update();
    }
修改Employee类,新增如下方法:
    public boolean isNew() {
        throw new UnsupportedOperationException();
    }

    public void update() {
        throw new UnsupportedOperationException();
    }

    public void create() {
        throw new UnsupportedOperationException();
    }

    public static void giveIncrementOf(int percentage) {
        throw new UnsupportedOperationException();
    }
在EmployeeServiceTest类中新增shouldCreateNewEmployeeIfEmployeeIsNew方法, 并新增导入import org.mockito.Mockito;:
    @Test
    public void shouldCreateNewEmployeeIfEmployeeIsNew() {

        Employee mock = PowerMockito.mock(Employee.class);
        PowerMockito.when(mock.isNew()).thenReturn(true);
        EmployeeService employeeService = new EmployeeService();
        employeeService.saveEmployee(mock);
        Mockito.verify(mock).create();
        Mockito.verify(mock, Mockito.never()).update();
    }
Mockito.verify(mock).create()验证调用了create方法。 Mockito.verify(mock, Mockito.never()).update();验证没有调用update方法。
下面验证静态方法,在EmployeeServiceTest类添加shouldInvoke_giveIncrementOfMethodOnEmployeeWhileGivingIncrement方法:
    @Test
    public void shouldInvoke_giveIncrementOfMethodOnEmployeeWhileGivingIncrement() {

        PowerMockito.mockStatic(Employee.class);
        PowerMockito.doNothing().when(Employee.class);
        Employee.giveIncrementOf(9);
        EmployeeService employeeService = new EmployeeService();
        employeeService.giveIncrementToAllEmployeesOf(9);
        PowerMockito.verifyStatic();
        Employee.giveIncrementOf(9);
    }
同样,静态验证也要分两步走。
其他验证模式可以验证调用次数:
-
Mockito.times(int n) : This verification mode asserts that the mocked method was invoked exactly ‘n’ times
-
Mockito.atLeastOnce() : This verification mode asserts that the mocked method was invoked at least once
-
Mockito.atLeast(int n) : This verification mode asserts that the mocked method was invoked at least ‘n’ times
-
Mockito.atMost(int n) : This verification mode asserts that the mocked method was invoked at most ‘n’ times
使用Mockito.inOrder还可以验证调用的顺序,注意要导入import org.mockito.InOrder;
    @Test
    public void shouldInvokeIsNewBeforeInvokingCreate() {

        Employee mock = PowerMockito.mock(Employee.class);
        PowerMockito.when(mock.isNew()).thenReturn(true);
        EmployeeService employeeService = new EmployeeService();
        employeeService.saveEmployee(mock);
        InOrder inOrder = Mockito.inOrder(mock);
        inOrder.verify(mock).isNew();
        Mockito.verify(mock).create();
        Mockito.verify(mock, Mockito.never()).update();
    }
模拟final类或方法
新增EmployeeIdGenerator类:
public final class EmployeeIdGenerator {

    public final static int getNextId() {
        throw new UnsupportedOperationException();
    }
}
在Employee类新增方法:
    public void setEmployeeId(int nextId) {

        throw new UnsupportedOperationException();
    }
修改EmployeeService类的saveEmployee方法:
    public void saveEmployee(Employee employee) {
        if(employee.isNew()) {
            employee.setEmployeeId(EmployeeIdGenerator.getNextId());
            employee.create();
            return;
        }
        employee.update();
    }
修改EmployeeServiceTest类:
import org.junit.Test;
import org.junit.runner.RunWith;
import org.mockito.Mockito;
import org.powermock.api.mockito.PowerMockito;
import org.powermock.core.classloader.annotations.PrepareForTest;
import org.powermock.modules.junit4.PowerMockRunner;

@RunWith(PowerMockRunner.class)
@PrepareForTest(EmployeeIdGenerator.class)
public class EmployeeServiceTest {

    @Test
    public void shouldGenerateEmployeeIdIfEmployeeIsNew() {

        Employee mock = PowerMockito.mock(Employee.class);
        PowerMockito.when(mock.isNew()).thenReturn(true);
        PowerMockito.mockStatic(EmployeeIdGenerator.class);
        PowerMockito.when(EmployeeIdGenerator.getNextId()).thenReturn(90);
        EmployeeService employeeService = new
        EmployeeService();
        employeeService.saveEmployee(mock);
        PowerMockito.verifyStatic();
        EmployeeIdGenerator.getNextId();
        Mockito.verify(mock).setEmployeeId(90);
        Mockito.verify(mock).create();
    }
}
可见final和static的在类头部处理方法类似,两者可以基本归为一类。
其他java mock框架大多基于代理模式,参见https://en.wikipedia.org/wiki/Proxy_pattern 。这种方式严重依赖子类及方法可以重载。所以不能模拟final和static。
处理构造方法
现在创建新职员的时候要发送欢迎邮件。
新增类WelcomeEmail:
public class WelcomeEmail {

    public WelcomeEmail(final Employee employee, final String message) {
        throw new UnsupportedOperationException();
    }

    public void send() {
        throw new UnsupportedOperationException();
    }
}
修改EmployeeService类的saveEmployee方法:
    public void saveEmployee(Employee employee) {
        if(employee.isNew()) {
            employee.setEmployeeId(EmployeeIdGenerator.getNextId());
            employee.create();
            WelcomeEmail emailSender = new WelcomeEmail(employee,
            "Welcome to Mocking with PowerMock How-to!");
            emailSender.send();
            return;
        }
        employee.update();
    }
import org.junit.Test;
import org.junit.runner.RunWith;
import org.mockito.Mockito;
import org.powermock.api.mockito.PowerMockito;
import org.powermock.core.classloader.annotations.PrepareForTest;
import org.powermock.modules.junit4.PowerMockRunner;
@RunWith(PowerMockRunner.class)
@PrepareForTest({EmployeeIdGenerator.class, EmployeeService.class})
public class EmployeeServiceTest {
@Test
public void shouldSendWelcomeEmailToNewEmployees()throws Exception {
Employee employeeMock =PowerMockito.mock(Employee.class);
PowerMockito.when(employeeMock.isNew()).thenReturn(true);
PowerMockito.mockStatic(EmployeeIdGenerator.class);
WelcomeEmail welcomeEmailMock = PowerMockito.mock(WelcomeEmail.class);
PowerMockito.whenNew(WelcomeEmail.class).withArguments(employeeMock, "Welcome to Mocking with PowerMock How-to!").thenReturn(welcomeEmailMock);
EmployeeService employeeService = new EmployeeService();
employeeService.saveEmployee(employeeMock);
PowerMockito.verifyNew(WelcomeEmail.class).withArguments(employeeMock, "Welcome to Mocking with PowerMock How-to!");
Mockito.verify(welcomeEmailMock).send();
}
}注意PowerMockito.verifyNew的第2个参数支持前面提到的验证模式。PowerMockito.whenNew().withArguments(…).thenReturn()是对构造方法的mock模式,PowerMockito.verifyNew().withArguments()是验证模式。
参数匹配
PowerMock使用equals方法验证参数。matcher可更加灵活的处理参数。
为EmployeeController类添加如下方法:
    public Employee findEmployeeByEmail(String email) {
        return employeeService.findEmployeeByEmail(email);
    }

    public boolean isEmployeeEmailAlreadyTaken(String email) {
        Employee employee = new Employee();
        return employeeService.employeeExists(employee);
    }
为EmployeeService类添加如下方法:
    public Employee findEmployeeByEmail(String email) {
        throw new UnsupportedOperationException();
    }

    public boolean employeeExists(Employee employee) {
        throw new UnsupportedOperationException();
    }
为EmployeeControllerTest类新增测试
    @Test
    public void shouldFindEmployeeByEmail() {

        final EmployeeService mock = PowerMockito.mock(EmployeeService.class);
        final Employee employee = new Employee();
        PowerMockito.when(mock.findEmployeeByEmail(Mockito.startsWith("deep"))).thenReturn(employee);
        final EmployeeController employeeController = new EmployeeController(mock);
        assertSame(employee, employeeController.findEmployeeByEmail("[email protected]"));
        assertSame(employee, employeeController.findEmployeeByEmail("[email protected]"));
        assertNull(employeeController.findEmployeeByEmail("[email protected]"));
    }

    @Test
    public void shouldReturnNullIfNoEmployeeFoundByEmail() {

        final EmployeeService mock = PowerMockito.mock(EmployeeService.class);
        PowerMockito.when(mock.findEmployeeByEmail(Mockito.anyString())).thenReturn(null);
        final EmployeeController employeeController = new EmployeeController(mock);
        assertNull(employeeController.findEmployeeByEmail("[email protected]"));
        assertNull(employeeController.findEmployeeByEmail("[email protected]"));
        assertNull(employeeController.findEmployeeByEmail("[email protected]"));
    }
后面还有个基于argThat例子,因为没有搞到源码,意思暂时没有揣度出来。先不涉及。
另外其他类似的内置匹配器如下:Mockito.eq、Mockito.matches、Mockito.any(anyBoolean , anyByte , anyShort , anyChar , anyInt ,anyLong , anyFloat , anyDouble , anyList , anyCollection , anyMap , anySet等等)、Mockito.isNull、Mockito.isNotNull、Mockito.endsWith、Mockito.isA。
回答(Answer)
在某些边缘的情况下不可能通过简单地通过PowerMockito.when().thenReturn()模拟,这时可以使用Answer接口。
在EmployeeControllerTest类中增加如下方法:
import org.mockito.stubbing.Answer;

public class EmployeeControllerTest {

    @Test
    public void shouldFindEmployeeByEmailUsingTheAnswerInterface() {

        final EmployeeService mock = PowerMockito.mock(EmployeeService.class);
        final Employee employee = new Employee();

        PowerMockito.when(mock.findEmployeeByEmail(Mockito.anyString())).then(new Answer<Employee>() {

            public Employee answer(InvocationOnMock invocation) throws Throwable {
                final String email = (String) invocation.getArguments()[0];
                if(email == null) return null;
                if(email.startsWith("deep")) return employee;
                if(email.endsWith("packtpub.com")) return employee;
                return null;
            }
        });

        final EmployeeController employeeController = new EmployeeController(mock);
        assertSame(employee, employeeController.findEmployeeByEmail("[email protected]"));
        assertSame(employee, employeeController.findEmployeeByEmail("[email protected]"));
        assertNull(employeeController.findEmployeeByEmail("[email protected]"));
    }

    @Test
    public void shouldReturnCountOfEmployeesFromTheServiceWithDefaultAnswer() {

        EmployeeService mock = PowerMockito.mock(EmployeeService.class, new Answer() {

            public Object answer(InvocationOnMock invocation) {
                return 10;
            }
        });

        EmployeeController employeeController = new EmployeeController(mock);
        assertEquals(12, employeeController.getProjectedEmployeeCount());
    }
}
Answer接口指定执行的action和返回值执。 Answer的参数是InvocationOnMock的实例,支持:
-
callRealMethod():调用真正的方法
-
getArguments():获取所有参数
-
getMethod():返回mock实例调用的方法
-
getMock():获取mock实例
第一个测试方法根据不同情况构造不同返回。第2个测试方法设定调用返回的默认值。
使用spy进行部分模拟
现在调整类EmployeeService,拆分saveEmployee为方法:saveEmployee和createEmployee:
    public void saveEmployee(Employee employee) {
        if(employee.isNew()) {
            createEmployee(employee);
            return;
        }
        employee.update();
    }

    void createEmployee(Employee employee) {
        employee.setEmployeeId(EmployeeIdGenerator.getNextId());
        employee.create();
        WelcomeEmail emailSender = new WelcomeEmail(employee,
        "Welcome to Mocking with PowerMock How-to!");
        emailSender.send();
    }
EmployeeServiceTest类添加测试方法shouldInvokeTheCreateEmployeeMethodWhileSavingANewEmployee:
    @Test
    public void shouldInvokeTheCreateEmployeeMethodWhileSavingANewEmployee() {

        final EmployeeService spy = PowerMockito.spy(new EmployeeService());
        final Employee employeeMock = PowerMockito.mock(Employee.class);
        PowerMockito.when(employeeMock.isNew()).thenReturn(true);
        PowerMockito.doNothing().when(spy).createEmployee(employeeMock);
        spy.saveEmployee(employeeMock);
        Mockito.verify(spy).createEmployee(employeeMock);
    }
注意spy只能使用PowerMockito.doNothing()/doReturn()/doThrow()。
模拟私有方法
现在我们修改EmployeeService.createEmployee为private,在EmployeeServiceTest类添加如下方法:
import org.junit.Test;
import org.junit.runner.RunWith;
import org.powermock.api.mockito.PowerMockito;
import org.powermock.core.classloader.annotations.PrepareForTest;
import org.powermock.modules.junit4.PowerMockRunner;

@RunWith(PowerMockRunner.class)
@PrepareForTest({EmployeeIdGenerator.class, EmployeeService.class})
public class EmployeeServiceTest {

    @Test
    public void shouldInvokeTheCreateEmployeeMethodWhileSavingANewEmployee() throws Exception {

        final EmployeeService spy = PowerMockito.spy(new EmployeeService());
        final Employee employeeMock = PowerMockito.mock(Employee.class);
        PowerMockito.when(employeeMock.isNew()).thenReturn(true);
        PowerMockito.doNothing().when(spy, "createEmployee", employeeMock);
        spy.saveEmployee(employeeMock);
        PowerMockito.verifyPrivate(spy).invoke("createEmployee", employeeMock);
    }
}
模拟私有方法还有另外一种相对较复杂的方法,这里不做介绍了。
查看封装内容
添加 Department类
import java.util.ArrayList;
import java.util.List;

public class Department {

    private List<Employee> employees = new ArrayList<Employee>();
    private long maxSalaryOffered;
    public void addEmployee(final Employee employee) {
        employees.add(employee);
        updateMaxSalaryOffered();
    }

    /**
    * The private method that keeps track of
    * max salary offered by this department.
    */
    private void updateMaxSalaryOffered() {
        maxSalaryOffered = 0;
        for (Employee employee : employees) {
            if(employee.getSalary() > maxSalaryOffered) {
                maxSalaryOffered = employee.getSalary();
            }
        }
    }
}
修改Employee类的如下方法:
    public long getSalary() {
        return salary;
    }

    public void setSalary(int i) {
        salary = i;
    }
新建DepartmentTest类,添加如下测试方法:
import static org.junit.Assert.*;
import java.util.ArrayList;
import java.util.List;
import org.junit.Test;
import org.powermock.reflect.Whitebox;

public class DepartmentTest {
    @Test
    public void shouldVerifyThatNewEmployeeIsAddedToTheDepartment() {

        final Department department = new Department();
        final Employee employee = new Employee();
        department.addEmployee(employee);
        final List<Employee> employees = Whitebox.getInternalState(department, "employees");
        assertTrue(employees.contains(employee));
    }


    @Test
    public void shouldAddNewEmployeeToTheDepartment() {

        final Department department = new Department();
        final Employee employee = new Employee();
        final ArrayList<Employee> employees = new ArrayList<Employee>();
        Whitebox.setInternalState(department, "employees", employees);
        department.addEmployee(employee);
        assertTrue(employees.contains(employee));
    }

    @Test
    public void shouldVerifyThatMaxSalaryOfferedForADepartmentIsCalculatedCorrectly() throws Exception
    {

        final Department department = new Department();
        final Employee employee1 = new Employee();
        final Employee employee2 = new Employee();
        employee1.setSalary(60000);
        employee2.setSalary(65000);
        //Adding two employees to the test employees list.
        final ArrayList<Employee> employees = new ArrayList<Employee>();
        employees.add(employee1);
        employees.add(employee2);
        Whitebox.setInternalState(department, "employees", employees);
        Whitebox.invokeMethod(department,"updateMaxSalaryOffered");
        final long maxSalary = Whitebox.getInternalState(department, "maxSalaryOffered");
        assertEquals(65000, maxSalary);
    }
}
Whitebox.getInternalState(department, “employees”)类似堆栈,查看变量的值。Whitebox.setInternalState(department, “employees”,
employees)设置变量的值。 Whitebox.invokeMethod(department, “updateMaxSalaryOffered”)调用方法。
更多参考:http://powermock.googlecode.com/svn/docs/powermock-1.5/apidocs/org/powermock/reflect/Whitebox.html。
ads_sms中测试手机号码发送短信
package com.oppo.os.ads.sms.sevice;

import static org.junit.Assert.*;

import org.junit.After;
import org.junit.Test;
import org.junit.runner.RunWith;
import org.powermock.reflect.Whitebox;
import org.springframework.beans.factory.annotation.Autowired;
import org.springframework.test.context.ContextConfiguration;
import org.springframework.test.context.junit4.SpringJUnit4ClassRunner;


@RunWith(SpringJUnit4ClassRunner.class)
@ContextConfiguration(locations="classpath:dubbo/ads-sms-svc.xml")
public class SmsTaskTest {

    @Autowired
    SmsTask svc;

    @After
    public void tearDown() throws Exception {
    }

    @Test
    public void checkLimitOk() throws Exception {
        System.out.println("initAccUser");
        boolean result = Whitebox.invokeMethod(svc,"checkLimit", 6, "13246680798", 3, 20160121, 20160121);
        assertEquals(true, result);
    }

    @Test
    public void checkLimitFail() throws Exception {
        System.out.println("initAccUser");
        boolean result = Whitebox.invokeMethod(svc,"checkLimit", 0, "13246680998", 3, 20160121, 20160121);
        assertEquals(false, result);
    }
}
ads_ad 中的pom.xml配置:
        <dependency>
            <groupId>org.powermock</groupId>
            <artifactId>powermock-module-junit4</artifactId>
            <version>1.6.3</version>
            <scope>test</scope>
        </dependency>
        <dependency>
            <groupId>org.powermock</groupId>
            <artifactId>powermock-api-mockito</artifactId>
            <version>1.6.3</version>
            <scope>test</scope>
        </dependency>
        <dependency>
              <groupId>org.powermock</groupId>
              <artifactId>powermock-module-junit4-rule</artifactId>
              <version>1.6.3</version>
              <scope>test</scope>
        </dependency>

        <dependency>
              <groupId>org.powermock</groupId>
              <artifactId>powermock-classloading-xstream</artifactId>
              <version>1.6.3</version>
              <scope>test</scope>
        </dependency>
测试文件:
package com.oppo.os.ads.ad.cpd.app.service;

import org.junit.Rule;
import org.junit.Test;
import org.junit.runner.RunWith;
import org.powermock.core.classloader.annotations.PrepareForTest;
import org.powermock.modules.junit4.rule.PowerMockRule;
import org.powermock.reflect.Whitebox;
import org.springframework.beans.factory.annotation.Autowired;
import org.springframework.test.context.ContextConfiguration;
import org.springframework.test.context.junit4.SpringJUnit4ClassRunner;
import static org.mockito.Matchers.*;

import com.oppo.os.ads.ad.cpd.app.entity.AdsAdBid;

@RunWith(SpringJUnit4ClassRunner.class)
@ContextConfiguration(locations="classpath:dubbo/ad-cpd-app-svc.xml")
public class AdsAdAppBidSrvTest {

    //@Rule
    //public PowerMockRule rule = new PowerMockRule();

    @Autowired
    AdsAdAppBidSrv appSrvImpl;

    @Test
    public void testAccOutDayBudgetString() {
        appSrvImpl.accOutDayBudget("2839488");
    }

    @Test
    public void testAccOutDayBudgetInt() {
        appSrvImpl.accOutDayBudget(2839488);
    }

    @Test
    public void testOutDayBudget() {
        appSrvImpl.outDayBudget(5160);
    }

    @Test
    public void testBalanceInsufficientString() {
        appSrvImpl.balanceInsufficient("2839488");
    }

    @Test
    public void testBalanceInsufficientLong() {
        appSrvImpl.balanceInsufficient(2839488);
    }

    @Test
    public void testAddAd() {
        AdsAdBid bid = new AdsAdBid();
        bid.setId(5160L);
        appSrvImpl.addAd(bid);
    }

    @Test
    public void testUpdateAd() {
        AdsAdBid bid = new AdsAdBid();
        bid.setId(5160L);
        bid.setName("789798");
        appSrvImpl.updateAd(bid);
    }


    @Test
    public void testStartAd() {
        appSrvImpl.startAd(5160);
    }

    @Test
    public void testPauseAd() {
        AdsAdBid bid = new AdsAdBid();
        bid.setId(5160L);
        appSrvImpl.pauseAd(bid);
    }

    @Test
    public void testDeleteAdCache() throws Exception {

        Whitebox.invokeMethod(appSrvImpl,"deleteAdCache", "1001");
    }


}
禁用非预期行为
新增类BaseEntity:
public class BaseEntity {

    static {
        String x = null;
        x.toString();
    }

    public BaseEntity() {
        throw new UnsupportedOperationException();
    }

    protected void performAudit(String auditInformation) {
        throw new UnsupportedOperationException();
    }
}
修改类Department:
public class Department extends BaseEntity {

    private int departmentId;
    private String name;

    public Department(int departmentId) {
        super();
        this.departmentId = departmentId;
    }

    public void setName(String name) {
        this.name = name;
        super.performAudit(this.name);
    }

    protected void performAudit(String auditInformation) {
        throw new UnsupportedOperationException();
    }

    public Object getDepartmentId() {
        return departmentId;
    }

    public Object getName() {
        return name;
    }
}
修改类DepartmentTest:
import static org.junit.Assert.*;

import org.junit.Test;
import org.junit.runner.RunWith;
import org.mockito.Mockito;
import org.powermock.api.mockito.PowerMockito;
import org.powermock.core.classloader.annotations.PrepareForTest;
import org.powermock.core.classloader.annotations.SuppressStaticInitializationFor;
import org.powermock.modules.junit4.PowerMockRunner;


@RunWith(PowerMockRunner.class)
@PrepareForTest(Department.class)
@SuppressStaticInitializationFor("BaseEntity")
public class DepartmentTest {

    @Test
    public void shouldSuppressTheBaseConstructorOfDepartment() {
        PowerMockito.suppress(PowerMockito.constructor(BaseEntity.class));
        assertEquals(10, new Department(10).getDepartmentId());
    }

    @Test
    public void shouldSuppressThePerformAuditMethodOfBaseEntity() {
        PowerMockito.suppress(PowerMockito.constructor(BaseEntity.class));
        PowerMockito.suppress(PowerMockito.method(BaseEntity.class, "performAudit", String.class));
        final Department department = new Department(18);
        department.setName("Mocking with PowerMock");
        assertEquals("Mocking with PowerMock", department.getName());
    }

    @Test
        public void shouldSuppressTheInitializerForBaseEntity() {

            PowerMockito.suppress(PowerMockito.constructor(BaseEntity.class));
            assertNotNull(new Department(18));
    }
}
注意测试代码并未试验成功。
PowerMockito.suppress(PowerMockito.constructor(BaseEntity.class));表示禁用BaseEntity的构造函数。PowerMockito.suppress(PowerMockito.constructor(BaseEntity.class, String.class, Integer.class))后面表示带字符串和整数参数。
PowerMockito.suppress(PowerMockito.method(BaseEntity.class, “performAudit”, String.class))表示禁用BaseEntity的performAudit方法。
@SuppressStaticInitializationFor(“BaseEntity”)表示禁用BaseEntity的静态初始化。注意引号部分通常需要全名,比如”com.gitshah.powermock.BaseEntity”。
PowerMockito.suppress(PowerMockito.field(BaseEntity.class,”identifier”)):禁用域。
参考资料
简明教程: https://github.com/jayway/powermock
https://github.com/jayway/powermock/wiki/MockitoUsage
https://www.ibm.com/developerworks/cn/java/j-lo-powermock/
书籍:Instant Mock Testing with PowerMock
作者博客:http://my.oschina.net/u/1433482 python测试开发精华群 291184506 PythonJava单元白盒测试 144081101
Powermock在Spring测试的应用
本部分先对spring做简单介绍,然后介绍mockito和powermock在spring测试中的应用。
此部分需要准备的软件:
基于JDK 7或以上版本
Eclipse http://www.oracle.com/technetwork/java/javase/downloads/index.html
Mockito http://mockito.org/
Spring http://maven.springframework.org/release/org/springframework/spring/
Spring简介
Spring是Java的开源企业应用程序开发框架,它为 Java beans控制容器的翻转。最初由Rod Johnson在2003年6月基于Apache2.0许可证发布。
Spring框架处理底层,使我们能够专注于应用程序逻辑。 Spring能够从POJOs(Plain Old Java Objects)非侵入式的构建应用程序。比如:
•不需要处理servlet或servlet API,Java方法可以处理HTTP POST / GET请求。
•不需要处理web服务API,Java方法可提供RESTful Web服务
•不需要处理事务API,Java方法可以执行数据库事务
•不需要处理远程API,本地Java方法使用RPC(remote procedure call)
•不需要处理JMS API,Java方法可以使用和处理消息
•不需要处理JMX API,Java方法可以作为管理扩展
Spring的特性:
•开源应用程序框架
•企业轻量级应用框架
•非侵入性(基于POJO)
•模块化
•可扩展用于其他框架
•Java企业应用程序的事实标准
优势:
•使用POJO、轻,非入侵
•通过依赖注入和接口定向实现松耦合
•通过aspect和共同约定实现声明式编程
•通过aspect和模板减少代码

Spring Framework的核心容器:
• Core and Beans:提供IOC(Inversion of control)和DI(dependency injection)
• Context:类似JNDI(Java Naming and Directory Interface,Java命名和目录接口),用于在框架中访问对象。
• 表示语言(Expression Language):SpEL,用于查询和修改对象图并评估数学表达式。
AOP模块
AOP是Spring面向方面编程的实现。它解耦业务逻辑和日志、安全等基础代码。
instrumentation模块
提供instrumentation类支持,通过MBean展示容器资源和帮助JMX管理。
消息模块
包含Spring Integration项目的关键抽象如Message、MessageChannel和的MessageHandler。
数据访问模块
•JDBC:JDBC抽象层
•ORM:为流行的对象关系映射提供集成层API,包括JPA,JDO,Hibernate和iBATIS
•OXM:对象/ XML映射抽象层,实现了JAXB,Castor,XMLBeans的,JiBX和Xstream
•JMS:生产和消费消息
•事务:它支持programmatic和programmatic事务管理
web层
该网络层包括web,webmvc / servlet中,WebSocket和webmvc-portlet模块:
•Web:文件上传等基础组件。
•Webmvc:
•Portlet
•WebSocket
Spring项目涉及安全配置、Web应用程序、大数据、LDAP等。 Spring框架是其中一部分。
JNDI(Java Naming and Directory Interface,Java命名和目录接口)
Java相关的一些博客:
IoC(Inversion of Control)和DI(dependency injection)经常不区分使用。IoC由IoC实现。
两种类型的依赖注入:
• Constructor injection
• Setter injection
比如定义:
<bean id="bookLister" class="com.packt.di.BookLister">
<constructor-arg ref="bookService"/>
</bean>
<bean id="bookService" class="com.packt.di.BookServiceImpl" />
等同于:
BookService service = new BookServiceImpl();
BookLister bookLister = new BookLister(service);
<bean id="bookListerSetterInjection" class="com.packt.di.BookLister"> <property name="bookService" ref="bookService" /> </bean> <bean id="bookService" class="com.packt.di.BookServiceImpl" />
等同于:
BookService service = new BookServiceImpl();
BookLister bookLister = new BookLister();
bookLister.setBookService(service);
Spring IoC container 即ApplicationContext。管理的容器叫bean,比如bookService就是bean,即Spring IoC container管理的对象。
bean的属性有:
class、name(即id)、scope、constructor-arg、properties、lazy-init(使用时才创建容器)、init-method 、destroy-method。
scope的取值有:
-
singleton:每个bean实例一个容器。实际上是每个bean实例一个classloader。
-
prototype:每个bean实例多个实例对象。
-
request:每个bean实例一个HTTP request。
-
session:每个bean实例一个HTTP session。
-
global-session:每个bean实例一个全局HTTP session。
生命周期:
第一个实例
前提: Maven和STS安装OK,都可以从Eclipse 市场安装。
新建Spring Starter Project项目,
Name:SpringOverview 注明名字前后不要有空格。
Type:Maven
其他用默认配置。
原有默认的SpringOverviewApplication类内容如下:
package com.example;

import org.springframework.boot.SpringApplication;
import org.springframework.boot.autoconfigure.SpringBootApplication;

@SpringBootApplication
public class SpringOverviewApplication {

    public static void main(String[] args) {
        SpringApplication.run(SpringOverviewApplication.class, args);
    }
}
删除包com.example下面的SpringOverviewApplication类。新建HelloWorld类:
package com.example;

public class HelloWorld {

    private String message;

    public String getMessage() {
        return message;
    }

    public void setMessage(String message) {
        this.message = message;
    }
}
在src/main/resources新建 applicationContext.xml:
<?xml version="1.0" encoding="UTF-8"?>
<beans xmlns="http://www.springframework.org/schema/beans"
xmlns:xsi="http://www.w3.org/2001/XMLSchema-instance"
xsi:schemaLocation="http://www.springframework.org/schema/beans
http://www.springframework.org/schema/beans/spring-beans.xsd">
    <bean id="helloWorld" class="com.example.HelloWorld">
        <property name="message" value="Welcome to the Spring world">
        </property>
    </bean>
</beans>
com.example下面新建类HelloWorldExample:
package com.example;

import org.springframework.context.ApplicationContext;
import org.springframework.context.support.ClassPathXmlApplicationContext;

public class HelloWorldExample {

    public static void main(String[] args) {
        ApplicationContext context = new ClassPathXmlApplicationContext("applicationContext.xml");
        HelloWorld world = (HelloWorld)
        context.getBean("helloWorld");
        System.out.println(world.getMessage());
        }
}
用Spring Boot App的方式执行:
11:38:15.765 [main] DEBUG o.s.core.env.StandardEnvironment - Adding [systemProperties] PropertySource with lowest search precedence
11:38:15.768 [main] DEBUG o.s.core.env.StandardEnvironment - Adding [systemEnvironment] PropertySource with lowest search precedence
11:38:15.768 [main] DEBUG o.s.core.env.StandardEnvironment - Initialized StandardEnvironment with PropertySources [systemProperties,systemEnvironment]
11:38:15.770 [main] INFO o.s.c.s.ClassPathXmlApplicationContext - Refreshing org.springframework.context.support.ClassPathXmlApplicationContext@71c7db30: startup date [Thu Dec 31 11:38:15 CST 2015]; root of context hierarchy
11:38:15.794 [main] DEBUG o.s.core.env.StandardEnvironment - Adding [systemProperties] PropertySource with lowest search precedence
11:38:15.795 [main] DEBUG o.s.core.env.StandardEnvironment - Adding [systemEnvironment] PropertySource with lowest search precedence
11:38:15.795 [main] DEBUG o.s.core.env.StandardEnvironment - Initialized StandardEnvironment with PropertySources [systemProperties,systemEnvironment]
11:38:15.801 [main] INFO o.s.b.f.xml.XmlBeanDefinitionReader - Loading XML bean definitions from class path resource [applicationContext.xml]
11:38:15.811 [main] DEBUG o.s.b.f.xml.DefaultDocumentLoader - Using JAXP provider [com.sun.org.apache.xerces.internal.jaxp.DocumentBuilderFactoryImpl]
11:38:15.830 [main] DEBUG o.s.b.f.xml.PluggableSchemaResolver - Loading schema mappings from [META-INF/spring.schemas]
11:38:15.833 [main] DEBUG o.s.b.f.xml.PluggableSchemaResolver - Loaded schema mappings: {http://www.springframework.org/schema/cache/spring-cache-4.2.xsd=org/springframework/cache/config/spring-cache-4.2.xsd, http://www.springframework.org/schema/aop/spring-aop-4.1.xsd=org/springframework/aop/config/spring-aop-4.1.xsd, http://www.springframework.org/schema/context/spring-context-3.1.xsd=org/springframework/context/config/spring-context-3.1.xsd, http://www.springframework.org/schema/util/spring-util-3.0.xsd=org/springframework/beans/factory/xml/spring-util-3.0.xsd, http://www.springframework.org/schema/tool/spring-tool.xsd=org/springframework/beans/factory/xml/spring-tool-4.2.xsd, http://www.springframework.org/schema/aop/spring-aop-3.2.xsd=org/springframework/aop/config/spring-aop-3.2.xsd, http://www.springframework.org/schema/lang/spring-lang-4.1.xsd=org/springframework/scripting/config/spring-lang-4.1.xsd, http://www.springframework.org/schema/context/spring-context-4.0.xsd=org/springframework/context/config/spring-context-4.0.xsd, http://www.springframework.org/schema/beans/spring-beans-4.2.xsd=org/springframework/beans/factory/xml/spring-beans-4.2.xsd, http://www.springframework.org/schema/tool/spring-tool-4.1.xsd=org/springframework/beans/factory/xml/spring-tool-4.1.xsd, http://www.springframework.org/schema/lang/spring-lang-3.2.xsd=org/springframework/scripting/config/spring-lang-3.2.xsd, http://www.springframework.org/schema/cache/spring-cache-3.2.xsd=org/springframework/cache/config/spring-cache-3.2.xsd, http://www.springframework.org/schema/jee/spring-jee-4.1.xsd=org/springframework/ejb/config/spring-jee-4.1.xsd, http://www.springframework.org/schema/util/spring-util-2.0.xsd=org/springframework/beans/factory/xml/spring-util-2.0.xsd, http://www.springframework.org/schema/task/spring-task-4.2.xsd=org/springframework/scheduling/config/spring-task-4.2.xsd, http://www.springframework.org/schema/tool/spring-tool-3.2.xsd=org/springframework/beans/factory/xml/spring-tool-3.2.xsd, http://www.springframework.org/schema/context/spring-context.xsd=org/springframework/context/config/spring-context-4.2.xsd, http://www.springframework.org/schema/cache/spring-cache-4.1.xsd=org/springframework/cache/config/spring-cache-4.1.xsd, http://www.springframework.org/schema/aop/spring-aop-4.0.xsd=org/springframework/aop/config/spring-aop-4.0.xsd, http://www.springframework.org/schema/jee/spring-jee-3.2.xsd=org/springframework/ejb/config/spring-jee-3.2.xsd, http://www.springframework.org/schema/context/spring-context-3.0.xsd=org/springframework/context/config/spring-context-3.0.xsd, http://www.springframework.org/schema/util/spring-util-2.5.xsd=org/springframework/beans/factory/xml/spring-util-2.5.xsd, http://www.springframework.org/schema/beans/spring-beans-3.2.xsd=org/springframework/beans/factory/xml/spring-beans-3.2.xsd, http://www.springframework.org/schema/aop/spring-aop-3.1.xsd=org/springframework/aop/config/spring-aop-3.1.xsd, http://www.springframework.org/schema/lang/spring-lang-4.0.xsd=org/springframework/scripting/config/spring-lang-4.0.xsd, http://www.springframework.org/schema/beans/spring-beans-4.1.xsd=org/springframework/beans/factory/xml/spring-beans-4.1.xsd, http://www.springframework.org/schema/tool/spring-tool-4.0.xsd=org/springframework/beans/factory/xml/spring-tool-4.0.xsd, http://www.springframework.org/schema/lang/spring-lang-3.1.xsd=org/springframework/scripting/config/spring-lang-3.1.xsd, http://www.springframework.org/schema/cache/spring-cache-3.1.xsd=org/springframework/cache/config/spring-cache-3.1.xsd, http://www.springframework.org/schema/jee/spring-jee-4.0.xsd=org/springframework/ejb/config/spring-jee-4.0.xsd, http://www.springframework.org/schema/task/spring-task-4.1.xsd=org/springframework/scheduling/config/spring-task-4.1.xsd, http://www.springframework.org/schema/tool/spring-tool-3.1.xsd=org/springframework/beans/factory/xml/spring-tool-3.1.xsd, http://www.springframework.org/schema/cache/spring-cache-4.0.xsd=org/springframework/cache/config/spring-cache-4.0.xsd, http://www.springframework.org/schema/jee/spring-jee-3.1.xsd=org/springframework/ejb/config/spring-jee-3.1.xsd, http://www.springframework.org/schema/util/spring-util-4.2.xsd=org/springframework/beans/factory/xml/spring-util-4.2.xsd, http://www.springframework.org/schema/task/spring-task-3.2.xsd=org/springframework/scheduling/config/spring-task-3.2.xsd, http://www.springframework.org/schema/beans/spring-beans-3.1.xsd=org/springframework/beans/factory/xml/spring-beans-3.1.xsd, http://www.springframework.org/schema/util/spring-util.xsd=org/springframework/beans/factory/xml/spring-util-4.2.xsd, http://www.springframework.org/schema/aop/spring-aop-3.0.xsd=org/springframework/aop/config/spring-aop-3.0.xsd, http://www.springframework.org/schema/beans/spring-beans-4.0.xsd=org/springframework/beans/factory/xml/spring-beans-4.0.xsd, http://www.springframework.org/schema/beans/spring-beans.xsd=org/springframework/beans/factory/xml/spring-beans-4.2.xsd, http://www.springframework.org/schema/lang/spring-lang-3.0.xsd=org/springframework/scripting/config/spring-lang-3.0.xsd, http://www.springframework.org/schema/context/spring-context-2.5.xsd=org/springframework/context/config/spring-context-2.5.xsd, http://www.springframework.org/schema/task/spring-task-4.0.xsd=org/springframework/scheduling/config/spring-task-4.0.xsd, http://www.springframework.org/schema/tool/spring-tool-3.0.xsd=org/springframework/beans/factory/xml/spring-tool-3.0.xsd, http://www.springframework.org/schema/aop/spring-aop-2.0.xsd=org/springframework/aop/config/spring-aop-2.0.xsd, http://www.springframework.org/schema/jee/spring-jee-3.0.xsd=org/springframework/ejb/config/spring-jee-3.0.xsd, http://www.springframework.org/schema/util/spring-util-4.1.xsd=org/springframework/beans/factory/xml/spring-util-4.1.xsd, http://www.springframework.org/schema/task/spring-task-3.1.xsd=org/springframework/scheduling/config/spring-task-3.1.xsd, http://www.springframework.org/schema/beans/spring-beans-3.0.xsd=org/springframework/beans/factory/xml/spring-beans-3.0.xsd, http://www.springframework.org/schema/jee/spring-jee.xsd=org/springframework/ejb/config/spring-jee-4.2.xsd, http://www.springframework.org/schema/aop/spring-aop-2.5.xsd=org/springframework/aop/config/spring-aop-2.5.xsd, http://www.springframework.org/schema/lang/spring-lang-2.0.xsd=org/springframework/scripting/config/spring-lang-2.0.xsd, http://www.springframework.org/schema/util/spring-util-3.2.xsd=org/springframework/beans/factory/xml/spring-util-3.2.xsd, http://www.springframework.org/schema/task/spring-task.xsd=org/springframework/scheduling/config/spring-task-4.2.xsd, http://www.springframework.org/schema/tool/spring-tool-2.0.xsd=org/springframework/beans/factory/xml/spring-tool-2.0.xsd, http://www.springframework.org/schema/lang/spring-lang-2.5.xsd=org/springframework/scripting/config/spring-lang-2.5.xsd, http://www.springframework.org/schema/context/spring-context-4.2.xsd=org/springframework/context/config/spring-context-4.2.xsd, http://www.springframework.org/schema/jee/spring-jee-2.0.xsd=org/springframework/ejb/config/spring-jee-2.0.xsd, http://www.springframework.org/schema/tool/spring-tool-2.5.xsd=org/springframework/beans/factory/xml/spring-tool-2.5.xsd, http://www.springframework.org/schema/jee/spring-jee-2.5.xsd=org/springframework/ejb/config/spring-jee-2.5.xsd, http://www.springframework.org/schema/util/spring-util-4.0.xsd=org/springframework/beans/factory/xml/spring-util-4.0.xsd, http://www.springframework.org/schema/task/spring-task-3.0.xsd=org/springframework/scheduling/config/spring-task-3.0.xsd, http://www.springframework.org/schema/aop/spring-aop-4.2.xsd=org/springframework/aop/config/spring-aop-4.2.xsd, http://www.springframework.org/schema/lang/spring-lang.xsd=org/springframework/scripting/config/spring-lang-4.2.xsd, http://www.springframework.org/schema/context/spring-context-3.2.xsd=org/springframework/context/config/spring-context-3.2.xsd, http://www.springframework.org/schema/util/spring-util-3.1.xsd=org/springframework/beans/factory/xml/spring-util-3.1.xsd, http://www.springframework.org/schema/beans/spring-beans-2.0.xsd=org/springframework/beans/factory/xml/spring-beans-2.0.xsd, http://www.springframework.org/schema/cache/spring-cache.xsd=org/springframework/cache/config/spring-cache-4.2.xsd, http://www.springframework.org/schema/lang/spring-lang-4.2.xsd=org/springframework/scripting/config/spring-lang-4.2.xsd, http://www.springframework.org/schema/context/spring-context-4.1.xsd=org/springframework/context/config/spring-context-4.1.xsd, http://www.springframework.org/schema/beans/spring-beans-2.5.xsd=org/springframework/beans/factory/xml/spring-beans-2.5.xsd, http://www.springframework.org/schema/tool/spring-tool-4.2.xsd=org/springframework/beans/factory/xml/spring-tool-4.2.xsd, http://www.springframework.org/schema/jee/spring-jee-4.2.xsd=org/springframework/ejb/config/spring-jee-4.2.xsd, http://www.springframework.org/schema/aop/spring-aop.xsd=org/springframework/aop/config/spring-aop-4.2.xsd}
11:38:15.833 [main] DEBUG o.s.b.f.xml.PluggableSchemaResolver - Found XML schema [http://www.springframework.org/schema/beans/spring-beans.xsd] in classpath: org/springframework/beans/factory/xml/spring-beans-4.2.xsd
11:38:15.862 [main] DEBUG o.s.b.f.x.DefaultBeanDefinitionDocumentReader - Loading bean definitions
11:38:15.871 [main] DEBUG o.s.b.f.xml.XmlBeanDefinitionReader - Loaded 1 bean definitions from location pattern [applicationContext.xml]
11:38:15.872 [main] DEBUG o.s.c.s.ClassPathXmlApplicationContext - Bean factory for org.springframework.context.support.ClassPathXmlApplicationContext@71c7db30: org.springframework.beans.factory.support.DefaultListableBeanFactory@4d95d2a2: defining beans [helloWorld]; root of factory hierarchy
11:38:15.888 [main] DEBUG o.s.c.s.ClassPathXmlApplicationContext - Unable to locate MessageSource with name 'messageSource': using default [org.springframework.context.support.DelegatingMessageSource@11758f2a]
11:38:15.889 [main] DEBUG o.s.c.s.ClassPathXmlApplicationContext - Unable to locate ApplicationEventMulticaster with name 'applicationEventMulticaster': using default [org.springframework.context.event.SimpleApplicationEventMulticaster@4671e53b]
11:38:15.890 [main] DEBUG o.s.b.f.s.DefaultListableBeanFactory - Pre-instantiating singletons in org.springframework.beans.factory.support.DefaultListableBeanFactory@4d95d2a2: defining beans [helloWorld]; root of factory hierarchy
11:38:15.890 [main] DEBUG o.s.b.f.s.DefaultListableBeanFactory - Creating shared instance of singleton bean 'helloWorld'
11:38:15.890 [main] DEBUG o.s.b.f.s.DefaultListableBeanFactory - Creating instance of bean 'helloWorld'
11:38:15.898 [main] DEBUG o.s.b.f.s.DefaultListableBeanFactory - Eagerly caching bean 'helloWorld' to allow for resolving potential circular references
11:38:15.914 [main] DEBUG o.s.b.f.s.DefaultListableBeanFactory - Finished creating instance of bean 'helloWorld'
11:38:15.915 [main] DEBUG o.s.c.s.ClassPathXmlApplicationContext - Unable to locate LifecycleProcessor with name 'lifecycleProcessor': using default [org.springframework.context.support.DefaultLifecycleProcessor@2f8f5f62]
11:38:15.915 [main] DEBUG o.s.b.f.s.DefaultListableBeanFactory - Returning cached instance of singleton bean 'lifecycleProcessor'
11:38:15.917 [main] DEBUG o.s.c.e.PropertySourcesPropertyResolver - Searching for key 'spring.liveBeansView.mbeanDomain' in [systemProperties]
11:38:15.917 [main] DEBUG o.s.c.e.PropertySourcesPropertyResolver - Found key 'spring.liveBeansView.mbeanDomain' in [systemProperties] with type [String] and value ''
11:38:15.919 [main] DEBUG o.s.b.f.s.DefaultListableBeanFactory - Returning cached instance of singleton bean 'helloWorld'
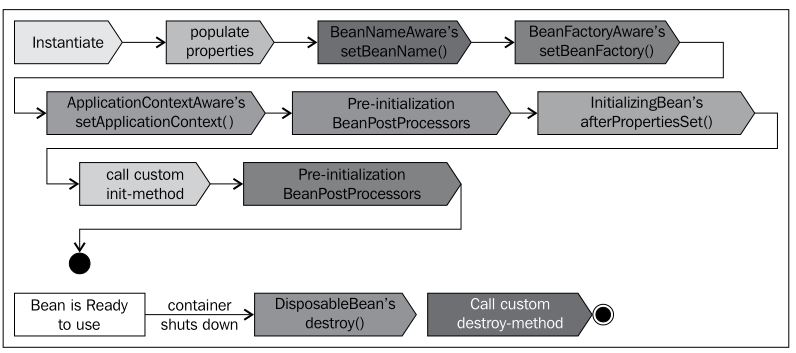
Welcome to the Spring world生命周期信息
ApplicationContextAware:实现setApplicationContext方法。
BeanNameAware:实现setBeanName方法。
InitializingBean:实现InitializingBean方法。
BeanFactoryAware:实现setBeanFactory方法。
BeanPostProcessor:实现postProcessBeforeInitialization和postProcessAfterInitialization方法。
DisposableBean:实现destroy方法。
在HelloWorld类中添加如下方法:
    public void myInit() {
        System.out.println("custom myInit is called ");
    }

    public void myDestroy() {
        System.out.println("custom myDestroy is called ");
    }
修改xml文件:
<bean id="helloWorld" class="com.packt.lifecycle.HelloWorld"
init-method="myInit" destroy-method="myDestroy">
<property name="message" value="Welcome to the Spring world">
</property>
</bean>
修改HelloWorldExample类
    public static void main(String[] args) {
        AbstractApplicationContext context = new ClassPathXmlApplicationContext("applicationContext.xml");
        HelloWorld world = (HelloWorld) context.getBean("helloWorld");
        context.getBean("helloWorld");
        System.out.println(world.getMessage());
        context.registerShutdownHook();
    }
现在执行可以看到“custom myInit is called ”等信息。
autowiring和注解
Spring容器可以自动处理bean之间的依赖关系,这样就没必要使用 <constructor-arg>和 <constructor-arg>标签,简化了应用程序上下文XML配置。
autowiring的类型如下:
•no:默认没有。
•byName:使用配置文件中相同名字的beans定义。
•byType的:使用配置文件中相同属性的beans定义。如果有多个则抛出异常。
•constructor:类似type,但基于构造类型。
•default:先使用constructor,不成功则基于byType。
修改applicationContext.xml:
<?xml version="1.0" encoding="UTF-8"?>
<beans xmlns="http://www.springframework.org/schema/beans"
    xmlns:context="http://www.springframework.org/schema/context"
    xmlns:aop="http://www.springframework.org/schema/aop"
    xmlns:tx="http://www.springframework.org/schema/tx"
    xmlns:xsi="http://www.w3.org/2001/XMLSchema-instance"
    xsi:schemaLocation="http://www.springframework.org/schema/beans http://www.springframework.org/schema/beans/spring-beans.xsd
    http://www.springframework.org/schema/context
    http://www.springframework.org/schema/context/spring-context-4.1.xsd
    http://www.springframework.org/schema/tx http://www.springframework.org/schema/tx/spring-tx-4.1.xsd
    http://www.springframework.org/schema/aop http://www.springframework.org/schema/aop/spring-aop-4.1.xsd
    ">
    <context:annotation-config/>
       <bean name="message" id="message" class="java.lang.String">
           <constructor-arg value="auto wired" />
    </bean>

    <bean id="helloWorld" class="com.example.HelloWorld">
    </bean>

</beans>
注解类型如下:
•@Required:该注释适用于bean的setter方法
•@Autowired:bean的setter方法,构造函数和属性
•@Qualifier:和@Autowired一起用于限定bean。
通过<context:annotation-config/>开启autowiring的注解。
修改HelloWorld:
package com.example;
import org.springframework.beans.BeansException;
import org.springframework.beans.factory.BeanFactory;
import org.springframework.beans.factory.BeanFactoryAware;
import org.springframework.beans.factory.BeanNameAware;
import org.springframework.beans.factory.DisposableBean;
import org.springframework.beans.factory.InitializingBean;
import org.springframework.beans.factory.annotation.Autowired;
import org.springframework.beans.factory.config.BeanPostProcessor;
import org.springframework.context.ApplicationContext;
import org.springframework.context.ApplicationContextAware;
public class HelloWorld implements ApplicationContextAware,BeanNameAware, InitializingBean,
        BeanFactoryAware,BeanPostProcessor,  DisposableBean {

    @Autowired
    private String message;
    public String getMessage() {
        return message;
    }

    @Autowired
    public void setMessage(String message) {
        this.message = message;
    }


    public void setBeanName(String arg0) {
        System.out.println("setBeanName is called with " + arg0);
    }
    @Override
    public void afterPropertiesSet() throws Exception {
        System.out.println("afterPropertiesSet is called ");
    }
    @Override
    public void setBeanFactory(BeanFactory arg0) throws BeansException {
        System.out.println("setBeanFactory is called ");
    }
    public void myInit() {
        System.out.println("custom myInit is called ");
    }
    public void myDestroy() {
        System.out.println("custom myDestroy is called ");
    }

    @Override
    public void destroy() throws Exception {
        System.out.println("destroy is called ");// TODO Auto-generated method stub
    }
    @Override
    public Object postProcessAfterInitialization(Object arg0, String arg1)
            throws BeansException {
        System.out.println("postProcessAfterInitialization is called with "+arg0+" and "+arg1);
        return null;
    }
    @Override
    public Object postProcessBeforeInitialization(Object arg0, String arg1)
            throws BeansException {
        System.out.println("postProcessBeforeInitialization is called with "+arg0+" and "+arg1);
        return null;
    }
    @Override
    public void setApplicationContext(ApplicationContext arg0)
            throws BeansException {
        System.out.println("setApplicationContext is called ");
    }
}
现在执行可以看到”auto wired”信息。
aspect
AOP是Spring框架的关键组件之一。面向对象编程不能很好地处理一些通用功能。比如:
•日志记录和跟踪
•事务管理
•安全
•缓存
•错误处理
•性能监控
•自定义业务规则
•事件处理
AOP覆盖OOP的数据驱动层,用AspectJ和Spring AOP的实现:
•AspectJ:这是原来的AOP技术(从第一个版本的日期1995开始),提供了全面的,面向方向的编程语言,使用字节码修改。
•Spring AOP的:基于Java的AOP框架,它使用动态代理,主要用来解决企业级问题。
•Join point连接点:插入逻辑的连接点。通常在:
°方法调用
°类初始化
°对象初始化
•Advice建议:连接点执行的代码。3种如下:
°before。
°after。
°around(兼具before和after的功能。
•Pointcut切入点:连接点的集合,通常是多个实际Join point的执行点。
•Aspect切面:实现横切,连接advice和Pointcut。一个应用可以有
任何数目的方面的,根据不同的要求。
•Weaving编织:应用到代码的过程,有三种类型:
°编译时
°类加载
°运行时
•目标:
•简介:修改该结构,引入额外的方法或字段。
有两种类型的AOP:
•静态AOP
°weaving是构建过程中的另一个步骤
°例如Java程序,可以过改变和修改应用程序的实际字节码
•动态AOP
°weaving在运行时动态地进行
°很容易改变的weaving过程而无需重新编译
Spring AOP是基于代理。关于代理的更多资料: http://en.wikipedia.org/wiki/Proxy_pattern,下面我们做个简单的演示:
创建接口IMessageWriter:
package com.example;
public interface IMessageWriter {
    void writeMessage();
}
MessageWriter类实现IMessageWriter:
package com.example;
public class MessageWriter implements IMessageWriter {

    @Override
    public void writeMessage() {
        System.out.print("World");
    }
}
调用 writeMessage()是连接点。我们想把“World”把改成“ Hello World !”。MethodInterceptor是AOP标准接口。新建类MessageDecorator:
package com.example;
import org.aopalliance.intercept.MethodInterceptor;
import org.aopalliance.intercept.MethodInvocation;
public class MessageDecorator implements MethodInterceptor {
    public Object invoke(MethodInvocation invocation) throws Throwable {
        System.out.print("Hello ");
        Object retVal = invocation.proceed();
        System.out.println("!");
        return retVal;
    }
}
AOPTest类使用ProxyFactory类创建代理:
package com.example;
import org.springframework.aop.framework.ProxyFactory;
public class AOPTest {
    public static void main(String[] args) {
        MessageWriter target = new MessageWriter();
        // create the proxy
        ProxyFactory pf = new ProxyFactory();
        // Add the given AOP Alliance advice to the tail
        // of the advice (interceptor) chain
        pf.addAdvice(new MessageDecorator());
        // Set the given object as target
        pf.setTarget(target);
        // Create a new proxy according to the
        // settings in this factory
        MessageWriter proxy = (MessageWriter) pf.getProxy();
        // write the messages
        target.writeMessage();
        System.out.println("");
        // use the proxy
        proxy.writeMessage();
    }
}
Spring JDBC
Spring Data Access Object (DAO)支持统一的方式访问JDBC, Hibernate或JDO。Spring还可以处理异常,转换为未检查或者运行时。
DAO支持类如下:
• JdbcDaoSupport
• HibernateDaoSupport
• JdoDaoSupport
• JpaDaoSupport
通常的JDBC访问数据库代码如下:
1.定义连接参数。
2.打开连接。
3.指定的语句。
4.准备和执行该语句。
5.设置循环遍历结果(如果有的话)。
6.处理每个迭代。
7.处理异常。
8.处理事务。
9.关闭连接。
Spring简化为如下:
1.指定语句。
2.处理每个迭代。
Spring-JDBC事务框架包含如下包:
• org.springframework.jdbc.core
• org.springframework.jdbc.datasource
• org.springframework.jdbc.object
• org.springframework.jdbc.support
org.springframework.jdbc.core包含如下类:
• JdbcTemplate
• 不同的回调接口
• 其他相关类
org.springframework.jdbc.datasource包有以下类:
•便于数据源访问的工具类
•各种简单的DataSource实现,用于在J2EE容器之外测试和运行未修改的JDBC代码
•utility类提供静态方法从JNDI获得连接和必要时关闭连接。
•支持绑定线程的连接,例如DataSourceTransactionManager
org.springframework.jdbc.object包含以下内容:
•线程安全并可重用的数据库查询,更新和存储过程类
•这种方法是通过JDO模型,查询对象与数据库断开连接
•JDBC的高层抽象依赖于底层抽象org.springframework.jdbc.core。
该org.springframework.jdbc.support包包含以下内容:
•SQLException的转换功能和一些工具类
•转换异常
•使用Spring JDBC抽象层的代码不需要实现JDBC-或者RDBMS特定的错误处理
•所有unchecked异常。
JdbcTemplate类是org.springframework.jdbc.core的主类。它处理了资源创建和释放,简化了JDBC的使用。这有助于避免通用错误,如不关闭连接。它执行核心JDBC工作流,如语句创建和执行。
TestContext框架介绍
Spring的TestContext框架是一个通用的,注解驱动的框架,用于单元测试和集成测试。框架的资源位于org.springframework.test.context包,约定优于配置,每个配置都有默认值,通过注解可以修改非约定的配置。支持JUnit和TestNG,比如可以自定义JUnit执行器来支持非入侵的POJO测试类。
框架包含的类如下:
•TestContext: 该类提供在测试执行的上下文和上下文管理和缓存支持。加载应用程序上下文使用ContextLoader或SmartContextLoader接口。
•TestContextManager:框架的主入口点。它管理单个TestContext类和发布事件到TestExecutionListener实现。
这是测试执行要点:
°在静态类方法之前,
°在测试执行方法之前,
°在测试实例的准备
°测试执行方法之后
°在静态类方法之后
以下是接口:
•TestExecutionListener
•ContextLoader:这个接口加载集成测试的ApplicationContext
•SmartContextLoader:扩展ContextLoader接口,在Spring3.1引入,处理资源位置,注解类,或上下文初始化,还可以设置 active bean profiles ( @ActiveProfiles )和属性资源。
每个测试有一个TestContextManager类,它管理TestContext并处理 dependency injection, dirty checks, transactional support等。TestContextManager委派TestExecutionListener(通过dependency injection,managing transactions实现实际的测试执行)。
默认TestExecutionListener的实现方式注册方式如下:
• ServletTestExecutionListener: WebApplicationContext的Servlet API mock。
• DependencyInjectionTestExecutionListener
• DirtiesContextTestExecutionListener:检查上下文,确实测试执行时是否有脏bean。它还处理@DirtiesContext注解。
• TransactionalTestExecutionListener:这提供了事务性支持
•SqlScriptsTestExecutionListener:通过@sql注解执行SQL脚本
自定义TestExecutionListener
新建Spring maven新工程SpringTests。
新建类SpringTestsApplication:
package com.example;
import org.springframework.context.ApplicationContext;
import org.springframework.test.context.TestContext;
import org.springframework.test.context.TestExecutionListener;

public class SysOutTestExecutionListener implements TestExecutionListener {

    @Override
    public void afterTestClass(TestContext testContext) throws Exception {
        ApplicationContext ctx = testContext.getApplicationContext();
        System.out.println("In afterTestClass for class = " + testContext.getTestClass());
    }

    @Override
    public void afterTestMethod(TestContext testContext) throws Exception {
        System.out.println("In afterTestMethod for = " + testContext.getTestMethod().getName());
    }

    @Override public void beforeTestClass(TestContext testContext) throws Exception {
        System.out.println("In beforeTestClass for class = " + testContext.getTestClass());
    }

    @Override public void beforeTestMethod(TestContext testContext) throws Exception {
        System.out.println("In beforeTestMethod for =" + testContext.getTestMethod().getName());
    }
    @Override
    public void prepareTestInstance(TestContext testContext) throws Exception {
        System.out.println("In prepareTestInstance for= " + testContext.getTestInstance());
    }
}
新建类:
package com.example;

import org.junit.Test;
import org.junit.runner.RunWith;
import org.springframework.test.context.ContextConfiguration;
import org.springframework.test.context.TestExecutionListeners;
import org.springframework.test.context.junit4.SpringJUnit4ClassRunner;

@RunWith(SpringJUnit4ClassRunner.class)
@ContextConfiguration(locations="classpath:applicationContext.xml")
@TestExecutionListeners({SysOutTestExecutionListener.class})
public class TestExecutionListenerTest {

    @Test
    public void someTest() throws Exception {
        System.out.println("executing someTest");
    }

    @Test
    public void someOtherTest() throws Exception {
        System.out.println("executing someOtherTest");
    }
}
新建文件:SpringTests/src/main/resources/applicationContext.xml
<?xml version="1.0" encoding="UTF-8"?>
<beans xmlns="http://www.springframework.org/schema/beans"
    xmlns:context="http://www.springframework.org/schema/context"
    xmlns:aop="http://www.springframework.org/schema/aop"
    xmlns:tx="http://www.springframework.org/schema/tx"
    xmlns:xsi="http://www.w3.org/2001/XMLSchema-instance"
    xsi:schemaLocation="http://www.springframework.org/schema/beans http://www.springframework.org/schema/beans/spring-beans.xsd
    http://www.springframework.org/schema/context
    http://www.springframework.org/schema/context/spring-context-4.1.xsd
    http://www.springframework.org/schema/tx http://www.springframework.org/schema/tx/spring-tx-4.1.xsd
    http://www.springframework.org/schema/aop http://www.springframework.org/schema/aop/spring-aop-4.1.xsd
    ">
</beans>
另有注册多个监听器和设置默认值的方法,暂时没有试验,请参见:Mockito for Spring – 2015
配置Spring profile
Spring3.1引入了profile。它可以把一个包可以部署在各种环境中,如开dev, test, prod, perf等。
定义的系统属性spring.profiles.active,或使用 @ActiveProfiles注解测试类即可。
修改: applicationContext.xml
<beans xmlns="http://www.springframework.org/schema/beans"
       xmlns:xsi="http://www.w3.org/2001/XMLSchema-instance" xmlns:context="http://www.springframework.org/schema/context"
       xsi:schemaLocation="http://www.springframework.org/schema/beans http://www.springframework.org/schema/beans/spring-beans-3.1.xsd
       http://www.springframework.org/schema/context http://www.springframework.org/schema/context/spring-context-3.1.xsd">

    <bean name="noProfileBean" id="message"
        class="java.lang.String">
        <constructor-arg value="I'm a free bean" />
    </bean>

    <beans profile="dev">
        <bean name="message" id="message" class="java.lang.String">
            <constructor-arg value="I'm a dev bean" />
        </bean>
    </beans>

     <beans profile="prod">
        <bean name="message" id="message" class="java.lang.String">
        <constructor-arg value="I'm a prod bean" />
        </bean>
    </beans>

</beans>
新建测试类:
package com.example;

import static org.junit.Assert.*;

import org.junit.Test;
import org.junit.runner.RunWith;
import org.springframework.beans.factory.annotation.Autowired;
import org.springframework.context.ApplicationContext;
import org.springframework.test.context.ActiveProfiles;
import org.springframework.test.context.ContextConfiguration;
import org.springframework.test.context.junit4.SpringJUnit4ClassRunner;

@RunWith(SpringJUnit4ClassRunner.class)
@ContextConfiguration(locations="classpath:applicationContext.xml")
@ActiveProfiles(profiles={"dev"})
public class ProfileTest {

    @Autowired
    ApplicationContext context;

    @Test
    public void profile() throws Exception {
        assertEquals("I'm a dev bean", context.getBean("message"));
        //assertEquals("I'm a free bean", context.getBean("noProfileBean"));
    }
}
除了ActiveProfiles注解,也可以在环境变量中指定。比如spring.profiles.active = dev。
环境mock
后面补充
JNDI查找mock
后面补充
ReflectionTestUtils
org.springframework.test.util包的ReflectionTestUtils类包含不少反射方法,如设置非公开域或调用private/protected的setter方法等。
如下:
•ORM框架,如JPA和Hibernate
•Spring的注解支持,如@Autowired,@Inject,和@Resource,这对于private/protected域的提供依赖注入,setter方法和配置方法。
下面的示例演示ReflectionUtils的功能:
新增方法:Secret
package com.example;

public class Secret {

    private String secret;
    public void initiate(String key) {
        this.secret = key.replaceAll("a", "z").replaceAll("i", "k");
    }
}
测试代码
package com.example;

import static org.junit.Assert.*;
import java.lang.reflect.Field;
import org.junit.Test;
import org.springframework.util.ReflectionUtils;

public class ReflectionUtilsTest {

    @Test
    public void private_field_access() throws Exception {

        Secret myClass = new Secret();
        myClass.initiate("aio");
        Field secretField = ReflectionUtils.findField(Secret.class, "secret", String.class);
        assertNotNull(secretField);
        ReflectionUtils.makeAccessible(secretField);
        assertEquals("zko", ReflectionUtils.getField(secretField, myClass));
        ReflectionUtils.setField(secretField, myClass, "cool");
        assertEquals("cool", ReflectionUtils.getField(secretField, myClass));
    }
}
Java程序设计入门
这篇教程介绍了Java编程语言的安装和使用,并且包含一些编程实例。
Java简介
历史
Java 编程语言由Sun微电子公司的James Gosling于1991年创建。1995年发布第一个版本(Java 1.0)。2010年 Sun 微电子公司被 Oracle 公司收购,现在 Java 语言由 Oracle公司控制和管理。2006年Sun宣布Java遵循GNU General Public License (GPL), Oracle继续该项目,即OpenJDK。随着时间的推移,新的增强版本的 Java 已经发布,最新的版本是 Java 1.8 即 Java 8。
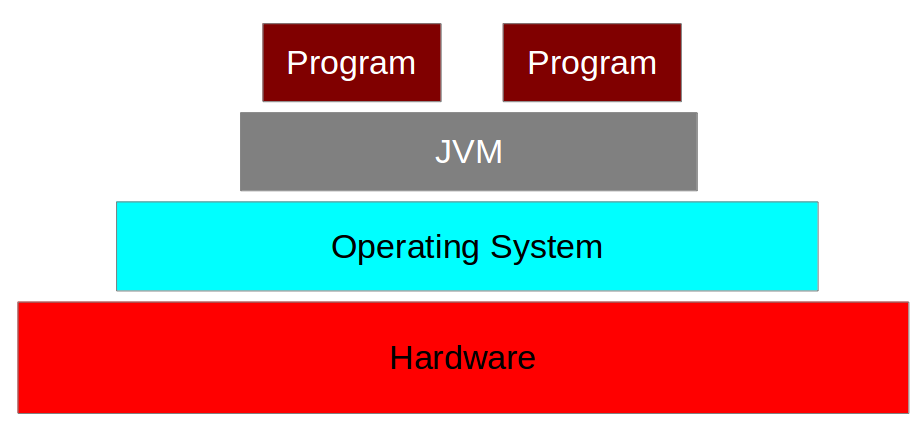
Java由规范确定,包含编程语言、编译器、核心库和JVM (运行时Java virtual machine)。Java运行时允许软件开发者用其他语言编码,仍然运行在Java虚拟机上。 Java平台通常与Java虚拟机和Java核心库相关联。
Java 虚拟机
Java 虚拟机(JVM)可以理解为是由软件实现的虚拟计算机,可以像物理计算机一样执行程序代码。Java 虚拟机在不同操作系统下有特定的版本,比如:针对 Linux 操作系统的版本与针对 Windows 操作系统的版本是不一样的。
Java程序由 Java 编译器编译成字节码(bytecode),编译后的字节码由 Java 虚拟机解释执行。
JRE 和 JDK
Java 的发布版本有两种,Java Runtime Environment(JRE)以及 Java Development Kit(JDK)。
Java Runtime Environment(JRE)包含运行 Java 程序需要的必要组件:Java 虚拟机以及 Java 类库。
Java Development Kit(JDK)包含用来创建 Java 应用程序的必要工具,比如,Java 编译器、Java 虚拟机以及 Java 类库。
Java 语言的特点
Java 语言的设计目标是:一次编写到处运行。
Java 语言有以下特点:
-
平 台无关性:Java 使用 Java 虚拟机运行 Java 程序,Java 虚拟机相当于应用程序和操作系统间的抽象层,应用程序不会直接访问操作系统。这使得 Java 应用程序具备高度的可移植性。一个兼容标准和遵循规则的 Java 应用程序可以无需修改的在所有已支持的平台上工作,例如: Windows 和 Linux。
-
面向对象的编程语言:除了原生数据类型,Java 语言中一切皆对象。
-
强类型编程语言:Java 语言是强类型编程语言。比如:变量类型需要预先定义,严格的类型转换检查(大多数情况下有程序猿完成)。
-
解 释性和编译型语言: Java 源代码被编译成字节码(bytecode)这样使得 Java 语言具备平台独立性。这些字节码(bytecode)指令由 Java虚拟机(JVM)解释执行。JVM 使用 Hotspot 编译技术会将性能相关的字节码指令转换为对用操作系统的二进制代码执行。
-
自动内存管理: Java 。管理新创建对象的内存分配和回收工作应用程序代码不直接访问内存。由称之为垃圾回收(garbage collector)的机制自动删除没有无引用的对象。
Java 语言的语法与 C++ 语言的语法非常接近,Java 语言是大小写敏感的,比如: myValue 变量与 myvalue 变量是两个不同的变量。
Java语言的开发过程
Java 源代码文件是一个纯文本文档,Java 程序员通常在 Integrated Development Evvironment(IDE)中编写 Java 程序。IDE是帮助程序员完成编码工作的工具,它具备自动格式化代码、语法高亮等功能。
Java 程序员(或 IDE)调用 Java 编译工具(javac)编译源代码,Java 编译工具会将源代码编译成字节码(bytecode)指令。这些指令保存在 .class 文件中由 Java 虚拟机(JVM)来运行。
垃圾回收(Garbage collector)
JVM 自动回收没有被引用的内存空间,它会检查所有对象的引用并查找那些对象可以被自动回收。垃圾回收机制使程序员无需手工管理内存,但是程序员还是需要保证程 序中没有不需要的对象引用,否则垃圾回收机制就无法自动释放对象内存。我们通常把不需要的对象引用通常被称为“内存泄漏”。
Classpath
Java 编译器以及 Java 运行时通过类路径(classpath)来查找和装载 .class文件。比如,如果你打算在应用程序中使用第三方 Java 类库那么你需要把类库的路径添加到你的类路径中,否则你的应用程序无法编译或者运行。
安装 Java
检查安装
你的计算机可能已经安装了 Java,你可以在控制台中使用下面命令来测试 Java 是否已安装(如果你使用 Windows 操作系统,可以按下 Win+R,输入 cmd 后回车即可打开控制台):
java -version如果你的计算机已经安装了 Java,你应该会看到输出已安装的 Java 版本信息。如果命令行返回应用程序没有找到,那么你就需要安装 Java 了。
安装 Java
在 Ubuntu 操作系统中,你可以使用下面的命令安装 Java:
sudo apt-get install openjdk-7-jdkjava8的安装:
# install Java from the OpenJDK project
sudo apt-get install openjdk-8-jdk
# in case you prefer the Oracle Java distribution
# you can alternatively use the following commands
sudo add-apt-repository ppa:webupd8team/java
sudo apt-get update
sudo apt-get install oracle-java8-installer
对于 Microsoft Windows 操作系统,可以到 Oracle 官网下载对应的安装包,官网也有相应的文档来指导你如何在其他操作系统上安装 Java。
如果在安装过程中出现了问题,可以使用“how to install JDK on your_os”关键词在谷歌搜索,记住把 “your_os” 替换为你的操作系统名称哦,比如:Windows、Ubuntu、Mac OS X 等等。
验证安装
回到刚才的命令行执行下面的命令:
java -version你会得到下面的输出内容:
$ java -version
java version "1.7.0_79"
OpenJDK Runtime Environment (IcedTea 2.5.6) (7u79-2.5.6-0ubuntu1.14.04.1)
OpenJDK 64-Bit Server VM (build 24.79-b02, mixed mode)
如何查看当前使用的是32位或64位版本的 Java
在64位操作系统上你可以使用32位或64位版本的Java,如果 java -version 命令的输出中包含 64-bit这样的字符串说明你正在使用的 Java 版本是64位的,否则你正在使用的 Java 版本是32位的。下面的是64位版本的输出:
java version "1.7.0_25"OpenJDK Runtime Environment (IcedTea 2.3.10) (7u25-2.3.10-1ubuntu0.13.04.2)
OpenJDK 64-Bit Server VM (build 23.7-b01, mixed mode)
编写源代码
下面的 Java 代码是在 Linux 操作系统命令行上使用文本编辑器(vim、emacs等)编写的。其他操作系统上也类似,这里就不再做介绍了。
首先需要新建一个目录来保存源代码,这里我们使用目录 \home\vogella\javastarter。如果你使用 Windows 目录可能是 c:\temp\javastarter,后面我们会使用 “javadir” 来代表这个路径。
打开一个文本编辑器,不如:Linux操作系统下的 gedit、vim、emacs等,Windows下的 Notepad等,然后输入以下代码:
HelloWorld.java:
// a small Java program
public class HelloWorld {  public static void main(String[] args) {
    System.out.println("Hello World");
  }
}注意:不要使用富文本编辑器,如:Microsoft Word 或者 LibreOffice 来编写源代码。
将源代码保存到 “javadir” 目录下的 HelloWorld.java 文件中。Java 源文件名称始终要与源代码中得类名一致,并且以 .java作为后缀。这个例子中源文件名为 HelloWorld.java 因为我们定义的类名是 HelloWorld。
编译、运行
打开一个Shell(Linux以及Unix-like)或者命令行(Windows),使用 cd javadir 进入 “javadir” 目录,在我们的例子中命令是 cd \home\vogella\javastarter。使用 ls (Window中是 dir)来验证源文件是否存在。
使用下面命令编译源文件:
javac HelloWorld.java命令完成后,重新使用 ls(或者 dir)命令查看目录内容,可以看到目录中多出一个 HelloWorld.class 文件,说明你已经成功的将源代码编译成字节码了。
提示:默认情况下编译器会将每个类文件放在和源文件下共同的目录中。你可以在编译时使用 -d 参数来指定不同的目录。
现在可以运行你的第一个 Java 应用程序了。确保你还在 “javadir” 目录,然后执行下面命令来运行程序:
java HelloWorld程序会在终端输出 “Hello World” 字符串,参考下图

使用类路径(classpath)
你可以通过指定类路径从其他位置运行应用程序。还是打开Shell或者控制台,然后随便进入一个目录,输入以下命令:
java HelloWorld如果你当前不在编译后类文件所在的目录,那么 Java 虚拟机会提示错误:”Exception in thread “main” java.lang.NoClassDefFoundError: HelloWorld”。
要正确运行程序,输入下面的命令(将mydirectory替换为你的”javadir”):
java -classpath "mydirectory" HelloWorld这样你又可以看到 “HelloWorld” 字符串输出了。
Java 语言结构
基础:包(Package)、类(Class)和对象(Object)
了解 Java 的包(Package)、类(Class)和对象(Object)这些基础术语是非常重要的,这部分内容将概要的介绍这些术语。
包(Package)
Java 使用包来组织类,通常按照业务逻辑将类分组到不同的包中。比如:应用程序的所有图形界面可能被分组到 com.vogella.webapplication.views 包中。
通常的做法是使用公司域名的倒序作为顶层包,比如:公司的域名是 “4byte.cn” 那么这个公司 Java 应用的顶层包名可能是 cn.4byte。
包的另一个重要用途是避免类命名冲突,类命名冲突是指两个开发人员为他们编写的类使用了同样的全限定名。Java 中类的全限定名是 报名+‘.’+类名,比如:cn.4byte.HelloWorld。
如果没有包,当两个程序猿同时给他编写的类起名为Test 时就会产生命名冲突(而且操作系统也无法创建文件)。结合 Java 包机制,我们可以明确的告诉虚拟机我们将使用哪个 Test 类,比如:第一个程序员将 Test 类放到 report 包中,另一个程序员将他写得 Test 类放到 xmlreader 包中,那么他们就可以通过全限定名来明确区分两个类 report.Test 以及 xmlreader.Test。
类(class)
定义:类是一个模板,用来定义对象的数据以及行为,可以理解类为对象的蓝图。
在 Java 中使用 class 关键字来定义类,类名的第一个字母必须大写。类体需要在'{..}’中定义。如:
MyClass.java:
package test;

class MyClass {

}
类的数据保存在属性中,类行为由方法实现。Java 源文件需要以 “类名“ + “.java” 的形式保存。
对象(Object)
定义:对象是类的一个实例。 对象是真实的元素具有数据和可执行的操作。每一个对象都是依据类的定义进行创建的。
继承
一个类可以从另一个类派生,我们称之为子类。另一个常用的说法是:一个类扩展另一个类。被派生(或继承或被扩展)的类我们称之为”父类”。
继承允许子类继承父类的方法和行为(这里还没有提到访问限定问题,会在后面介绍),下面的代码演示了如何继承一个类,Java 是单继承体系(与C++不同)一个类只能有一个父类。
MyBaseClass.java:
class MyBaseClass {

  public void hello() {
    System.out.println("Hello from MyBaseClass");
  }
}
public class MyExtensionClass {
}
Object是所有类的父类
Java 中所有的类都隐式继承 Object 类。Object 类为每一个 Java 对象定义了下面的一些方法:
-
equals(other)检查当前对象是否等于other对象 -
getClass()返回对象的类(Class对象) -
hashCode()返回对象的唯一标示符 -
toString()返回当前对象的字符串描述
Modem.java
public class Modem {
    int speed;

    public void displaySpeed() {
        System.out.println("Speed: " + speed);
    }
}
CableModem.java
public class CableModem extends Modem {
    String method = "cable connection";

    public void connect() {
        System.out.println("Connecting to the Internet ...");
        System.out.println("Using a " + method);
    }
}
DslModem.java
public class DslModem extends Modem {
    String method = "DSL phone connection";

    public void connect() {
        System.out.println("Connecting to the Internet ...");
        System.out.println("Using a " + method);
    }
}
ModemTester.java
public class ModemTester {
    public static void main(String[] args) {
        CableModem surfBoard = new CableModem();
        DslModem gateway = new DslModem();
        surfBoard.speed = 500000;
        gateway.speed = 400000;
        System.out.println("Trying the cable modem:");
        surfBoard.displaySpeed();
        surfBoard.connect();
        System.out.println("Trying the DSL modem:");
        gateway.displaySpeed();
        gateway.connect();
    }
}
Point3D.java
import java.awt.*;

public class Point3D extends Point {
    public int z;

    public Point3D(int x, int y, int z) {
        super(x,y);
        this.z = z;
    }

    public void move(int x, int y, int z) {
        this.z = z;
        super.move(x, y);
    }

    public void translate(int x, int y, int z) {
        this.z += z;
        super.translate(x, y);
    }
}
PointTester.java
import java.awt.*;

class PointTester {
    public static void main(String[] args) {
        Point object1 = new Point(11,22);
        Point3D object2 = new Point3D(7,6,64);

        System.out.println("The 2D point is located at (" + object1.x
            + ", " + object1.y + ")");
        System.out.println("\tIt's being moved to (4, 13)");
        object1.move(4,13);
        System.out.println("The 2D point is now at (" + object1.x
            + ", " + object1.y + ")");
        System.out.println("\tIt's being moved -10 units on both the x "
            + "and y axes");
        object1.translate(-10,-10);
        System.out.println("The 2D point ends up at (" + object1.x
            + ", " + object1.y + ")\n");

        System.out.println("The 3D point is located at (" + object2.x
            + ", " + object2.y + ", " + object2.z + ")");
        System.out.println("\tIt's being moved to (10, 22, 71)");
        object2.move(10,22,71);
        System.out.println("The 3D point is now at (" + object2.x
            + ", " + object2.y + ", " + object2.z + ")");
        System.out.println("\tIt's being moved -20 units on the x, y "
            + "and z axes");
        object2.translate(-20,-20,-20);
        System.out.println("The 3D point ends up at (" + object2.x
            + ", " + object2.y + ", " + object2.z + ")");
    }
}
异常处理
异常是表示应用程序的运行时的 错误事件。它破坏了应用程序的正常流程。通常异常会逐层抛出直到被捕获为止。

检查异常示例:
public void fileNotFoundExceptionIsCaughtInside() {
  try {
    createFileReader();
  } catch (FileNotFoundException e) {
    logger.error(e.getMessage(), e);
  }
}

public void fileNotFoundExceptionIsReThrown() throws FileNotFoundException {
  createFileReader();
}

public void createFileReader() throws FileNotFoundException {
  File file = new File("/home/Documents/JavaTraining.txt");
  // creating a new FileReader can cause a FileNotFoundException
  new FileReader(file);
}
运行时异常是方法没有提及的异常,不必显式地捕获。最有名的运行时异常是NullPointerException异常,其运行过程中发生,当一个对象调用为空时。
public void causeANullPointerException() {
  String thisStringIsNull = getMessage(false);

  // because the thisStringIsNull object is null
  // this will cause a NullPointerException
  thisStringIsNull.toLowerCase();
}

public String getMessage(boolean messageIsAvailable) {
  if(messageIsAvailable) {
    return message;
  }

  return null;
}
又一实例:
public class NewCalculator {
    public static void main(String[] arguments) {
        float sum = 0;
        for (int i = 0; i < arguments.length; i++) {
            try {
                sum = sum + Float.parseFloat(arguments[i]);
            } catch (NumberFormatException e) {
                System.out.println(arguments[i] + " is not a number.");
            }
        }
       System.out.println("Those numbers add up to " + sum);
    }
}
捕捉多个异常:
public class NumberDivider {
    public static void main(String[] arguments) {
        if (arguments.length == 2) {
            int result = 0;
            try {
                result = Integer.parseInt(arguments[0]) /
                    Integer.parseInt(arguments[1]);
                System.out.println(arguments[0] + " divided by " +
                    arguments[1] + " equals " + result);
            } catch (NumberFormatException e) {
                System.out.println("Both arguments must be numbers.");
            } catch (ArithmeticException e) {
                System.out.println("You cannot divide by zero.");
            }
        }
    }
}
Exception是所有异常类的子类。 |可用于分割类。
try {
// statements that might cause the exception
} catch (Exception e) {
// what to do when the exception occurs
} finally {
// statements to execute no matter what
}
finally部分不管是否有异常都会执行。
抛出异常:
try {
    principal = Float.parseFloat(loanText) * 1.1F;
} catch (final Exception e) {
    System.out.println(“Error “ + e.getMessage());
    throw e;
}
忽略异常:
public loadURL(String address) throws MalformedURLException {
    URL page = new URL(address);
    loadWebPage(page);
}
实例:
import java.net.*;
public class HomePage {
    String owner;
    URL address;
    String category = "none";
    public HomePage(String inOwner, String inAddress)
        throws MalformedURLException {
        owner = inOwner;
        address = new URL(inAddress);
    }
    public HomePage(String inOwner, String inAddress, String inCategory)
        throws MalformedURLException {
        this(inOwner, inAddress);
        category = inCategory;
    }
}
import java.net.*;
public class PageCatalog {
public static void main(String[] arguments) {
HomePage[] catalog = new HomePage[5];
try {
catalog[0] = new HomePage("Mark Evanier",
"http://www.newsfromme.com", "comic books");
catalog[1] = new HomePage("Todd Smith",
"http://www.sharkbitten.com", "music");
catalog[2] = new HomePage("Rogers Cadenhead",
"http://workbench.cadenhead.org", "programming");
catalog[3] = new HomePage("Juan Cole",
"http://www.juancole.com", "politics");
catalog[4] = new HomePage("Rafe Colburn",
"http://www.rc3.org");
for (int i = 0; i < catalog.length; i++) {
System.out.println(catalog[i].owner + ": " +
catalog[i].address + " -- " +
catalog[i].category);
}
} catch (MalformedURLException e) {
System.out.println("Error: " + e.getMessage());
}
}
}
Java 接口(interface)
接口(interface)
接口是一个契约,用来描述一个实现类可以完成什么任务,接口并没有去实现契约,契约是由实现接口类来实现的。
接口的定义方法跟类很相似,接口中可以定义方法,接口中只能定义抽象方法,不能定义任何具体方法。接口中定义的方法默认都是:public abstract 方法。
接口中可以定义常量,常量默认是:public static final。
实现接口的类需要实现接口中定义的全部方法(如果不想实现部分方法,那么需要定义这个类为抽象类)。如果重写(override)接口中得方法,可以在方法上使用 @override 注解。
下面是定义接口以及实现接口的代码示例:
public interface MyInterface {

    // constant definition
    String URL = "http://www.vogella.com";

    // public abstract methods
    void test();
    void write(String s);

    // default method
    default String reserveString(String s){
      return new StringBuilder(s).reverse().toString();
    }
}
public class MyClassImpl implements MyInterface {
@Override
public void test() {
}
@Override
public void write(String s) {
}
public static void main(String[] args) {
MyClassImpl impl = new MyClassImpl();
System.out.println(impl.reserveString("Lars Vogel"));
}
}没有main方法的,有applets(在web页面中执行)和servlets(在web服务器中执行)。
接口演变
Java 8以前不能给接口创建新方法。Java的8引入了默认方法,类可以重载默认方法 。
多重继承
如果类实现两个接口且这些接口提供相同的默认方法,Java解释规则如下:
-
父类大于父接口 – 如果类继承父类 和父接口的方法,类继承父类方法。
-
子类型大于父类型。
-
在其他情况下的类需要实现的默认方法。见下面列子:
public interface A {
  default void m() {}
}

public interface B {
  default void m() {}
}

public class C implements A, B {
  @Override
  public void m() {}
}
实现时可以调用父类方法:
public class C implements A, B {
  @Override
  public void m() {A.super.m();}
}
函数接口(Functional interfaces)
所有只有一个方法的接口称之为函数式接口(Functional interfaces)。函数式接口的优势是可以结合lambda表达式(“闭包”或“匿名方法”)一起使用(函数式编程 )
Java 编译器可以自动识别函数式接口,然而最好在函数式接口上使用 @FunctionalInterface 注解来体现你的设计意图。
一些 Java 标准库中的函数式接口:
-
java.lang.Runnable -
java.util.concurrent.Callable -
java.io.FileFilter -
java.util.Comparator* -
java.beans.PropertyChangeListener
JDK 的 java.util.function 包包含了一些常用的函数式接口:
Predicate<T>:对象的布尔值属性
Consumer<T>:对象的action
Function<T , R>:转换T为R的函数
Supplier<T>:提供T的实例,类似工厂函数。
UnaryOperator<T>:转换T为T的函数
BinaryOperator<T>:转换(T, T)为T的函数
注解
注解有运行时(RetentionPolicy.RUNTIME)和开发时(RetentionPolicy.SOURCE)两种。
重写方法和@Override 注解
如果一个类继承另一个类,它会继承父类的方法。如果它想要改变父类的一些方法,可重写这些方法。可以在子类中用相同的方法签名重写父类方法。
你可以使用 @Override 注解明确告诉后续的维护代码的程序员以及 Java 编译器,重写了父类对应方法。
@Deprecated表示不推荐使用。
Java 8提供了类型注解,比如:
@NonNull String name;
List<@NonNull String> names;
class UnmodifiableList<T> implements @Readonly List<@Readonly T> {...}
email = (@Email String) input;
new @Information MyObject();
void doSomething() throws @ImportantForMe MyException { ... }
下面的代码演示了如何重写父类的方法:
MyBaseClass.java:
class MyBaseClass {

  public void hello() {
    System.out.println("Hello from MyBaseClass");
  }
}MyExtensionClass2.java:
class MyExtensionClass2 extends MyBaseClass {

  @Override
  public void hello() {
    System.out.println("Hello from MyExtensionClass2");
  }
}
最好始终在重写父类方法时使用 @Override 注解,这样编译机可以帮助开发人员检查是否正确的重写了父类中对应的方法。
变量和方法
原始数据类型和应用
Java 中主要有两大类类型,原始类型(比如:boolean、short、int、double、float、char 以及 byte)和引用类型(比如:Object 和 String)。
原始数据类型
原始数据类型变量用来描述:数字、布尔值(true/false) 或者字符。原始类型变量不是 对象,因此不能通过这些变量执行方法调用。
*,-,+,/只能在原始类型上使用,不过 + 可以在字符串上使用,代表字符串拼接。
int –2.14 billion to 2.14 billion
float decimal numbers of up to 38 figures
double decimal numbers up to 300 figures
character 单个字符
string
byte –128 to 127
short –32,768 to 32,767
long –9.22 quintillion to 9.22 quintillion
long salary = 264_400_000; java 7 支持。
变量名: 字母、下划线或者美元符号开头。
指明数值类型:
float pi = 3.14F;
没有F默认是double,L对应long integer, D对应float。
引用类型
引用类型变量代表到一个对象的引用(或者指针)。如果你修改引用类型变量的值,那么这个变量会指向性的对象或者 null,null代表空引用或者引用到一个不存在的对象。修改应用对象变量并不会修改它指向的对象。修改指向对象的内容也不会影响指向它的引用。
类型自动装箱(Autobox)和拆箱(Wrapper)
每一个原始类型都有对应的引用类型(或者说对应的类)。这些引用类型可以在一个对象中保存对应的原始类型。比如:java.lang.Integer 和 int。
将原始类型转换到一个引用类型的实例或者相反的过程称之为:装箱和拆箱。Java 会在必要的情况下自动执行这些过程。这允许你在调用参数为对象的方法时传递原始类型,这个过程称之为自动装箱。
变量
Java 程序在运行过程中使用变量来保存过程值。变量可以是原始类型也可以使引用类型。原始类型变量保存对应的值,而引用类型变量保存的是对象的引用(指针)。因此,如果你比较两个引用类型变量,你实际上是在比较两个引用类型变量是否指向同一个对象。因此,比较对象时需要使用 object1.equals(object2) 。
实例变量
实例变量定义在对象一级,在对象生命周期内都可以访问。实例变量可以赋予任何访问控制并且可以被标注为 final 或者 transient。
被标注为 final 的实例变量在被赋值后是不能被改变的(实际就是只能被赋值一次)。通常情况下,final变量有3个地方可以赋值:直接赋值,构造函数中,或是初始化块中。
由于在java的语法中,声明和初始化是联系在一起的,也就是说:如果你不显示的初始化一个变量,系统会自动用一个默认值来对其进行初始化(如 int就是0)。对于final变量,在声明时,如果你没有赋值,系统默认这是一个空白域,在构造函数进行初始化,如果同时也是是静态的 (static),则可以在初始化块赋值。
局部变量(Local variable)
局部变量不能赋予除 final 以外的访问控制修饰,final 修饰的局部变量在赋值后不可以被改变。
局部变量不会分配默认值,因此需要在使用前初始化它们。
方法
方法是具备参数表以及返回值的代码块,需要通过对象来调用方法,下面是一个 tester 方法的定义:
MyMethodExample.java:
public class MyMethodExample {
  void tester(String s) {
    System.out.println("Hello World");
  }
}方法可以定义可变参数(var-args),定义类可变参数的方法可以接受0个或者多个值(语法:type ... name;,一个方法只能定义一个可变参数,而且必须是方法参数表的最后一个参数定义。
重写父类方法:子类方法需要与父类方法有完全相同个数和类型的参数以及相同类型的返回值。
重载方法:重载方法是指多个方法有相同的方法名,但是有不同个数或类型参数,返回类型不同不能区分重载方法。
主方法(Main method)
具有 public static 签名的方法可以用来启动 Java 应用程序(主入口),这个方法通常是 main 方法
public static void main(String[] args) {

}
构造函数(Constructor)
类包含它的构造函数,构造函数式在类构造时被调用的方法(执行 new SomeClass 时调用)。构造函数的声明方式与方法类似,唯一的要求就是构造函数名必须与类名相同且不许定义返回类型。
类可以有多个重载的构造函数,参考上一节对重载的描述。每一个类需要有至少一个构造函数。下面构造函数代码示例:
MyConstructorExample2.java:
public class MyConstructorExample2 {

  String s;

  public MyConstructorExample2(String s) {
    this.s = s;
  }
}
如果代码中没有明确编写构造函数,编译器会在编译期间隐式添加一个,如果一个类继承与其他类,那么父类的构造函数会被隐式调用。
下面的例子中不需要定义一个无参的空构造函数,如果类中没有定义构造函数,那么编译器会在编译期间为你定义一个构造函数:
MyConstructorExample.java:
public class MyConstructorExample {

  // unnecessary: would be created by the compiler if left out
  public MyConstructorExample() {
  }
}
构造函数的命名约定是: classname (Parameter p1, ...) { }。每一个对象是基于构造函数创建的,构造函数是对象可以使用之前被调用的第一个方法。
Virus.java
public class Virus {
    static int virusCount = 0;

    public Virus() {
        virusCount++;
    }

    static int getVirusCount() {
        return virusCount;
    }
}
VirusLab.java
public class VirusLab {
    public static void main(String[] args) {
        int numViruses = Integer.parseInt(args[0]);
        if (numViruses > 0) {
            Virus[] virii = new Virus[numViruses];
            for (int i = 0; i < numViruses; i++) {
                virii[i] = new Virus();
            }
            System.out.println("There are " + Virus.getVirusCount()
                + " viruses.");
        }
    }
}
修饰符(Modifiers)
访问控制修饰符
有三个用于访问控制的关键字: public、protected 和 private
和 4 种访问控制级别:public、protected、default 以及 private,这些级别用来定义元素对其他组件的可见性。
如果某些元素被声明为 public。比如:类或者方法,那么它们可以由其它 Java 对象创建或访问。如果某些元素被声明为 private,比如一个方法,那么这个方法就只能被定义它的类中的元素访问。
访问级别 protected 和 default 很相似,一个 protected 的类只能被同一个包中的类或者它的子类(同一个包或者其他包)访问,default 访问级别的类只能被同一个包中的类访问。
下表是访问级别的总结。
表1. 访问级别
| 修饰符 | 类 | 包 | 子类 | 全局 |
|---|---|---|---|---|
| public | Y | Y | Y | Y |
| protected | Y | Y | Y | N |
| no modifier | Y | Y | N | N |
| private | Y | N | N | N |
其他修饰符
-
final方法:不可以被子类重写 -
abstracct方法:抽象方法,没有实现的方法 -
synchronized方法:线程安全的方法,可以是final方法以及赋予其他任何访问控制 -
native方法:这种方法用来编写平台相关代码(比如:针对 Linux、Windows或Mac OS X等特定操作系统的本地代码) -
strictfp:strictfp关键字可应用于类、接口或方法。使用strictfp关键字声明一个方法时,该方法中所有的float和double表达式都严格遵守FP-strict的限制,符合IEEE-754规范。当对一个类或接口使用strictfp关键字时,该类中的所有代码,包括嵌套类型中的初始设定值和代码,都将严格地进行计算。严格约束意味着所有表达式的结果都必须是 IEEE 754 算法对操作数预期的结果,以单精度和双精度格式表示。
import语句
使用 import 语句
在 Java 开发中我们需要使用类的全名来访问类,比如:cn.4byte.some_package.SomeClass。
你可以在类中使用 import 语句引入一些类或包,这样你在类中可以不用使用全名称来访问引入的类。
静态导入
static import 特性可以让我们在类中使用公共静态类( public static 定义的类)中的成员(方法、属性),而不需要在使用时指定定义成员的类。
该功能提供了一种类型安全的机制,让我们在代码中使用常量,而不必引用最初定义的常量的类。
更多的java语言结构
类方法和类变量
与实例方法和实例变量不同,类方法和类变量是关联类的。需要使用 类名+’.’+方法名或变量名的方式访问类方法和类变量,如:SomeClass.someMethod 或者 SomeClass.someVariable。
类方法和类变量需要使用 static 关键字来定义,类方法通常称为静态方法,类变量通常称为静态变量或者静态属性。
类变量的一个例子就是使用 System.out.println("Hello World") 调用 println 函数,这里的 out 就是一个静态域(静态变量),它是 PrintStream 的实例,我们通过它来调用 println 方法。
当你定义类变量后,Java 运行时环境在加载类时就会会为类变量分配固定的内存以及访问地址,因此无论类有多少个实例它的类变量始终指向相同的内存地址。我们可以将类变量理解为全局变量。下面的代码演示如何使用 static 域:
MyStaticExample.java
public class MyStaticExample {

  static String PLACEHOLDER = "TEST";

  static void test() {
    System.out.println("Hello");
  }
}
Main.java:
public class Tester {

  public static void main(String[] args) {
    System.out.println(MyStaticExample.PLACEHOLDER);
    MyStaticExample.test();
  }
}
如果想要将变量定义为常量,可以使用 static final 关键字声明这个变量。
静态方法只能通过类来访问,不可以使用类的实例访问,它不能直接访问类中的非静态变量和方法。
抽象类和抽象方法
类以及方法可以被声明为抽象的 abstract。如果一个类包含至少一个抽象方法(只有方法声明,没有方法实现)那么这个类就是一个抽象类,它也需要使用 abstract 关键字声明,并且这个类是不能够被直接实例化的。抽象类的子类需要实现抽象类中的抽象方法,除非子类也是抽象类。
下面是抽象类定义的代码示例:
MyAbstractClass.java:
public abstract class MyAbstractClass {
  abstract double returnDouble();
}
类中类
下面Wrecker.java编译后生成 Wrecker.class和VirusCode.class。
public class Wrecker {
    String author = “Ignoto”;

    public void infectFile() {
        VirusCode vic = new VirusCode(1024);
    }
}

class VirusCode {
    int vSize;

    VirusCode(int size) {
        vSize = size;
    }
}
下面Wrecker.java编译后生成 Wrecker.class和Wrecker$VirusCode.class。
public class Wrecker {
    String author = “Ignoto”;

    public void infectFile() {
        VirusCode vic = new VirusCode(1024);
    }

    class VirusCode {
        int vSize;

        VirusCode(int size) {
            vSize = size;
        }
    }
}
备忘清单
使用类
在 Java 开发中你需要编写很多的类、方法、和实例变量,下面的代码使用 test 作为包名。
表格2
| What to do | How to do it |
|---|---|
| 创建MyNewClass类 | |
| 创建 var1 变量 |
|
| 创建构造函数,为 var1 赋值 | |
| 创建doSomeThing方法 |
|
| 创建doSomeThing2方法 | |
|
|
|
| 创建 MyOtherClass 类,以及两个属性 myvalue 和 dog及其set和get。 | |
this表示当前对象,这种方式引用变量可读性更好。
使用局部变量
局部变量只能在方法中定义
表格3
| 目的 | 实现 |
|---|---|
| 创建 String 类型的局部变量 | String variable1; |
| 创建 String 类型的局部变量,并赋值 “Test” | String variable2 = "Test"; |
创建 Person 类型的局部变量 |
Person person; |
创建 Person 类型的局部变量,并创建 Person 对象赋值给它 |
Person person = new Person(); |
创建字符串数组 |
String array[]; |
| 创建 Person 数组并指定数组长度为 5 | Person array[]= new Person[5]; |
| 创建局部变量 var1 赋值 5 | var1 = 5; |
| 将 pers1 指向 pers2 | pers1 = pers2; |
| 创建 ArrayList 元素类型为 Person | ArrayList<Person> persons; |
| 创建新的 ArrayList 并赋值给 persons | persons = new ArrayList<Person>(); |
| 创建 ArrayList 元素类型为 Person,并实例化 | ArrayList<Person> persons = new ArrayList<Person>(); |
集成开发环境(IDE)
前面的章节介绍了如何在Shell(命令行)中创建和编译 Java 应用程序。 Java集成开发环境(IDE)提供了大量用于创建Java程序的易用功能。有很多功能丰富的 IDE 比如:Eclipse IDE
更多的信息可以参考 教程。
术语 “创建一个 Java 项目(Create a Java project)”在这里可以理解为在 Eclipse 中创建一个 Java 项目。
练习:创建 Java 对象和方法
创建 Person 类并且实例化它
-
创建一个 Java 项目叫 exercises1 并且使用
com.vogella.javastarter.exercises1作为包名。 -
创建
Person类,并且为这个类增加三个实例变量:firstName、lastName和age。 -
使用
Person的构造函数设置默认值。 -
添加下面的
toString方法并完善TODO内容,用于转换对象为字符串表示。
@Override
public String toString() {
    // TODO replace "" with the following:
    // firstName + " " + lastName
  return "";
}-
创建
Main类,并定义方法public static void main(String[] args),在这个方法中创建Person类的实例。
使用构造函数
为你的 Person 类添加构造函数,构造函数定义两个参数用来传递 first name 和 last name。并将这两个参数的值赋给对应的实例变量。
定义 getter 和 setter 方法
定义用来读取和设置实例变量值的方法,这些方法被称为 getter 和 setter 方法。
Getter 方法命名方式是: get+实例变量名(实例变量名首字符需要大写)比如: getFirstName()。
Setter 方法命名方式是:set+实例变量名(实例变量名手字符需要大写)比如:setFirstName(String value)。
修改 main 方法,使用 getter 和 setter 方法修改 Person 对象的 last name字段。
创建 Address 对象
创建Address 类用来保存 Person 的地址。
在 Person 对象中增加一个新的 Address 类型实例变量,以及对应的 getter 和 setter 方法。
答案:创建 Java 对象以及方法
创建 Person 类并实例化
Person.java:
package exercises.exercise04;

class Person {

  String firstname = "Jim";
  String lastname = "Knopf";
  int age = 12;

  @Override
  public String toString() {
    return firstName + " " + lastName;
  }
}
Main.java:
package exercises.exercise04;
public class Main {

  public static void main(String[] args) {
    Person person = new Person();

    //  this calls the toString method on the pers object
    System.out.println(pers);
  }
}
使用构造函数
package com.vogella.javastarter.exercises1;

class Person {

  String firstName;
  String lastName;
  int age;

  public Person(String a, String b, int value) {
    firstName = a;
    lastName = b;
    age=value;
  }

  @Override
  public String toString() {
    return firstName + " " + lastName;
  }
}
Main.java:
package com.vogella.javastarter.exercises1;
public class Main {

  public static void main(String[] args) {

    Person p1 = new Person("Jim", "Knopf" , 12);
    System.out.println(p1);
    // reuse the same variable and assign a new object to it
    Person p2 = new Person("Henry", "Ford", 104);
    System.out.println(p2);
  }
}
定义 getter 和 setter 方法
package com.vogella.javastarter.exercises1;

class Person {

  String firstName;
  String lastName;
  int age;

  public Person(String a, String b, int value) {
    firstName = a;
    lastName = b;
    age = value;
  }

  public String getFirstName() {
    return firstName;
  }

  public void setFirstName(String firstName) {
    this.firstName = firstName;
  }

  public String getLastName() {
    return lastName;
  }

  public void setLastName(String lastName) {
    this.lastName = lastName;
  }

  public int getAge() {
    return age;
  }

  public void setAge(int age) {
    this.age = age;
  }

  @Override
  public String toString() {
    return firstName + " " + lastName;
  }
}
Main.java:
package com.vogella.javastarter.exercises1;

public class Main {

  public static void main(String[] args) {

    Person person = new Person("Jim", "Knopf", 21);
    Person p2 = new Person("Jill", "Sanders", 20);
    // Jill gets married to Jim
    // and takes his name
    p2.setLastName("Knopf");
    System.out.println(p2);
  }
}
创建 Address 对象
Address.java:
package com.vogella.javastarter.exercises1;

public class Address {

  private String street;
  private String number;
  private String postalCode;
  private String city;
  private String country;

  public String getStreet() {
    return street;
  }

  public void setStreet(String street) {
    this.street = street;
  }

  public String getNumber() {
    return number;
  }

  public void setNumber(String number) {
    this.number = number;
  }

  public String getPostalCode() {
    return postalCode;
  }
  public void setPostalCode(String postalCode) {
    this.postalCode = postalCode;
  }

  public String getCity() {
    return city;
  }

  public void setCity(String city) {
    this.city = city;
  }

  public String getCountry() {
    return country;
  }

  public void setCountry(String country) {
    this.country = country;
  }

  public String toString() {
    return street + " " + number + " " + postalCode + " " + city + " "
        + country;
  }
}
Person.java:
package com.vogella.javastarter.exercises1;

class Person {

  String firstName;
  String lastName;
  int age;
  private Address address;

  public Person(String a, String b, int value) {
    firstName = a;
    lastName = b;
    age=value;
  }

  public String getFirstName() {
    return firstName;
  }

  public void setFirstName(String firstName) {
    this.firstName = firstName;
  }

  public String getLastName() {
    return lastName;
  }

  public void setLastName(String lastName) {
    this.lastName = lastName;
  }

  public int getAge() {
    return age;
  }

  public void setAge(int age) {
    this.age = age;
  }

  public Address getAddress() {
    return address;
  }

  public void setAddress(Address address) {
    this.address = address;
  }

  @Override
  public String toString() {
    return firstName + " " + lastName;
  }
}
Main.java:
package com.vogella.javastarter.exercises1;

public class Main {

  public static void main(String[] args) {

    // I create a person
    Person pers = new Person("Jim", "Knopf", 31);
    // set the age of the person to 32
    pers.setAge(32);

    // just for testing I write this to the console
    System.out.println(pers);
    /*
     * actually System.out.println always calls toString, if you do not
     * specify it so you could also have written System.out.println(pers);
     */
    // create an address
    Address address = new Address();
    // set the values for the address
    address.setCity("Heidelberg");
    address.setCountry("Germany");
    address.setNumber("104");
    address.setPostalCode("69214");
    address.setStreet("Musterstr.");

    // assign the address to the person
    pers.setAddress(address);

    // dispose reference to address object
    address = null;

    // person is moving to the next house in the same street
    pers.getAddress().setNumber("105");

  }

}
基础语句
if-then 和 if-then-else 语句
if-then 语句是控制语句,如果 if 部分表达式的结果为 true 将执行其定义的代码块。当 if 部分表达式结果为 false 则执行 else 代码块(若有的话)。
下面的代码演示了通过两个方法演示了 if-then 以及 if-then-else 语句:
class Game {
    public static void main(String[] arguments) {
        int total = 0;
        int score = 7;
        if (score == 7) {
            System.out.println("You score a touchdown!");
        }
        if (score == 3) {
            System.out.println("You kick a field goal!");
        }
        total = total + score;
        System.out.println("Total score: " + total);
    }
}
Switch
switch 语句是一个多条件选择执行语句简称开关语句,类似于 if-else语句。在 switch 的每一个分支里面都必须写 break,break 表示退出整个 switch语句,如果不使用 break 语句则当第一个 case 匹配后,会顺序执行后面的程序代码,而不管后面的 case 是否匹配,直到遇到 break语句为止,下面是 switch 语句的一个示例:
import java.util.*;

class Clock {
    public static void main(String[] arguments) {
        // get current time and date
        Calendar now = Calendar.getInstance();
        int hour = now.get(Calendar.HOUR_OF_DAY);
        int minute = now.get(Calendar.MINUTE);
        int month = now.get(Calendar.MONTH) + 1;
        int day = now.get(Calendar.DAY_OF_MONTH);
        int year = now.get(Calendar.YEAR);

        // display greeting
        if (hour < 12) {
            System.out.println("Good morning.\n");
        } else if (hour < 17) {
            System.out.println("Good afternoon.\n");
        } else {
            System.out.println("Good evening.\n");
        }

        // begin time message by showing the minutes
        System.out.print("It's");
        if (minute != 0) {
            System.out.print(" " + minute + " ");
            System.out.print( (minute != 1) ? "minutes" :
                "minute");
            System.out.print(" past");
        }

        // display the hour
        System.out.print(" ");
        System.out.print( (hour > 12) ? (hour - 12) : hour );
        System.out.print(" o'clock on ");

        // display the name of the month
        switch (month) {
            case 1:
                System.out.print("January");
                break;
            case 2:
                System.out.print("February");
                break;
            case 3:
                System.out.print("March");
                break;
            case 4:
                System.out.print("April");
                break;
            case 5:
                System.out.print("May");
                break;
            case 6:
                System.out.print("June");
                break;
            case 7:
                System.out.print("July");
                break;
            case 8:
                System.out.print("August");
                break;
            case 9:
                System.out.print("September");
                break;
            case 10:
                System.out.print("October");
                break;
            case 11:
                System.out.print("November");
                break;
            case 12:
                System.out.print("December");
        }

        // display the date and year
        System.out.println(" " + day + ", " + year + ".");
    }
}
switch的后面可以带类型: character, an integer, or a string,后面要接break。 另外还有default。注意string在java7才支持。
public class Commodity {
    public static void main(String[] arguments) {
        String command = "BUY";
        int balance = 550;
        int quantity = 42;

        switch (command) {
            case "BUY":
               quantity += 5;
                balance -= 20;
                break;
            case "SELL":
                quantity -= 5;
                balance += 15;
        }
        System.out.println("Balance: " + balance + "\n"
            + "Quantity: " + quantity);
        }
}
布尔操作
使用 == 来比较两个原始类型是否相同或者比较两个引用类型是否指向同一个对象。使用 equals() 方法比较两个不同的对象是否相等。
&& 和 || 都是短路方法,意思是一旦表达 式中某个条件判断结果已经明确时,方法会停止不再执行后面的条件判断。比如:(true || ...) 结果始终是 true,(false && ...) 结果始终是 false。使用示例:(var !=null && var.method1() ...)确保在调用 var.method1() 之前变量 var 始终不为 null。
表4
| Operations | Description |
|---|---|
== |
比较,对于原始类型比较两个值,对于引用比较引用的对象地址 |
&& |
与 |
!= |
不等于 |
a.equals(b) |
检查字符串 a 是否等于字符串 b |
a.equalsIgnoreCase(b) |
检查字符串 a 是否等于字符串 b,忽略大小写 |
If (value ? false : true) {} |
三元操作,如果 value == true 返回 true |
循环语句
for 循环
循环处理的语句。Java的for语句形式有两种:一种是和C语言中的for语句形式一样,另一种形式用于在集合和数组之中进行迭代。有时候把这种形式称为增强的 for(enhanced for) 语句,它可以使循环更加紧凑和容易阅读。它的一般形式为 for(;;) 语句; 初始化总是一个赋值语句,它用来给循环控制变量赋初值;条件表达式是一个关系表达式,它决定什么时候退出循环;增量定义循环控制变量每循环一次后 按什么方式变化。这三个部分之间用”;”分开。例如:
for循环定义:
for(initialization; expression; update_statement)
{   //block of code to run
}
示例语句:
public class ForTest {
  public static void main(String args[]) {
  for(int i = 1; i < 10; i = i+1) {
    System.out.println("value of i : " + i);
    }
  }
}
多个变量:
int i, j;
for (i = 0, j = 0; i * j < 1000; i++, j += 2) {
    System.out.println(i + “ * “ + j + “ = “ + (i * j));
}
初始化部分也可以为空。
for ( ; displayCount < endValue; displayCount++) {
    // loop statements would be here
}
While循环
while 循环语句是一个控制结构,可以重复的特定任务次数。在执行时,如果布尔表达式的结果为真,则循环中的动作将被执行,否则就跳出循环。
语法:
while(expression)
{  // block of code to run
}
示例:
public class WhileTest {

  public static void main(String args[]) {

    int x = 1;
    while (x < 10) {
      System.out.println("value of x : " + x);
      x++;
    }
  }
}
do-while 循环
do-while 循环与 while 循环非常类似,区别在于 while 循环先进行条件判断再开始循环,do-while 循环则是先循环在进行条件判断。
语法:
do{
    // block of code to run
} while(expression);
示例:
public class DoTest {
  public static void main(String args[]) {
    int x = 1;
    do {
      System.out.println("value of x : " + x);
      x++;
    } while (x < 10);
  }
}
循环命名适用于continue和break。
int points = 0;
int target = 100;
targetLoop:
while (target <= 100) {
    for (int i = 0; i < target; i++) {
        if (points > 50)
            break targetLoop;
        points = points + i;
    }
}
数组
数组是有序数据(同一类型数据)的集合,数组中的项称为元素,数组中的每个元素使用相同的数组名和下标来唯一地确定数组中的元素。数组中的第一个元素下标为 0,第二个元素下标为 1 … 以此类推。
布尔类型在数组中默认值false,int默认值0,字符串 ‘\0’,对象类型则默认为null。
长度:.length。
public class TestMain {
    public static void main(String[] args) {

        // declares an array of integers
        int[] array;

        // allocates memory for 10 integers
        array = new int[10];

        // initialize values
        array[0] = 10;
        // initialize second element
        array[1] = 20;
        array[2] = 30;
        array[3] = 40;
        array[4] = 50;
        array[5] = 60;
        array[6] = 70;
        array[7] = 80;
        array[8] = 90;
        array[9] = 100;
    }
}
字符串也可以当做数组处理:
class SpaceRemover {
    public static void main(String[] args) {
        String mostFamous = "Rudolph the Red-Nosed Reindeer";
        char[] mfl = mostFamous.toCharArray();
        for (int dex = 0; dex < mfl.length; dex++) {
            char current = mfl[dex];
            if (current != ' ') {
                System.out.print(current);
            } else {
                System.out.print('.');
            }
        }
        System.out.println();
    }
}
数组排序
import java.util.*;

class Name {
    public static void main(String[] args) {
        String names[] = { "Lauren", "Audrina", "Heidi", "Whitney",
            "Stephanie", "Spencer", "Lisa", "Brody", "Frankie",
            "Holly", "Jordan", "Brian", "Jason" };
        System.out.println("The original order:");
        for (int i = 0; i < names.length; i++) {
            System.out.print(i + ": " + names[i] + " ");
        }
        Arrays.sort(names);
        System.out.println("\nThe new order:");
        for (int i = 0; i < names.length; i++) {
            System.out.print(i + ": " + names[i] + " ");
        }
        System.out.println();
    }
}
注意:字符串和基础类型只能升序。
下面统计单词出现次数:
class Wheel {
    public static void main(String[] args) {
        String phrase[] = {
            "A STITCH IN TIME SAVES NINE",
            "DON'T EAT YELLOW SNOW",
            "JUST DO IT",
            "EVERY GOOD BOY DOES FINE",
            "I WANT MY MTV",
            "I LIKE IKE",
            "PLAY IT AGAIN, SAM",
            "FROSTY THE SNOWMAN",
            "ONE MORE FOR THE ROAD",
            "HOME FIELD ADVANTAGE",
            "VALENTINE'S DAY MASSACRE",
            "GROVER CLEVELAND OHIO",
            "SPAGHETTI WESTERN",
            "AQUA TEEN HUNGER FORCE",
            "IT'S A WONDERFUL LIFE"
        };
        int[] letterCount = new int[26];
        for (int count = 0; count < phrase.length; count++) {
            String current = phrase[count];
            char[] letters = current.toCharArray();
            for (int count2 = 0;  count2 < letters.length; count2++) {
                char lett = letters[count2];
                if ( (lett >= 'A') & (lett <= 'Z') ) {
                    letterCount[lett - 'A']++;
                }
            }
        }
        for (char count = 'A'; count <= 'Z'; count++) {
            System.out.print(count + ": " +
                letterCount[count - 'A'] +
                " ");
        }
        System.out.println();
    }
}
针对数组和容器增强的 for循环
可以使用下面更简单的 for 循环语句来遍历数组以及容器类,语法为:
for(declaration : expression)
{
  // body of code to be executed
}
用法示例:
public class TestMain {
    public static void main(String[] args) {

        // declares an array of integers
        int[] array;

        // allocates memory for 10 integers
        array = new int[10];

        // initialize values
        array[0] = 10;
        // initialize second element
        array[1] = 20;
        array[2] = 30;
        array[3] = 40;
        array[4] = 50;
        array[5] = 60;
        array[6] = 70;
        array[7] = 80;
        array[8] = 90;
        array[9] = 100;

        int idx = 0;
        for (int i : array) {
            System.out.println("Element at index " + idx + " :"  + i);
            idx++;
        }
    }
}
字符串
Java 中的字符串
Java 语言中使用 String 类来表示字符串,所有的字符串,如:”hello” 都是这个类的一个实例。字符串是不可变类型,比如:给String 对象赋新的值会创建一个新的 String 对 象。
Java 中的字符串池
Java 使用 String 池来提高字符串对象的内存使用效率。因为 Java 中字符串对象是不可变类型,因此字符串池允许重复使用已存在的字符串而不是每次都创建一个新的。
如果同一个字符串在 Java 代码中被多次使用,Java 虚拟机只会创建一个改字符串实例,并将其保存在字符串池中。
当一个 String 对象创建后,如:String s = "constant",字符串 “connstant” 会被保存在池中。不过,new 操作符会强制创建一个新的 String 对象拷贝, 并为它分配新的内存,比如:String s = new String("constant");。
在 Java 中比较字符串
在 Java 中需要使用 equals() 来比较字符串对象,比如:s1.equals(s2)。使用 == 来比较字符串对象是不正确的,因为 == 是用来比较对象引用是否相同。由于 Java 使用字符串池,因此 == 在某些时候会给出正确的结果。
下面的例子将会得到正确的结果:
String a = "Hello";
String b = "Hello";
if (a==b) {
  // if statement is true
  // because String pool is used and
  // a and b point to the same constant
}
下面的比较会返回 false:
String a = "Hello";
String b = new String("Hello");
if (a==b) {

} else {
                  // if statement is false
  // because String pool is used and
  // a and b point to the same constant
}
警告:当进行字符串比较时,应该总是使用 equals() 方法。等于判断:favorite.equals(guess)。
长度计算:
String cinematographer = “Stuart Dryburgh”;
int nameLength = cinematographer.length();
字符串连接时,有一方是字符串,另一方可以转为字符串,这点比python要爽。
使用字符串
String是对象,首字母大写。
println()比print()多了换行
转义字符
\’ Single quotation mark
\” Double quotation mark
\\ Backslash
\t Tab
\b Backspace
\r Carriage return
\f Formfeed
\n Newline
下面的表格列出了常用的字符串方法
表格5:
| Command | Description |
|---|---|
"Testing".equals(text1); |
字符串对象 text1 的值等于 “Testing” 时返回 true |
"Testing".equalsIgnoreCase(text1); |
字符串对象 text1 的值等于 “Testing” 时返回 true。忽略大小写 |
StringBuffer str1 = new StringBuffer(); |
声明并实例化一个 StringBuffer 对象 |
str.charat(1); |
返回字符串中位置 1 的字符 |
str.substring(1); |
删除第一个字符,只影响输出结果 |
str.substring(1, 5); |
返回第2个至第5个字符 |
str.indexOf("Test") |
在字符串中查找 “Test” 并返回位置 |
str.lastIndexOf("ing") |
从后向前在字符串中查找 “ing” 并返回位置 |
str.endsWith("ing") |
检查字符串是否以 “ing” 结尾 |
str.startsWith("Test") |
检查字符串是否以 “Test” 开头 |
str.trim() |
删除字符串前后的空格 |
str.replace(str1, str2) |
将字符串中的 "str1" 替换为 "str2" |
str2.concat(str1); |
将 “str1” 拼接到 “str2” 尾部 |
str.toLowerCase()/str.toUpperCase() |
转换字符串为小写或大写 |
str1 + str2 |
连接字符串 |
|
|
将字符串根据 “-” 分隔成字符串数组。注意分割内容部分是正则表达式。 |
toUpperCase() toLowerCase() 不会改变原字符串。indexOf() 找不到返回-1,否则返回索引。
class Credits {
    public static void main(String[] args) {
        // set up film information
        String title = "The Piano";
        int year = 1993;
        String director = "Jane Campion";
        String role1 = "Ada";
        String actor1 = "Holly Hunter";
        String role2 = "Baines";
        String actor2 = "Harvey Keitel";
        String role3 = "Stewart";
        String actor3 = "Sam Neill";
        String role4 = "Flora";
        String actor4 = "Anna Paquin";
        // display information
        System.out.println(title + " (" + year + ")\n" +
            "A " + director + " film.\n\n" +
            role1 + "\t" + actor1 + "\n" +
            role2 + "\t" + actor2 + "\n" +
            role3 + "\t" + actor3 + "\n" +
            role4 + "\t" + actor4);
    }
}
Lambda 表达式
什么是 lambda 表达式
Java 编程语言从 Java 8 开始支持 lambda 表达式。Lambda 表达式是可以作为参数使用的一段代码。lambda 表达式允许指定的代码在稍后执行。Lambda 表达式 用于任何函数式接口适用的地方。
lambda 表达式和闭包的区别
lambda 表达式是一个匿名函数,比如:它可以作为参数定义。闭包是一个拥有许多变量和绑定了这些变量的环境的表达式(通常是一个函数),因而这些变量也是该表达式的一部分。这意味着闭包可以访问不在他参数列表中的变量,并且可以将闭包赋值给一个变量。
Java 支持 lambda 表达式,但不支持闭包。
引入 lambda 表达式的目的
使用 lambda 表达式比其他 Java 语法结构更加简洁,比如,Java 8 中 Collections 新增了一个 forEach 方法,这个方法可以接受 lambda 表达式,如下例:
List<String> list = new ArrayList<>();
list.add("vogella.com");
list.add("google.com");
list.add("heise.de");
list.forEach(System.out::println);
使用方法引用
在 lambda 表达式中可以使用方法引用,方法引用定义可以通过 CalledFrom::method 来调用的方法,CallFrom 可以是:
-
instance::instanceMethod
-
SomeClass::staticMethod
-
SomeClass::instanceMethod
比如下面代码:
List<String> list = new ArrayList<>();
list.add("vogella.com");
list.add("google.com");
list.add("heise.de");
list.forEach(s-> System.out.println(s));
流(stream)
Java 8 中的流(stream)是什么?
流(stream)是支持串行和并行聚合操作的元素序列。
新增加的Stream API (java.util.stream)引入了在Java里可以工作的函数式编程。这是目前为止对java库最大的一次功能添加,希望程序员通过编写有效、整洁和简明的代码,能够大大提高生产率。
IntStream
用来创建支持串行和并行聚合操作的包含原始 int 类型的元素序列。下面演示的range和python的range很类似。
import java.util.ArrayList;
import java.util.List;
import java.util.stream.IntStream;
public class IntStreamExample {

  public static void main(String[] args) {

    // printout the numbers from 1 to 100
    IntStream.range(1, 101).forEach(s -> System.out.println(s));

    // create a list of integers for 1 to 100
    List<Integer> list = new ArrayList<>();
    IntStream.range(1, 101).forEach(it -> list.add(it));
    System.out.println("Size " + list.size());
  }
}
stream 和 lambda 的 Reduction 操作
Reduction 操作接受一个元素序列为输入,反复使用某个合并操作,把序列中的元素合并成一个汇总的结果,参考下面代码:
Task.java:
public class Task {

      private String summary;
      private int duration;

      public Task(String summary, int duration) {
        this.summary = summary;
        this.duration = duration;
      }
      public String getSummary() {
        return summary;
      }
      public void setSummary(String summary) {
        this.summary = summary;
      }
      public int getDuration() {
        return duration;
      }
      public void setDuration(int duration) {
        this.duration = duration;
      }

}
StreamTester.java:
import java.util.ArrayList;
import java.util.List;
import java.util.Random;
import java.util.stream.Collectors;
import java.util.stream.IntStream;

public class StreamTester {
      public static void main(String[] args) {

            Random random = new Random();
            // Generate a list of random task
            List<Task> values = new ArrayList<>();
            IntStream.range(1, 20).forEach(i -> values.add(new Task("Task" + random.nextInt(10), random.nextInt(10))));


            // get a list of the distinct task summary field
            List<String> resultList =
                  values.stream().filter(t -> t.getDuration() > 5).map(t -> t.getSummary()).distinct().collect(Collectors.toList());
            System.out.println(resultList);


            // get a concatenated string of Task with a duration longer than 5 hours
            String collect =
                values.stream().filter(t -> t.getDuration() > 5).map(t -> t.getSummary()).distinct().collect(Collectors.joining("-"));
            System.out.println(collect);
      }
}
Optional
如果你调用未初始化的字段或方法会收到 NullPointerException异常(NPE)。java.util.Optional类用于避免这些NPE。它通过方法的签名直接看到值是否存在,而不是通过javadoc返回null,它的 filter方法在没有值时返回空对象。该功能相当于把python默认值的一小部分学了过来,但是操作要复杂得多。
创建:
// use this if the object is not null
opt = Optional.of(o);
// creates an empty Optional, if o is null
opt = Optional.ofNullable(o);
// create an empty Optional
opt = Optional.empty();ifPresent可以查看对象是否存在。
Todo todo = new Todo(-1);
Optional<Todo> optTodo = Optional.of(todo);
// get the id of the todo or a default value
optTodo.ifPresent(t-> System.out.println(t.getId()));
Todo todo = new Todo(-1);
    Optional<Todo> optTodo = Optional.of(todo);
    // get the summary (trimmed) of todo if the id is higher than 0
    Optional<String> map = optTodo.filter(o -> o.getId() > 0).map(o -> o.getSummary().trim());
    // same as above but print it out
    optTodo.filter(o -> o.getId() > 0).map(o -> o.getSummary().trim()).ifPresent(System.out::println);
// using a String
String s = "Hello";
Optional<String> maybeS = Optional.of(s);
// get length of the String or -1 as default
int len = maybeS.map(String::length).orElse(-1);
// orElseGet allows to construct an object / value with a Supplier
int calStringlen = maybeS.map(String::length).orElseGet(()-> "Hello".length());实例:
import java.util.Optional;

public class Java8Tester {

   public static void main(String args[]){

      Java8Tester java8Tester = new Java8Tester();
      Integer value1 = null;
      Integer value2 = new Integer(10);

      //Optional.ofNullable - allows passed parameter to be null.
      Optional<Integer> a = Optional.ofNullable(value1);

      //Optional.of - throws NullPointerException if passed parameter is null
      Optional<Integer> b = Optional.of(value2);
      System.out.println(java8Tester.sum(a,b));
   }

   public Integer sum(Optional<Integer> a, Optional<Integer> b){

      //Optional.isPresent - checks the value is present or not

      System.out.println("First parameter is present: " + a.isPresent());
      System.out.println("Second parameter is present: " + b.isPresent());

      //Optional.orElse - returns the value if present otherwise returns
      //the default value passed.
      Integer value1 = a.orElse(new Integer(0));

      //Optional.get - gets the value, value should be present
      Integer value2 = b.get();
      return value1 + value2;
   }
}
类型转换(casting)
如果使用不同类型的变量,Java 需要进行显式类型转换,下面章节是一些例子。
转换为字符串
参考下面的代码将其他类型对象转换为字符串:
// Convert from int to String
String s1 = String.valueOf (10); // "10"
// Convert from double to String
String s2 = String.valueOf (Math.PI); // "3.141592653589793"
// Convert from boolean to String
String s3 = String.valueOf (1 < 2); // "true"
// Convert from date to String
String s4 = String.valueOf (new Date()); // "Tue Jun 03 14:40:38 CEST 2003"
22.2 将字符串转换为数字
// Conversion from String to int
int i = Integer.parseInt(String);
// Conversion from float to int
float f = Float.parseFloat(String);
// Conversion from double to int
double d = Double.parseDouble(String);
从字符串到数字的转换独立于区域设置,比如:它总是使用数字的英语表示方法。在这种表示法中 “8.20” 是一个正确的数字,但德国藏用的 “8,20” 则是一个错误的数字。
要转换类似于德国的数字表示,你需要使用 NumberFormat 类。我们面临的挑战是,当类似于 “98.00” 这类数字表示时, NumberFormat 会将其转换成 Long 而不是 Double。如果需要转换成 Double 请参考下面的方法,
private Double convertStringToDouble(String s) {

    Locale l = new Locale("de", "DE");
    Locale.setDefault(l);
    NumberFormat nf = NumberFormat.getInstance();
    Double result = 0.0;

    try {
      if (Class.forName("java.lang.Long").isInstance(nf.parse(s))) {
        result = Double.parseDouble(String.valueOf(nf.parse(s)));
      } else {
        result = (Double) nf.parse(new String(s));
      }
    } catch (ClassNotFoundException e1) {
      e1.printStackTrace();
    } catch (ParseException e1) {
      e1.printStackTrace();
    }
    return result;
  }
22.3 Double 转换为 int
int i = (int) double;
22.4 SQL 日期类型转换
使用下面的类将 Date 类型转换为 SQL 的 Date类型
package test;
import java.text.DateFormat;
import java.text.ParseException;
import java.text.SimpleDateFormat;

public class ConvertDateToSQLDate {

    private void convertDateToSQL(){
       SimpleDateFormat template =
          new SimpleDateFormat("yyyy-MM-dd");
          java.util.Date enddate = new java.util.Date("10/31/99");
          java.sql.Date sqlDate = java.sql.Date.valueOf(template.format(enddate));

    }
      public static void main(String[] args) {
        ConvertDateToSQLDate date = new ConvertDateToSQLDate();
        date.convertDateToSQL();
      }
}
boolean ( Boolean class), byte ( Byte ), char ( Character ), double ( Double ),
float ( Float ), int ( Integer ), long ( Long )和short ( Short )能自动装箱(Autoboxing)和自动拆箱(Unboxing)。
下面代码在1.5以后不会报错。
Float total = new Float(1.3F);
float sum = total / 5;
计划任务
Java 支持计划任务,计划任务可以被执行一次或多次。
使用 java.util.Timer 和 java.util.TimerTask 来完成计划任务。实现 TimeTask 的对象将会由 Time 在指定的时间间隔执行。
MyTask.java:
package schedule;
import java.util.TimerTask;

public class MyTask extends TimerTask {

  private final String string;
  private int count = 0;

  public MyTask(String string) {
    this.string = string;
  }
  @Override
  public void run() {
    count++;
    System.out.println(string + " called " + count);
  }
}
ScheduleTest.java:
package schedule;
import java.util.Timer;
public class ScheduleTest {
  public static void main(String[] args) {
    Timer timer = new Timer();
    // wait 2 seconds (2000 milli-secs) and then start
    timer.schedule(new MyTask("Task1"), 2000);
    for (int i = 0; i < 100; i++) {
      // wait 1 seconds and then again every 5 seconds
      timer.schedule(new MyTask("Task " + i), 1000, 5000);
    }
  }
}
提示:开源框架 “quartz” 提供了增强的计划任务功能。参考: http://www.onjava.com/lpt/a/4637 或 http://www.quartz-scheduler.org/
正则表达式
通配符
| Regular Expression | Description |
|---|---|
. |
Matches any character |
^regex |
Finds regex that must match at the beginning of the line. |
regex$ |
Finds regex that must match at the end of the line. |
[abc] |
Set definition, can match the letter a or b or c. |
[abc][vz] |
Set definition, can match a or b or c followed by either v or z. |
[^abc] |
When a caret appears as the first character inside square brackets, it negates the pattern. This pattern matches any character except a or b or c. |
[a-d1-7] |
Ranges: matches a letter between a and d and figures from 1 to 7, but not d1. |
X|Z |
Finds X or Z. |
XZ |
Finds X directly followed by Z. |
$ |
Checks if a line end follows. |
元字符
| Regular Expression | Description |
|---|---|
\d |
Any digit, short for [0-9] |
\D |
A non-digit, short for [^0-9] |
\s |
A whitespace character, short for [ \t\n\x0b\r\f] |
\S |
A non-whitespace character, short for [^\s] |
\w |
A word character, short for [a-zA-Z_0-9] |
\W |
A non-word character [^\w] |
\S+ |
Several non-whitespace characters |
\b |
Matches a word boundary where a word character is [a-zA-Z0-9_]. |
These meta characters have the same first letter as their representation, e.g., digit, space, word, and boundary. Uppercase symbols define the opposite.
数量
| Regular Expression | Description | Examples |
|---|---|---|
* |
Occurs zero or more times, is short for {0,} |
X* finds no or several letter X, .* finds any character sequence |
+ |
Occurs one or more times, is short for {1,} |
X+ – Finds one or several letter X |
? |
Occurs no or one times, ? is short for {0,1}. |
X? finds no or exactly one letter X |
{X} |
Occurs X number of times, {} describes the order of the preceding liberal |
\d{3} searches for three digits, .{10}for any character sequence of length 10. |
{X,Y} |
Occurs between X and Y times, | \d{1,4} means \d must occur at least once and at a maximum of four. |
*? |
? after a quantifier makes it a reluctant quantifier. It tries to find the smallest match. This makes the regular expression stop at the first match. |
参考资料
英文地址:http://www.vogella.com/tutorials/JavaIntroduction/article.html
http://codex.wiki/post/165971-434
最佳实践的代码:http://javaboutique.internet.com/
微博 http://weibo.com/cizhenshi 作者博客:http://my.oschina.net/u/1433482 python测试开发精华群 291184506 PythonJava单元白盒测试 144081101
其他内容
参数处理
class BlankFiller {
    public static void main(String[] arguments) {
        System.out.println("The " + arguments[0]
            + " " + arguments[1] + " fox "
            + "jumped over the "
            + arguments[2] + " dog."
        );
    }
}
命令行执行:
# java BlankFiller hello new world
The hello new fox jumped over the world dog.
在NetBeans执行:
Run -> Project Configuration -> Customize, 输入BlankFiller,参数部分输入hello new world。
按F6或者Run -> run project。
Applet实例

JApplet的行为和属性:
equals()
setBackground()
add()
setLayout()
import javax.swing.*;

public class SalutonFrame extends JFrame {
    public SalutonFrame() {
        super("Saluton mondo!");
        setLookAndFeel();
        setSize(350, 100);
        setDefaultCloseOperation(JFrame.EXIT_ON_CLOSE);
        setVisible(true);
    }

    private void setLookAndFeel() {
        try {
            UIManager.setLookAndFeel(
                "com.sun.java.swing.plaf.nimbus.NimbusLookAndFeel"
            );
        } catch (Exception exc) {
            // ignore error
        }
    }

    public static void main(String[] arguments) {
        SalutonFrame sal = new SalutonFrame();
    }
}
上面的
super("Saluton mondo!");设置了标题,也可以单独用方法设置:setTitle(“Main Frame”);
设置大小的另外一种方法是先填充,然后使用pack()。同时,默认会有合适的大小。
setDefaultCloseOperation()的选项:JFrame.EXIT_ON_CLOSE、Frame.DISPOSE_ON_CLOSE、JFrame.DO_NOTHING_ON_CLOSE、JFrame.HIDE_ON_CLOSE。
java7引入的增强视觉方案引入方法:
UIManager.setLookAndFeel(
“com.sun.java.swing.plaf.nimbus.NimbusLookAndFeel”
);
上述实例的效果如下:

下面实例增加button:
import javax.swing.*;
import java.awt.*;

public class Playback extends JFrame {
    public Playback() {
        super("Playback");
        setLookAndFeel();
        setSize(225, 80);
        setDefaultCloseOperation(JFrame.EXIT_ON_CLOSE);
        FlowLayout flo = new FlowLayout();
        setLayout(flo);
        JButton play = new JButton("Play");
        JButton stop = new JButton("Stop");
        JButton pause = new JButton("Pause");
        add(play);
        add(stop);
        add(pause);
        setVisible(true);
    }

    private void setLookAndFeel() {
        try {
            UIManager.setLookAndFeel(
                "com.sun.java.swing.plaf.nimbus.NimbusLookAndFeel"
            );
        } catch (Exception exc) {
            // ignore error
        }
    }

    public static void main(String[] arguments) {
        Playback pb = new Playback();
    }
}
效果如下:

CheckBoxes.java
import javax.swing.*;
import java.awt.*;

public class CheckBoxes extends JFrame {
    public CheckBoxes() {
        super("CheckBoxes");
        setLookAndFeel();
        setSize(195, 170);
        setDefaultCloseOperation(JFrame.EXIT_ON_CLOSE);
        JCheckBox jumboSize = new JCheckBox("Jumbo Size", true);
        JCheckBox frogLegs = new JCheckBox("Frog Leg Grande", true);
        JCheckBox fishTacos = new JCheckBox("Fish Taco Platter", false);
        JCheckBox emuNuggets = new JCheckBox("Emu Nuggets", false);
        FlowLayout flo = new FlowLayout();
        ButtonGroup meals = new ButtonGroup();
        meals.add(frogLegs);
        meals.add(fishTacos);
        meals.add(emuNuggets);
        setLayout(flo);
        add(jumboSize);
        add(frogLegs);
        add(fishTacos);
        add(emuNuggets);
        setVisible(true);
    }

    private void setLookAndFeel() {
        try {
            UIManager.setLookAndFeel(
                "com.sun.java.swing.plaf.nimbus.NimbusLookAndFeel"
            );
        } catch (Exception exc) {
            // ignore error
        }
    }

    public static void main(String[] arguments) {
        CheckBoxes cb = new CheckBoxes();
    }
}
执行效果:

ClockPanel.java
import javax.swing.*;
import java.awt.*;
import java.util.*;

public class ClockPanel extends JPanel {
    public ClockPanel() {
        super();
        String currentTime = getTime();
        JLabel time = new JLabel("Time: ");
        JLabel current = new JLabel(currentTime);
        add(time);
        add(current);
    }

    final String getTime() {
        String time;
        // get current time and date
        Calendar now = Calendar.getInstance();
        int hour = now.get(Calendar.HOUR_OF_DAY);
        int minute = now.get(Calendar.MINUTE);
        int month = now.get(Calendar.MONTH) + 1;
        int day = now.get(Calendar.DAY_OF_MONTH);
        int year = now.get(Calendar.YEAR);

        String monthName = "";
        switch (month) {
            case (1):
                monthName = "January";
                break;
            case (2):
                monthName = "February";
                break;
            case (3):
                monthName = "March";
                break;
            case (4):
                monthName = "April";
                break;
            case (5):
                monthName = "May";
                break;
            case (6):
                monthName = "June";
                break;
            case (7):
                monthName = "July";
                break;
            case (8):
                monthName = "August";
                break;
            case (9):
                monthName = "September";
                break;
            case (10):
                monthName = "October";
                break;
            case (11):
                monthName = "November";
                break;
            case (12):
                monthName = "December";
        }
        time = monthName + " " + day + ", " + year + " "
            + hour + ":" + minute;
        return time;
    }
}
ClockFrame.java
import java.awt.*;
import javax.swing.*;

public class ClockFrame extends JFrame {
    public ClockFrame() {
        super("Clock");
        setLookAndFeel();
        setSize(225, 125);
        setDefaultCloseOperation(JFrame.EXIT_ON_CLOSE);
        FlowLayout flo = new FlowLayout();
        setLayout(flo);
        ClockPanel time = new ClockPanel();
        add(time);
        setVisible(true);
    }

    private void setLookAndFeel() {
        try {
            UIManager.setLookAndFeel(
                "com.sun.java.swing.plaf.nimbus.NimbusLookAndFeel"
            );
        } catch (Exception exc) {
            // ignore error
        }
    }

    public static void main(String[] arguments) {
        ClockFrame clock = new ClockFrame();
    }
}
执行效果
ComboBoxes.java
import javax.swing.*;
import java.awt.*;

public class ComboBoxes extends JFrame {
    public ComboBoxes() {
        super("ComboBoxes");
        setLookAndFeel();
        setSize(345, 120);
        setDefaultCloseOperation(JFrame.EXIT_ON_CLOSE);
        JComboBox profession = new JComboBox();
        FlowLayout flo = new FlowLayout();
        profession.addItem("Butcher");
        profession.addItem("Baker");
        profession.addItem("Candlestick maker");
        profession.addItem("Fletcher");
        profession.addItem("Fighter");
        profession.addItem("Technical writer");
        setLayout(flo);
        add(profession);
        setVisible(true);
    }

    private void setLookAndFeel() {
        try {
            UIManager.setLookAndFeel(
                "com.sun.java.swing.plaf.nimbus.NimbusLookAndFeel"
            );
        } catch (Exception exc) {
            // ignore error
        }
    }

    public static void main(String[] arguments) {
        ComboBoxes cb = new ComboBoxes();
    }
}
执行效果:

TextArea.java
import javax.swing.*;
import java.awt.*;

public class TextArea extends JFrame {
    public TextArea() {
        super("TextArea");
        setLookAndFeel();
        setSize(500, 190);
        setDefaultCloseOperation(JFrame.EXIT_ON_CLOSE);
        JTextArea comments = new JTextArea(8, 40);
        FlowLayout flo = new FlowLayout();
        setLayout(flo);
        add(comments);
        setVisible(true);
    }

    private void setLookAndFeel() {
        try {
            UIManager.setLookAndFeel(
                "com.sun.java.swing.plaf.nimbus.NimbusLookAndFeel"
            );
        } catch (Exception exc) {
            // ignore error
        }
    }

    public static void main(String[] arguments) {
        TextArea ta = new TextArea();
    }
}
执行效果:

TextField.java
import javax.swing.*;
import java.awt.*;

public class TextField extends JFrame {
    public TextField() {
        super("TextField");
        setLookAndFeel();
        setSize(375, 80);
        setDefaultCloseOperation(JFrame.EXIT_ON_CLOSE);
        JLabel pageLabel = new JLabel("Web page address: ", JLabel.RIGHT);
        JTextField pageAddress = new JTextField(20);
        FlowLayout flo = new FlowLayout();
        setLayout(flo);
        add(pageLabel);
        add(pageAddress);
        setVisible(true);
    }

    private void setLookAndFeel() {
        try {
            UIManager.setLookAndFeel(
                "com.sun.java.swing.plaf.nimbus.NimbusLookAndFeel"
            );
        } catch (Exception exc) {
            // ignore error
        }
    }

    public static void main(String[] arguments) {
        TextField tf = new TextField();
    }
}
执行效果:

TwoFrames.java
import javax.swing.*;

public class TwoFrames extends JFrame {
    public TwoFrames() {
        super("First Frame");
        setSize(350, 100);
        setDefaultCloseOperation(JFrame.EXIT_ON_CLOSE);
        setLookAndFeel();
        SecondFrame two = new SecondFrame();
        setVisible(true);
        two.setVisible(true);
    }

    private void setLookAndFeel() {
        try {
            UIManager.setLookAndFeel(
                "com.sun.java.swing.plaf.nimbus.NimbusLookAndFeel"
            );
        } catch (Exception exc) {
            // ignore error
        }
    }

    public static void main(String[] arguments) {
        TwoFrames tf = new TwoFrames();
    }
}

class SecondFrame extends JFrame {
    SecondFrame() {
        super("Second Frame");
        setSize(150, 80);
        setDefaultCloseOperation(JFrame.EXIT_ON_CLOSE);
    }
}
import java.awt.*;
public class RootApplet extends javax.swing.JApplet {
int number;
public void init() {
number = 225;
}
public void paint(Graphics screen) {
Graphics2D screen2D = (Graphics2D) screen;
screen2D.drawString("The square root of " +
number +
" is " +
Math.sqrt(number), 5, 50);
}
}执行效果:
基于FlowLayout的布局:
import java.awt.*;
import javax.swing.*;
public class Crisis extends JFrame {
JButton panicButton;
JButton dontPanicButton;
JButton blameButton;
JButton mediaButton;
JButton saveButton;
public Crisis() {
super("Crisis");
setLookAndFeel();
setSize(348, 128);
setDefaultCloseOperation(JFrame.EXIT_ON_CLOSE);
FlowLayout flo = new FlowLayout();
setLayout(flo);
panicButton = new JButton("Panic");
dontPanicButton = new JButton("Don't Panic");
blameButton = new JButton("Blame Others");
mediaButton = new JButton("Notify the Media");
saveButton = new JButton("Save Yourself");
add(panicButton);
add(dontPanicButton);
add(blameButton);
add(mediaButton);
add(saveButton);
setVisible(true);
}
private void setLookAndFeel() {
try {
UIManager.setLookAndFeel(
"com.sun.java.swing.plaf.nimbus.NimbusLookAndFeel"
);
} catch (Exception exc) {
// ignore error
}
}
public static void main(String[] arguments) {
Crisis cr = new Crisis();
}
}执行效果:
另外还有GridLayout、
GridLayout grid = new GridLayout(2, 3);
setLayout(grid);BorderLayout:
BorderLayout crisisLayout = new BorderLayout();
setLayout(crisisLayout);
add(panicButton, BorderLayout.NORTH);
add(dontPanicButton, BorderLayout.SOUTH);
add(blameButton, BorderLayout.EAST);
add(mediaButton, BorderLayout.WEST);
add(saveButton, BorderLayout.CENTER);BoxLayout(垂直布局):
JPanel pane = new JPanel();
BoxLayout box = new BoxLayout(pane, BoxLayout.Y_AXIS);
pane.setLayout(box);
pane.add(panicButton);
pane.add(dontPanicButton);
pane.add(blameButton);
pane.add(mediaButton);
pane.add(saveButton);
add(pane);还可以指定位置插入:
Insets around = new Insets(10, 6, 10, 3);布局实例:
import java.awt.*;
import javax.swing.*;
public class LottoMadness extends JFrame {
// set up row 1
JPanel row1 = new JPanel();
ButtonGroup option = new ButtonGroup();
JCheckBox quickpick = new JCheckBox("Quick Pick", false);
JCheckBox personal = new JCheckBox("Personal", true);
// set up row 2
JPanel row2 = new JPanel();
JLabel numbersLabel = new JLabel("Your picks: ", JLabel.RIGHT);
JTextField[] numbers = new JTextField[6];
JLabel winnersLabel = new JLabel("Winners: ", JLabel.RIGHT);
JTextField[] winners = new JTextField[6];
// set up row 3
JPanel row3 = new JPanel();
JButton stop = new JButton("Stop");
JButton play = new JButton("Play");
JButton reset = new JButton("Reset");
// set up row 4
JPanel row4 = new JPanel();
JLabel got3Label = new JLabel("3 of 6: ", JLabel.RIGHT);
JTextField got3 = new JTextField("0");
JLabel got4Label = new JLabel("4 of 6: ", JLabel.RIGHT);
JTextField got4 = new JTextField("0");
JLabel got5Label = new JLabel("5 of 6: ", JLabel.RIGHT);
JTextField got5 = new JTextField("0");
JLabel got6Label = new JLabel("6 of 6: ", JLabel.RIGHT);
JTextField got6 = new JTextField("0", 10);
JLabel drawingsLabel = new JLabel("Drawings: ", JLabel.RIGHT);
JTextField drawings = new JTextField("0");
JLabel yearsLabel = new JLabel("Years: ", JLabel.RIGHT);
JTextField years = new JTextField();
public LottoMadness() {
super("Lotto Madness");
setLookAndFeel();
setSize(550, 400);
setDefaultCloseOperation(JFrame.EXIT_ON_CLOSE);
GridLayout layout = new GridLayout(5, 1, 10, 10);
setLayout(layout);
FlowLayout layout1 = new FlowLayout(FlowLayout.CENTER,
10, 10);
option.add(quickpick);
option.add(personal);
row1.setLayout(layout1);
row1.add(quickpick);
row1.add(personal);
add(row1);
GridLayout layout2 = new GridLayout(2, 7, 10, 10);
row2.setLayout(layout2);
row2.add(numbersLabel);
for (int i = 0; i < 6; i++) {
numbers[i] = new JTextField();
row2.add(numbers[i]);
}
row2.add(winnersLabel);
for (int i = 0; i < 6; i++) {
winners[i] = new JTextField();
winners[i].setEditable(false);
row2.add(winners[i]);
}
add(row2);
FlowLayout layout3 = new FlowLayout(FlowLayout.CENTER,
10, 10);
row3.setLayout(layout3);
stop.setEnabled(false);
row3.add(stop);
row3.add(play);
row3.add(reset);
add(row3);
GridLayout layout4 = new GridLayout(2, 3, 20, 10);
row4.setLayout(layout4);
row4.add(got3Label);
got3.setEditable(false);
row4.add(got3);
row4.add(got4Label);
got4.setEditable(false);
row4.add(got4);
row4.add(got5Label);
got5.setEditable(false);
row4.add(got5);
row4.add(got6Label);
got6.setEditable(false);
row4.add(got6);
row4.add(drawingsLabel);
drawings.setEditable(false);
row4.add(drawings);
row4.add(yearsLabel);
years.setEditable(false);
row4.add(years);
add(row4);
setVisible(true);
}
private void setLookAndFeel() {
try {
UIManager.setLookAndFeel(
"com.sun.java.swing.plaf.nimbus.NimbusLookAndFeel"
);
} catch (Exception exc) {
// ignore error
}
}
public static void main(String[] arguments) {
LottoMadness frame = new LottoMadness();
}
}效果如下:
组件的开启与关闭:
JButton previousButton = new JButton(“Previous”);
JButton nextButton = new JButton(“Next”);
JButton previousButton = new JButton(“Previous”);
JButton nextButton = new JButton(“Next”);滚动条的构建
JSlider() 默认值50,范围0-100
JSlider(int, int)
JSlider(int, int, int) 最小、最大和默认值。
方向: JSlider.VERTICAL or JSlider.HORIZONTAL
比如:
JSlider guess = new JSlider(JSlider.VERTICAL, 1, 1000, 500);
其他设置:
setMajorTickSpacing(int)
setMinorTickSpacing(int)
如下方式开启:
setPaintTicks(boolean)或setPaintLabels(boolean)。
ChangeListener接口可以改变事件:
import javax.swing.*;
import javax.swing.event.*;
import java.awt.*;
public class ColorSliders extends JFrame implements ChangeListener {
ColorPanel canvas;
JSlider red;
JSlider green;
JSlider blue;
public ColorSliders() {
super("Color Slide");
setLookAndFeel();
setSize(270, 300);
setDefaultCloseOperation(JFrame.EXIT_ON_CLOSE);
setVisible(true);
canvas = new ColorPanel();
red = new JSlider(0, 255, 255);
green = new JSlider(0, 255, 0);
blue = new JSlider(0, 255, 0);
red.setMajorTickSpacing(50);
red.setMinorTickSpacing(10);
red.setPaintTicks(true);
red.setPaintLabels(true);
red.addChangeListener(this);
green.setMajorTickSpacing(50);
green.setMinorTickSpacing(10);
green.setPaintTicks(true);
green.setPaintLabels(true);
green.addChangeListener(this);
blue.setMajorTickSpacing(50);
blue.setMinorTickSpacing(10);
blue.setPaintTicks(true);
blue.setPaintLabels(true);
blue.addChangeListener(this);
JLabel redLabel = new JLabel("Red: ");
JLabel greenLabel = new JLabel("Green: ");
JLabel blueLabel = new JLabel("Blue: ");
GridLayout grid = new GridLayout(4, 1);
FlowLayout right = new FlowLayout(FlowLayout.RIGHT);
setLayout(grid);
JPanel redPanel = new JPanel();
redPanel.setLayout(right);
redPanel.add(redLabel);
redPanel.add(red);
add(redPanel);
JPanel greenPanel = new JPanel();
greenPanel.setLayout(right);
greenPanel.add(greenLabel);
greenPanel.add(green);
add(greenPanel);
JPanel bluePanel = new JPanel();
bluePanel.setLayout(right);
bluePanel.add(blueLabel);
bluePanel.add(blue);
add(bluePanel);
add(canvas);
setVisible(true);
}
public void stateChanged(ChangeEvent event) {
JSlider source = (JSlider) event.getSource();
if (source.getValueIsAdjusting() != true) {
Color current = new Color(red.getValue(), green.getValue(),
blue.getValue());
canvas.changeColor(current);
canvas.repaint();
}
}
public Insets getInsets() {
Insets border = new Insets(45, 10, 10, 10);
return border;
}
private void setLookAndFeel() {
try {
UIManager.setLookAndFeel(
"com.sun.java.swing.plaf.nimbus.NimbusLookAndFeel"
);
} catch (Exception exc) {
// ignore error
}
}
public static void main(String[] arguments) {
ColorSliders cs = new ColorSliders();
}
}
class ColorPanel extends JPanel {
Color background;
ColorPanel() {
background = Color.red;
}
public void paintComponent(Graphics comp) {
Graphics2D comp2D = (Graphics2D) comp;
comp2D.setColor(background);
comp2D.fillRect(0, 0, getSize().width, getSize().height);
}
void changeColor(Color newBackground) {
background = newBackground;
}
}图片的创建
ImageIcon stopSign = new ImageIcon(“stopsign.gif”);
ImageIcon saveFile = new ImageIcon(“images/savefile.gif”);
使用
ImageIcon siteLogo = new ImageIcon(“siteLogo.gif”);
JLabel logoLabel = new JLabel(siteLogo);
ImageIcon searchWeb = new ImageIcon(“searchGraphic.gif”);
JButton search = new JTextField(searchWeb);
JButton refresh = new JButton(“Refresh”, “images/refreshIcon.gif”);
JToolBar()创建水平工具条
JToolBar(int),可以是水平(SwingConstants.HORIZONTAL)或者垂直(SwingConstants.HORIZONTAL)。
容器:BorderLayout
BorderLayout border = new BorderLayout();
pane.setLayout(border);
JToolBar bar = new JToolBar(SwingConstants.VERTICAL);
ImageIcon play = new ImageIcon(“play.gif”);
JButton playButton = new JButton(play);
ImageIcon stop = new ImageIcon(“stop.gif”);
JButton stopButton = new JButton(stop);
ImageIcon pause = new ImageIcon(“pause.gif”);
JButton pauseButton = new JButton(pause);
bar.add(playButton);
bar.add(stopButton);
bar.add(pauseButton);
add(bar, BorderLayout.WEST);
import java.awt.*;
import java.awt.event.*;
import javax.swing.*;
public class Tool extends JFrame {
public Tool() {
super("Tool");
setLookAndFeel();
setSize(370, 200);
setDefaultCloseOperation(JFrame.EXIT_ON_CLOSE);
// build toolbar buttons
ImageIcon image1 = new ImageIcon("d:\\newfile.gif");
JButton button1 = new JButton(image1);
ImageIcon image2 = new ImageIcon("d:\\openfile.gif");
JButton button2 = new JButton(image2);
ImageIcon image3 = new ImageIcon("d:\\savefile.gif");
JButton button3 = new JButton(image3);
// build toolbar
JToolBar bar = new JToolBar();
bar.add(button1);
bar.add(button2);
bar.add(button3);
// build text area
JTextArea edit = new JTextArea(8, 40);
JScrollPane scroll = new JScrollPane(edit);
// create frame
BorderLayout border = new BorderLayout();
setLayout(border);
add("North", bar);
add("Center", scroll);
setVisible(true);
}
private void setLookAndFeel() {
try {
UIManager.setLookAndFeel(
"com.sun.java.swing.plaf.nimbus.NimbusLookAndFeel"
);
} catch (Exception exc) {
// ignore error
}
}
public static void main(String[] arguments) {
Tool frame = new Tool();
}
}简单的applet实例:
import java.awt.*;

public class RootApplet extends javax.swing.JApplet {
    int number;

    public void init() {
        number = 225;
    }

    public void paint(Graphics screen) {
       Graphics2D screen2D = (Graphics2D) screen;
       screen2D.drawString("The square root of " +
           number +
           " is " +
           Math.sqrt(number), 5, 50);
    }
}嵌入浏览器:
mport java.awt.*;

public class SalutonApplet extends javax.swing.JApplet {
    String greeting;

    public void init() {
        greeting = "Saluton mondo!";
    }

    public void paint(Graphics screen) {
        Graphics2D screen2D = (Graphics2D) screen;
        screen2D.drawString(greeting, 25, 50);
    }
}
<html>
<head>
<title>Saluton Mondo!</title>
</head>
<body bgcolor="#000000" text="#FF00FF">
<p>This is a Java applet.</p>
<applet
code="SalutonApplet.class"
codebase="..\\..\\build\\classes"
height="150"
width="300"
>
<p>You need a Java-enabled browser to see this.</p>
</applet>
</body>
</html>参数传递:
import java.awt.*;

public class WeightScale extends javax.swing.JApplet {
    float lbs = 0F;
    float ozs;
    float kgs;
    float metricTons;
    String name = "somebody";

    public void init() {
        String lbsValue = getParameter("weight");
        if (lbsValue != null) {
            lbs = Float.valueOf(lbsValue);
        }
        String personValue = getParameter("person");
        if (personValue != null) {
            name = personValue;
        }
        ozs = (float) (lbs * 16);
        kgs = (float) (lbs / 2.204623);
        metricTons = (float) (lbs / 2204.623);
    }

    public void paint(Graphics screen) {
        Graphics2D screen2D = (Graphics2D) screen;
        screen2D.drawString("Studying the weight of " + name, 5, 30);
        screen2D.drawString("In pounds: " + lbs, 55, 50);
        screen2D.drawString("In ounces: " + ozs, 55, 70);
        screen2D.drawString("In kilograms: " + kgs, 55, 90);
        screen2D.drawString("In metric tons: " + metricTons, 55, 110);
    }
}
相应的HTML:
WeightScale.html
<applet code="WeightScale.class" codebase="..\\..\\build\\classes"
    height="170" width="210">
    <param name="person" value="Konishiki">
    <param name="weight" value="605">
</applet>
HTML5 要改用object标签
<applet code="WeightScale.class" codebase="..\\..\\build\\classes"
    height="170" width="210">
    <param name="person" value="Konishiki">
    <param name="weight" value="605">
</applet>
表达式的用途:更改变量的值;计数;使用数学公式。
Vector
Vector类似python的列表,长度可变。
import java.util.*;

public class StringLister {
    String[] names = { "Spanky", "Alfalfa", "Buckwheat", "Daria",
        "Stymie", "Marianne", "Scotty", "Tommy", "Chubby" };

    public StringLister(String[] moreNames) {
        Vector<String> list = new Vector<String>();
        for (int i = 0; i < names.length; i++) {
            list.add(names[i]);
        }
        for (int i = 0; i < moreNames.length; i++) {
            list.add(moreNames[i]);
        }
        Collections.sort(list);
        for (String name : list) {
            System.out.println(name);
        }
    }

    public static void main(String[] args) {
        StringLister lister = new StringLister(args);
    }
}
多线程
import java.awt.*;
import javax.swing.*;
import java.awt.event.*;

class PrimeFinder extends JFrame implements Runnable, ActionListener {
    Thread go;
    JLabel howManyLabel;
    JTextField howMany;
    JButton display;
    JTextArea primes;

    PrimeFinder() {
        super("Find Prime Numbers");
        setLookAndFeel();
        setSize(400, 300);
        setDefaultCloseOperation(JFrame.EXIT_ON_CLOSE);
        BorderLayout bord = new BorderLayout();
        setLayout(bord);

        howManyLabel = new JLabel("Quantity: ");
        howMany = new JTextField("400", 10);
        display = new JButton("Display primes");
        primes = new JTextArea(8, 40);

        display.addActionListener(this);
        JPanel topPanel = new JPanel();
        topPanel.add(howManyLabel);
        topPanel.add(howMany);
        topPanel.add(display);
        add(topPanel, BorderLayout.NORTH);

        primes.setLineWrap(true);
        JScrollPane textPane = new JScrollPane(primes);
        add(textPane, BorderLayout.CENTER);

        setVisible(true);
    }

    public void actionPerformed(ActionEvent event) {
        display.setEnabled(false);
        if (go == null) {
            go = new Thread(this);
            go.start();
        }
    }

    public void run() {
        int quantity = Integer.parseInt(howMany.getText());
        int numPrimes = 0;
        // candidate: the number that might be prime
        int candidate = 2;
        primes.append("First " + quantity + " primes:");
        while (numPrimes < quantity) {
            if (isPrime(candidate)) {
                primes.append(candidate + " ");
                numPrimes++;
            }
            candidate++;
        }
    }

    public static boolean isPrime(int checkNumber) {
        double root = Math.sqrt(checkNumber);
        for (int i = 2; i <= root; i++) {
            if (checkNumber % i == 0) {
                return false;
            }
        }
        return true;
    }

    private void setLookAndFeel() {
        try {
            UIManager.setLookAndFeel(
                "com.sun.java.swing.plaf.nimbus.NimbusLookAndFeel"
            );
        } catch (Exception exc) {
            // ignore error
        }
    }
    public static void main(String[] arguments) {
        PrimeFinder fp = new PrimeFinder();
    }
}
基于Applet的多线程实例:
import java.applet.*;
import java.awt.*;
import java.awt.event.*;
import javax.swing.*;
import java.net.*;
public class LinkRotator extends JApplet
    implements Runnable, ActionListener {
    String[] pageTitle = new String[6];
    URL[] pageLink = new URL[6];
    Color butterscotch = new Color(255, 204, 158);
    int current = 0;
    Thread runner;
    public void init() {
        pageTitle = new String[] {
            "Sun's Java site",
            "Cafe au Lait",
            "JavaWorld",
            "Java in 24 Hours",
            "Sams Publishing",
            "Workbench"
        };
        pageLink[0] = getURL("http://java.sun.com");
        pageLink[1] = getURL("http://www.ibiblio.org/javafaq");
        pageLink[2] = getURL("http://www.javaworld.com");
        pageLink[3] = getURL("http://www.java24hours.com");
        pageLink[4] = getURL("http://www.samspublishing.com");
        pageLink[5] = getURL("http:// workbench.cadenhead.org");
        Button goButton = new Button("Go");
        goButton.addActionListener(this);
        FlowLayout flow = new FlowLayout();
        setLayout(flow);
        add(goButton);
    }
    URL getURL(String urlText) {
        URL pageURL = null;
        try {
            pageURL = new URL(getDocumentBase(), urlText);
        } catch (MalformedURLException m) { }
        return pageURL;
    }
    public void paint(Graphics screen) {
        Graphics2D screen2D = (Graphics2D) screen;
        screen2D.setColor(butterscotch);
        screen2D.fillRect(0, 0, getSize().width, getSize().height);
        screen2D.setColor(Color.black);
        screen2D.drawString(pageTitle[current], 5, 60);
        screen2D.drawString("" + pageLink[current], 5, 80);
    }
    public void start() {
        if (runner == null) {
            runner = new Thread(this);
            runner.start();
        }
    }
    public void run() {
        Thread thisThread = Thread.currentThread();
        while (runner == thisThread) {
            current++;
            if (current > 5) {
                current = 0;
            }
            repaint();
            try {
                Thread.sleep(10000);
            } catch (InterruptedException e) {
                // do nothing
            }
        }
    }
    public void stop() {
        if (runner != null) {
            runner = null;
        }
    }
    public void actionPerformed(ActionEvent event) {
        if (runner != null) {
            runner = null;
        }
        AppletContext browser = getAppletContext();
        if (pageLink[current] != null) {
            browser.showDocument(pageLink[current]);
        }
    }
}
文件读写
未经允许不得转载:Linux学习笔记 » Java单元测试之模拟利器-使用PowerMock进行Mock测试
搜索
最新文章
 搜索工具grep命令的使用例子列举阅读(9)
-
【推荐软件】Linux文本编辑器Vim以及它的…阅读(49)
-
Shadowsocks利用 Brook 实现中继(中转/端…阅读(23)
-
最新nginx网站架构实战(web)(软件十年)阅读(22)
-
老男孩Linux运维高级就业班第17期全集 高…阅读(26)
-
GIT 命令“从初学到专业”完整进阶指南阅读(39)
热门推荐
-
Proface GP-Pro EX栈缓冲区溢出远程代码执…阅读(56)
-
Netflix 订阅人数增长放缓,或受加价消息…阅读(36)
-
Debian 下一个稳定版的代号被确定为 Squee…阅读(40)
-
unzip命令_Linux unzip 命令用法详解:用…阅读(43)
-
Cisco IOS DHCPv6服务器拒绝服务漏洞(CVE-…阅读(38)
-
RHCE033内容摘要阅读(33)
-
Android 刮奖效果控件 ScratchView阅读(46)
-
苹果 Mac OS X 已移除浏览器 Java 插件阅读(36)
-
SliTaz GNU/Linux 4.0 RC2 发布下载阅读(22)
-
Oracle hints 学习笔记整理阅读(36)
-
在集群上运行caffe程序时如何避免Out of M…阅读(32)
-
Gappproxy 分支版本 Gappproxy2 发布阅读(49)