预习内容:
8.1 shell介绍
8.2 命令历史
8.3 命令补全和别名
8.4 通配符
8.5 输入输出重定向
8.6 管道符和作业控制
8.7/8.8 shell变量
8.9 环境变量配置文件
8.10 shell特殊符号cut命令
8.11 sort_wc_uniq命令
8.12 tee_tr_split命令
8.13 shell特殊符号下
扩展:
bashrc和bash_profile的区别 http://ask.apelearn.com/question/7719
简易审计系统(必须要预习): http://www.68idc.cn/help/server/linux/2014042190951.html
关于PROMPT_COMMAND环境变量的含义 http://www.linuxnote.org/prompt_command-environment-variables.html
source exec 区别 http://alsww.blog.51cto.com/2001924/1113112
sort并未按ASCII排序 http://blog.csdn.net/zenghui08/article/details/7938975
8.1 shell介绍:

Shell 俗称壳(用来区别于核),是指“提供使用者使用界面”的软件(命令解析器)。shell 类似于 DOS 下的 command 和后来的 cmd.exe 。它接收用户命令,然后调用相应的应用程序。Linux 下的shell 有很多种,CentOS7 默认 shell 为 bash 。
什么是Shell:http://c.biancheng.net/view/706.html
如果想安装zsh、ksh可以使用命令搜索,然后选择合适的版本安装:

同时 shell 又是一种程序设计语言。作为命令语言,它交互式解释和执行用户输入的命令或者自动地解释和执行预先设定好的一连串的命令;作为程序设计语言,它定义了各种变量和参数,并提供了许多在高级语言中才具有的控制结构,包括循环和分支。在排序算法中, shell 是希尔排序的名称。
8.2 命令历史:
众所周知 CentOS 中使用键盘向上方向键可以查看历史使用过的命令,实际上这些历史命令是在用户家目录下的一个叫 /.bash_history 的文件中存放着,可以使用 cat 命令查看一下:
[root@sc ~]# ls /root/.bash_history
/root/.bash_history
[root@sc ~]# cat !$
使用 history 命令可以查看到这个文件存放了多少条历史命令:
[root@sc ~]# history

这个文件最大可以存一千条历史命令,这个数量是由一个 HISTSIZE 环境变量决定的:
[root@sc ~]# echo $HISTSIZE
1000
history -c 命令可以把当前内存的历史命令清空,这条命令仅清空内存中的历史命令, .bash_history 文件立的历史命令不会被清空:
注意:只有当退出终端的时候,内存中的历史命令才会保存到.bash_history文件里。
[root@sc ~]# history -c
[root@sc ~]# history
   15  history
[root@sc ~]# cat .bash_history  # 查看配置文件里历史命令,不会被清空
在 /etc 目录下的 profile 文件中可以定义 HESTSIZE 环境变量:
注意:修改完后可以使用 source /etc/profile 命令让文件生效。
[root@sc ~]# vi /etc/profile
[root@sc ~]# echo $HISTSIZE
1000
[root@sc ~]# source /etc/profile
[root@sc ~]# echo $HISTSIZE
5000

如果想要记录历史命令的时候还能记录这些命令的执行时间的话,可以重新赋值一下环境变量:
具体操作如下:HISTTIMEFORMAT=“%Y/%m%d%H:%M:%S”
[root@sc ~]# HISTTIMEFORMAT=“%Y/%m%d%H:%M:%S”
[root@sc ~]# echo $HISTTIMEFORMAT
“%Y/%m%d%H:%M:%S”
[root@sc ~]# history
 	1  “2019/040116:06:37”mount /dev/vg1/lv1 /mnt/  #可以查看命令的执行时间
    2  “2019/040116:06:37”clear
    3  “2019/040116:06:37”mkfs.xfs -f /dev/vg1/lv1
    4  “2019/040116:06:37”clear
    5  “2019/040116:06:37”umount /mnt/
    6  “2019/040116:06:37”mkfs.xfs -f /dev/vg1/lv1
    7  “2019/040116:06:37”mount /dev/vg1/lv1 /mnt/
    8  “2019/040116:06:37”ls /mnt/
    9  “2019/040116:06:37”touch /mnt/233.txt
   10  “2019/040116:06:37”echo "aaaa">/mnt/233.txt
因为以上定义环境变量方式只在当前终端下有效,如果打开新的终端就不存在此环境变量了,如果想要在所有的终端都生效的话,需要把这个环境变量配置进 /etc 目录下的 profile 文件中:
[root@sc ~]# vim /etc/profile

修改完后,重新登录终端就可以生效了。
[root@sc ~]# source !$
source /etc/profile
想要永久保存 .bash_history 文件中的内容,只需要授予 a 权限即可:
注意:如果不是正常退出终端的话,内存中的历史命令会保存不全,或者不会被保存。
[root@sc ~]# chattr +a ~/.bash_history
[root@sc ~]# lsattr .bash_history
-----a---------- .bash_history
!!可以执行上一条执行的命令,例如我先执行一条ls命令然后再执行!!:
[root@sc ~]# !!
lsattr .bash_history
-----a---------- .bash_history
!+ 数字可以指定运行某条命令,例如我指定运行第 10 条命令:
[root@sc ~]# !1007
echo $HISTTIMEFORMAT
“%Y/%m%d%H:%M:%S”
!+ 命令字符串的话,会倒序往上找到那个命令并执行:
[root@sc ~]# !echo
echo $HISTTIMEFORMAT
“%Y/%m%d%H:%M:%S”
8.3 命令补全和别名:
敲一下Tab键可以补全命令或者文件目录的名称,当一个命令或文件目录的名称有一个以上时,按两下Tab键可以列出这些命令的名称和文件目录的名称:
[root@sc ~]# ls
ls        lscpu     lsipc     lsmem     lspci
lsattr    lshw      lslocks   lsmod     lsscsi
lsblk     lsinitrd  lslogins  lsns
[root@sc ~]# mk
mkdict            mkfs.ext4
mkdir             mkfs.minix
mkdumprd          mkfs.xfs
mke2fs            mkhomedir_helper
mkfifo            mkinitrd
mkfs              mklost+found
mkfs.btrfs        mknod
mkfs.cramfs       mkpasswd
mkfs.ext2         mkswap
mkfs.ext3         mktemp
CentOS7 可以自动补全命令的参数,但是默认是不支持的,需要安装一个工具,安装完这个包后,需要 reboot 操作系统后才能生效:
[root@sc ~]# yum install -y bash-completion
已加载插件:fastestmirror
Loading mirror speeds from cached hostfile
epel/x86_64/metalink         | 4.5 kB     00:00
 * epel: mirror.premi.st
base                         | 3.6 kB     00:00
epel                         | 4.7 kB     00:00
extras                       | 3.4 kB     00:00
updates                      | 3.4 kB     00:00
(1/2): epel/x86_64/updateinfo  | 1.0 MB   00:00
(2/2): epel/x86_64/primary_db  | 6.6 MB   00:06
正在解决依赖关系
--> 正在检查事务
---> 软件包 bash-completion.noarch.1.2.1-6.el7 将被 安装
--> 解决依赖关系完成

依赖关系解决

====================================================
 Package          架构    版本          源     大小
====================================================
正在安装:
 bash-completion  noarch  1:2.1-6.el7   base   85 k

事务概要
====================================================
安装  1 软件包

总下载量:85 k
安装大小:259 k
Downloading packages:
bash-completion-2.1-6.el7.noar |  85 kB   00:00
Running transaction check
Running transaction test
Transaction test succeeded
Running transaction
  正在安装    : 1:bash-completion-2.1-6.el7.n   1/1
  验证中      : 1:bash-completion-2.1-6.el7.n   1/1

已安装:
  bash-completion.noarch 1:2.1-6.el7

完毕!
[root@sc ~]# systemctl res
rescue        reset-failed  restart
[root@sc ~]# systemctl restart network
CentOS 重启网络服务,输入下面的命令:systemctl retart network.service 或 systemctl restart network。
CentOS 启动网络服务,输入下面的命令:systemctl start network.service 或 systemctl start network。
CentOS 停止网络服务,输入下面的命令:systemctl stop network.service 或 systemctl stop network。
当一个命令太长的时候,可以给这条命令起一个简化的别名,以方便使用,输入alias可以查看系统里的命令别名:
[root@sc ~]# alias restartnet='systemctl restart network.service'
[root@sc ~]# restartnet
[root@sc ~]# alias
alias cp='cp -i'
alias egrep='egrep --color=auto'
alias fgrep='fgrep --color=auto'
alias grep='grep --color=auto'
alias l.='ls -d .* --color=auto'
alias ll='ls -l --color=auto'
alias ls='ls --color=auto'
alias mv='mv -i'
alias restartnet='systemctl restart network.service'
alias rm='rm -i'
alias which='alias | /usr/bin/which --tty-only --read-alias --show-dot --show-tilde'
用户家目录下的 .bashrc 文件里只存放了最基本几个命令别名,剩下的大部分别名相关文件都在 /etc 目录下的 /profile.d/ 目录里放着:
[root@sc ~]# vi .bashrc

# .bashrc

# User specific aliases and functions

alias rm='rm -i'
alias cp='cp -i'
alias mv='mv -i'

# Source global definitions
if [ -f /etc/bashrc ]; then
        . /etc/bashrc
fi
~
~
~
~
".bashrc" 12L, 176C
[root@sc ~]# cd /etc/profile.d/
[root@sc profile.d]# ls
256term.csh  bash_completion.sh  colorgrep.sh  colorls.sh  lang.csh  less.csh  sh.local  vim.sh      which2.sh
256term.sh   colorgrep.csh       colorls.csh   csh.local   lang.sh   less.sh   vim.csh   which2.csh
unalias 取消自定义的别名:
[root@sc profile.d]# unalias restartnet
[root@sc profile.d]# alias
alias cp='cp -i'
alias egrep='egrep --color=auto'
alias fgrep='fgrep --color=auto'
alias grep='grep --color=auto'
alias l.='ls -d .* --color=auto'
alias ll='ls -l --color=auto'
alias ls='ls --color=auto'
alias mv='mv -i'
alias rm='rm -i'
alias which='alias | /usr/bin/which --tty-only --read-alias --show-dot --show-tilde'
8.4 通配符:

* 表示通配,也就是任意字符都可以的意思,不管是文件,还是目录都可以列出来:
[root@sc ~]# ls
1.txt    3.txt  7.txt            passwd.sh
233.txt  6.txt  anaconda-ks.cfg  ys
[root@sc ~]# ls *.txt
1.txt  233.txt  3.txt  6.txt  7.txt
[root@sc ~]# ls *txt*
1.txt  233.txt  3.txt  6.txt  7.txt
[root@sc ~]# ls 1*
1.txt
? 表示任意一个字符,仅限单个字符,一个以上的字符则不包括,* 则是包括多个字符的:
[root@sc ~]# touch a.txt
[root@sc ~]# touch bb.txt
[root@sc ~]# ls ?.txt
1.txt  3.txt  5.txt  7.txt
2.txt  4.txt  6.txt  a.tx
方括号里可以指定一个范围:
[root@sc ~]# ls [0-3].txt
1.txt  2.txt  3.txt
[root@sc ~]# ls [123].txt
1.txt  2.txt  3.txt
[root@sc ~]# ls [23].txt
2.txt  3.txt
[root@sc ~]# ls [13].txt
1.txt  3.txt
[root@sc ~]# ls [0-9].txt
1.txt  2.txt  3.txt  4.txt  5.txt  6.txt  7.txt
[root@sc ~]# ls [0-9a-z].txt
1.txt  3.txt  5.txt  7.txt
2.txt  4.txt  6.txt  a.txt
[root@sc ~]# ls [0-9A-Z].txt
1.txt  3.txt  5.txt  7.txt  B.txt
2.txt  4.txt  6.txt  A.txt
大括号里也可以指定一个范围,类似于方括号的第二种用法,只不过大括号里需要加逗号,相对于方括号看起来要直观一些:
[root@sc ~]# ls {1,2,4,7,a,B}.txt
1.txt  2.txt  4.txt  7.txt  a.txt  B.txt
8.5 输入输出重定向:
>就是把前面命令的输出的内容输入到后面这个文件中,会覆盖后面那个文件本身的内容:
[root@sc ~]# cat 1.txt
asdfsafsadfsaf
asdfsdafsadfsda
asdfdsafadsfdsa
sdadfsadfsadf
asdfdsafdsaf
[root@sc ~]# cat 1.txt >2.txt
[root@sc ~]# cat 2.txt
asdfsafsadfsaf
asdfsdafsadfsda
asdfdsafadsfdsa
sdadfsadfsadf
asdfdsafdsaf
>>则不会覆盖后面那个文件的内容,也就是追加的意思:
[root@sc ~]# cat 1.txt >>2.txt
[root@sc ~]# cat 2.txt
asdfsafsadfsaf
asdfsdafsadfsda
asdfdsafadsfdsa
sdadfsadfsadf
asdfdsafdsaf
asdfsafsadfsaf
asdfsdafsadfsda
asdfdsafadsfdsa
sdadfsadfsadf
asdfdsafdsaf
2> 会把命令产生的错误信息输出到指定的文件里去,会覆盖指定的文件的内容:
[root@sc ~]# lsaaa
-bash: lsaaa: 未找到命令
[root@sc ~]# lsaaa 2>a.txt
[root@sc ~]# cat a.txt
-bash: lsaaa: 未找到命令
2>> 则不会覆盖指定的文件的内容,也就是追加的意思:
[root@sc ~]# lsaaa 2>>a.txt
[root@sc ~]# cat a.txt
-bash: lsaaa: 未找到命令
-bash: lsaaa: 未找到命令
&> 是结合了>+2>,也就是错误信息和正确信息都会输出到指定内容,并且会覆盖指定文件本身的内容:
[root@sc ~]# ls [12].txt aaa.txt &>a.txt
[root@sc ~]# cat a.txt
ls: 无法访问aaa.txt: 没有那个文件或目录
1.txt
2.txt
&>> 就能追加内容:
[root@sc ~]# ls [12].txt aaa.txt &>>a.txt
[root@sc ~]# cat a.txt
ls: 无法访问aaa.txt: 没有那个文件或目录
1.txt
2.txt
ls: 无法访问aaa.txt: 没有那个文件或目录
1.txt
2.txt
还有以下这种用法:
[root@sc ~]# ls [12].txt aaa.txt >1.txt 2>a.txt
[root@sc ~]# cat 1.txt
1.txt
2.txt
[root@sc ~]# cat a.txt
ls: 无法访问aaa.txt: 没有那个文件或目录
< 输入重定向,可以把右边文件的内容输入到左边的命令里面去,使用 < 输入重定向时左边必须是命令,如果是文件的话是不行的:
[root@sc ~]# wc -l <1.txt
2
[root@sc ~]# 2.txt <1.txt
-bash: 2.txt: 未找到命令
8.6 管道符和作业控制:

管道符:
管道符可以把一个文件的输出内容,传递给后面的命令:
所以管道符简单的说就是把前面的命令执行结果交给后面的命令执行。
[root@sc ~]# cat 1.txt |wc -l
2
作业控制:
Ctrl+z 可以临时停止当前的命令:
这时vim的命令就被丢到后台了
[root@sc ~]# vim 1.txt

[1]+  已停止               vim 1.txt
现在如果想要继续 vim 命令,就需要使用 fg 命令:
[root@sc ~]# fg
vim 1.txt

1.txt
2.txt
~
~
~

                               1,1          全部
Ctrl+z 可以停止多个命令,jobs 可以查看当前暂停的命令:
[root@sc ~]# vim 1.txt

[1]+  已停止               vim 1.txt
[root@sc ~]# vim aa.txt

[2]+  已停止               vim aa.txt
[root@sc ~]# jobs
[1]-  已停止               vim 1.txt
[2]+  已停止               vim aa.txt
fg 命令加 id 号可以继续指定的命令:
[root@sc ~]# fg 1
vim 1.txt
[root@sc ~]# fg 2
vim aa.txt
[root@sc ~]#
bg 命令可以将暂停的命令转到后台去运行,如果需要关闭输入 fg 放到前端来,然后ctrl+c关闭:

在命令的末尾加&符号可以将一条命令丢到后台去执行,命令在后台运行完之后会显示完成:
[root@sc ~]# sleep 100 &
[1] 7677
[root@sc ~]# jobs
[1]+  运行中               sleep 100 &
8.7/8.8 shell变量:
我们知道 PATH 是系统内置变量,还有 HOME、PWD、LOGNAME 等变量,这些变量是在系统里的配置文件规定的,env 命令可以获取到系统变量,系统的变量一般都是大写的,变量的值则可以是字符串或数字:
[root@sc ~]# env
XDG_SESSION_ID=2
HOSTNAME=sc
SELINUX_ROLE_REQUESTED=
TERM=xterm
SHELL=/bin/bash
HISTSIZE=5000
SSH_CLIENT=192.168.94.1 49575 22
SELINUX_USE_CURRENT_RANGE=
SSH_TTY=/dev/pts/0
USER=root
LS_COLORS=rs=0:di=01;34:ln=01;36:mh=00:pi=40;33:so=01;35:do=01;35:bd=40;33;01:cd=40;33;01:or=40;31;01:mi=01;05;37;41:su=37;41:sg=30;43:ca=30;41:tw=30;42:ow=34;42:st=37;44:ex=01;32:*.tar=01;31:*.tgz=01;31:*.arc=01;31:*.arj=01;31:*.taz=01;31:*.lha=01;31:*.lz4=01;31:*.lzh=01;31:*.lzma=01;31:*.tlz=01;31:*.txz=01;31:*.tzo=01;31:*.t7z=01;31:*.zip=01;31:*.z=01;31:*.Z=01;31:*.dz=01;31:*.gz=01;31:*.lrz=01;31:*.lz=01;31:*.lzo=01;31:*.xz=01;31:*.bz2=01;31:*.bz=01;31:*.tbz=01;31:*.tbz2=01;31:*.tz=01;31:*.deb=01;31:*.rpm=01;31:*.jar=01;31:*.war=01;31:*.ear=01;31:*.sar=01;31:*.rar=01;31:*.alz=01;31:*.ace=01;31:*.zoo=01;31:*.cpio=01;31:*.7z=01;31:*.rz=01;31:*.cab=01;31:*.jpg=01;35:*.jpeg=01;35:*.gif=01;35:*.bmp=01;35:*.pbm=01;35:*.pgm=01;35:*.ppm=01;35:*.tga=01;35:*.xbm=01;35:*.xpm=01;35:*.tif=01;35:*.tiff=01;35:*.png=01;35:*.svg=01;35:*.svgz=01;35:*.mng=01;35:*.pcx=01;35:*.mov=01;35:*.mpg=01;35:*.mpeg=01;35:*.m2v=01;35:*.mkv=01;35:*.webm=01;35:*.ogm=01;35:*.mp4=01;35:*.m4v=01;35:*.mp4v=01;35:*.vob=01;35:*.qt=01;35:*.nuv=01;35:*.wmv=01;35:*.asf=01;35:*.rm=01;35:*.rmvb=01;35:*.flc=01;35:*.avi=01;35:*.fli=01;35:*.flv=01;35:*.gl=01;35:*.dl=01;35:*.xcf=01;35:*.xwd=01;35:*.yuv=01;35:*.cgm=01;35:*.emf=01;35:*.axv=01;35:*.anx=01;35:*.ogv=01;35:*.ogx=01;35:*.aac=01;36:*.au=01;36:*.flac=01;36:*.mid=01;36:*.midi=01;36:*.mka=01;36:*.mp3=01;36:*.mpc=01;36:*.ogg=01;36:*.ra=01;36:*.wav=01;36:*.axa=01;36:*.oga=01;36:*.spx=01;36:*.xspf=01;36:
MAIL=/var/spool/mail/root
PATH=/usr/local/sbin:/usr/local/bin:/usr/sbin:/usr/bin:/root/bin
PWD=/root
LANG=zh_CN.UTF-8
SELINUX_LEVEL_REQUESTED=
HISTCONTROL=ignoredups
SHLVL=1
HOME=/root
LOGNAME=root
SSH_CONNECTION=192.168.94.1 49575 192.168.94.128 22
LESSOPEN=||/usr/bin/lesspipe.sh %s
XDG_RUNTIME_DIR=/run/user/0
_=/usr/bin/env
set 命令也可以查看变量,不过不仅仅查看系统的变量,还能查看用户自定义的变量,在 CentOS6 之前这个命令只会显示系统变量和自定义变量,在 CentOS7 则多了很多 shell 脚本相关的东西:
[root@sc ~]# set
用户自定义变量,自定义的变量也可以在 set 里体现出来:


写 shell 脚本的时候经常要使用变量,变量的命名规则:变量可以以字母、下划线开头,但是不能以数字开头:
[root@sc ~]# a1=2
[root@sc ~]# echo $a1
2
[root@sc ~]# a_1=3
[root@sc ~]# echo $a_1
3
[root@sc ~]# _a1=4
[root@sc ~]# echo $_a1
4
[root@sc ~]# 1aa=2
-bash: 1aa=2: 未找到命令
[root@sc ~]# 2aa=3
-bash: 2aa=3: 未找到命令
变量值有特殊符号时需要用单引号括起来:
[root@sc ~]# a=a b c
-bash: b: 未找到命令
[root@sc ~]# a='a b c'
[root@sc ~]# echo $a
a b c
[root@sc ~]# a="a$bc"  # 加双引号转义不了
[root@sc ~]# echo $a
a
[root@sc ~]# a='a$bc'
[root@sc ~]# echo $a
a$bc
变量的叠加:
[root@sc ~]# a=1
[root@sc ~]# b=2
[root@sc ~]# echo $a$b
12
[root@sc ~]# a='a$bc'
[root@sc ~]# b=2
[root@sc ~]# echo $a$b
a$bc2
[root@sc ~]# c="a$b"c
[root@sc ~]# echo $c
a2c
[root@sc ~]# c='a$b'c
[root@sc ~]# echo $c
a$bc
[root@sc ~]# c='a$bc'
[root@sc ~]# echo $c
a$bc
[root@sc ~]# c=a"$b"c
[root@sc ~]# echo $c
a2c
echo $SSH_TTY 命令可以查看当前在哪个终端下:
[root@sc ~]# w
 10:51:43 up  1:06,  3 users,  load average: 0.00, 0.01, 0.05
USER     TTY      FROM             LOGIN@   IDLE   JCPU   PCPU WHAT
root     tty1                      09:45    1:05m  0.06s  0.06s -bash
root     pts/0    192.168.94.1     09:46    7.00s  0.15s  0.02s w
root     pts/1    192.168.94.1     10:49    2:39   0.03s  0.03s -bash
[root@sc ~]# echo $SSH_TTY
/dev/pts/0
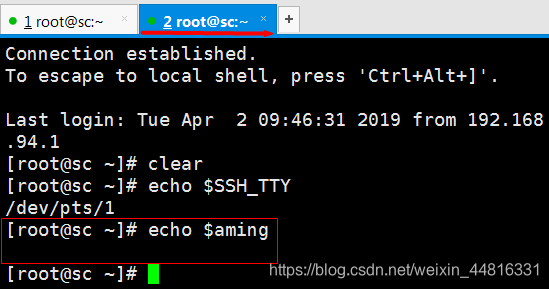
在窗口 1 自创建环境变量,在窗口 2 是不会显示的: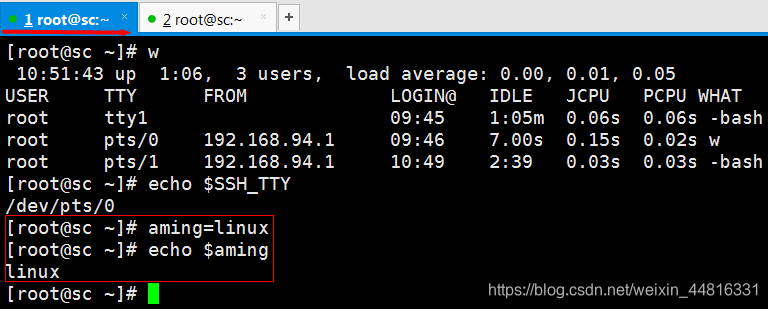
bash 命令可打开子 shell,相当于打开了一个终端:
[root@sc ~]# bash
[root@sc ~]# pstree
systemd─┬─NetworkManager─┬─dhclient
        │                └─2*[{NetworkManager}]
        ├─VGAuthService
        ├─auditd───{auditd}
        ├─chronyd
        ├─crond
        ├─dbus-daemon───{dbus-daemon}
        ├─firewalld───{firewalld}
        ├─login───bash
        ├─lvmetad
        ├─master─┬─pickup
        │        └─qmgr
        ├─polkitd───6*[{polkitd}]
        ├─rsyslogd───2*[{rsyslogd}]
        ├─sshd─┬─3*[sshd───bash]
        │      └─sshd───bash───bash───pstree
        ├─systemd-journal
        ├─systemd-logind
        ├─systemd-udevd
        ├─tuned───4*[{tuned}]
        └─vmtoolsd───{vmtoolsd}
[root@sc ~]# exit
exit
[root@sc ~]# pstree
systemd─┬─NetworkManager─┬─dhclient
        │                └─2*[{NetworkManager}]
        ├─VGAuthService
        ├─auditd───{auditd}
        ├─chronyd
        ├─crond
        ├─dbus-daemon───{dbus-daemon}
        ├─firewalld───{firewalld}
        ├─login───bash
        ├─lvmetad
        ├─master─┬─pickup
        │        └─qmgr
        ├─polkitd───6*[{polkitd}]
        ├─rsyslogd───2*[{rsyslogd}]
        ├─sshd─┬─3*[sshd───bash]
        │      └─sshd───bash───pstree
        ├─systemd-journal
        ├─systemd-logind
        ├─systemd-udevd
        ├─tuned───4*[{tuned}]
        └─vmtoolsd───{vmtoolsd}
[root@sc ~]# echo $aming
[root@sc ~]# linux
全局变量:
在当前终端自定义的变量在子 shell 里是查看不到的,因为这种定义的变量不是全局变量,是本地变量,如果要定义全局变量需要使用 export 命令:
[root@sc ~]# aming=linux
[root@sc ~]# echo $aming
linux
[root@sc ~]# clear
[root@sc ~]# export aming=linux
[root@sc ~]# echo $aming
linux
[root@sc ~]# bash
[root@sc ~]# echo $aming
linux
[root@sc ~]# pstree
systemd─┬─NetworkManager─┬─dhclient
        │                └─2*[{NetworkManager}]
        ├─VGAuthService
        ├─auditd───{auditd}
        ├─chronyd
        ├─crond
        ├─dbus-daemon───{dbus-daemon}
        ├─firewalld───{firewalld}
        ├─login───bash
        ├─lvmetad
        ├─master─┬─pickup
        │        └─qmgr
        ├─polkitd───6*[{polkitd}]
        ├─rsyslogd───2*[{rsyslogd}]
        ├─sshd─┬─2*[sshd───bash]
        │      └─sshd───bash───bash───bash───pst+
        ├─systemd-journal
        ├─systemd-logind
        ├─systemd-udevd
        ├─tuned───4*[{tuned}]
        └─vmtoolsd───{vmtoolsd}
export 定义的全局变量是向下的,也就是说如果在子 shell 里定义的全局变量在这个子 shell 的父 shell 上是查看不到的:
[root@sc ~]# export b=123
[root@sc ~]# echo $b
123
[root@sc ~]# exit
exit
[root@sc ~]# echo $b
取消变量:
unset命令后面跟变量的名称,就可以取消掉这个变量的值:
[root@sc ~]# echo $aming
linux
[root@sc ~]# unset aming
[root@sc ~]# echo $aming
8.9 环境变量配置文件:

环境变量的配置文件有两大类,一是系统层次维度的配置文件在 etc 目录下,二是用户层次维度的配置文件在用户的家目录下。
profile 文件是用户登录的时候会加载到,bashrc 文件是在用户、系统执行一些 shell 脚本的时候会加载到,系统层次的 profile 和 bashrc 文件一般情况下不要去动,如果要修改的话就修改用户层次的 .bashrc_profile 和 .bashrc 文件。
.bashrc_profile 文件加载的时候会调用 .bashrc 文件, .bashrc 文件又会去调用 /etc 目录下的 bashrc 文件。
[root@sc ~]# vim .bash_profile

[root@sc ~]# vim .bashrc

.bashrc_loguot 文件用来定义用户退出时的需要做的一些操作,如果你想让用户退出时删除历史命令,可以把删除历史命令的命令写在 .bashrc_loguot 文件里。
PS1 变量是在 /etc 目录下的 bashrc 文件里面定义的:
[root@sc ~]# vim /etc/bashrc

PS1 变量就是用来配置这个字符串显示的内容的:
[root@sc ~]# cd /etc/sysconfig/network-scripts/
[root@sc network-scripts]# echo $PS1
[\u@\h \W]\$  # u=用户,h=主机名,W=目录名
例如我把大写的 W 改成小写的 w ,这样的就会显示绝对路径:
[root@sc network-scripts]# PS1='[\u@\h \w]\$'
[root@sc ~]#cd 123
[root@sc ~/123]#cd /tmp/
[root@sc /tmp]#
[root@sc /tmp]#PS1='<\u@\h \w> \$'
<root@sc /tmp> #
变颜色:PS1=’[\033[01;32m]\u@\h[\033[00m]:[\033[01;36m]\w[\033[00m]$’

PS2 是用在另外一种环境的,例如 mysql 的命令行:
root@sc:/tmp#echo $PS2
>
root@sc:/tmp#for i in `seq 1 100`
> do
> echo $i
> done
1
2
3
4
5
6
7
8
9
10
11
12
13
14
15
16
17
18
19
20
21
22
23
24
25
26
27
28
29
30
31
32
33
34
35
36
37
38
39
40
41
42
43
44
45
46
47
48
49
50
51
52
53
54
55
56
57
58
59
60
61
62
63
64
65
66
67
68
69
70
71
72
73
74
75
76
77
78
79
80
81
82
83
84
85
86
87
88
89
90
91
92
93
94
95
96
97
98
99
100
root@sc:/tmp#for i in `seq 1 100` ; do echo $i; done
root@sc:/tmp#PS2="#"
root@sc:/tmp#echo $PS2
#
root@sc:/tmp#for i in `seq 1 10`
#do
#echo $i
#done
1
2
3
4
5
6
7
8
9
10
8.10 shell特殊符号cut命令:

1. * 任意个任意字符通配符:
root@sc:~#ls *.txt
1.txt    3.txt  6.txt   a.txt   B.txt
233.txt  4.txt  7.txt   A.txt
2.txt    5.txt  aa.txt  bb.txt
2. ? 任意一个字符:
root@sc:~#ls ?.txt
1.txt  3.txt  5.txt  7.txt  A.txt
2.txt  4.txt  6.txt  a.txt  B.txt
3. # 注释字符:一条命令前面加注释字符的话,命令就不会执:
root@sc:~# #ls a.txt
root@sc:~#
root@sc:~##ls a.txt #adfkdsakfjdsalfjd
root@sc:~#
4. \ 脱义字符,有些字符是命令,所以需要脱义符来让这个字符变成普通字符,而非命令字符:
root@sc:~#a=1
root@sc:~#b=2
root@sc:~#c=$a$b
root@sc:~#echo $c
12
root@sc:~#c='$a$b'
root@sc:~#c=\$a\$b
root@sc:~#echo $c
$a$b
5. | 管道符,把前面命令的输出结果交给后面的命令执行:
root@sc:~#cat /etc/passwd |wc -l
27

cut 命令可以分割字符串,可以指定某个字符进行分割,例如我要分割passwd 文件里的字符串,并以冒号为分割符,然后指定查看第一段字符串


8.11 sort_wc_uniq命令:
sort命令可以对字符串或数字排序,排序的方法是安照ASCII码排序的,例如我排序passwd文件的内容: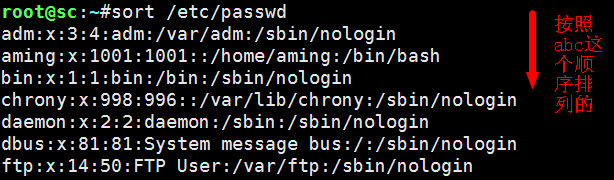
root@sc:~#head /etc/passwd >> 1.txt
root@sc:~#vim 1.txt
root@sc:~#sort 1.txt
<
>
]
{
1.txt
222111
222222aaaaa
223333
22aaa
2.txt
4888888888adsfdsaf
adm:x:3:4:adm:/var/adm:/sbin/nologin
bin:x:1:1:bin:/bin:/sbin/nologin
daemon:x:2:2:daemon:/sbin:/sbin/nologin
halt:x:7:0:halt:/sbin:/sbin/halt
lp:x:4:7:lp:/var/spool/lpd:/sbin/nologin
mail:x:8:12:mail:/var/spool/mail:/sbin/nologin
operator:x:11:0:operator:/root:/sbin/nologin
root:x:0:0:root:/root:/bin/bash
*sdjfasdfjl
shutdown:x:6:0:shutdown:/sbin:/sbin/shutdown
sync:x:5:0:sync:/sbin:/bin/sync
加 -n 选项会照数字去排序,这时相对于数字来说字母和特殊符号相当于是零:
root@sc:~#sort -n 1.txt
<
>
]
{
adm:x:3:4:adm:/var/adm:/sbin/nologin
bin:x:1:1:bin:/bin:/sbin/nologin
daemon:x:2:2:daemon:/sbin:/sbin/nologin
halt:x:7:0:halt:/sbin:/sbin/halt
lp:x:4:7:lp:/var/spool/lpd:/sbin/nologin
mail:x:8:12:mail:/var/spool/mail:/sbin/nologin
operator:x:11:0:operator:/root:/sbin/nologin
root:x:0:0:root:/root:/bin/bash
*sdjfasdfjl
shutdown:x:6:0:shutdown:/sbin:/sbin/shutdown
sync:x:5:0:sync:/sbin:/bin/sync
1.txt
2.txt
22aaa
222111
222222aaaaa
223333
4888888888adsfdsaf
-r 则是倒序排序:
root@sc:~#sort -r 1.txt
sync:x:5:0:sync:/sbin:/bin/sync
shutdown:x:6:0:shutdown:/sbin:/sbin/shutdown
*sdjfasdfjl
root:x:0:0:root:/root:/bin/bash
operator:x:11:0:operator:/root:/sbin/nologin
mail:x:8:12:mail:/var/spool/mail:/sbin/nologin
lp:x:4:7:lp:/var/spool/lpd:/sbin/nologin
halt:x:7:0:halt:/sbin:/sbin/halt
daemon:x:2:2:daemon:/sbin:/sbin/nologin
bin:x:1:1:bin:/bin:/sbin/nologin
adm:x:3:4:adm:/var/adm:/sbin/nologin
4888888888adsfdsaf
2.txt
22aaa
223333
222222aaaaa
222111
1.txt
{
]
>
<
wc -l 命令是统计行数的:
root@sc:~#wc -l 1.txt
22 1.txt
加 -m 选项则是统计字符数,包括换行符:
root@sc:~#wc -m 1.txt
468 1.txt
root@sc:~#vim 2.txt
root@sc:~#cat 2.txt  # 往2.txt里写了6个字符
abc
123
root@sc:~#wc -m 2.txt  # 但是显示是8个字符
8 2.txt
root@sc:~#cat -A 2.txt  # 原来是有换行符存在,换行符是隐藏状态
abc$
123$
加 - w 选项是安照单词统计,这个单词是以逗号或者空格分开的一个个词:
root@sc:~#wc -w 2.txt  # 123是一个词,abc是一个词,一共两个词
2 2.txt
root@sc:~#vim 2.txt
root@sc:~#wc -w 2.txt
3 2.txt
root@sc:~#cat 2.txt
abc
123 111.222  # 111,222也是一个词
uniq 命令是去掉重复的字符,需要排序再去重:
root@sc:~#uniq 2.txt
abc
123 111.222
123
abc
1
2
root@sc:~#cat 2.txt
abc
123 111.222
123
abc
1
1
2
root@sc:~#sort 2.txt
1
1
123
123 111.222
2
abc
abc
root@sc:~#sort 2.txt |uniq
1
123
123 111.222
2
abc
uniq 命令是去掉重复的字符,-c 是统计行数,配合 sort 命令使用:
root@sc:~#sort 2.txt |uniq -c
      2 1
      1 123
      1 123 111.222
      1 2
      2 abc
8.12 tee_tr_split命令:
tee 命令和输出重定向有点像,它们的区别是 tee 是可以看到输出重定向的结果, > 则不能看到:
[root@sc ~]# sort 2.txt |uniq -c >a.txt
[root@sc ~]# cat a.txt
      2 1
      1 123
      1 123 111.222
      1 2
      2 abc
[root@sc ~]# sort 2.txt |uniq -c |tee a.txt
      2 1
      1 123
      1 123 111.222
      1 2
      2 abc
[root@sc ~]# cat a.txt
      2 1
      1 123
      1 123 111.222
      1 2
      2 abc
清空 a.txt 内容的命令:
[root@sc ~]# >a.txt
[root@sc ~]# cat a.txt
[root@sc ~]#
tee -a 追加重定向:
[root@sc ~]# sort 2.txt |uniq -c |tee -a a.txt
      2 1
      1 123
      1 123 111.222
      1 2
      2 abc
[root@sc ~]# cat a.txt
      2 1
      1 123
      1 123 111.222
      1 2
      2 abc
      2 1
      1 123
      1 123 111.222
      1 2
      2 abc
tr 命令是用来替换字符的,针对字符来操作的:
 split 切割命令,可以用来切割文件,因为有些文件太大了,不方便查看,所以需要使用 split 来切割成多个文件来方便查看,split 可以针对大小切割也可以针对行数切割:
[root@sc ~]# find /etc/ -type f -name "*conf" -exec cat {} >>a.txt \;
[root@sc ~]# du -sh a.txt
448K	a.txt
[root@sc ~]# ls
123      4.txt   anaconda-ks.cfg  passwd.sh
1.txt    5.txt   a.txt            test
233.txt  6.txt   A.txt            ys
2.txt    7.txt   bb.txt
3.txt    aa.txt  B.txt
[root@sc ~]# mv a.txt test/
[root@sc ~]# cd test/
[root@sc test]# ls
a.txt

删除x*的文件:
[root@sc test]# rm -fr *
[root@sc test]# ls
[root@sc test]#
指定分割的文件大小:
[root@sc test]# split -b 100k a.txt
[root@sc test]# ls
a.txt  xaa  xab  xac
指定分割的文件前缀名:
[root@sc test]# split -b 100k a.txt abc
[root@sc test]# ls
abcaa  abcab  abcac  a.txt  xaa  xab  xac
[root@sc test]# split -b 100k a.txt abc.
[root@sc test]# ls
abcaa  abc.aa  abcab  abc.ab  abcac  abc.ac  a.txt  xaa  xab  xac
指定分割的文件的行数:
[root@sc test]# split -l 1000 a.txt
[root@sc test]# ls -l
总用量 856
-rw-r--r--. 1 root root 102400 4月   3 12:40 abcaa
-rw-r--r--. 1 root root 102400 4月   3 12:42 abc.aa
-rw-r--r--. 1 root root 102400 4月   3 12:40 abcab
-rw-r--r--. 1 root root 102400 4月   3 12:42 abc.ab
-rw-r--r--. 1 root root   9252 4月   3 12:40 abcac
-rw-r--r--. 1 root root   9252 4月   3 12:42 abc.ac
-rw-r--r--. 1 root root 214052 4月   3 12:35 a.txt
-rw-r--r--. 1 root root  33754 4月   3 12:44 xaa
-rw-r--r--. 1 root root  46342 4月   3 12:44 xab
-rw-r--r--. 1 root root  44785 4月   3 12:44 xac
-rw-r--r--. 1 root root  43775 4月   3 12:44 xad
-rw-r--r--. 1 root root  33687 4月   3 12:44 xae
-rw-r--r--. 1 root root  11709 4月   3 12:44 xaf
[root@sc test]# wc -l *
  2499 abcaa
  2499 abc.aa
  2567 abcab
  2567 abc.ab
   284 abcac
   284 abc.ac
  5350 a.txt
  1000 xaa
  1000 xab
  1000 xac
  1000 xad
  1000 xae
   350 xaf
 21400 总用量
8.13 shell特殊符号下:

想要把多条命令写在一行里,就需要使用分号分割:
[root@sc ~]# ls 1.txt ; wc -l 2.txt
1.txt
7 2.txt
|| 是或者的意思,写在两条命令中间的话只要左边的命令执行成功,那么右边的命令就不会执行。如果左边的命令执行失败,那么右边的命令就会执行:
[root@sc ~]# ls 1a.txt || wc -l 2.txt
ls: 无法访问1a.txt: 没有那个文件或目录
7 2.txt
[root@sc ~]# ls 1.txt || wc -l 2.txt
1.txt
&& 是并且的意思,只有左边的命令执行成功的时候,右边才会执行,只要左边的命令没有执行成功,那么右边的命令一定不会被执行:
[root@sc ~]# ls 1a.txt && wc -l 2.txt
ls: 无法访问1a.txt: 没有那个文件或目录
[root@sc ~]# ls 1.txt && wc -l 2.txt
1.txt
7 2.txt