Service启动和绑定过程
Service的启动过程可以分为两个部分:
- ContextImpl 到AMS的调用过程
- ActivityThread启动Service
先来看一下第一个过程。
ContextImpl 到AMS的调用过程
启动Service的入口是startService(),代码在ContextWrapper中,ContextWrapper的startService()又调用了内部的ContextImpl的startService():
public ComponentName startService(Intent service) {
        return mBase.startService(service);
    }
ContextImpl创建时机:
这个mBase就是ContextImpl,那它是什么时候创建的呢?前面学习Activity启动时,在ActivityThread启动Activity中会创建Activity的上下文环境:
private Activity performLaunchActivity(ActivityClientRecord r, Intent customIntent) {
   ...
   //1. 创建ContextImpl
   ContextImpl appContext = createBaseContextForActivity(r);
   Activity activity = null;
   ...
   //2.将ContextImpl和Activity关联起来
   activity.attach(appContext, this, getInstrumentation(), r.token,
                        r.ident, app, r.intent, r.activityInfo, title, r.parent,
                        r.embeddedID, r.lastNonConfigurationInstances, config,
                        r.referrer, r.voiceInteractor, window, r.configCallback);
看看创建ContextImpl的过程:
private ContextImpl createBaseContextForActivity(ActivityClientRecord r) {
        ...
        //内部直接new一个ContextImpl并返回
        ContextImpl appContext = ContextImpl.createActivityContext(this, r.packageInfo, r.activityInfo, r.token, displayId, r.overrideConfig);		  ...
        return appContext;
    }
ContextImpl和Activity关联:
上面ContextImpl创建后,会调用Activity的attach()方法:
//Activity.java
final void attach(Context context,...) {
    //这里调用了ContextThemeWrapper的attachBaseContext()方法
    attachBaseContext(context);
 }

// ContextThemeWrapper.java,继承自ContextWrapper,而ContextWrapper又继承自Context
protected void attachBaseContext(Context newBase) {
   super.attachBaseContext(newBase); //这里调用了Context的attachBaseContext()
}

//Context.java,base就是上面创建的ContextImpl
protected void attachBaseContext(Context base) {
   if (mBase != null) {
        throw new IllegalStateException("Base context already set");
   }
   mBase = base; //最终将ContextImpl赋值给了mBase,所以mBase其实就是ContextImpl
 }
紧接着来看看ContextImpl.startService()的过程:
内部调用了startServiceCommon():
private ComponentName startServiceCommon(Intent service, boolean requireForeground,
            UserHandle user) {
        try {
            validateServiceIntent(service);
            service.prepareToLeaveProcess(this);
            //这里又获取了AMS,然后调用AMS的startService(),说明这里就从应用程序进入了AMS。
            ComponentName cn = ActivityManager.getService().startService(
                mMainThread.getApplicationThread(), service, service.resolveTypeIfNeeded(
                            getContentResolver()), requireForeground,
                            getOpPackageName(), user.getIdentifier());
            ...
            return cn;
        } catch (RemoteException e) {
            throw e.rethrowFromSystemServer();
        }
    }
ActivityThread启动Service过程
首先看一下大体的时序图:

1. 首先来看下AMS的startService()
public ComponentName startService(IApplicationThread caller, Intent service,String resolvedType, boolean requireForeground, ...)throws TransactionTooLargeException {
  ...
  synchronized(this) {
            final int callingPid = Binder.getCallingPid();
            final int callingUid = Binder.getCallingUid();
            final long origId = Binder.clearCallingIdentity();
            ComponentName res;
            try {
              //这里调用了ActiveServices的startServiceLocked(),
                res = mServices.startServiceLocked(caller, service,resolvedType, callingPid, callingUid,requireForeground, callingPackage, userId);

            } finally {
                Binder.restoreCallingIdentity(origId);
            }
            return res;
        }
}
2. ActiveServices的startServiceLocked()
ComponentName startServiceLocked(IApplicationThread caller, Intent service, ...) throws TransactionTooLargeException {
	...
	//1. 这里去检查是否有与参数对应的ServiceRecord,如果没有,则调用PMS去获取Service对于的Service信息,封装到ServiceRecord中,然后再封装成ServiceLookupResult()返回。
	ServiceLookupResult res = retrieveServiceLocked(service, resolvedType, callingPackage,callingPid, callingUid, userId, true, callerFg, false);
    if (res == null) {
       return null;
     }
     if (res.record == null) {
          return new ComponentName("!", res.permission != null ? res.permission : "private to package");
     }
	 //ServiceRecord和ActivityRecord类似,用于描述Service的所有信息
     ServiceRecord r = res.record;
    //最后调用 startServiceInnerLocked()方法,这个方法内部又调用了bringUpServiceLocked()
    ComponentName cmp = startServiceInnerLocked(smap, service, r, callerFg, addToStarting);
    return cmp;
3. ActiveServices 的bringUpServiceLocked()
private String bringUpServiceLocked(ServiceRecord r, int intentFlags, boolean execInFg,boolean whileRestarting, boolean permissionsReviewRequired)
            throws TransactionTooLargeException {

  ...
  //1.获取该Service想要在哪个进程中运行,默认是当前进程,可以在AndroidManifest.xml中通过andorid:process属性来开启一个进程运行Service
  final String procName = r.processName;
   String hostingType = "service";
   ProcessRecord app;

   f (!isolated) {
   				//2.查询是否存在一个与Service对应的ProcessRecord类型的对象app
            app = mAm.getProcessRecordLocked(procName, r.appInfo.uid, false);
            //3.如果运行service的应用程序进程存在
            if (app != null && app.thread != null) {
                try {
                    app.addPackage(r.appInfo.packageName, r.appInfo.versionCode, mAm.mProcessStats);
                    //4.启动Service,这个过程和启动Activity的过程是类似的
                    realStartServiceLocked(r, app, execInFg);
                    return null;
                } catch (TransactionTooLargeException e) {
                    throw e;
                } catch (RemoteException e) {
                    Slog.w(TAG, "Exception when starting service " + r.shortName, e);
                }

                // If a dead object exception was thrown -- fall through to
                // restart the application.
            }

            //5.如果运行service的应用程序进程不存在
            if (app == null && !permissionsReviewRequired) {
            //则调用startProcessLocked()去创建应用程序进程,之前在应用程序进程启动过程已经学习过
            if ((app=mAm.startProcessLocked(procName, r.appInfo, true, intentFlags,
                    hostingType, r.name, false, isolated, false)) == null) {
                String msg = "Unable to launch app "
                        + r.appInfo.packageName + "/"
                        + r.appInfo.uid + " for service "
                        + r.intent.getIntent() + ": process is bad";
                Slog.w(TAG, msg);
                bringDownServiceLocked(r);
                return msg;
            }
            if (isolated) {
                r.isolatedProc = app;
            }
        }
        }
     ...
4. realStartServiceLocked()
private final void realStartServiceLocked(ServiceRecord r,ProcessRecord app, boolean execInFg) throws RemoteException {
  ...
  //这里调用了app.thread的scheduleCreateService, app.thread是ActivityThread的ApplicationThread,它是一个Binder对象,通过它从AMS转到了应用程序进程,和Activity的方式一样
  app.thread.scheduleCreateService(r, r.serviceInfo,mAm.compatibilityInfoForPackageLocked(r.serviceInfo.applicationInfo),app.repProcState);
  r.postNotification();
  created = true;

  ...
5.scheduleCreateService()
public final void scheduleCreateService(IBinder token,
                ServiceInfo info, CompatibilityInfo compatInfo, int processState) {
            updateProcessState(processState, false);
            CreateServiceData s = new CreateServiceData();
            s.token = token;
            s.info = info;
            s.compatInfo = compatInfo;
				//ApplicationThread运行在Binder线程池,通过Handler切回到主线程,这个sendMessage()用于向主线程发送一个CREATE_SERVICE消息
            sendMessage(H.CREATE_SERVICE, s);
        }
6.主线程处理CREATE_SERVICE消息
public void handleMessage(Message msg) {
  ...
	case CREATE_SERVICE:
          Trace.traceBegin(Trace.TRACE_TAG_ACTIVITY_MANAGER, ("serviceCreate: " + String.valueOf(msg.obj)));
          //再看看这个方法内部处理
          handleCreateService((CreateServiceData)msg.obj);
          Trace.traceEnd(Trace.TRACE_TAG_ACTIVITY_MANAGER);
          break;
  ...
}
7. handleCreateService()完成service的创建以及初始化,并调用onCreate()
private void handleCreateService(CreateServiceData data) {

		 //1. 获取要启动的Service的应用程序的LoadApk
        LoadedApk packageInfo = getPackageInfoNoCheck(data.info.applicationInfo, data.compatInfo);
        Service service = null;
        try {
            //2. 获取类加载
            java.lang.ClassLoader cl = packageInfo.getClassLoader();
            //3. 创建service实例
            service = packageInfo.getAppFactory().instantiateService(cl, data.info.name, data.intent);
        } catch (Exception e) {
            if (!mInstrumentation.onException(service, e)) {
                throw new RuntimeException(
                    "Unable to instantiate service " + data.info.name
                    + ": " + e.toString(), e);
            }
        }

        try {
           //4. 创建Service的上下文环境ContextImpl对象
            ContextImpl context = ContextImpl.createAppContext(this, packageInfo);
            context.setOuterContext(service);
				//获取Application对象,在之前创建Activity时已经创建了这个Application对象,且调用了onCreate()方法
            Application app = packageInfo.makeApplication(false, mInstrumentation);
            //5.初始化Service,并将service和ContextImpl关联起来
            service.attach(context, this, data.info.name, data.token, app, ActivityManager.getService());
            //6.紧接着调用service的onCreate()方法,至此,service就启动起来了啊
            service.onCreate();
            //然后将service加入mService中,这是一个ArrayMap类型的对象,方便管理Service,后面也会用到
            mServices.put(data.token, service);
            try {
            	//最后通知AMS,service已经启动完毕。
             ActivityManager.getService().serviceDoneExecuting(data.token, SERVICE_DONE_EXECUTING_ANON, 0, 0);
            } catch (RemoteException e) {
                throw e.rethrowFromSystemServer();
            }
        } catch (Exception e) {
            if (!mInstrumentation.onException(service, e)) {
                throw new RuntimeException(
                    "Unable to create service " + data.info.name
                    + ": " + e.toString(), e);
            }
        }
    }
Service的绑定过程
也可分为两个步骤:
- ContextImpl到AMS的调用过程
- service的绑定过程
ContextImpl到AMS的调用过程
和启动Service的步骤类似,都会ContextWrapper入口,经ContextImpl,最后会调用ContextImpl的bindServiceCommon():
private boolean bindServiceCommon(Intent service, ServiceConnection conn, int flags, Handlerhandler, UserHandle user) {

        ...
        //1. 调用LoadApk类型的mPackageInfo的getServiceDispatcher()方法,将ServiceConnection封装成IServiceConnection对象并返回,这个也是一个Binder对象喔
        if (mPackageInfo != null) {
            sd = mPackageInfo.getServiceDispatcher(conn, getOuterContext(), handler, flags);
        } else {
            throw new RuntimeException("Not supported in system context");
        }
        validateServiceIntent(service);
        try {
            IBinder token = getActivityToken();
            if (token == null && (flags&BIND_AUTO_CREATE) == 0 && mPackageInfo != null
                    && mPackageInfo.getApplicationInfo().targetSdkVersion
                    < android.os.Build.VERSION_CODES.ICE_CREAM_SANDWICH) {
                flags |= BIND_WAIVE_PRIORITY;
            }
            service.prepareToLeaveProcess(this);
            //2. 接下来又是熟悉的通过AMS去实现bindService()的过程,这里就从应用程序进程进入了AMS。
            int res = ActivityManager.getService().bindService(
                mMainThread.getApplicationThread(), getActivityToken(), service,
                service.resolveTypeIfNeeded(getContentResolver()),
                sd, flags, getOpPackageName(), user.getIdentifier());
            if (res < 0) {
                throw new SecurityException(
                        "Not allowed to bind to service " + service);
            }
            return res != 0;
        } catch (RemoteException e) {
            throw e.rethrowFromSystemServer();
        }
    }
service的绑定过程
从AMS的bindService开始,经历的前半部分时序图:
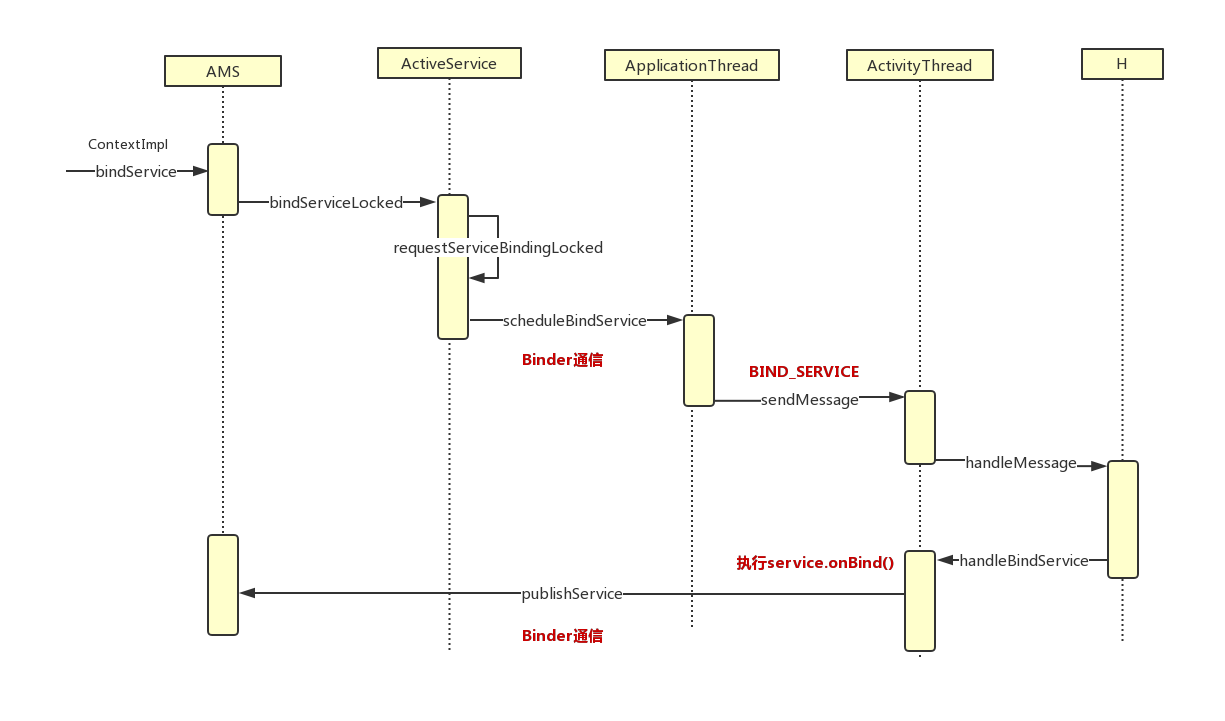
1.AMS内部bindService的过程也是跟startService类似,调用ActiveServices的bindServiceLock()
int bindServiceLocked(IApplicationThread caller, IBinder token, Intent service,...){

...
//1.调用s.retrieveAppBindingLocked去获取AppBindRecord,它记录了Service与应用程序进程之间的关联,例如谁绑定了Service,被绑定的service,绑定Service的IntentBindRecord等等
AppBindRecord b = s.retrieveAppBindingLocked(service, callerApp);

...

if ((flags&Context.BIND_AUTO_CREATE) != 0) {
 s.lastActivity = SystemClock.uptimeMillis();
 //	2,启动Service,这里面会调用realStartServiceLocked()方法,然后再由ActivityThread来调用Service的onCreate(),上面启动Service已经学习过
// 绑定service需要先启动service
 if (bringUpServiceLocked(s, service.getFlags(), callerFg, false, permissionsReviewRequired) != null) {
    return 0;
    }
 }
...

...
//3.这里表示service已经运行,且当前应用程序已经接受到绑定Service时返回的Binder,这样应用程序就可以通过binder和service通信了。
if (s.app != null && b.intent.received) {

                try {
                    //4.  c.conn是IServiceConnection对象
                    c.conn.connected(s.name, b.intent.binder, false);
                } catch (Exception e) {
                    Slog.w(TAG, "Failure sending service " + s.shortName
                            + " to connection " + c.conn.asBinder()
                            + " (in " + c.binding.client.processName + ")", e);
                }

               //5.表示当前应用程序是第一个与Service绑定的,且service已经  调用过OnUnBind()方法
                if (b.intent.apps.size() == 1 && b.intent.doRebind) {
                   //6.那么就调用这个方法
                    requestServiceBindingLocked(s, b.intent, callerFg, true);
                }
            } else if (!b.intent.requested) { //7. 表示当前应用程序的client端没有发送过绑定service的请求
               //8.则调用这个方法,和上面区别是最后参数不同,那么这个方法是干嘛的呢?
                requestServiceBindingLocked(s, b.intent, callerFg, false);
            }

            getServiceMapLocked(s.userId).ensureNotStartingBackgroundLocked(s);

        } finally {
            Binder.restoreCallingIdentity(origId);
        }

        return 1;
    }
2. requestServiceBindingLocked()
private final boolean requestServiceBindingLocked(ServiceRecord r, IntentBindRecord i, boolean execInFg, boolean rebind) throws TransactionTooLargeException {
  //i.requested表示是否发送过绑定service的请求,如果从上面注释5进来,那么就是绑定过,rebind为true。i.apps.size()表示所有用当前intent绑定service的应用程序进程个数大于0
 if ((!i.requested || rebind) && i.apps.size() > 0) {
            try {
                bumpServiceExecutingLocked(r, execInFg, "bind");
                r.app.forceProcessStateUpTo(ActivityManager.PROCESS_STATE_SERVICE);
                //2. 这里调用了ApplicationThread的scheduleBindService(),从AMS进入了应用程序进程。
                r.app.thread.scheduleBindService(r, i.intent.getIntent(), rebind, r.app.repProcState);
                if (!rebind) {
                    i.requested = true;
                }
                i.hasBound = true;
                i.doRebind = false;
            }
            ...
            return true;
  }
3. scheduleBindService()
public final void scheduleBindService(IBinder token, Intent intent,boolean rebind, int processState) {
            updateProcessState(processState, false);
            //1. 将service信息封装成BindServiceData
            BindServiceData s = new BindServiceData();
            s.token = token;
            s.intent = intent;
            s.rebind = rebind;

            //2. 通过handler向主线程发送一个BIND_SERVICE消息,切换到主线程,主线程收到后会执行handleBindService()方法:
            sendMessage(H.BIND_SERVICE, s);
        }
4.handleBindService()
private void handleBindService(BindServiceData data) {
		 //1. 从mService中取出Service
        Service s = mServices.get(data.token);

        if (s != null) {
            try {
                data.intent.setExtrasClassLoader(s.getClassLoader());
                data.intent.prepareToEnterProcess();
                try {
                    //2. 这里为false,service未被绑定过的情况
                    if (!data.rebind) {
                    	 //3.调用service的onBind()方法,这里service就处于绑定状态了
                        IBinder binder = s.onBind(data.intent);
                        //4.进入AMS的publishService(),这里又从应用程序进入了AMS
                        ActivityManager.getService().publishService(data.token, data.intent, binder);
                    } else {
                    	 //5.否则就调用onRebind(),即如果当前应用程序进程第一个与Service绑定,并且service已经调用过onUnBind()方法,则会调用service的onReBInd()
                        s.onRebind(data.intent);
                        ActivityManager.getService().serviceDoneExecuting(data.token, SERVICE_DONE_EXECUTING_ANON, 0, 0);
                    }
                    ensureJitEnabled();
                } catch (RemoteException ex) {
                    throw ex.rethrowFromSystemServer();
                }
            } catch (Exception e) {
                if (!mInstrumentation.onException(s, e)) {
                    throw new RuntimeException(
                            "Unable to bind to service " + s
                            + " with " + data.intent + ": " + e.toString(), e);
                }
            }
        }
    }
从AMSpublishService()开始,经历的后半部分时序图:
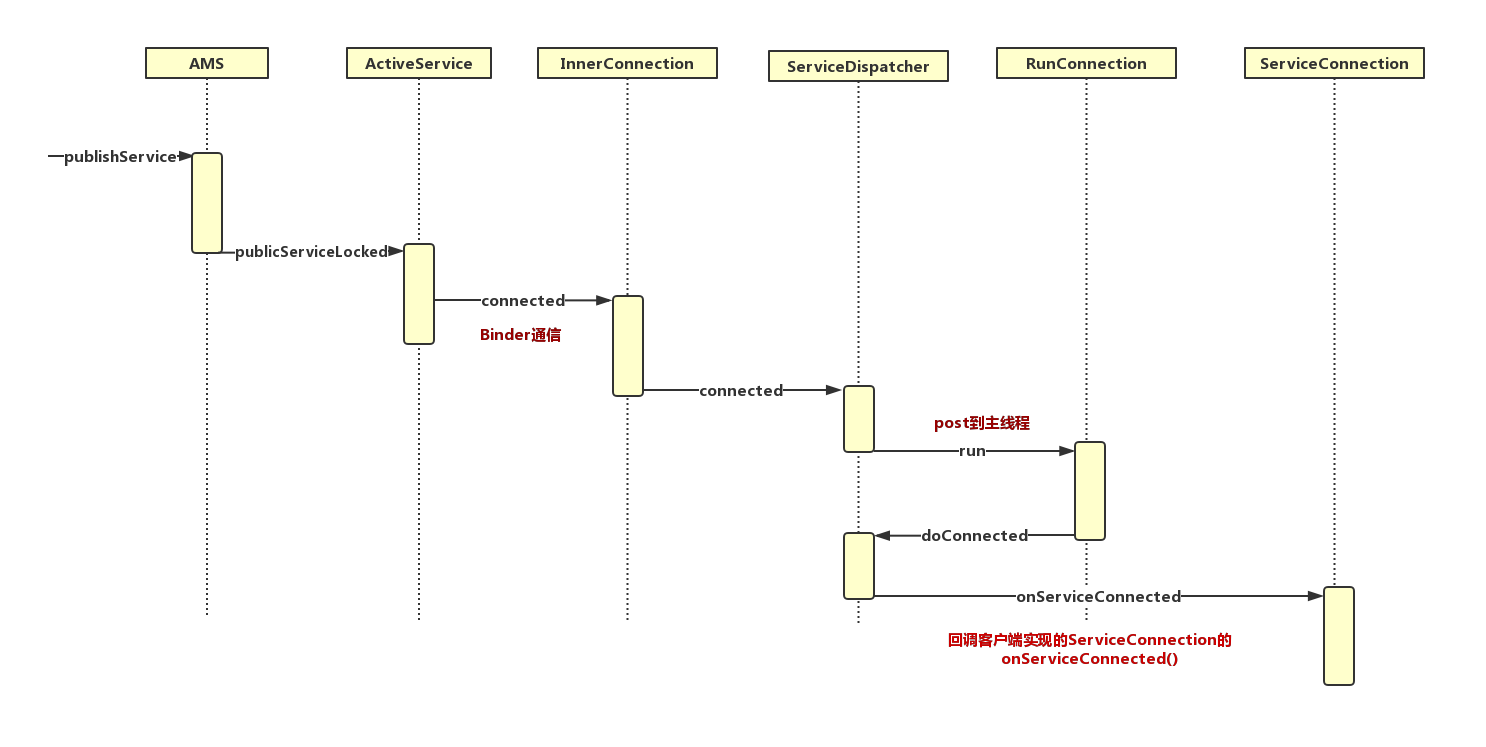
5. publishService()
public void publishService(IBinder token, Intent intent, IBinder service) {

        if (intent != null && intent.hasFileDescriptors() == true) {
            throw new IllegalArgumentException("File descriptors passed in Intent");
        }

        synchronized(this) {
            if (!(token instanceof ServiceRecord)) {
                throw new IllegalArgumentException("Invalid service token");
            }
            //调用了ActiveServices的publishServiceLocked()
            mServices.publishServiceLocked((ServiceRecord)token, intent, service);
        }
    }
6.publishServiceLocked()
void publishServiceLocked(ServiceRecord r, Intent intent, IBinder service) {
        final long origId = Binder.clearCallingIdentity();
        try {
            ...
                    b.received = true;
                    for (int conni=r.connections.size()-1; conni>=0; conni--) {
                     ...
                            try {
                              //这个c.conn指的是IServiceConnection,它是ServiceConnection在本地的代理,用于解决当前应用进程和Service跨进程通信的问题。实现是
                              //ServiceDispatcher.InnerConnection,这里又通过binder回到了应用程序进程,内部调用了LoadApk的connected()
                                c.conn.connected(r.name, service, false);
                            } catch (Exception e) {
                                Slog.w(TAG, "Failure sending service " + r.name +
                                      " to connection " + c.conn.asBinder() +
                                      " (in " + c.binding.client.processName + ")", e);
                            }
                        }
                    }
                }

                serviceDoneExecutingLocked(r, mDestroyingServices.contains(r), false);
            }
        } finally {
            Binder.restoreCallingIdentity(origId);
        }
    }
7.ServiceDispatcher.InnerConnection.connected()
private static class InnerConnection extends IServiceConnection.Stub {
            final WeakReference<LoadedApk.ServiceDispatcher> mDispatcher;

            InnerConnection(LoadedApk.ServiceDispatcher sd) {
                mDispatcher = new WeakReference<LoadedApk.ServiceDispatcher>(sd);
            }

            public void connected(ComponentName name, IBinder service, boolean dead)throws RemoteException {
                LoadedApk.ServiceDispatcher sd = mDispatcher.get();
                if (sd != null) {
                   //调用LoadApk的connected()
                    sd.connected(name, service, dead);
                }
            }
        }
8.LoadApk的connected()
public void connected(ComponentName name, IBinder service, boolean dead) {
            if (mActivityThread != null) {
                // mActivityThread是一个Handler对象,调用post()方法,将RunConnection的内容运行在主线程
                mActivityThread.post(new RunConnection(name, service, 0, dead));
            } else {
                doConnected(name, service, dead);
            }
        }
9. RunConnection()
private final class RunConnection implements Runnable {

            RunConnection(ComponentName name, IBinder service, int command, boolean dead) {
                mName = name;
                mService = service;
                mCommand = command ; //0
                mDead = dead;
            }

            public void run() {
            //主要来看看run()方法的工作,由于mCommand == 0,所以调用下面doConnected()方法。
                if (mCommand == 0) {
                    doConnected(mName, mService, mDead);
                } else if (mCommand == 1) {
                    doDeath(mName, mService);
                }
            }

            final ComponentName mName;
            final IBinder mService;
            final int mCommand;
            final boolean mDead;
        }
10.doConnected()方法
public void doConnected(ComponentName name, IBinder service, boolean dead) {
            ...

            if (old != null) {
                mConnection.onServiceDisconnected(name);
            }
            if (dead) {
                mConnection.onBindingDied(name);
            }

            if (service != null) {
               //这里就会调用ServiceConnection的onServiceConnected()方法,那么客户端实现了ServiceConnection接口类的onServiceConnected()就会被回调。
               // 这样,绑定的整个过程就完成了,分别经历了Service的onCreate()、onBind()以及客户端的onServiceConnected()
                mConnection.onServiceConnected(name, service);
            } else
                mConnection.onNullBinding(name);
            }
        }