pymysql简介
pymysql是python操纵mysql的一个模块,本质上是一个socket客户端
pymysql使用
准备数据
#创建数据库db2,如果已存在,请忽略
CREATE DATABASE db2 DEFAULT CHARACTER SET utf8;
#创建用户表
CREATE TABLE `userinfo` (
  `id` int(10) unsigned NOT NULL AUTO_INCREMENT COMMENT 'id',
  `username` varchar(20) NOT NULL COMMENT '用户名',
  `password` varchar(32) NOT NULL COMMENT '密码',
  PRIMARY KEY (`id`)
) ENGINE=InnoDB DEFAULT CHARSET=utf8 COMMENT='用户表';

#插入一条数据
INSERT INTO `db2`.`userinfo` (`id`, `username`, `password`) VALUES ('1', 'helln', '123');
实现
使用Python实现用户登录,如果用户存在则登录成功(假设该用户已在数据库中)
#导入模块
import pymysql

user = input('请输入用户名:')
pwd = input('请输入密码:')

# 1.连接
conn = pymysql.connect(host='127.0.0.1', port=3306, user='root', password='', db='db2', charset='utf8')

# 2.创建游标
cursor = conn.cursor()

# 注意%s需要加引号
sql = "select * from userinfo where username='%s' and password='%s'" % (user, pwd)
print('sql语句:',sql)

# 3.执行sql语句
cursor.execute(sql)

result = cursor.execute(sql)  # 执行sql语句,返回sql查询成功的记录数目
print('返回记录数:',result)

# 关闭连接,游标和连接都要关闭
cursor.close()
conn.close()

if result:
    print('登陆成功')
else:
    print('登录失败')
演示
输入正确用户名和密码
请输入用户名:helln
请输入密码:123
sql语句: select * from userinfo where username='helln' and password='123'
返回记录数: 1
登陆成功
输入错误时
请输入用户名:helln
请输入密码:234
sql语句: select * from userinfo where username='helln' and password='234'
返回记录数: 0
登录失败
sql注入
sql注入有两种形式:用户名存在绕过密码、用户不存在绕过用户名和密码
用户名存在绕过密码
格式
存在的用户名' -- 任意字符
或者
存在的用户名' #任意字符
测试'--
请输入用户名:helln' -- skdjfskdf
请输入密码:sdf
sql语句: select * from userinfo where username='helln' -- skdjfskdf' and password='sdf'
返回记录数: 1
登陆成功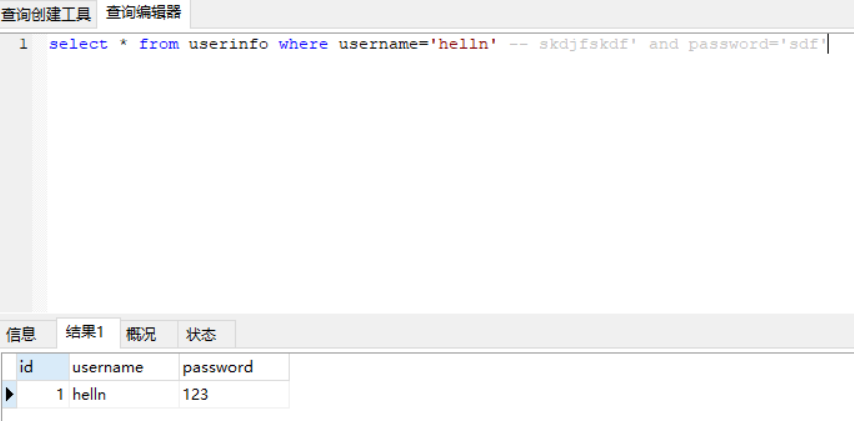
测试' #
请输入用户名:helln' #lsjefls
请输入密码:woieurweio
sql语句: select * from userinfo where username='helln' #lsjefls' and password='woieurweio'
返回记录数: 1
登陆成功

在navicat中可以看到-- 和#后面的都被注释掉了,所以只有username='helln'起作用,自然也就能够查询到结果
用户名不存在,绕过用户名和密码
格式
任意用户名' or 1=1 -- 任意字符
或者
任意用户名' or 1=1 #任意字符
或者
任意用户名' or '任意字符'='任意字符
注意:
- 用户名后面有一个单引号
- or前后都有空格
- 必须保证等式成立
测试
请输入用户名:sfhgk' or 1=1 -- sfjeor
请输入密码:vnxlngf' or 2=2 #sdfwer
sql语句: select * from userinfo where username='sfhgk' or 1=1 -- sfjeor' and password='vnxlngf' or 2=2 #sdfwer'
返回记录数: 1
登陆成功
sql注入的本质是(通过注释)构造恒为真的表达式绕过验证
解决办法
原来我们是用字符串拼接做的
sql="select * from userinfo where name='%s' and password='%s'" %(username,pwd)
print(sql)
result=cursor.execute(sql)
将上面的语句改为下面这样,注意一定不要再加引号了
#改写为(execute帮我们做字符串拼接,我们无需且一定不能再为%s加引号了)
sql="select * from userinfo where name=%s and password=%s" #!!!注意%s需要去掉引号,因为pymysql会自动为我们加上
result=cursor.execute(sql,[user,pwd]) #pymysql模块自动帮我们解决sql注入的问题,只要我们按照pymysql的规矩来。
commit()提交
在数据库里增、删、改的时候,必须要进行提交,否则插入的数据不生效。
增
#导入模块
import pymysql

user = input('请输入用户名:')
pwd = input('请输入密码:')

# 1.连接
conn = pymysql.connect(host='127.0.0.1', port=3306, user='root', password='', db='db2', charset='utf8')

# 2.创建游标
cursor = conn.cursor()

sql = "insert into userinfo(username,password) values (%s,%s)"
print('sql语句:',sql)

# 3.执行sql语句,返回sql查询成功的记录数
#同时插入多条数据
result = cursor.executemany(sql,[(user+'1',pwd),(user+'2',pwd)])
print('返回记录数:',result)

#一定记得commit
conn.commit()

# 关闭连接,游标和连接都要关闭
cursor.close()
conn.close()

#判断结果
if result:
    print('ok')
else:
    print('error')
改
#!/usr/bin/env python
# -*- coding: utf-8 -*-
#导入模块
import pymysql

user = input('请输入用户名:')
pwd = input('请输入密码:')

# 1.连接
conn = pymysql.connect(host='127.0.0.1', port=3306, user='root', password='', db='db2', charset='utf8')

# 2.创建游标
cursor = conn.cursor()

sql = "update userinfo set username = %s  where id = '8'"
print('sql语句:',sql)

# 3.执行sql语句,返回sql查询成功的记录数
#修改一条数据
result = cursor.execute(sql,user)
print('返回记录数:',result)

#一定记得commit
conn.commit()

# 关闭连接,游标和连接都要关闭
cursor.close()
conn.close()

#判断结果
if result:
    print('ok')
else:
    print('error')
删
#!/usr/bin/env python
# -*- coding: utf-8 -*-
#导入模块
import pymysql

#删除不需要执行这2个input了
# user = input('请输入用户名:')
# pwd = input('请输入密码:')

# 1.连接
conn = pymysql.connect(host='127.0.0.1', port=3306, user='root', password='', db='db2', charset='utf8')

# 2.创建游标
cursor = conn.cursor()

sql = "delete from userinfo  where id = '2'"
print('sql语句:',sql)

# 3.执行sql语句,返回sql查询成功的记录数
#删除一条数据
result = cursor.execute(sql)
print('返回记录数:',result)

#一定记得commit
conn.commit()

# 关闭连接,游标和连接都要关闭
cursor.close()
conn.close()

#判断结果
if result:
    print('ok')
else:
    print('error')
查
查有三种:fetchone()、fetchall()和fetchmany
fetchone():获取下一行数据(第一次使用时是首行),返回值是一个元组
#导入模块
import pymysql

# 1.连接
conn = pymysql.connect(host='localhost', port=3306, user='root', password='', db='db2', charset='utf8')

# 2.创建游标
cursor = conn.cursor()

sql = 'select * from userinfo'
cursor.execute(sql)

# 查询第一行的数据
row = cursor.fetchone()
print(row) # (1, 'helln', '123')

# 查询第二行数据
row = cursor.fetchone()
print(row) # (6, 'sophia', '123')

# 4.关闭游标
cursor.close()

# 5.关闭连接
conn.close()
在fetchone示例中,在获取行数据的时候,可以理解开始的时候,有一个行指针指着第一行的上方,获取一行,它就向下移动一行,所以当行指针到最后一行的时候,就不能再获取到行的内容,所以我们可以使用如下方法来移动行指针:
cursor.scroll(1,mode='relative')  # 相对当前位置移动,整数向下移动,负数向上移动
cursor.scroll(2,mode='absolute') # 相对绝对位置移动
fetchall(): 获取所有数据,返回值是元组套元组
#导入模块
import pymysql

# 1.连接
conn = pymysql.connect(host='localhost', port=3306, user='root', password='', db='db2', charset='utf8')

# 2.创建游标
cursor = conn.cursor()

sql = 'select * from userinfo'
cursor.execute(sql)

# 获取所有的数据
rows = cursor.fetchall()
print(rows)

# 4.关闭游标
cursor.close()

# 5.关闭连接
conn.close()
默认情况下,我们获取到的返回值是元组,只能看到每行的数据,却不知道每一列代表的是什么,这个时候可以使用以下方式来返回字典,每一行的数据都会生成一个字典:
cursor = conn.cursor(cursor=pymysql.cursors.DictCursor) #在实例化的时候,将属性cursor设置为pymysql.cursors.DictCursor
fetchmany(): 获取多行记录,括号内的参数为获取的行数
#导入模块
import pymysql

# 1.连接
conn = pymysql.connect(host='localhost', port=3306, user='root', password='', db='db2', charset='utf8')

# 2.创建游标
cursor = conn.cursor(cursor=pymysql.cursors.DictCursor)

sql = 'select * from userinfo'
cursor.execute(sql)

# 获取2条数据
rows = cursor.fetchmany(2)
print(rows)

# 4.关闭游标
cursor.close()

# 5.关闭连接
conn.close()