版权声明:本文为博主原创文章,未经博主允许不得转载。 https://blog.csdn.net/ytuglt/article/details/84962471
tips:虚拟机安装centos7之后配置网卡
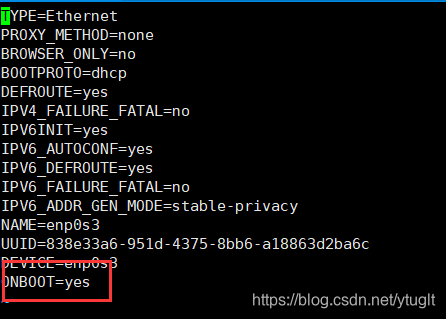
安装完成虚拟机后需要配置一下网卡,配置为网卡ip为动态获取,配置方式如下:
[root@localhost ~]# vi /etc/sysconfig/network-scripts/ifcfg-enp0s3

将ONBOOT改为yes,然后重启网卡
service network restart
ip addr
然后再次查看ip地址,发现就会有了,ping一下百度也正常了
1.查看网络状况
[root@bogon opt]# ping www.baidu.com
PING www.a.shifen.com (180.149.131.98) 56(84) bytes of data.
64 bytes from 180.149.131.98: icmp_seq=1 ttl=56 time=24.0 ms
64 bytes from 180.149.131.98: icmp_seq=2 ttl=56 time=16.3 ms
64 bytes from 180.149.131.98: icmp_seq=3 ttl=56 time=97.3 ms
^C
--- www.a.shifen.com ping statistics ---
3 packets transmitted, 3 received, 0% packet loss, time 2005ms
rtt min/avg/max/mdev = 16.338/45.930/97.377/36.515 ms
2.查看yum是否可用
[root@bogon opt]# yum list | grep gcc
3.确认关闭iptables规则
对iptables不懂的初学者可能会在后期端口等方面造成一定影响,懂的可以自己配置好
iptables -L: 查看规则
iptables -t nat -L:查看nat表的规则
iptables -F:关闭规则
iptables -t nat -F:关闭nat表的规则
[root@bogon opt]# iptables -L
Chain INPUT (policy ACCEPT)
target     prot opt source               destination

Chain FORWARD (policy DROP)
target     prot opt source               destination
DOCKER-ISOLATION  all  --  anywhere             anywhere
DOCKER     all  --  anywhere             anywhere
ACCEPT     all  --  anywhere             anywhere             ctstate RELATED,ESTABLISHED
ACCEPT     all  --  anywhere             anywhere
ACCEPT     all  --  anywhere             anywhere

Chain OUTPUT (policy ACCEPT)
target     prot opt source               destination

Chain DOCKER (1 references)
target     prot opt source               destination

Chain DOCKER-ISOLATION (1 references)
target     prot opt source               destination
RETURN     all  --  anywhere             anywhere
[root@bogon opt]# iptables -F
[root@bogon opt]# iptables -L
Chain INPUT (policy ACCEPT)
target     prot opt source               destination

Chain FORWARD (policy DROP)
target     prot opt source               destination

Chain OUTPUT (policy ACCEPT)
target     prot opt source               destination

Chain DOCKER (0 references)
target     prot opt source               destination

Chain DOCKER-ISOLATION (0 references)
target     prot opt source               destination
4.确认停用selinux
因为安全性会对一些http或者服务请求等屏蔽,为了学习不受影响。先关闭
//查看selinux是否运行
[root@bogon opt]# getenforce
Enforcing
//关闭selinux
[root@bogon opt]# setenforce 0
5.安装一些基本库和基本工具
[root@localhost ~]# yum -y install gcc gcc-c++ autoconf pcre pcre-devel make automake
[root@localhost ~]# yum -y install wget httpd-tools vim
6.初始化一些目录
app:代码目录
download:网上下载的源码包等
logs:放一些自定义的日志
work:存放一些shell的脚本
backup:对一些东西修改备份的时候,把备份文件放到这个目录下
[root@localhost ~]# cd /opt/
[root@localhost opt]# ls
[root@localhost opt]# mkdir app
[root@localhost opt]# mkdir backup
[root@localhost opt]# mkdir download
[root@localhost opt]# mkdir logs
[root@localhost opt]# mkdir work
[root@localhost opt]# ls
app  backup  download  logs  work
[root@localhost opt]#
7.关闭防火墙
systemctl stop firewalld.service #停止firewall
systemctl disable firewalld.service #禁止firewall开机启动