SSM:SpringMVC+Spring+MyBatis的集成
- 和Spring集成的核心思路:
(1)把当前框架的核心类,交给Spring管理
(2)如果框架有事务,那么事务也要统一交给Spring管理
此次的大概步骤:
- Spring
- Spring+SpringMVC
- Spring+Mybtis
- Spring+SpringMVC+Mybatis(事务)
一、单独集成sprig
- 新建普通的Javaweb项目
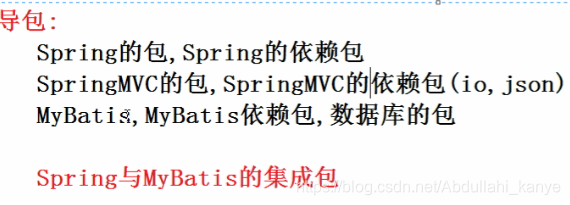
- 导入相应的jar包。

- 在resources中创建个db.properties配置文件。连接数据库的“四大金刚”。

- 在resources中创建一个applicationContext.xml文件,里面做相应的配置。
- 配置引入jdbc.properties配置文件。注意还要配置响应头context
- 创建数据源(dataSource)
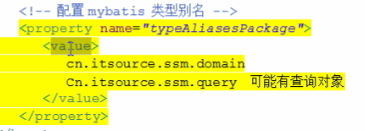
- 配置一个Bean:SqlSessionFactory,然后在其中还要配置引入数据源、配置xml文件的映射和为所有相应的包中的类取别名的配置。
如果以后需要配置别名的类型较多,那么可以如下配置:

- 配置映射器mapper
- 配置扫描service层
- 配置一个事务管理器。
- 注意还要配置标签支持事务。注意还要配置响应头tx
- 也可以配置分页插件。先导入分页插件的jar包

<?xml version="1.0" encoding="UTF-8"?>
<beans xmlns="http://www.springframework.org/schema/beans"
       xmlns:context="http://www.springframework.org/schema/context"
       xmlns:tx="http://www.springframework.org/schema/tx"
       xmlns:xsi="http://www.w3.org/2001/XMLSchema-instance"
       xsi:schemaLocation="http://www.springframework.org/schema/beans http://www.springframework.org/schema/beans/spring-beans.xsd
                     http://www.springframework.org/schema/context http://www.springframework.org/schema/context/spring-context.xsd
                     http://www.springframework.org/schema/tx http://www.springframework.org/schema/tx/spring-tx.xsd
">

    <!--扫描service层-->
    <context:component-scan base-package="cn.lyq.ssm.service"/>

    <!--引入jdbc.properties配置文件-->
    <context:property-placeholder location="classpath:jdbc.properties"/>
    <!--创建数据源(dataSource)-->
    <bean id="dataSource" class="org.apache.commons.dbcp.BasicDataSource" destroy-method="close">
        <property name="driverClassName" value="${jdbc.driverClassName}"/>
        <property name="url" value="${jdbc.url}"/>
        <property name="username" value="${jdbc.username}"/>
        <property name="password" value="${jdbc.password}"/>
    </bean>

   <!-- 配置一个Bean:SqlSessionFactory
    当初JPA中:要配置一个EntityManagerFactory,咱们使用了一个FactoryBean完成 -> EntityManagerFactoryBean
    在mybatis中:需要 SqlSessionFactory,咱们就使用SqlSessionFactoryBean来完成
   -->
    <bean id="sqlSessionFactory" class="org.mybatis.spring.SqlSessionFactoryBean">
        <!--引入上面配置的数据源-->
        <property name="dataSource" ref="dataSource" />
        <!--配置XML的映射。classpath;扫描资源文件下的所有xml文件-->
        <property name="mapperLocations" value="classpath:cn/lyq/ssm/mapper/*.xml" />
        <!--为所有相应的包中的类取别名-->
        <property name="typeAliasesPackage" value="cn.lyq.ssm.domain" />
    </bean>

    <!--
        这是一个映射器的FactoryBean,帮咱们创建一个映射器
        这样写的话咱们以后每一个映射器都要做单独的配置
    -->
    <!--
    <bean id="departmentMapper" class="org.mybatis.spring.mapper.MapperFactoryBean">
        <property name="mapperInterface" value="cn.lyq.ssm.mapper.DepartmentMapper" />
        <property name="sqlSessionFactory" ref="sqlSessionFactory" />
    </bean>
    -->

    <!--推荐使用方案:直接创建所有的映射器mapper。就不用每个映射器单独配置了-->
    <bean class="org.mybatis.spring.mapper.MapperScannerConfigurer">
        <property name="basePackage" value="cn.lyq.ssm.mapper" />
    </bean>

    <!--我们需要配置一个事务管理器
        以前学习JPA ,是有一个类JpaTransactionManager的事务对象
        mybatis用的是:DataSourceTransactionManager
    -->
    <bean id="transactionManager" class="org.springframework.jdbc.datasource.DataSourceTransactionManager">
        <property name="dataSource" ref="dataSource" />
    </bean>
    <!--配置标签支持事务-->
    <tx:annotation-driven transaction-manager="transactionManager" />
</beans>
- 展示图:

- 流程
- 准备好domain

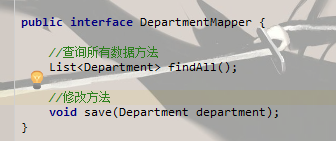
- mapper层

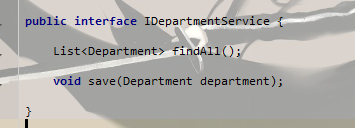
- service接口层

- service的实现层

- 在resources文件下的映射文件写好相应的sql语句

- 就不用在写之前的mybatis的核心xml配置文件了。因为都交给了spring去管理。所以spring的配置文件applicationContext.xml就如上配置。
- 单独的mapper层测试

- service层测试

三、在上面的基础上再集成SpringMVC
- 在web.xml中配置相应的配置
- 配置核心控制器------springmvc的配置
- 读取Spring的核心配置文件applicationContext.xml-------sprig的配置
- 配置监听器:直接启动Spring------sprig的配置
- 配置编码过滤器
<?xml version="1.0" encoding="UTF-8"?>
<web-app xmlns="http://java.sun.com/xml/ns/javaee"
           xmlns:xsi="http://www.w3.org/2001/XMLSchema-instance"
           xsi:schemaLocation="http://java.sun.com/xml/ns/javaee
		  http://java.sun.com/xml/ns/javaee/web-app_3_0.xsd"
           version="3.0">

    <!-- 配置工程编码过滤器 -->
    <filter>
        <filter-name>characterEncodingFilter</filter-name>
        <filter-class>org.springframework.web.filter.CharacterEncodingFilter</filter-class>
        <init-param>
            <param-name>encoding</param-name>
            <param-value>UTF-8</param-value>
        </init-param>
        <init-param>
            <param-name>forceEncoding</param-name>
            <param-value>true</param-value>
        </init-param>
    </filter>
    <filter-mapping>
        <filter-name>characterEncodingFilter</filter-name>
        <url-pattern>/*</url-pattern>
    </filter-mapping>

    <!--读取Spring的核心配置文件-->
    <context-param>
        <param-name>contextConfigLocation</param-name>
        <param-value>classpath:applicationContext.xml</param-value>
    </context-param>

    <!--配置监听器:直接启动Spring-->
    <listener>
        <listener-class>org.springframework.web.context.ContextLoaderListener</listener-class>
    </listener>

    <!--配置核心控制器-->
    <servlet>
        <servlet-name>dispatcherServlet</servlet-name>
        <servlet-class>org.springframework.web.servlet.DispatcherServlet</servlet-class>
        <!--SpringMVC的配置文件-->
        <init-param>
            <param-name>contextConfigLocation</param-name>
            <param-value>classpath:applicationContext-mvc.xml</param-value>
        </init-param>
        <!--随着tomcat启动而启动-->
        <load-on-startup>1</load-on-startup>
    </servlet>
    <servlet-mapping>
        <servlet-name>dispatcherServlet</servlet-name>
        <url-pattern>/</url-pattern>
    </servlet-mapping>
</web-app>
- 在资源文件resources中配置springmvc的配置文件applicationContext-mvc.xml
- 扫描Controller包。注意配置响应头context
- 支持SpringMVC的注解。注意配置响应头mvc
- 静态资源放行,解决restful风格
- 视图解析器
- 文件上传解析器
<?xml version="1.0" encoding="UTF-8"?>
<beans xmlns="http://www.springframework.org/schema/beans"
       xmlns:context="http://www.springframework.org/schema/context"
       xmlns:mvc="http://www.springframework.org/schema/mvc"
       xmlns:xsi="http://www.w3.org/2001/XMLSchema-instance"
       xsi:schemaLocation="
       http://www.springframework.org/schema/beans http://www.springframework.org/schema/beans/spring-beans.xsd
       http://www.springframework.org/schema/context http://www.springframework.org/schema/context/spring-context.xsd
       http://www.springframework.org/schema/mvc http://www.springframework.org/schema/mvc/spring-mvc.xsd
">
    <!--扫描Controller-->
    <context:component-scan base-package="cn.lyq.ssm.controller" />
    <!--支持SpringMVC的注解-->
    <mvc:annotation-driven />
    <!--静态资源放行,解决restful风格-->
    <mvc:default-servlet-handler />
    <!--视图解析器-->
    <bean class="org.springframework.web.servlet.view.InternalResourceViewResolver">
        <property name="prefix" value="/WEB-INF/views/" />
        <property name="suffix" value=".jsp" />
    </bean>
    <!--上传解析器-->
    <!--文件上传解析器:必须是这个multipartResolver-->
    <bean id="multipartResolver" class="org.springframework.web.multipart.commons.CommonsMultipartResolver">
        <!-- 设置上传文件的最大尺寸为1MB -->
        <property name="maxUploadSize">
            <value>1048576</value>
        </property>
    </bean>

    <!--不要这样引入:以后还要集成其它框架(shiro)就集成不了-->
    <!--<import resource="classpath:applicationContext.xml" />-->
</beans>
- 图片展示

- 测试
controller层:

- 注意:不要有下面的错误写法:
在web.xml中不配置spring的applicationContext.xml配置文件,如下

而是直接在applicationContext-mvc.xml直接导入applicationContext.xml文件

虽然说也能完成现在的正常操作,但是以后可能集成不了其他的框架,比如shiro安全框架等等。所以千万不能使用。


