在编写自定义view过程当中,可能涉及到自定义容器类控件,因为存在容器类控件,并不能满足要求,那么我们需要通过继承ViewGroup类来定义容器类控件。本篇博客,会通过简单的实例给大家介绍继承ViewGroup之后,我们需要做那些必要的操作。
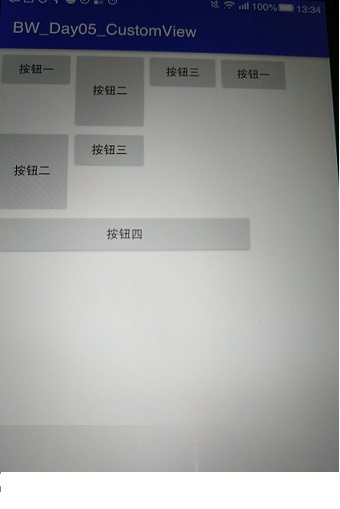
比如实现流式布局,何为流式布局,其实就是将容器当中所排布的控件,从左到右进行排布,然后这一行的高度以这行当中最高的控件为基准,如果排布过程当中,剩余的宽度小于要排布进去的控件的宽度,那么就自动换行,将要排布进去的控件存放到下一行当中,然后下一行的底部高度,是上一行最高的控件底部的高度。如下图所示:
如何实现这个功能呢,详细代码如下:
public class FlowLayout extends ViewGroup{
    public FlowLayout(Context context, AttributeSet attrs) {
        super(context, attrs);
    }
//     onLayout :计算容器内部每个控件应该放置的位置。
    @Override
    protected void onLayout(boolean changed, int l, int t, int r, int b) {
//        获取当前容器的宽度
        int selfWidth = r-l;
//      获取当前容器当中存放了多少个子控件
        int childCount = getChildCount();
        int cl = 10;   //设定每个控件距离左边的边距
        int ct = 10;   //设定每个控件距离上边的边距
//        定义一个值,表示这一行当中最高的控件的高度
        int lineMaxHeight = 0;
        for (int i = 0; i < childCount; i++) {
            View childView = getChildAt(i);

            int childHeight = childView.getMeasuredHeight();  //测量出来的子控件的高度
            int childWidth = childView.getMeasuredWidth();      //测量出来的子控件的宽度

            int cr = cl+childWidth;
            int cb = ct+childHeight;
//            判断当前控件的右边的角标是否超过了容器的宽度,如果超过了容器的宽度,就需要换行,
//            如果没有超过容器的宽度,就不需要换行
            if (cr>selfWidth) {  //应该换行
                cl = 10;
                ct = ct+lineMaxHeight;
//                换行之后要把当前控件的高度先作为最高的高度,是比较的标准
                lineMaxHeight = childHeight;
//                换行之后,右边和下边的角标
                cr = cl+childWidth;
                cb = ct+childHeight;
            }else{
//           如果不换行,就会直接放置控件,那么就要判断,当前要放进去的是不是这一行当中最高的控件。
                 lineMaxHeight = Math.max(lineMaxHeight, childHeight);
            }
            childView.layout(cl,ct,cr,cb);
            cl = cr;
        }
    }
/**
 * onMeasure作用:
 * 1.测量当前view的宽高
 * 2.如果在容器类布局当中重新了这个方法,还可以测量容器类当中所有的子控件
 * */
    @Override
    protected void onMeasure(int widthMeasureSpec, int heightMeasureSpec) {
//        对于容器当中的子控件进行设置
        measureChildren(widthMeasureSpec,heightMeasureSpec);
        super.onMeasure(widthMeasureSpec, heightMeasureSpec);
    }
}
如代码所示,在onLayout的方法当中,我们需要对于计算每一个控件排布时,距离左,上,右,下四个角度的坐标,然后就能够确定出控件放置的位置。然后调用这个子控件layout的方法,将其进行排布。这就是onLayout方法的作用。同样为了能够去准确的获得子控件的宽度和高度,我们需要重写onMeasure方法,并且在onMeasure方法当中,调用计算子控件宽高的方法:
measureChildren(widthMeasureSpec,heightMeasureSpec);
<?xml version="1.0" encoding="utf-8"?>
<com.animee.day406.demo03.FlowLayout
    xmlns:android="http://schemas.android.com/apk/res/android"
    android:layout_width="match_parent"
    android:layout_height="match_parent">
    <Button
        android:layout_width="100dp"
        android:layout_height="30dp"
        android:text="Button1"/>
    <Button
        android:layout_width="80dp"
        android:layout_height="40dp"
        android:text="BB"/>
    <Button
        android:layout_width="150dp"
        android:layout_height="80dp"
        android:text="AA"/>
    <Button
        android:layout_width="200dp"
        android:layout_height="50dp"
        android:text="CC"/>
    <Button
        android:layout_width="40dp"
        android:layout_height="60dp" />
    <Button
        android:layout_width="300dp"
        android:layout_height="100dp" />
</com.animee.day406.demo03.FlowLayout>
关于简单流式布局的操作就结束了,你学会了~~