我总结出了很多互联网公司的面试题及答案,并整理成了文档,以及各种学习的进阶学习资料,免费分享给大家。
扫描二维码或搜索下图红色VX号,加VX好友,拉你进【程序员面试学习交流群】免费领取。也欢迎各位一起在群里探讨技术。
推荐文章:Java 面试知识点解析;Mysql优化技巧(数据库设计、命名规范、索引优化
通过前面10篇文章的学习,相信我们对SpringBoot已经有了一些了解,那么如何来验证我们的学习成果呢?当然是通过做项目来证明啦!所以从这一篇开始我将会对之前自己做的.net项目用java来重写。这一篇,我们来现实登录模块。
一提到登录,我们首先想到的基本的功能点就有如下:
输入:用户名、密码、验证码。
登录成功后,跳转到后台。如果未登录直接访问后台,将会跳转到登录页面。
这里暂不考虑复杂的登录实现。
技术选型,沿用前面用到的知识点。那么这里较之于之前的文章,新用到的一个就是图片验证码,一个就是权限拦截器了。
1、新建spring boot web项目,具体配置信息如pom.xml所示:


<?xml version="1.0" encoding="UTF-8"?>

<project xmlns="http://maven.apache.org/POM/4.0.0" xmlns:xsi="http://www.w3.org/2001/XMLSchema-instance"

         xsi:schemaLocation="http://maven.apache.org/POM/4.0.0 http://maven.apache.org/xsd/maven-4.0.0.xsd">

    <modelVersion>4.0.0</modelVersion>

    <groupId>com.yujie</groupId>

    <artifactId>website</artifactId>

    <version>0.0.1-SNAPSHOT</version>

    <packaging>jar</packaging>

    <name>website</name>

    <description>通用角色权限管理系统</description>

    <parent>

        <groupId>org.springframework.boot</groupId>

        <artifactId>spring-boot-starter-parent</artifactId>

        <version>1.5.13.RELEASE</version>

        <relativePath/> <!-- lookup parent from repository -->

    </parent>

    <properties>

        <project.build.sourceEncoding>UTF-8</project.build.sourceEncoding>

        <project.reporting.outputEncoding>UTF-8</project.reporting.outputEncoding>

        <java.version>1.8</java.version>

    </properties>

    <dependencies>

        <dependency>

            <groupId>org.springframework.boot</groupId>

            <artifactId>spring-boot-starter-web</artifactId>

        </dependency>

        <!--mybatis-->

        <dependency>

            <groupId>org.mybatis.spring.boot</groupId>

            <artifactId>mybatis-spring-boot-starter</artifactId>

            <version>1.3.2</version>

        </dependency>

        <!--mysql-->

        <dependency>

            <groupId>mysql</groupId>

            <artifactId>mysql-connector-java</artifactId>

            <scope>runtime</scope>

        </dependency>

        <!--集成druid,使用连接池-->

        <dependency>

            <groupId>com.alibaba</groupId>

            <artifactId>druid</artifactId>

            <version>1.1.0</version>

        </dependency>

        <!--thymeleaf-->

        <dependency>

            <groupId>org.springframework.boot</groupId>

            <artifactId>spring-boot-starter-thymeleaf</artifactId>

        </dependency>

        <dependency>

            <groupId>net.sourceforge.nekohtml</groupId>

            <artifactId>nekohtml</artifactId>

            <version>1.9.22</version>

        </dependency>

        <!-- 分页插件 -->

        <dependency>

            <groupId>com.github.pagehelper</groupId>

            <artifactId>pagehelper-spring-boot-starter</artifactId>

            <version>1.1.2</version>

        </dependency>

        <!--单元测试-->

        <dependency>

            <groupId>org.springframework.boot</groupId>

            <artifactId>spring-boot-starter-test</artifactId>

            <scope>test</scope>

        </dependency>

        <!--热部署-->

        <dependency>

            <groupId>org.springframework.boot</groupId>

            <artifactId>spring-boot-devtools</artifactId>

            <optional>true</optional>

        </dependency>

    </dependencies>

    <build>

        <plugins>

            <plugin>

                <groupId>org.springframework.boot</groupId>

                <artifactId>spring-boot-maven-plugin</artifactId>

            </plugin>

            <!-- mybatis generator 自动生成代码插件 -->

            <plugin>

                <groupId>org.mybatis.generator</groupId>

                <artifactId>mybatis-generator-maven-plugin</artifactId>

                <version>1.3.2</version>

                <configuration>

                    <configurationFile>${basedir}/src/main/resources/generator/generatorConfig.xml</configurationFile>

                    <overwrite>true</overwrite>

                    <verbose>true</verbose>

                </configuration>

            </plugin>

        </plugins>

        <resources>

            <resource>

                <directory>src/main/java</directory>

                <includes>

                    <include>**/*.xml</include>

                </includes>

                <filtering>true</filtering>

            </resource>

        </resources>

    </build>

</project>
View Code
2、准备数据库、数据表。这里只用一张用户表t_user.sql
/*

Navicat MySQL Data Transfer

Source Server         : localhost

Source Server Version : 50717

Source Host           : localhost:3306

Source Database       : rightcontrol

Target Server Type    : MYSQL

Target Server Version : 50717

File Encoding         : 65001

Date: 2018-07-13 11:19:03

*/

SET FOREIGN_KEY_CHECKS=0;

-- ----------------------------

-- Table structure for `t_user`

-- ----------------------------

DROP TABLE IF EXISTS `t_user`;

CREATE TABLE `t_user` (

  `Id` int(4) NOT NULL AUTO_INCREMENT,

  `UserName` varchar(20) DEFAULT NULL COMMENT '用户名(登录)',

  `RealName` varchar(20) DEFAULT NULL COMMENT '姓名',

  `PassWord` char(32) DEFAULT NULL COMMENT '密码',

  `RoleId` int(4) DEFAULT NULL COMMENT '角色ID',

  `Status` bit(1) DEFAULT NULL COMMENT '状态',

  `CreateOn` datetime DEFAULT NULL COMMENT '创建时间',

  `UpdateOn` datetime DEFAULT NULL COMMENT '修改时间',

  `CreateBy` int(4) DEFAULT NULL COMMENT '创建者',

  `UpdateBy` int(4) DEFAULT NULL COMMENT '修改者',

  `Gender` tinyint(4) DEFAULT NULL COMMENT '性别(0:男,1:女)',

  `Phone` varchar(11) DEFAULT NULL COMMENT '手机',

  `Email` varchar(30) DEFAULT NULL COMMENT '邮箱',

  `Remark` varchar(50) DEFAULT NULL COMMENT '备注',

  `HeadShot` varchar(50) DEFAULT NULL COMMENT '头像',

  PRIMARY KEY (`Id`)

) ENGINE=InnoDB AUTO_INCREMENT=45 DEFAULT CHARSET=utf8;

-- ----------------------------

-- Records of t_user

-- ----------------------------

INSERT INTO `t_user` VALUES ('1', 'admin', '超级管理员', 'e10adc3949ba59abbe56e057f20f883e', '1', '', '0001-01-01 00:00:00', '2018-05-12 21:47:34', '0', '1', '0', '15243641131', '[email protected]', null, '/Upload/img/mmexport1510485826478[1]_看图王_2.jpg');

INSERT INTO `t_user` VALUES ('4', 'test', 'test', 'e10adc3949ba59abbe56e057f20f883e', '12', '', '2018-04-26 10:35:56', '2018-04-29 10:36:12', '0', null, null, null, null, null, null);

INSERT INTO `t_user` VALUES ('24', '3', '3', null, '1', '', '2018-04-29 08:42:00', '0001-01-01 00:00:00', '1', null, null, null, null, null, null);

INSERT INTO `t_user` VALUES ('25', '2', '2', null, '1', '', '2018-04-29 08:57:05', '0001-01-01 00:00:00', '1', null, null, null, null, null, null);

INSERT INTO `t_user` VALUES ('26', '34', '44', null, '1', '', '2018-04-29 08:58:31', '0001-01-01 00:00:00', '1', null, null, null, null, null, null);

INSERT INTO `t_user` VALUES ('27', '34', '3', null, '1', '', '2018-04-29 08:59:22', '0001-01-01 00:00:00', '1', null, null, null, null, null, null);

INSERT INTO `t_user` VALUES ('28', 'a', 'a', null, '1', '', '2018-04-29 09:04:29', '0001-01-01 00:00:00', '1', null, null, null, null, null, null);

INSERT INTO `t_user` VALUES ('29', 't', 't', null, '1', '', '2018-04-29 09:05:24', '0001-01-01 00:00:00', '1', null, null, null, null, null, null);

INSERT INTO `t_user` VALUES ('30', '44', '44', 'e10adc3949ba59abbe56e057f20f883e', '1', '', '2018-04-29 09:16:44', '0001-01-01 00:00:00', '1', null, null, null, null, null, null);

INSERT INTO `t_user` VALUES ('31', '4', '4', null, '1', '', '2018-04-29 09:17:29', '0001-01-01 00:00:00', '1', null, null, null, null, null, null);

INSERT INTO `t_user` VALUES ('32', '4', '4', null, '1', '', '2018-04-29 09:18:57', '0001-01-01 00:00:00', '1', null, null, null, null, null, null);

INSERT INTO `t_user` VALUES ('33', '23', '22', 'E10ADC3949BA59ABBE56E057F20F883E', '1', '', '2018-04-29 09:19:55', '0001-01-01 00:00:00', '1', null, null, null, null, null, null);

INSERT INTO `t_user` VALUES ('34', '4', '4', null, '1', '', '2018-04-29 09:32:53', '0001-01-01 00:00:00', '1', null, null, null, null, null, null);

INSERT INTO `t_user` VALUES ('35', '21', '21', 'e10adc3949ba59abbe56e057f20f883e', '2', '', '2018-04-29 09:33:13', '0001-01-01 00:00:00', '1', null, null, null, null, null, null);

INSERT INTO `t_user` VALUES ('36', '4', '4', null, '2', '', '2018-04-29 09:33:30', '2018-04-29 17:29:18', '0', null, null, null, null, null, null);

INSERT INTO `t_user` VALUES ('37', '41', '4', 'e10adc3949ba59abbe56e057f20f883e', '1', '', '2018-04-29 09:40:58', '2018-04-29 13:10:08', '0', null, null, null, null, null, null);

INSERT INTO `t_user` VALUES ('38', '41', '4', null, '1', '', '0001-01-01 00:00:00', '2018-04-29 10:32:02', '0', null, null, null, null, null, null);

INSERT INTO `t_user` VALUES ('40', '41', '41', null, '2', '', '0001-01-01 00:00:00', '2018-04-29 10:08:50', '0', null, null, null, null, null, null);

INSERT INTO `t_user` VALUES ('41', '61', '6', null, '2', '', '0001-01-01 00:00:00', '2018-04-29 10:08:09', '0', null, null, null, null, null, null);

INSERT INTO `t_user` VALUES ('42', '451', '55', null, '1', '', '0001-01-01 00:00:00', '2018-04-29 10:31:36', '0', null, null, null, null, null, null);

INSERT INTO `t_user` VALUES ('43', '41', '41', null, '2', '', '0001-01-01 00:00:00', '2018-04-29 10:07:36', '0', null, null, null, null, null, null);

INSERT INTO `t_user` VALUES ('44', '661', '661', null, '2', '', '0001-01-01 00:00:00', '2018-04-29 10:06:52', '0', null, null, null, null, null, null);
View Code
3、对项目进行配置。我对配置项进行了详实的注释,如有不懂的,自己翻阅相关文档。
application.yml
spring:

  profiles:

    active: dev
application-dev.yml
server:

  port: 8080

spring:

  thymeleaf:

    cache: false #开发阶段,建议关闭Thymeleaf的缓存

    mode: LEGACYHTML5 #使用遗留的html5以去掉对html标签的校验

  datasource:

    name: demo

    url: jdbc:mysql://127.0.0.1:3306/RightControl?useSSL=false&useUnicode=true&characterEncoding=utf-8&zeroDateTimeBehavior=convertToNull&autoReconnect=true

    username: root

    password: yujie

    # 使用druid数据源

    type: com.alibaba.druid.pool.DruidDataSource

    driver-class-name: com.mysql.jdbc.Driver

    filters: stat

    maxActive: 20 # 最大活跃数

    initialSize: 5 # 初始化数量

    maxWait: 60000

    minIdle: 1

    timeBetweenEvictionRunsMillis: 60000

    minEvictableIdleTimeMillis: 300000

    validationQuery: select 'x'

    testWhileIdle: true

    testOnBorrow: false

    testOnReturn: false

    poolPreparedStatements: true

    maxOpenPreparedStatements: 20

mybatis:

  mapper-locations: classpath:mapping/*.xml  #Locations of Mapper xml config file.

  type-aliases-package: com.yujie.dao  #Packages to search for type aliases. (Package delimiters are ",;
")

#pagehelper分页插件

pagehelper:

    helperDialect: mysql

    reasonable: true #pageNum<=0 时会查询第一页, pageNum>pages(超过总数时),会查询最后一页

    supportMethodsArguments: true #支持通过 Mapper 接口参数来传递分页参数

    #用于从对象中根据属性名取值,可以配置 pageNum,pageSize,count,pageSizeZero,reasonable。

    #不配置映射的用默认值,默认值为pageNum=pageNum;pageSize=pageSize;count=countSql;reasonable=reasonable;pageSizeZero=pageSizeZero

    params: count=countSql
4、自动生成mybatis相关的配置,具体如何生成这个可以参考我前面的文章。从.Net到Java学习第三篇——spring boot+mybatis+mysql
在自动生成好的mybatis配置中,我们还需要自己扩展一个方法CheckLogin用于校验用户名和密码是否正确。
我们首先修改UserModelMapper类,需要注意的是checkLogin方法中的参数前面一定要记得添加@Param,因为mybatis很坑的一个地方,是对于单个参数,你不需要添加@Param,对于多个参数你必须要添加@Param,否则会报错,提示找不到参数。
@Component

public interface UserModelMapper {

    int deleteByPrimaryKey(Integer id);

    int insert(UserModel record);

    int insertSelective(UserModel record);

    UserModel selectByPrimaryKey(Integer id);

    int updateByPrimaryKeySelective(UserModel record);

    int updateByPrimaryKey(UserModel record);

    //add

    UserModel checkLogin(@Param("username") String username,@Param("password") String password);

}
接下来修改UserModelMapper.xml,在其中添加一个checkLogin
  <sql id="Base_Column_List">
  Id, UserName, RealName, PassWord, RoleId, Status, CreateOn, UpdateOn, CreateBy, UpdateBy,
  Gender, Phone, Email, Remark, HeadShot
</sql>

<select id="checkLogin" resultMap="BaseResultMap">

    select

    <include refid="Base_Column_List" />

    from t_user

    where username=#{username,jdbcType=VARCHAR} and password=#{password,jdbcType=VARCHAR}

  </select>
5、增加验证码的实现类ValidateCode
package com.yujie.util;

import javax.imageio.ImageIO;

import java.awt.*;

import java.awt.image.BufferedImage;

import java.io.FileOutputStream;

import java.io.IOException;

import java.io.OutputStream;

import java.util.Random;

/**

 * 验证码生成器

 *

 * @author

 */

public class ValidateCode {

    // 图片的宽度。

    private int width = 160;

    // 图片的高度。

    private int height = 40;

    // 验证码字符个数

    private int codeCount = 5;

    // 验证码干扰线数

    private int lineCount = 150;

    // 验证码

    private String code = null;

    // 验证码图片Buffer

    private BufferedImage buffImg = null;

    // 验证码范围,去掉0(数字)和O(拼音)容易混淆的(小写的1和L也可以去掉,大写不用了)

    private char[] codeSequence = {'A', 'B', 'C', 'D', 'E', 'F', 'G', 'H', 'I', 'J',

            'K', 'L', 'M', 'N', 'P', 'Q', 'R', 'S', 'T', 'U', 'V', 'W',

            'X', 'Y', 'Z', '1', '2', '3', '4', '5', '6', '7', '8', '9'};

    /**

     * 默认构造函数,设置默认参数

     */

    public ValidateCode() {

        this.createCode();

    }

    /**

     * @param width  图片宽

     * @param height 图片高

     */

    public ValidateCode(int width, int height) {

        this.width = width;

        this.height = height;

        this.createCode();

    }

    /**

     * @param width     图片宽

     * @param height    图片高

     * @param codeCount 字符个数

     * @param lineCount 干扰线条数

     */

    public ValidateCode(int width, int height, int codeCount, int lineCount) {

        this.width = width;

        this.height = height;

        this.codeCount = codeCount;

        this.lineCount = lineCount;

        this.createCode();

    }

    public void createCode() {

        int x = 0, fontHeight = 0, codeY = 0;

        int red = 0, green = 0, blue = 0;

        x = width / (codeCount + 2);//每个字符的宽度(左右各空出一个字符)

        fontHeight = height - 2;//字体的高度

        codeY = height - 4;

        // 图像buffer

        buffImg = new BufferedImage(width, height, BufferedImage.TYPE_INT_RGB);

        Graphics2D g = buffImg.createGraphics();

        // 生成随机数

        Random random = new Random();

        // 将图像填充为白色

        g.setColor(Color.WHITE);

        g.fillRect(0, 0, width, height);

        // 创建字体,可以修改为其它的

        Font font = new Font("Fixedsys", Font.PLAIN, fontHeight);

//        Font font = new Font("Times New Roman", Font.ROMAN_BASELINE, fontHeight);

        g.setFont(font);

        for (int i = 0; i < lineCount; i++) {

            // 设置随机开始和结束坐标

            int xs = random.nextInt(width);//x坐标开始

            int ys = random.nextInt(height);//y坐标开始

            int xe = xs + random.nextInt(width / 8);//x坐标结束

            int ye = ys + random.nextInt(height / 8);//y坐标结束

            // 产生随机的颜色值,让输出的每个干扰线的颜色值都将不同。

            red = random.nextInt(255);

            green = random.nextInt(255);

            blue = random.nextInt(255);

            g.setColor(new Color(red, green, blue));

            g.drawLine(xs, ys, xe, ye);

        }

        // randomCode记录随机产生的验证码

        StringBuffer randomCode = new StringBuffer();

        // 随机产生codeCount个字符的验证码。

        for (int i = 0; i < codeCount; i++) {

            String strRand = String.valueOf(codeSequence[random.nextInt(codeSequence.length)]);

            // 产生随机的颜色值,让输出的每个字符的颜色值都将不同。

            red = random.nextInt(255);

            green = random.nextInt(255);

            blue = random.nextInt(255);

            g.setColor(new Color(red, green, blue));

            g.drawString(strRand, (i + 1) * x, codeY);

            // 将产生的四个随机数组合在一起。

            randomCode.append(strRand);

        }

        // 将四位数字的验证码保存到Session中。

        code = randomCode.toString();

    }

    public void write(String path) throws IOException {

        OutputStream sos = new FileOutputStream(path);

        this.write(sos);

    }

    public void write(OutputStream sos) throws IOException {

        ImageIO.write(buffImg, "png", sos);

        sos.close();

    }

    public BufferedImage getBuffImg() {

        return buffImg;

    }

    public String getCode() {

        return code.toLowerCase();

    }

}
View Code
这里需要注意的是假设我们要让验证码大小写不敏感,那么需要code.toLowerCase();对生成的验证码字符串进行转换。
6、新增一个ajax对象类AjaxResult
package com.yujie.util;

public class AjaxResult {

    /// <summary>

    /// 操作结果类型

    /// </summary>

    public Object state;

    /// <summary>

    /// 获取 消息内容

    public String message;

    /// <summary>

    /// 获取 返回数据

    /// </summary>

    public Object data;

    public Object getState() {

        return state;

    }

    public void setState(Object state) {

        this.state = state;

    }

    public String getMessage() {

        return message;

    }

    public void setMessage(String message) {

        this.message = message;

    }

    public Object getData() {

        return data;

    }

    public void setData(Object data) {

        this.data = data;

    }

    public static AjaxResult ok(String msg){

        AjaxResult model=new AjaxResult();

        model.setMessage(msg);

        model.state="success";

        return model;

    }

    public static AjaxResult error(String msg){

        AjaxResult model=new AjaxResult();

        model.setMessage(msg);

        model.state="fail";

        return model;

    }

}
View Code
7、添加控制器LoginController
@Controller

@RequestMapping("/login")

public class LoginController extends BaseController {

    @Autowired

    IUserService userService;

    @GetMapping("")

    public String login(Model model){

        model.addAttribute("title","后台管理系统");

        return render("login");

    }

    @ResponseBody

    @PostMapping("/CheckLogin")

    public AjaxResult CheckLogin(@RequestParam String username, @RequestParam String password, @RequestParam String code,

                                 HttpServletRequest request,

                                 HttpServletResponse response){

        Object objCode=request.getSession().getAttribute("code");

        String _code=objCode.toString().toLowerCase();

        if(!code.equals(_code)){

           return AjaxResult.error("验证码错误,请重新输入!");

        }

        UserModel userModel=userService.CheckLogin(username,password);

        if(userModel==null) {

            return AjaxResult.error("用户名或密码,请重新输入!");

        }else {

            request.getSession().setAttribute("userinfo",userModel);

            return AjaxResult.ok("成功");

        }

    }

    /**

     * 响应验证码页面

     * @return

     */

    @GetMapping(value="/GetAuthCode")

    public String validateCode(HttpServletRequest request, HttpServletResponse response) throws Exception{

        // 设置响应的类型格式为图片格式

        response.setContentType("image/jpeg");

        //禁止图像缓存。

        response.setHeader("Pragma", "no-cache");

        response.setHeader("Cache-Control", "no-cache");

        response.setDateHeader("Expires", 0);

        HttpSession session = request.getSession();

        ValidateCode vCode = new ValidateCode(120,40,4,100);

        session.setAttribute("code", vCode.getCode());

        vCode.write(response.getOutputStream());

        return null;

    }

}
考虑到一些公共的信息,我添加了一个控制器的父类BaseController
public abstract class BaseController {

    public static String THEME = "admin";

    public BaseController title(HttpServletRequest request, String title) {

        request.setAttribute("title", title);

        return this;

    }

    /**

     * 主页的页面主题

     * @param viewName

     * @return

     */

    public String render(String viewName) {

        return THEME + "/" + viewName;

    }

    public String render_404() {

        return "comm/error_404";

    }

    protected WebSiteModel GetWebSiteModel(){

        WebSiteModel model=new WebSiteModel();

        model.setSiteName("网站后台管理系统");

        return model;

    }

    protected UserModel GetUserInfo(HttpServletRequest request){

        HttpSession session = request.getSession();

        if (null == session) {

            return null;

        }

        return (UserModel)session.getAttribute("userinfo");

    }

}
8、实现服务层,添加IUserService接口,接口的命名我沿用C#的规范首字母用I
public interface IUserService extends IBaseService<UserModel> {

    UserModel CheckLogin(String username, String password);

}
9、添加接口的实现类UserService
package com.yujie.service.impl;

import com.yujie.dao.UserModelMapper;

import com.yujie.model.UserModel;

import com.yujie.service.IUserService;

import org.springframework.beans.factory.annotation.Autowired;

import org.springframework.stereotype.Service;

@Service

public class UserService implements IUserService {

    @Autowired

    UserModelMapper userModelMapper;

    @Override

    public UserModel CheckLogin(String username, String password) {

        return userModelMapper.checkLogin(username,password);

    }

}
接触java的时间不长,发现一个很有意思的想象,不知道是否是写java默认约定,那就是实现类都是单独用一个叫做impl的包封装。
10、剩下的就是View了,
<!DOCTYPE html> <html xmlns:th="http://www.thymeleaf.org"> <head> <meta charset="UTF-8"/> <title>快速开发平台</title> <link th:href="@{/fonts/iconfont.css}" rel="stylesheet" /> <link th:href="@{/css/login.css}" rel="stylesheet" /> <script th:src="@{/js/jquery-1.10.2.min.js}"></script> <script th:src="@{/js/jquery.cookie.js}"></script> <script th:src="@{/js/jquery.md5.js}"></script> <!--[if lte IE 8]> <div id="errorie"><div>您还在使用老掉牙的IE,正常使用系统前请升级您的浏览器到 IE8以上版本 <a target="_blank" href="http://windows.microsoft.com/zh-cn/internet-explorer/ie-8-worldwide-languages">点击升级</a> 强烈建议您更改换浏览器:<a href="http://down.tech.sina.com.cn/content/40975.html" target="_blank">谷歌 Chrome</a></div></div> <![endif]--> </head> <body> <div style="position: absolute; z-index: 999; top: 20px; left: 20px; color: #fff; font-size: 13px; line-height: 22px;"> 用户名 admin,密码 123456,请勿在系统内发表不文明信息 </div> <div class="wrapper"> <div class="container"> <div class="logo"> <i class="iconfont icon-ditu"></i> <h1><span>登录</span><span th:text="${title}" th:remove="tag"></span></h1> </div> <form class="form"> <div class="row"> <input id="txt_account" type="text" placeholder="用户名"> <i class="fa fa-user"></i> </div> <div class="row"> <input id="txt_password" type="password" placeholder="登录密码"> <i class="fa fa-key"></i> </div> <div class="row"> <input id="txt_code" maxlength="4" type="text" placeholder="验证码" style="width: 190px; float: left;"> <div style="width: 110px; float: right; padding-top: 14px; padding-left: 14px;"> 看不清?<a id="switchCode" href="javascript:void();" style="text-decoration: none;">换一张</a> <img id="imgcode" class="authcode" th:src="@{/login/GetAuthCode}" width="80" height="25" /> </div> </div> <div class="row"> <button id="login_button" type="button"><span>登录</span></button> </div> <div class="row"> </div> </form> <div class="login_tips"></div> </div> <ul class="bg-bubbles"> <li></li> <li></li> <li></li> <li></li> <li></li> <li></li> <li></li> <li></li> <li></li> <li></li> </ul> </div> <div class="copyright"> <a href="@ViewBag.SiteDomain" style="text-decoration:none;color:#fff;" target="_blank">@ViewBag.CopyRight 开发团队出品</a> <br> 适用浏览器:IE8以上、360、FireFox、Chrome、Safari、Opera、傲游、搜狗、世界之窗. </div> <script type="text/javascript"> (function ($) { $.login = { formMessage: function (msg) { $('.login_tips').find('.tips_msg').remove(); $('.login_tips').append('<div class="tips_msg"><i class="fa fa-question-circle"></i>' + msg + '</div>'); }, loginClick: function () { var $username = $("#txt_account"); var $password = $("#txt_password"); var $code = $("#txt_code"); if ($username.val() == "") { $username.focus(); $.login.formMessage('请输入用户名'); return false; } else if ($password.val() == "") { $password.focus(); $.login.formMessage('请输入登录密码。'); return false; } else if ($code.val() == "") { $code.focus(); $.login.formMessage('请输入验证码。'); return false; } else { $("#login_button").attr('disabled', 'disabled').find('span').html("loading..."); $.ajax({ url: "/login/CheckLogin", data: { username: $.trim($username.val()), password: $.md5($.trim($password.val())), code: $.trim($code.val()) }, type: "post", dataType: "json", success: function (data) { if (data.state == "success") { $("#login_button").find('span').html("登录成功,正在跳转..."); window.setTimeout(function () { window.location.href = "/home"; }, 500); } else { $("#login_button").removeAttr('disabled').find('span').html("登录"); $("#switchCode").trigger("click"); $code.val(''); $.login.formMessage(data.message); } } }); } }, init: function () { $('.wrapper').height($(window).height()); $(".container").css("margin-top", ($(window).height() - $(".container").height()) / 2 - 50); $(window).resize(function (e) { $('.wrapper').height($(window).height()); $(".container").css("margin-top", ($(window).height() - $(".container").height()) / 2 - 50); }); $("#switchCode").click(function () { $("#imgcode").attr("src", "/login/GetAuthCode?time=" + Math.random()); }); var login_error = top.$.cookie('nfine_login_error'); if (login_error != null) { switch (login_error) { case "overdue": $.login.formMessage("系统登录已超时,请重新登录"); break; case "OnLine": $.login.formMessage("您的帐号已在其它地方登录,请重新登录"); break; case "-1": $.login.formMessage("系统未知错误,请重新登录"); break; } top.$.cookie('nfine_login_error', '', { path: "/", expires: -1 }); } $("#login_button").click(function () { $.login.loginClick(); }); document.onkeydown = function (e) { if (!e) e = window.event; if ((e.keyCode || e.which) == 13) { document.getElementById("login_button").focus(); document.getElementById("login_button").click(); } } } }; $(function () { $.login.init(); }); })(jQuery); </script> </body> </html>
View Code
templates下添加admin目录,admin目录下,添加login.html页面。
这样登录就已经实现,然后我们还有一个权限拦截器啊。Java中通过实现HandlerInterceptor这个接口来进行过拦截功能,其实也可以通过继承另一个类来实现同样的功能,不过建议使用接口。具体类名,我一下子想不起来啦!O(∩_∩)O哈哈~
新建类BaseInterceptor
package com.yujie.filter;

import org.springframework.stereotype.Component;

import org.springframework.web.servlet.HandlerInterceptor;

import org.springframework.web.servlet.ModelAndView;

import javax.servlet.http.HttpServletRequest;

import javax.servlet.http.HttpServletResponse;

import java.util.logging.Logger;

@Component

public class BaseInterceptor implements HandlerInterceptor {

    private static final Logger logger = Logger.getLogger("BaseInterceptor");

    private static final String loginUrl="/login";

    @Override

    public boolean preHandle(HttpServletRequest request, HttpServletResponse response, Object o) throws Exception {

        //1、请求到登录页面 放行

        if(request.getServletPath().startsWith(loginUrl)) {

            return true;

        }

        //2、TODO 比如退出、首页等页面无需登录,即此处要放行 允许游客的请求

        //3、如果用户已经登录 放行

        if(request.getSession().getAttribute("userinfo") != null) {

            //更好的实现方式的使用cookie

            return true;

        }

        //4、非法请求 即这些请求需要登录后才能访问

        //重定向到登录页面

        response.sendRedirect(request.getContextPath() + loginUrl);

        return false;

    }

    @Override

    public void postHandle(HttpServletRequest httpServletRequest, HttpServletResponse httpServletResponse, Object o, ModelAndView modelAndView) throws Exception {

    }

    @Override

    public void afterCompletion(HttpServletRequest httpServletRequest, HttpServletResponse httpServletResponse, Object o, Exception e) throws Exception {

    }

}
View Code
然后我们要新建一个配置类WebMvcConfig,将这个创建的拦截器添加进来。
@Configuration

public class WebMvcConfig extends WebMvcConfigurerAdapter {

    @Resource

    private BaseInterceptor baseInterceptor;

    @Override

    public void addInterceptors(InterceptorRegistry registry) {

        // addPathPatterns 用于添加拦截规则, 这里假设拦截 /url 后面的全部链接

        // excludePathPatterns 用户排除拦截

        registry.addInterceptor(baseInterceptor).addPathPatterns("/**");

    }

    /**

     * 添加静态资源文件,外部可以直接访问地址

     * @param registry

     */

    @Override

    public void addResourceHandlers(ResourceHandlerRegistry registry) {

        registry.addResourceHandler("/upload/**").addResourceLocations("upload/");

        super.addResourceHandlers(registry);

    }

}
这样就一切OK了,接下来看下演示效果。
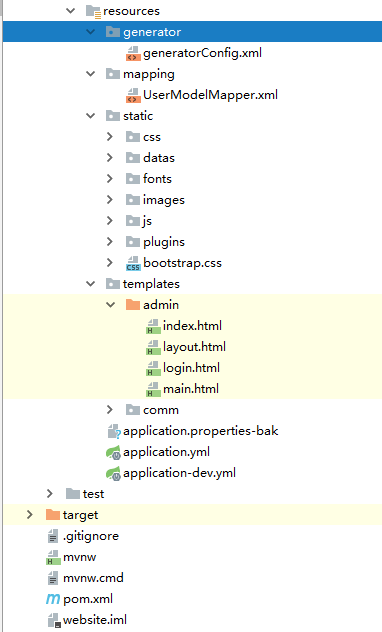
代码结构图: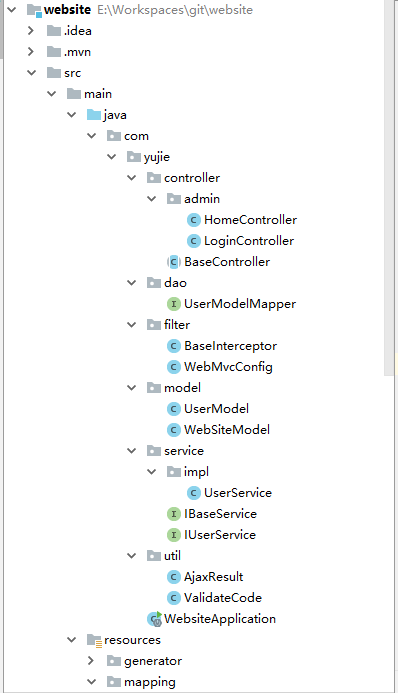
感觉有.net基础的话,进行java开发还是蛮简单的。
转载:https://www.cnblogs.com/jiekzou/p/9303871.html
推荐内容:
Java 小记 — Spring Boot 的实践与思考
【Java】几道常见的秋招面试题
[经验]java 中级面试指导yet
java 和 Android Base64加密
Java面试题总结-Day1
java面试官如何面试别人
java面试题1000道
[Java面试五]Spring总结以及在面试中的一些问题.
JAVA特性面试题:
JAVA工程师面试常见问题集锦