1、下载Maven 3安装包官网:http://maven.apache.org/download.cgi
清华镜像:https://mirrors.tuna.tsinghua.edu.cn/apache/maven/
2、安装Maven
[root@localhost opt]#tar xf apache‐maven‐3.3.9‐bin.tar.gz
[root@localhost opt]# mv apache-maven-3.3.9 /usr/local/maven
ln ‐s /usr/local/apache‐maven‐3.3.9/ /usr/local/maven
3、编辑/etc/profile文件
export PATH=/usr/local/maven/bin:$PATH
source /etc/profile
检查版本信息
[root@localhost /]# mvn -v
Apache Maven 3.3.9 (bb52d8502b132ec0a5a3f4c09453c07478323dc5; 2015-11-11T00:41:47+08:00)
Maven home: /usr/local/maven
Java version: 1.8.0_181, vendor: Oracle Corporation
Java home: /usr/java/jdk1.8.0_181-amd64/jre
Default locale: en_US, platform encoding: UTF-8
OS name: "linux", version: "3.10.0-693.el7.x86_64", arch: "amd64", family: "unix"
4、安装jdk1.8版本(只要是1.8即可,随便那种方式安装都行)
[root@localhost /]# rpm -ivh jdk-8u181-linux-x64.rpm
warning: jdk-8u181-linux-x64.rpm: Header V3 RSA/SHA256 Signature, key ID ec551f03: NOKEY
Preparing...                          ################################# [100%]
Updating / installing...
   1:jdk1.8-2000:1.8.0_181-fcs        ################################# [100%]
Unpacking JAR files...
        tools.jar...
        plugin.jar...
        javaws.jar...
        deploy.jar...
        rt.jar...
        jsse.jar...
        charsets.jar...
        localedata.jar...
查看版本安装是否成功
扫描二维码关注公众号,回复:
6086188 查看本文章

[root@localhost /]# java -version
java version "1.8.0_181"
Java(TM) SE Runtime Environment (build 1.8.0_181-b13)
Java HotSpot(TM) 64-Bit Server VM (build 25.181-b13, mixed mode)
在码云上下载博客资源
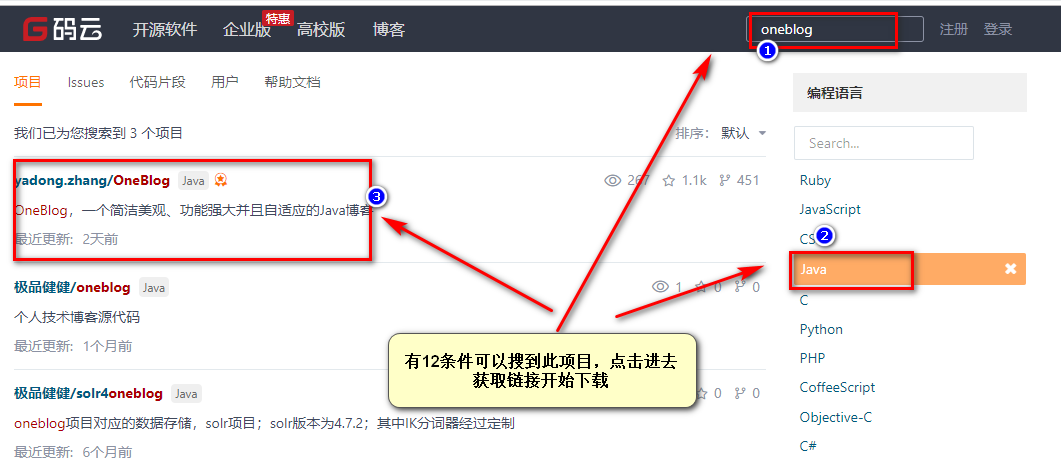
获取资源链接地址,开始下载,有安装git的可以使用git clone+链接的方式下载,没有的话只能安装git
因为链接资源是git文件,其他方式下载打不开的
这里安装并设置下git,然后下载项目资源
[root@localhost opt]#  yum -y install git
[root@localhost opt]# git init     #初始化仓库,不过注意此仓库不要有其他文件
[root@localhost opt]# git clone https://gitee.com/yadong.zhang/DBlog.git    #https这就是从码云上获取的链接
Cloning into 'DBlog'...
remote: Enumerating objects: 6356, done.
remote: Counting objects: 100% (6356/6356), done.
remote: Compressing objects: 100% (3022/3022), done.
remote: Total 6356 (delta 3147), reused 4916 (delta 2417)
Receiving objects: 100% (6356/6356), 6.87 MiB | 3.32 MiB/s, done.
Resolving deltas: 100% (3147/3147), done.
[root@localhost opt]# ls
DBlog
将下载地址换成阿里云
原因:因为原地址是国外的,对于我们来说获取资源太慢,所以换成了国内的,比如阿里云
[root@localhost opt]# cd /usr/local/maven/conf/
[root@localhost conf]# ls
logging  settings.xml  toolchains.xml
[root@localhost conf]# cp settings.xml settings.xml.bak
[root@localhost conf]# vim settings.xml

安装mysql,redis并配置
先配置mysql
[root@localhost opt]# mkdir /app
将mysql二进制包放进来后解压
[root@localhost app]# tar -xf mysql-5.7.20-linux-glibc2.12-x86_64.tar.gz
改名
[root@localhost app]# mv mysql-5.7.20-linux-glibc2.12-x86_64/ mysql
设置变量
[root@localhost app]# vim /etc/profile
export PATH=/app/mysql/bin:$PATH
激活变量
[root@localhost app]# source /etc/profile
查看版本,意味着变量设置成功
[root@localhost app]# mysql -V
mysql  Ver 14.14 Distrib 5.7.20, for linux-glibc2.12 (x86_64) using  EditLine wrapper
添加mysql用户,设置授权目录并初始化
[root@localhost app]# useradd mysql
[root@localhost app]# mkdir /data/mysql -p
[root@localhost app]# chown -R mysql.mysql /app/*
[root@localhost app]# chown -R mysql.mysql /data/*
[root@localhost app]# mysqld --initialize-insecure  --user=mysql --basedir=/app/mysql --datadir=/data/mysql
2019-05-01T16:11:19.720627Z 0 [Warning] TIMESTAMP with implicit DEFAULT value is deprecated. Please use --explicit_defaults_for_timestamp server option (see documentation for more details).
2019-05-01T16:11:23.737783Z 0 [Warning] InnoDB: New log files created, LSN=45790
2019-05-01T16:11:24.729527Z 0 [Warning] InnoDB: Creating foreign key constraint system tables.
2019-05-01T16:11:24.842128Z 0 [Warning] No existing UUID has been found, so we assume that this is the first time that this server has been started. Generating a new UUID: c48c1c90-6c2b-11e9-9c15-000c291d19ad.
2019-05-01T16:11:24.843849Z 0 [Warning] Gtid table is not ready to be used. Table 'mysql.gtid_executed' cannot be opened.
2019-05-01T16:11:24.846586Z 1 [Warning] root@localhost is created with an empty password ! Please consider switching off the --initialize-insecure option.
[root@localhost app]# cd /data/mysql/
[root@localhost mysql]# ll
total 110628
-rw-r-----. 1 mysql mysql       56 May  2 00:11 auto.cnf
-rw-r-----. 1 mysql mysql      419 May  2 00:11 ib_buffer_pool
-rw-r-----. 1 mysql mysql 12582912 May  2 00:11 ibdata1
-rw-r-----. 1 mysql mysql 50331648 May  2 00:11 ib_logfile0
-rw-r-----. 1 mysql mysql 50331648 May  2 00:11 ib_logfile1
drwxr-x---. 2 mysql mysql     4096 May  2 00:11 mysql
drwxr-x---. 2 mysql mysql     8192 May  2 00:11 performance_schema
drwxr-x---. 2 mysql mysql     8192 May  2 00:11 sys
添加配置文件
[root@localhost mysql]# vim /etc/my.cnf
[root@localhost mysql]# mv /etc/my.cnf /opt/my.cnf.bak
[root@localhost mysql]# vim /etc/my.cnf
[mysqld]
user=mysql
basedir=/app/mysql
datadir=/data/mysql
server_id=6
port=3306
socket=/tmp/mysql.sock
[mysql]
socket=/tmp/mysql.sock
prompt=3306 [\\d]>
[root@localhost mysql]# cp /app/mysql/support-files/mysql.server /etc/init.d/mysqld
[root@localhost mysql]# service mysqld start|stop|restart    ###这里和上一步是为了使用service命令控制服务,
[root@localhost mysql]# vim /etc/systemd/system/mysqld.service      ###如果上面的方式不爽,想用systemctl命令需要这样设置

[Unit]
Description=MySQL Server
Documentation=man:mysqld(8)
Documentation=http://dev.mysql.com/doc/refman/en/using-systemd.html
After=network.target
After=syslog.target
[Install]
WantedBy=multi-user.target
[Service]
User=mysql
Group=mysql
ExecStart=/app/mysql/bin/mysqld --defaults-file=/etc/my.cnf
LimitNOFILE = 5000
[root@localhost mysql]# mysqladmin -uroot -p password 123456
Enter password:
mysqladmin: [Warning] Using a password on the command line interface can be insecure.
Warning: Since password will be sent to server in plain text, use ssl connection to ensure password safety.
在mysql中创建dblog库即可;
3306 [(none)]>create database dblog charset utf8mb4;
Query OK, 1 row affected (0.00 sec)
Query OK, 1 row affected (0.00 sec)
3306 [(none)]>