在上例中,对Category的name属性注入了"category 1"字符串
在本例中 ,对Product对象,注入一个Category对象
步骤1:先运行,看到效果,再学习
步骤2:模仿和排错
步骤3:Product.java
步骤4:applicationContext.xml
步骤5:TestSpring
步骤 1 : 先运行,看到效果,再学习
老规矩,先下载下载区(点击进入)的可运行项目,配置运行起来,确认可用之后,再学习做了哪些步骤以达到这样的效果。
步骤 2 : 模仿和排错
在确保可运行项目能够正确无误地运行之后,再严格照着教程的步骤,对代码模仿一遍。
模仿过程难免代码有出入,导致无法得到期望的运行结果,此时此刻通过比较正确答案 ( 可运行项目 ) 和自己的代码,来定位问题所在。
采用这种方式,学习有效果,排错有效率,可以较为明显地提升学习速度,跨过学习路上的各个槛。
推荐使用diffmerge软件,进行文件夹比较。把你自己做的项目文件夹,和我的可运行项目文件夹进行比较。
这个软件很牛逼的,可以知道文件夹里哪两个文件不对,并且很明显地标记出来
这里提供了绿色安装和使用教程:diffmerge 下载和使用教程
步骤 3 : Product.java
Product类中有对Category对象的setter getter
package com.how2java.pojo;


public class Product {


    private int id;

    private String name;

    private Category category;

    public int getId() {

        return id;

    }

    public void setId(int id) {

        this.id = id;

    }

    public String getName() {

        return name;

    }

    public void setName(String name) {

        this.name = name;

    }

    public Category getCategory() {

        return category;

    }

    public void setCategory(Category category) {

        this.category = category;

    }

}
步骤 4 : applicationContext.xml
在创建Product的时候注入一个Category对象
注意,这里要使用ref来注入另一个对象
<?xml version="1.0" encoding="UTF-8"?>

<beans xmlns="http://www.springframework.org/schema/beans"

    xmlns:xsi="http://www.w3.org/2001/XMLSchema-instance"xmlns:aop="http://www.springframework.org/schema/aop"

    xmlns:tx="http://www.springframework.org/schema/tx"xmlns:context="http://www.springframework.org/schema/context"

    xsi:schemaLocation="

   http://www.springframework.org/schema/beans

   http://www.springframework.org/schema/beans/spring-beans-3.0.xsd

   http://www.springframework.org/schema/aop

   http://www.springframework.org/schema/aop/spring-aop-3.0.xsd

   http://www.springframework.org/schema/tx

   http://www.springframework.org/schema/tx/spring-tx-3.0.xsd

   http://www.springframework.org/schema/context

   http://www.springframework.org/schema/context/spring-context-3.0.xsd">


    <bean name="c" class="com.how2java.pojo.Category">

        <property name="name" value="category 1" />

    </bean>

    <bean name="p" class="com.how2java.pojo.Product">

        <property name="name" value="product1" />

        <property name="category" ref="c" />

    </bean>


</beans>
步骤 5 : TestSpring
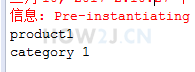
通过Spring拿到的Product对象已经被注入了Category对象了
package com.how2java.test;


import org.springframework.context.ApplicationContext;

import org.springframework.context.support.ClassPathXmlApplicationContext;


import com.how2java.pojo.Product;


public class TestSpring {


    public static void main(String[] args) {

        ApplicationContext context = new ClassPathXmlApplicationContext(new String[] {"applicationContext.xml" });


        Product p = (Product) context.getBean("p");


        System.out.println(p.getName());

        System.out.println(p.getCategory().getName());

    }

}
更多内容,点击了解: http://how2j.cn/k/spring/spring-injection/88.html