源码分析ElasticJob 启动流程
本篇文章重点讲解 ElasticJob 启动加载过程
ElasticJob 加载方法如下
CoordinatorRegistryCenter regCenter = setUpRegistryCenter();
//创建JobEvent配置对象
JobEventConfiguration jobConfig = new JobEventRdbConfiguration(null);
//设置simpleJob拼装
simpleJob(regCenter, jobConfig );
//设置setUpDataflowJob拼装
setUpDataflowJob(regCenter, jobConfig );
JobCoreConfiguration coreConfig =JobCoreConfiguration.newBuilder(“simpleJob”, “时间”,
shardingItemParameters(“分片规则”).build();
SimpleJobConfiguration simpleJobConfig = new SimpleJobConfiguration(coreConfig,
JavaSimpleJob.class.getCanonicalName());
new JobScheduler(regCenter, LiteJobConfiguration.newBuilder(simpleJobConfig).build(),
jobEventConfig).init();
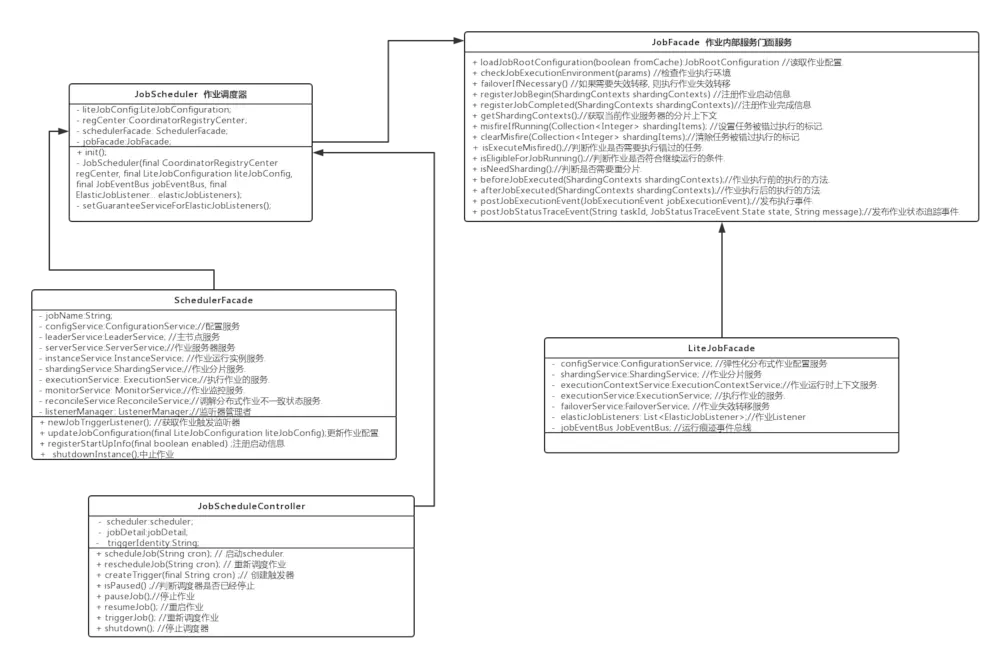
作业注册到Zookeeper之前,会将job任务统一存储到注册器JobRegistry,即托管所有
job的注册信息,而jobScheduler用于作业控制器,通过setUpSimpleJob、setUpDataflowJob不同类型的作业执行拼装后,将相关参数、服务配置拼装到jobScheduler对象中。init()方法执行如下
LiteJobConfiguration liteJobConfigFromRegCenter =
schedulerFacade.updateJobConfiguration(liteJobConfig);
JobRegistry.getInstance().setCurrentShardingTotalCount(liteJobConfigFromRegCenter.getJobName(),
liteJobConfigFromRegCenter.getTypeConfig().getCoreConfig().getShardingTotalCount());
JobScheduleController jobScheduleController = new JobScheduleController( createScheduler(),
createJobDetail(liteJobConfigFromRegCenter.getTypeConfig().getJobClass()),
liteJobConfigFromRegCenter.getJobName());
JobRegistry.getInstance().registerJob(liteJobConfigFromRegCenter.getJobName(),
jobScheduleController, regCenter);
schedulerFacade.registerStartUpInfo(!liteJobConfigFromRegCenter.isDisabled());
jobScheduleController.scheduleJob(liteJobConfigFromRegCenter.getTypeConfig().getCoreConfig().getCron());
启动 主要处理流程如下
- job的配置信息通过scheduler传递给configService服务,并通过zookeeper保存或更新最新的配置信息
- 所有分片参数、配置规则由 JobRegistry管理提供
- 根据配置中心去check是否正常加载选主节点、服务监控
- JobScheduleController ElasticJob自身接口
- scheduleJob主要启动quartz的schedule
到此启动完成
作者简介:张程 技术研究
更多文章请关注微信公众号:zachary分解狮 (frankly0423)